Blog

  • Why Solo Builders Build Forever and Launch Never

    Why Solo Builders Build Forever and Launch Never

    I built an Android app in a week.

    It worked. It did exactly what I planned. And instead of submitting it to the Play Store (and, I didn’t have $25 at that time to publish), I kept going. Better architecture. Cleaner code. One more feature that would make it “ready”. Then another. Then a refactor that made the first version look embarrassing by comparison with other huge recognized apps.

    A few weeks later, someone else published the same app. Same core idea. Rougher around the edges than mine, honestly, But it was out there. People were installing it. The numbers were real. And I was still tinkering.

    That was money I left on the table. Not because I was lazy. Not because I didn’t care. Because I convinced myself that more engineering was the same thing as more progress.

    It wasn’t.

    The Real Reason You’re Not Shipping

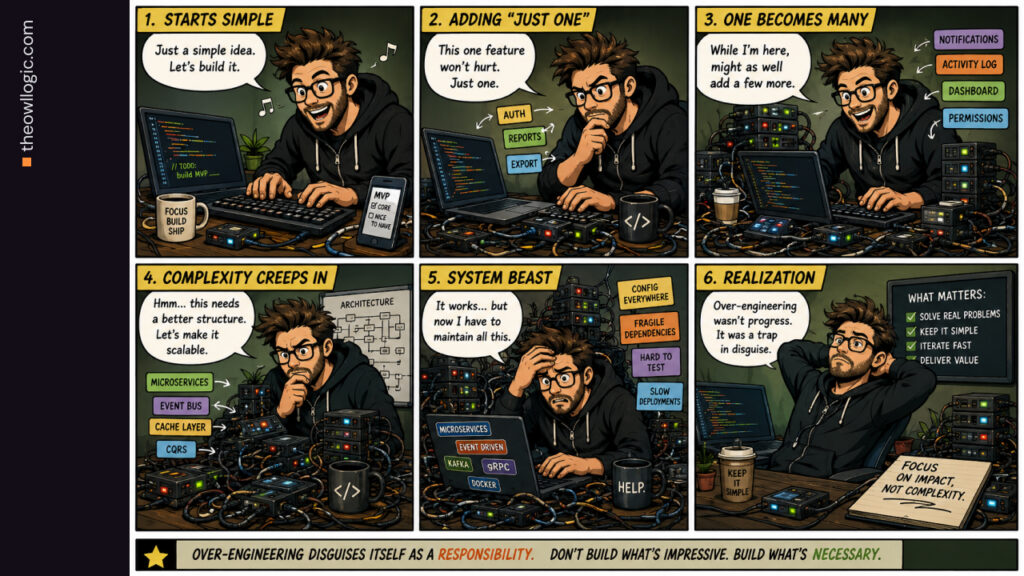
    overengineering is a trap

    Most solo builders don’t fail to ship because they’re stuck. They fail to ship because building feels like progress – and it is, right up until it isn’t.

    Over-engineering is a specific trap that gets the sharpest and most talented builders. It disguises itself as a responsibility. You’re not procrastinating, you’re being thorough. You’re not avoiding launch, you’re making sure it’s done right. But the result is identical to just not shipping: your product doesn’t exist in the world, and someone else’s does.

    The real reason most solo builders never ship is that they never define what “done” actually means. Without a clear finish line, building expands to fill all available time – and there’s always something that could be better. The problem isn’t your work ethic. It’s that you’re optimizing a product that no one is using yet.

    Ship the version that works. Everything else is future you’s problem.

    Why Over-Engineering Feels Productive (But Isn’t)

    When you’re building alone, there’s no one to tell you the authentication flow you spent three days redesigning was already fine. No PM cutting scope. No deadline that isn’t self-imposed. Just you, your laptop, and growing list of improvements that feel completely justified.

    This is what makes over-engineering so dangerous for solo builders specifically. In a team setting, someone eventually says “that’s good enough, ship it” Solo, that voice has to come from you though – and you’re too close to the thing to hear it clearly.

    There’s also a psychological comfort to building. The product is perfect in your head right up until users get it and tell you it’s not. Staying in build mode delays that moment indefinitely. It’s not conscious, but it’s real: the longer you build, the longer you don’t have to find out whether people actually want what you made.

    I understand this more clearly now looking back at that Android app. The “improvements” I was making weren’t for users. There were no users. They were for me – because I wanted to feel ready before I was exposed to the verdict.

    The MVP Boundary Test

    Here’s the thing about MVPs that gets lost in the way people talk about them: minimum viable doesn’t mean minimal effort. It means minimum scope. The features in your MVP should work well. But the list of features should be ruthlessly short.

    Before building anything new, I now ask one question: does a user need this to get value from the product?

    Not “would this be nice” Not “would this impress someone”. Does a real user need this specific thing to accomplish the core reason they downloaded or signed up?

    If the answer is no, it doesn’t go into v1. Full Stop. I actually write a short list of feature I’m explicitly not building for launch and keep it visible while I work. It’s easier to say no to scope creep when you’ve already decided in advance that those things don’t belong in this version.

    The goal of v1 isn’t to make something perfect. It’s to get your idea into contact with reality. Everything you learn from real users in the first two weeks is worth more than anything you could have added in those two weeks of extra building.

    What “Done” Actually Means for a Solo Builder

    Done means: someone who isn’t you can use this and get value from it.

    That’s it. Not “it’s architected the way I’d want a production system to be”. Not “I’ve handled every edge cases I can think of” Not “it’s something I’d be proud to show a senior staff or engineer”

    Can a stranger us it? Does it do the one core thing it’s supposed to do? Is it live somewhere they can reach it?

    If yes – It’s done enough to ship. The rest comes after.

    This is the mindset shift that actually changes things. You’re not launching a finished product. You’re launching the first version of something you’ll improve based on what you learn. The architecture can evolve. The features can expand. But none of that happens until it’s out.

    The builder who ships a rough v1 and iterates will always beat the builder who ships a perfect v3 two months later – because by then, the person with rough v1 has two months of real feedback, real users, and real signal.

    The Practical Habit That Actually Helps

    One thing that helped me break out of the over-engineering loop: timeboxing the build, not the features.

    Instead of deciding what’s in v1 and building until it’s done, I flip it. I pick a ship date, usually 1 – 2 weeks out – and then decide what’s possible within that window. The date is fixed. The scope adjusts.

    This work because it forces a different kind of decision making. Every feature request your brain generates get evaluated against a real constraint: does this fit before the date? If no, it goes on the v2 list. Having a v2 list is useful too – it makes cutting scope feel less like giving up and more like planning ahead.

    The App Already Has Installs. Ship Yours.

    Right now, somewhere, someone is using a version of what you’re building. Maybe it’s rougher than yours. Maybe it’s missing two features you consider essential. But it’s out, and yours isn’t – and that gap compounds every day.

    The cost of not shipping isn’t just opportunity. It’s motivation. Every week a project sits unshipped, it gets a little heavier. The longer you wait, the more the gap between what you have and what you imagine grows. Until one day you either force-ship something or quietly abandon it.

    The app I built in a week was good enough. The person who shipped theirs in a week got the installs. I got a lesson.

    Build enough to work. Ship it. Learn from real people using real software. Then build more. That’s the only sequence that actually moves anything forward.

  • n8n vs Zapier: Which Automation Tool Is Actually Right For You?

    n8n vs Zapier: Which Automation Tool Is Actually Right For You?

    Every week someone in the reddit community asks the same question: should I switch from zapier?

    Usually it starts with a bill. Their Zapier costs crept up as they added workflows, and now they’re paying $150-200/month for automations that feel like they should cost a fraction of that. Sometimes it starts with a wall – they hit something Zapier can’t do and started looking for alternatives.

    The honest answer is that it depends entirely on who you are and what you’re building. Zapier isn’t bad. n8n isn’t automatically better. They’re built for different people, and picking the wrong one costs you either money or weeks of frustration.

    The Short Answer: Which Tool Is Right for You?

    If you want the verdict before the explanation.

    You should useIf…
    ZapierYou’re non-technical, need a specific niche app integration, or want something running in 20 minutes.
    n8n cloudYou’re technical (or willing to learn), run complex multi-step workflows, and want to stop paying per action
    n8n self-hostedYou want zero executions limits, you handle sensitive data, or your zapier bill has gotten uncomfortable

    If none of those click immediately, keep reading – the billing model section below will make the decision obvious.

    What Makes These Tools Fundamentally Different

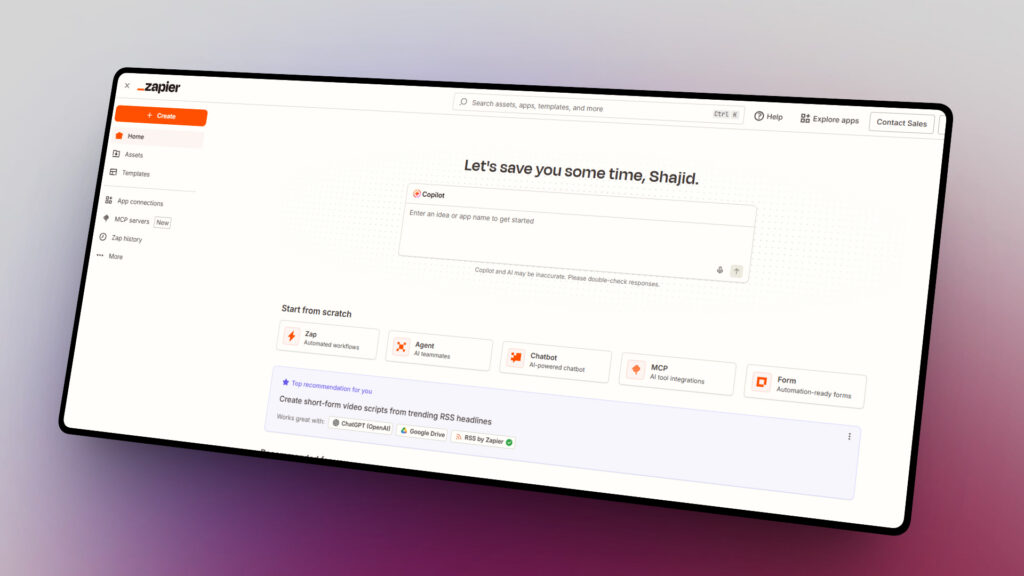
    zapier initial dashboard

    Zapier is a managed SaaS product. You sign up, connect your apps, and Zapier runs everything on their servers. You never touch infrastructure.

    n8n gives you a choice. You can use n8n Cloud (managed, like zapier) or self-host the entire thing on your own server.

    That one difference changes the economics, the privacy story, and the ceiling on what you can build.

    The philosophy behind each tool reflects that split.

    Zapier is built around accessibility – anyone should be able to automate in minutes. n8n is built around control – developers should be able to build anything without hitting artificial limits.

    Neither philosophy is wrong. The problem happens when people pick a tool that doesn’t match what they actually need.

    The Billing Model: Tasks vs Executions (This Changes Everything)

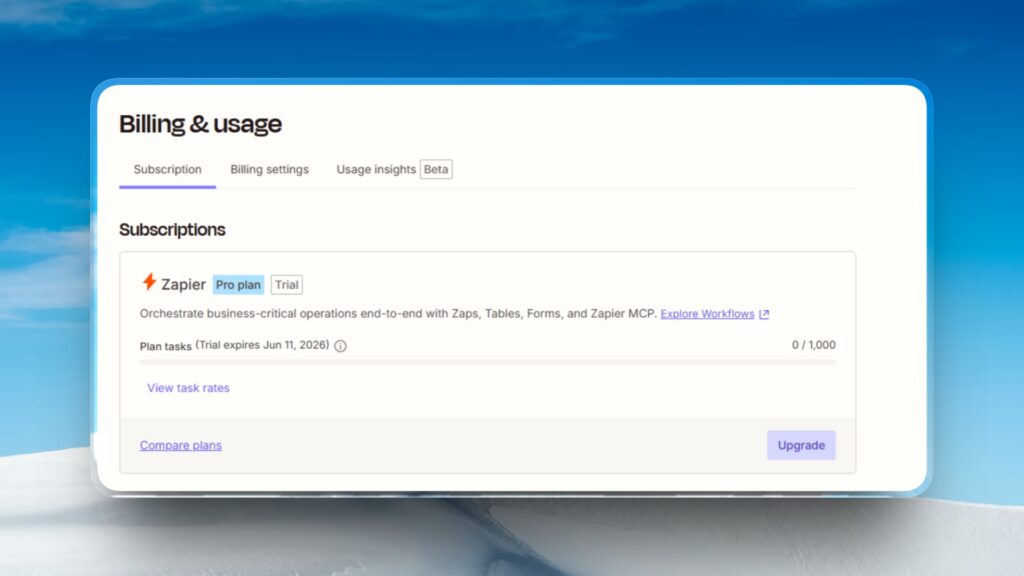
    zapier billing usages

    This is the part most comparison articles bury 1500+ words in. I’m putting it second because it’s the single most important thing to understand.

    Zapier charges per task. A task is each individual action step that runs in a workflow. A workflow with a trigger and four actions uses four tasks every time it runs. The trigger itself is free. Filters are free. But every action setup counts.

    n8n charges per execution. An execution is one complete workflow run – regardless of how many nodes are inside. A 20-node workflow running 500 times costs 500 executions.

    That same workflow on Zapier would cost 10,000 tasks.

    A Real Cost Example

    ScenarioMonthly RunsZapier tasks usedn8n executions used
    Light use5002,000500
    Medium use20008,0002,000
    Heavy use10,00040,00010,000

    At heavy use, Zapier’s professional plan (2,000 tasks/month) runs out at 500 workflow runs. You’d need a significantly more expensive tier. n8n’s Pro Cloud plan (10,000 executions) handles all 10,000 runs with room to spare.

    One more thing worth knowing: n8n only counts successful executions. Failed runs and test executions don’t count against your limit.

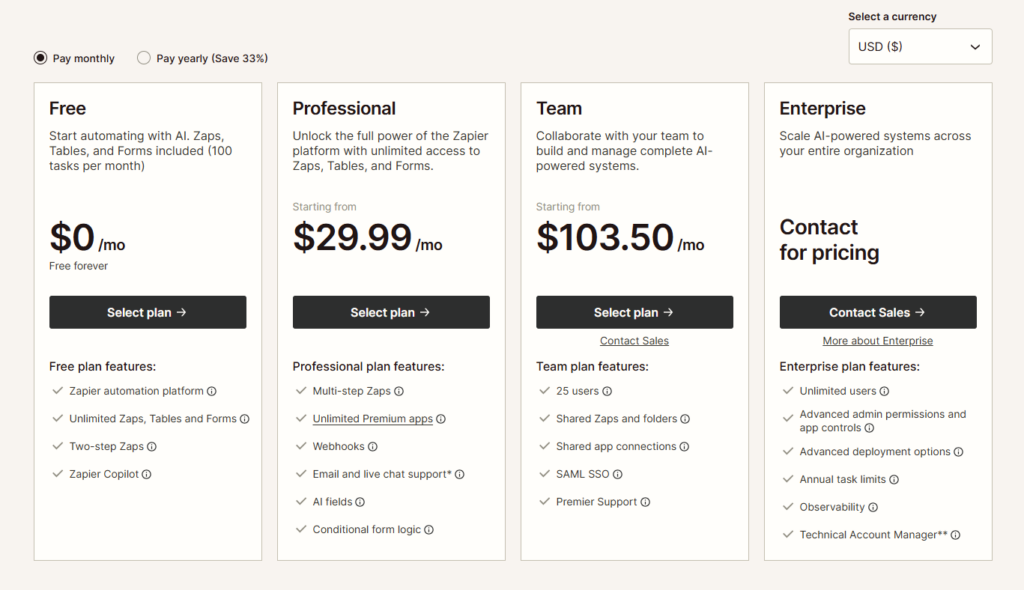
    Pricing Tiers Side by Side

    Current pricing as of May 2026 – verify on each vendor’s pricing page before committing, as these do change.

    PlanZapiern8n
    Free100 tasks/month, 5 zapsNone (Cloud), Self-hosted unlimited executions
    Entry paid$19.99/mo – 750 tasks~$24/mo – 2,500 executions
    Mid tier$49/mo – 2,000 tasks~$60/mo – 10,000 executions
    Team$69/mo – 2,000 tasks, shared workspace~$800/mo – 40,000 executions, SSO
    Self-hostedNot availableFree (Pay $5 – $20/mo) for a VPS

    Two things stand out. First, Zapier’s free plan used to offer 750 tasks – it was cut to 100. If you set something up years ago on “free tier” and it stopped working, that’s why.

    Second, n8n’s self-hosted community edition has no execution limits, no feature restrictions, and no use limits. You pay only for your server.

    If you’re comfortable with Docker and a basic Linux command line, setting up n8n self-hosted take a few hours and eliminates the billing question entirely.

    Integrations 9,000 vs. Unlimited (The Misleading Stat)

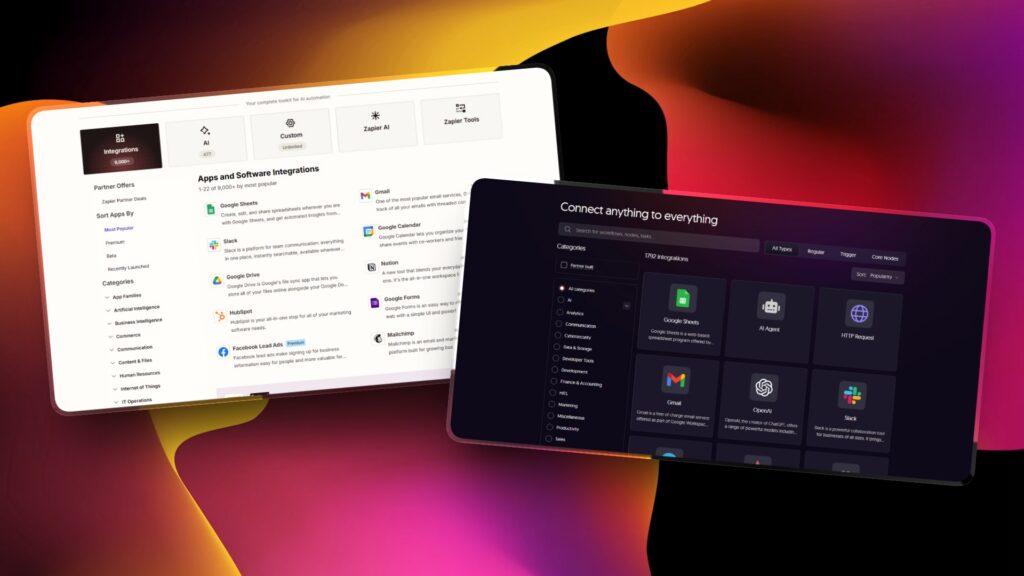
    n8n and zapier integration

    Zapier has 7,000 – 8,000+ native integrations. n8n has around 400+ native nodes. That gap sounds enormous. In practice, it’s less significant than it appears – but not zero.

    Here’s the nuance. n8n’s HTTP Request node connects to any REST or GraphQL API. Combined with 500+ community-built nodes on npm, n8n can reach virtually any service that has a public API.

    For developer teams, the integration count is effectively unlimited – it just requires building the connection yourself rather than clicking a pre-build option.

    Where Zapier’s breadth genuinely wins

    • Niche SaaS tools with no public API or non-standard auth (some older CRMs, specialized project management tools, industry-specific software)
    • Apps that require OAuth flows you’d rather not implement yourself.
    • Quick one-off connections where building an HTTP node workflow isn’t worth the time.

    If you’re connecting Google Sheets, Slack, Notion, Airtable, Asana, GitHub or any major product – n8n has you covered natively. If you need to connect something obscure that only exists in Zapier’s catalog, that’s a real consideration.

    Ease of Use vs. Power

    I won’t sugarcoat this. n8n has a steeper learning curve.

    Zapier uses a step by step guided interface. You pick a trigger app, pick an action app, map the fields. It’s genuinely usable in 10-15 minutes with no prior knowledge.

    n8n uses a node canvas. Data flows as JSON between nodes. You need to understand at least roughly what your data looks like at each step to configure the next one.

    Concept like how data flows between nodes and conditional branching require more upfront investment.

    If someone tells you n8n “just as easy” as Zapier – they’ve forgotten what it’s like to learn it fresh. It isn’t. The learning curve is real and worth acknowledging.

    That said, once you’re past the initial learning period, n8n’s power ceiling is dramatically higher.

    Things Zapier can’t do at all – looping over thousands of items, writing custom JavaScript in the middle of a workflow, changing sub-workflow, calling your own database – are straightforward in n8n.

    AI Capabilities in 2026

    AI automation is where the gap between these tools has widened most noticeably this year.

    n8n ships 70+ native AI and LangChain nodes. You can build an LLM chain, connect it to a vector store, add memory, and route outputs through conditional logic – all within the same workflow canvas.

    The n8n AI agent workflow is treated as a first-class feature, not a plugin.

    Zapier has AI capabilities, but they’re positioned differently. Zapier Agents and Chatbots are separate products layered on top of the core automation platform.

    For straightforward AI actions (summarize this email, classify this support ticket), Zapier works fine.

    For complex AI pipelines – multi-agent systems, retrieval-augmented generation, custom memory management – Zapier’s abstraction layer becomes a constraint.

    If AI-native workflows are central to what you’re building, n8n’s architecture suits it better. Zapier’s approach makes AI accessible to non-technical users, but trades depth for that accessibility.

    Data Privacy & Self-Hosting

    Zapier is cloud-only. All your workflow data, credentials, execution history, and business logic live on Zapier’s servers in the United States.

    For most small businesses and solo operators, that’s fine. For healthcare, legal, finance, or any team subject to GDPR or strict data residency requirements, it’s a hard blocker. You have no choice about where your data lives.

    n8n self-hosted puts everything on your infrastructure. Your credentials never leave your server. Your execution logs stay private. Setting up n8n on your own machine or VPS means you control the entire stack.

    This matters more than people initially think. It’s not just compliance. It’s also vendor lock-in. If Zapier changes pricing (which it has, multiple times), your only options are to pay more or migrate. With self-hosted n8n, the platform upgrade risk is yours to manage, but the pricing risk is essentially zero.

    Who Should Pick Which: The Final Verdict

    Use Zapier if:

    • You’re non-technical and want automation running today, not after a learning curve
    • You need a specific integration that only exists in Zapier’s 8,000+ catalog and has no public API
    • You’re running fewer than 5 simple 2-step workflows at low volume (the free tier actually works)
    • Your team has zero appetite for infrastructure or technical setup of any kind

    Use n8n Cloud if:

    • You’re comfortable with JSON and willing to spend a day or two learning the canvas
    • You run multi-step workflows (5+ actions) at any real volume the per-execution billing pays off fast
    • You want native AI/LangChain nodes without paying Zapier’s AI add-on pricing
    • You want the option to migrate to self-hosted later without rebuilding your workflows

    Use n8n self-hosted if:

    • Your Zapier bill has become painful and you’re technical enough to run Docker
    • You handle sensitive data and need full control over where it lives
    • You want to run high-volume workflows (10,000+ runs/month) without per-execution costs
    • You’re building something where workflow logic is part of your product, not just glue code

    One profile that genuinely belongs on Zapier: the solo founder with 3 simple automations who will never touch a terminal. Telling that person to self-host n8n would waste more time than it saves.

    If you’ve decided n8n is the right direction, the complete n8n beginner guide is the fastest path is getting your first workflow running.

    Start with installing n8n locally to explore without any cloud setup. Once you’re ready to build something real, the first Hello World workflow gets you familiar with how nodes connect and data flows.

    If you’re coming from Zapier, the canvas will feel different at first. Give it a couple of real workflows before forming an opinion. Most people who stick with it past the first week don’t go back.

    If Zapier is clearly the right fit – use it. The goal is automating what matters, not winning an argument about tools.

    Comparing more options? See n8n alternatives for how n8n stacks up against Make, Activepieces, and other platforms.

  • n8n vs Make: Which Automation Tool Should You Pick in 2026?

    n8n vs Make: Which Automation Tool Should You Pick in 2026?

    My first automation tool was Make.com.

    I didn’t go looking for it after research or a recommendation. It was simply the first thing I came across when I wanted to automate something in my workflow.

    I spent week on it. Learning how modules connect, how data flows from one step to the next, how integrations talk to each other. At the time I didn’t realize it, but Make was quietly teaching me how to think in automations.

    Then I heard about n8n.

    I expected a steep learning curve. Instead, something clicked me faster than I anticipated because Make had already built the mental model. The nodes, the connection, the logic. n8n just looked different on the surface. Underneath, I already spoke the automation language.

    That experience is actually why I think I’m in a decent position to compare these two.

    Not because I read the documentation for both, but because I’ve lived inside them at different points in my automation journey. What I’m sharing here isn’t a feature matrix repackaged as an article – it’s like, I genuinely wish someone had told me before I had to figure it out myself.

    So let me give you that shortcut first.

    If you already know your situation, the table below ends the decision in under a minute. If you’re not sure which row fits you, keep reading and the rest of this post gives you the context behind each choice.

    Short Answers

    Your situationPick this
    Non-technical team, visual-first, fast setup, no compliance concernsMake
    Developer or technical team, complex logic, high-volume workflows,
    AI agents
    n8n
    Mid-technical ops team, some scripting needed, no self-hosting
    required
    Either. Read the pricing section
    first

    If you’re not sure which row fits you, that third row is more common than people admit. The rest of this post gives you the information to decide.

    Why This Is a Harder Call Than n8n vs Zapier

    If you’ve already compared n8n to Zapier, you know that comparison has a clear winner for most technical users. This one is different.

    Make sits between Zapier and n8n on the technical spectrum. It has a visual canvas (like n8n), a free tier, integrations for 3,000+ apps, and this is what most comparisons miss JavaScript
    and Python support on paid plans.
    Make is not a purely no-code tool. Once you’re on a paid tier, you can add a Code module to a scenario and write real scripting logic.

    That changes the decision. If you assumed n8n was your only option for any scripting work, it isn’t.

    The gaps between Make and n8n are real, but they’re narrower than the marketing on both sides suggests. What actually separates them is the pricing model, the AI architecture, and whether you need to self-host.

    Pricing. Operations vs Executions (With Real Numbers)

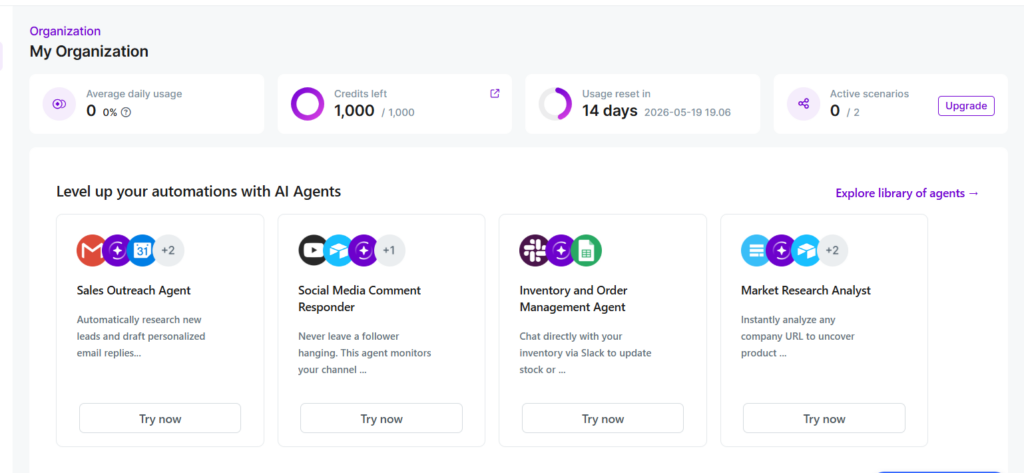
    credits in make.com

    This is the single most important thing to understand before committing to either platform.

    How Make charges

    Make bills per operation. Every individual module step in a scenario counts as one operation.

    A scenario with 8 modules that runs 500 times consumes 4,000 operations (8 × 500). Make’s Free plan includes 1,000 operations per month. Their Core plan starts at around $9/month for
    10,000 operations.

    That sounds like a lot until your scenarios get complex. A 15-step scenario processing 1,000 items per month = 15,000 operations. You’ve already outgrown the base paid tier on that one workflow alone.

    How n8n charges

    n8n bills per execution one complete workflow run, regardless of how many nodes it passes through.

    That same 8-node workflow running 500 times = 500 executions. n8n’s Starter cloud plan includes 2,500 executions/month at around $20/month.

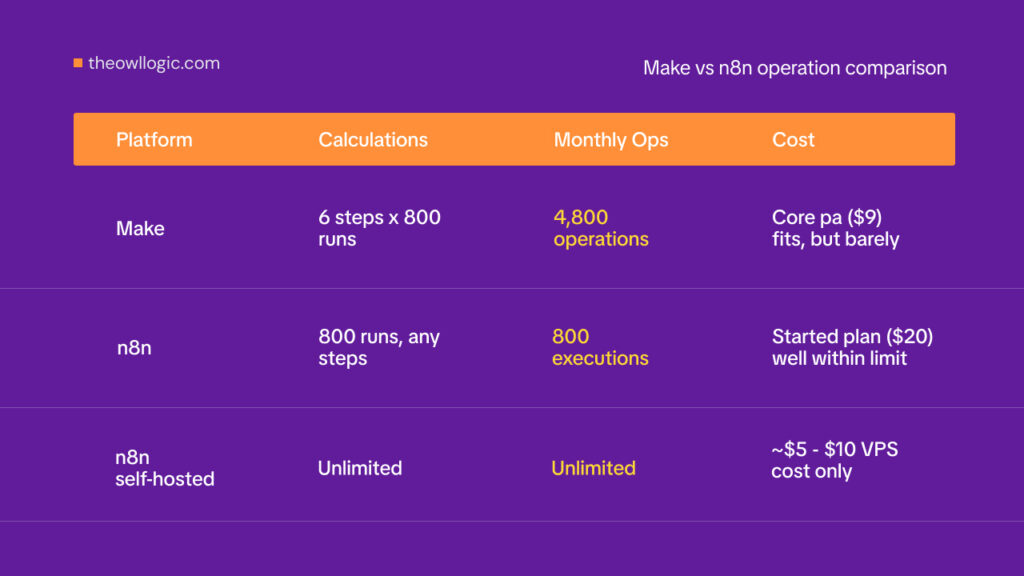
    The same workflow, priced on both platforms

    make vs n8n operation comparison

    Here’s a real scenario: a workflow that triggers on a new HubSpot contact, enriches the data with Clearbit, formats the record, adds a row to Google Sheets, sends a Slack notification, and creates a
    follow-up task in Asana. That’s 6 steps. It runs 800 times per month.
    PlatformCalculationMonthly
    operations/executions
    Approximate cost
    Make6 steps × 800 runs4,800 operationsCore plan ($9) fits, but barely
    n8n800 runs, any
    steps
    800 executionsStarter plan ($20) well within
    limit
    n8n self-hostedUnlimitedUnlimited~$5–10 VPS cost only

    Now add complexity. Double the steps to 12, or run it 2,000 times/month, and Make’s operation count climbs to 24,000. You’re adding operation packs. On n8n self-hosted, nothing changes.

    The breakeven point depends on your workflow complexity and run frequency. For simple, low-step scenarios running infrequently, Make’s free tier is genuinely useful. For anything running at scale with multiple steps, n8n’s execution model is often significantly cheaper.

    Setting up self-hosted n8n takes about 30 minutes with Docker. The full setup is covered in n8n self-hosted setup if you want to skip the cloud cost entirely.

    Visual Interface. Where Make Genuinely Wins

    Make’s scenario builder is more polished than n8n’s canvas. The icons are cleaner, the module connections are visually intuitive, and the onboarding flow gets non-technical users to a working
    automation faster. If you hand Make to a marketing manager who’s never touched automation software, they’ll figure it out in an afternoon.

    n8n’s canvas is more powerful but more demanding. The node-based layout resembles developer tooling like Node-RED more than a consumer app. JSON data structures are visible throughout. Expressions use their own syntax.

    These aren’t problems for developers, but they’re a real friction point for anyone who just wants to connect Typeform to Mailchimp without thinking about data payloads.

    There’s one area where n8n’s interface is concretely better debugging.

    n8n lets you deactivate individual nodes with a single click while keeping the rest of the workflow intact useful when
    you’re isolating a problem in a 15-step workflow.

    In Make, you’d need to manually disconnect modules to achieve the same result, which is slower and more disruptive to your workflow structure.

    For planning and structuring workflows before you build, n8n’s canvas also scales better as complexity grows branching paths and parallel flows are easier to follow visually at larger sizes.

    Integrations and Code. Correcting a Common Misconception

    The integration count comparison: Make has 3,000+ native modules, n8n has around 1,200 native nodes.

    Make wins on raw breadth, particularly for niche SaaS tools your marketing or finance team uses. If the app you need has a Make module, setup takes minutes. If it only has an n8n HTTP Request node option, you’re doing some API configuration work.

    Make on paid plans supports JavaScript and Python via the Code app. You’re not locked into purely visual logic once you upgrade. Enterprise plans add Custom Functions. This is a genuine
    middle ground that ops teams with some scripting ability should factor in.

    n8n’s Code node is unrestricted on all plans cloud and self-hosted. There’s no tier gating on scripting. You can write arbitrary JavaScript or Python in any workflow from day one, with full
    access to the node’s input/output data.

    Where n8n goes further: community nodes, self-hostable custom node development, and the HTTP Request node cover virtually any REST or GraphQL API. If an app has a public API at all, n8n can connect to it. The development overhead is real, but the ceiling is higher.

    For teams evaluating whether either platform covers a specific integration, n8n alternatives cover the broader tool landscape if you hit a gap.

    AI Capabilities 2026 Update

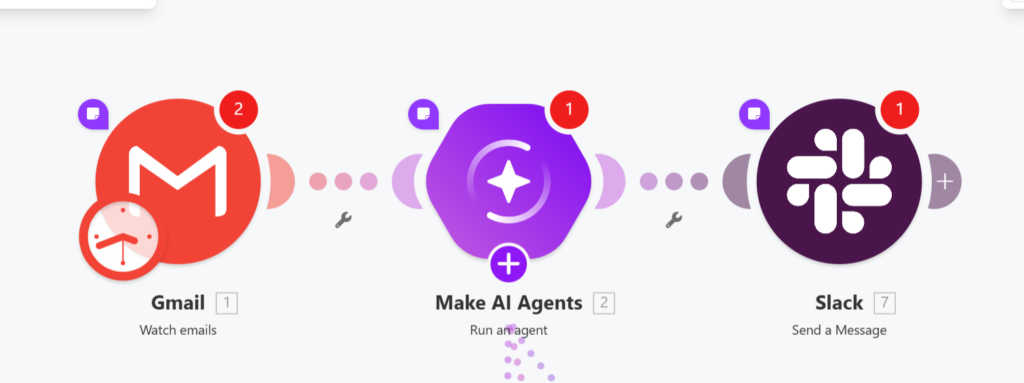
    Make has added AI capabilities that weren’t there 18 months ago. You can now trigger OpenAI and Anthropic calls as standard modules, and Make AI Agents provides a proprietary module for
    multi-step AI automation.

    For teams that want to add AI steps to existing workflows, like summarize this document, classify this email, extract these fields from this text Make works fine.

    The architectural difference shows up when you need AI that makes decisions, not just processes text.

    n8n’s AI Agent node lets an LLM choose which tools to call based on incoming data.

    The agent can decide to query a database, call an API, send a Slack message, or loop back based on what the data says, not based on a fixed sequence you defined.

    LangChain integration adds memory nodes (conversation context across runs), vector stores for RAG pipelines, and model flexibility across OpenAI, Anthropic, Mistral, and local Ollama models.

    Make’s AI modules are fixed steps in a sequence. You define when the AI runs and what it receives. n8n’s agent architecture means the AI is part of the routing logic itself.

    If you’re building an AI-powered support workflow, a document intelligence pipeline, or any automation where the AI needs to decide what happens next, that’s n8n. If you’re adding AI as
    one step in an otherwise rule-based workflow, Make handles it.

    A real n8n AI agent workflow with the actual node setup is covered in the n8n AI agent workflow.

    Self-Hosting and Data Residency

    n8n can be self-hosted. Make cannot.

    For teams with data sovereignty requirements, healthcare, finance, legal, any org with strict GDPR obligations around where data is processed, self-hosted n8n means workflow data,
    credentials, and execution history never leave your infrastructure.

    Make is cloud-only, but there’s a detail worth knowing: Make is a European company (Czech-based, part of Celonis since 2022), and its cloud infrastructure runs in European data centers. For
    EU businesses that need data to stay within the EU but can’t manage self-hosted infrastructure, Make is meaningfully different from US-hosted platforms like Zapier. This isn’t the same as self-hosting, but it matters for GDPR compliance discussions where US data transfers are the specific concern.

    The practical breakdown:

    • Full data sovereignty, any compliance requirement → n8n self-hosted
    • EU data residency without infrastructure overhead → Make (EU cloud)
    • US-based team with no residency requirements → either platform, choose on other criteria

    The Decision Framework. 4 Questions

    Answer in order. First “yes” ends the decision.

    • Do you need to self-host or keep all data within your own infrastructure?
      n8n. Make has no self-hosting option.
    • Is your team primarily non-technical, and do they need a polished visual interface with minimal configuration for common SaaS tools?
      Make. The UI onboarding is faster, the module library covers more apps out of the box, and the operation-based pricing is reasonable at low volumes.
    • Will your workflows regularly exceed 10 steps, or run at high volume (thousands of times per month)?
      n8n. The execution model becomes substantially cheaper than operation-based billing at any meaningful scale.
    • Are you building workflows where AI makes routing decisions, not just processing text as one fixed step?
      n8n. The AI Agent architecture and LangChain integration have no direct equivalent in Make.

    If none of these apply, small team, simple integrations, low volume, EU cloud is fine. Make and n8n are genuinely interchangeable for your use case. Pick whichever interface feels more natural after a free trial on both.

    To get started with n8n, the complete n8n beginner guide is the fastest way to go from zero to your first workflow.

  • n8n and Supabase: Complete Integration Guide

    n8n and Supabase: Complete Integration Guide

    Connecting n8n to Supabase is straightforward once you know which connection method to use. There are three options, and picking the wrong one is the most common reason people end up
    reading troubleshooting docs instead of building workflows.

    Three Ways to Connect n8n to Supabase

    Before touching credentials, decide which connection method fits for your workflow or usecase.

    MethodWhen to use it
    Native Supabase
    node
    CRUD on public schema tables simplest setup, no SQL required
    Postgres nodeComplex queries, JOINs, stored procedures, or direct database access with custom
    schemas
    HTTP Request
    node
    Supabase Edge Functions, Auth API, Storage API, or Realtime REST endpoints the
    native node doesn’t cover

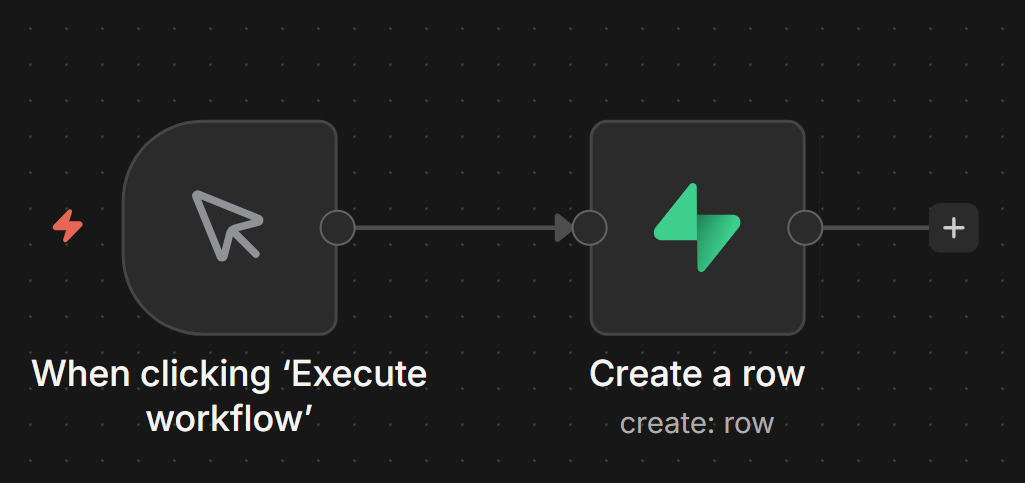
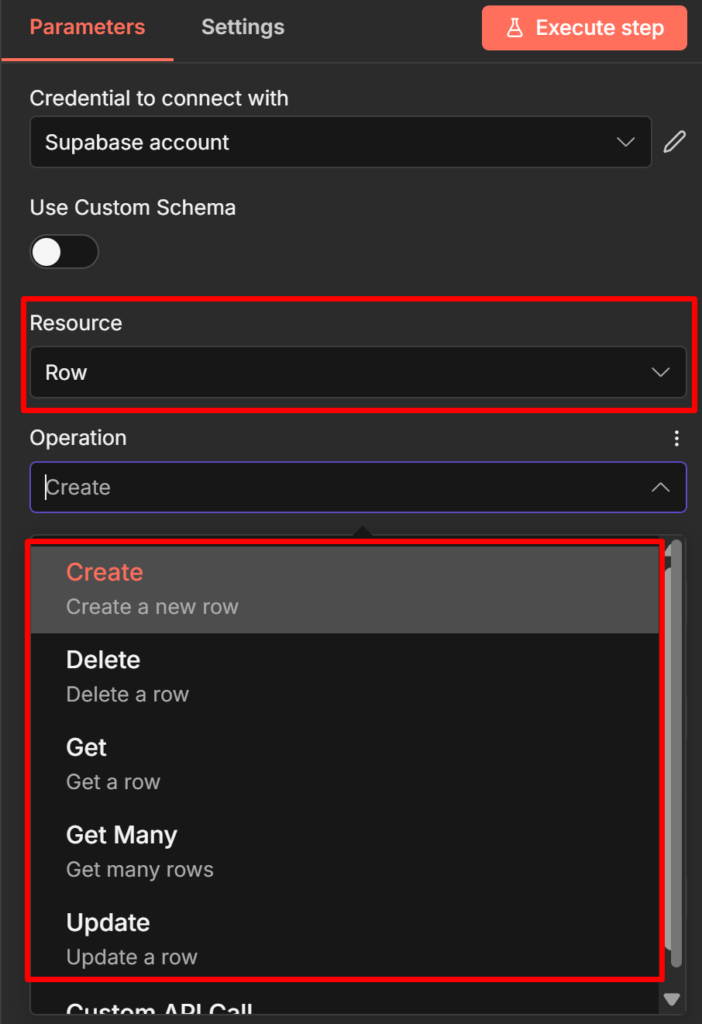
    Most workflows use the native Supabase node. It handles the common operations create, read, update, delete rows through a visual interface without writing SQL.

    The Postgres node gives you more power but requires a direct database connection string instead ofAPI key auth.

    The HTTP Request node is for anything outside the database itself.

    The rest of this guide focuses on the native Supabase node and Vector Store node, with a section at the end on when to reach for Postgres instead.

    Credentials Setup Supabase Node

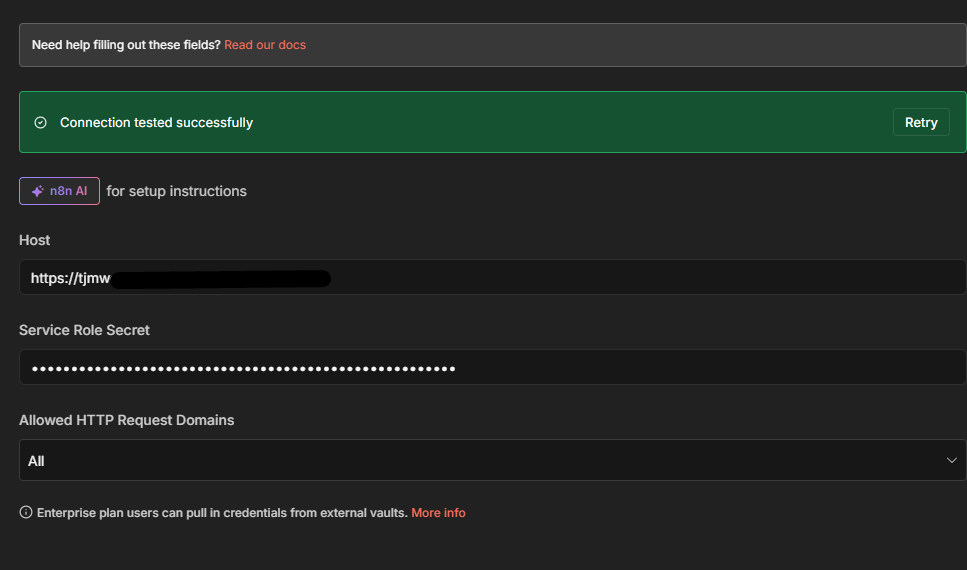
    The Supabase node authenticates with two pieces of information: your project URL and your service role secret key. These come from two different places in Supabase.

    Host (Project URL): On your project’s main dashboard, the URL appears directly below the project name — something like https://asfddssdexz.supabase.co. Hit Copy to grab it.

    Service Role Secret: Go to Project SettingsAPI. Scroll to the API Keys section, click Reveal next to the service_role key, and copy it.

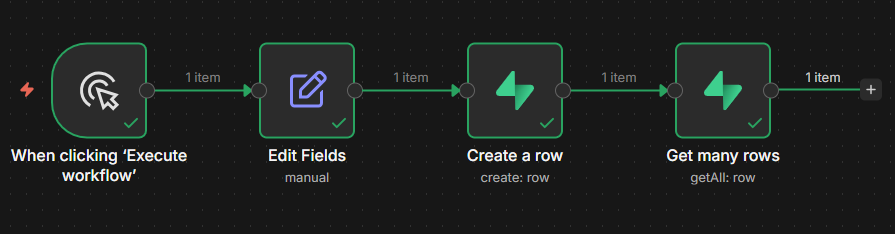
    In n8n: open Credentials → New → search for Supabase → paste both values → Save.

    One thing to understand before saving: the service_role key bypasses all Row Level Security (RLS) policies. That means your n8n workflows have unrestricted read and write access to every
    table in the database. For internal automation syncing data, processing records, building pipelines this is usually fine. If you’re building workflows that act on behalf of specific users or
    handle multi-tenant data, review whether service_role is appropriate before using it in production.

    For help with n8n credential management more broadly, the n8n credentials and service guide covers the patterns in detail.

    CRUD Operations What the Supabase Node Actually Does

    The Supabase node supports five operations: Get Row, Get All Rows, Create Row, Update Row, and Delete Row. Here’s what each does in practice.

    Create Row

    Use this to insert a new record into a table. Set Table to your table name, then map the fields you want to write.

    A typical use case: a form submission webhook triggers an n8n workflow, and you write the submission data to a leads table.

    // What the node writes to Supabase
    
    {
    "name": "Alice Chen",
    "email": "alice@example.com",
    "source": "contact_form",
    "created_at": "2026-04-23T09:15:00Z"
    }

    Map each field in the node’s Fields to Send section using expressions like {{ $json.name }} to pull values from the previous node.

    Get All Rows (with filters)

    This is the most-used read operation. It retrieves multiple records and supports filtering, AND/OR logic, and a limit on return count.

    Example: a scheduled workflow that runs every hour and fetches all leads where status is pending :

    • Table: leads
    • Return All: off (leave the default limit unless you need all records)
    • Filter: status equals pending

    For large tables, keep Return All off and set a reasonable Limit. Returning 10,000 rows into a workflow that processes each one will slow execution and may hit memory limits.

    Custom schema support: By default, the Supabase node only reads from the public schema. If your tables live in a custom schema, enable Use Custom Schema in the node settings and enter your schema name. This option is easy to miss and causes silent failures if you forget it.

    Why Your Supabase Node Returns No Data (The RLS Problem)

    This is the most common failure pattern when connecting n8n to Supabase for the first time. The node runs without error, the execution shows green, but the output is empty.

    The cause is Row Level Security.

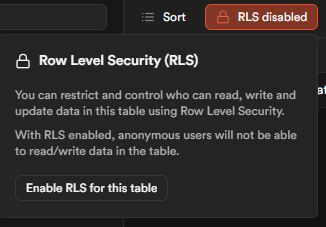
    Here’s the mechanism: When you create a table using the Supabase Table Editor (the UI), Supabase enables RLS on that table automatically. With RLS active and no policies defined, the
    anon (public) key returns zero rows not an error message, just nothing. The service_role key bypasses RLS entirely, which is why switching to service_role in your credentials immediately fixes the empty output.

    The confusing part is that there’s no error to tell you what’s happening. Your query ran, it just returned no data because RLS blocked it.

    Two valid fixes:

    Fix 1 Use the service_role key (recommended for internal automations). This is what the credentials setup section above configures. If your n8n workflows are internal, not acting on
    behalf of end users, service_role is the right choice.

    Fix 2 Create an RLS policy. If you need the anon key for a specific reason, go to Authentication → Policies in your Supabase dashboard, select your table, and create a policy that grants the access pattern you need. For example, to allow all reads:

    CREATE POLICY "Allow public read access"
    ON leads
    FOR SELECT
    USING (true);

    A third failure mode applies only to self-hosted setups: if both n8n and Supabase run in separate Docker containers, don’t use localhost as the host. Use supabase-kong (the Supabase API
    gateway container name
    ) instead.

    Check it out How to Install n8n locally (Docker + NPM Method)

    For setting up error alerts so silent failures like this get caught automatically, the error handling guide covers the error trigger workflow pattern.

    Triggering n8n Workflows From Supabase Events

    The connection works in both directions. Supabase can push events to n8n when database records change. There are two methods.

    Database Webhooks (simpler)

    Supabase Database Webhooks send an HTTP POST request to a URL whenever a row is inserted, updated, or deleted. In n8n, a Webhook node receives this POST and triggers your workflow.

    Setup in Supabase: Database → Webhooks → Create a new hook. Select your table, choose the events (INSERT, UPDATE, DELETE), and paste your n8n Webhook node URL as the endpoint.

    The payload n8n receives looks like this:

    {
    "type": "INSERT",
    "table": "leads",
    "schema": "public",
    "record": {
    "id": 42,
    "name": "Bob Okafor",
    "email": "bob@example.com",
    "status": "pending",
    "created_at": "2026-04-23T10:30:00Z"
    },
    "old_record": null
    }

    For UPDATE events, old_record contains the row’s state before the change. This lets you compare before and after without an extra database query useful for detecting which specific
    fields changed.

    The webhook guide covers how to configure the n8n Webhook node.

    Supabase Realtime (more complex)

    Supabase Realtime broadcasts database changes over WebSocket connections. n8n doesn’t have a native Realtime listener node, so you can’t subscribe to Realtime directly from a workflow canvas.

    The practical pattern is to bridge Realtime using a Supabase Edge Function: the Edge Function subscribes to Realtime events and POSTs to an n8n Webhook node when events arrive. This adds
    a layer of infrastructure, so most teams stick with Database Webhooks unless they need the lower latency Realtime provides.

    Using Supabase as a Vector Store for AI Workflows

    If you’re building AI workflows, RAG systems, document Q&A, and AI agents that search a knowledge base, the Supabase Vector Store node is a completely separate node from the CRUD Supabase node. It’s found in the AI section of the node panel, not the regular integrations section.

    It requires two things in Supabase that the CRUD node doesn’t need – the pgvector extension enabled, and a documents table structured for vector storage. The n8n docs include a SQL script
    in the Vector Store node’s quickstart section run it in Supabase’s SQL editor to create the right table structure.

    -- Run this in Supabase SQL editor to create the vector store table
    -- (use the exact script from n8n's Supabase Vector Store node docs,
    -- as the schema may vary with pgvector version)
    create extension if not exists vector;
    
    create table documents (
    id bigserial primary key,
    content text,
    metadata jsonb,
    embedding vector(1536) -- adjust dimension to match your embedding model
    );

    The dimension (1536 above) must match your embedding model’s output. OpenAI’s text embedding-3-small uses 1536. If you use a different model, update this value or you’ll get a dimension mismatch error on insert.

    Two main workflow patterns:

    Insert Documents (ingestion pipeline): Document Loader → Text Splitter → Embeddings model → Supabase Vector Store (Insert Documents mode)

    Use this to load PDFs, web pages, or text files into your vector store. Each chunk of text gets embedded and stored with its vector representation.

    Retrieve Documents (RAG chain or AI agent tool): Connect the Supabase Vector Store in Retrieve Documents (As Tool for AI Agent) mode directly to your AI Agent node’s tools connector. The agent calls it when it needs to search your knowledge base.

    When to Use the Postgres Node Instead

    The native Supabase node covers most CRUD use cases, but two scenarios push you toward the Postgres node.

    Complex queries. The Supabase node’s filter UI handles simple conditions well equality, greater than, less than. If you need JOINs across tables, aggregate functions, subqueries, or anything that requires writing actual SQL, use the Postgres node. It accepts raw SQL queries and returns results the same way any other n8n node does.

    Custom schemas and stored procedures. While the Supabase node supports custom schemas via the Use Custom Schema toggle, the Postgres node gives you direct database access without going through Supabase’s API layer. For stored procedures or database functions that aren’t exposed through the RESTAPI, the Postgres node is your only option.

    The trade-off: the Postgres node requires a direct database connection string (host, port, database name, username, password) rather than API key auth. Supabase provides these under Project Settings → Database → Connection string. Credential rotation is slightly more involved than rotating an API key.

    For teams running both n8n and Supabase self-hosted, the n8n self-hosted setup guide covers the infrastructure considerations for connecting services in the same environment.

  • How to Back Up n8n Workflows to GitHub (Step by Step)

    How to Back Up n8n Workflows to GitHub (Step by Step)

    If you’re self-hosting n8n, nothing is versioned by default.

    New to n8n? Start with the complete n8n beginner guide first – this tutorial assumes you already have an instance running.

    What if delete things accidentally – It’s gone. There’s no undo, no history or the rollback.

    Github fixes this. Every backup is a commit with a timestamp, which means you get a full version history and can restore any workflow to any point in time. It’s free for private repos and takes about 15 minutes to set up.

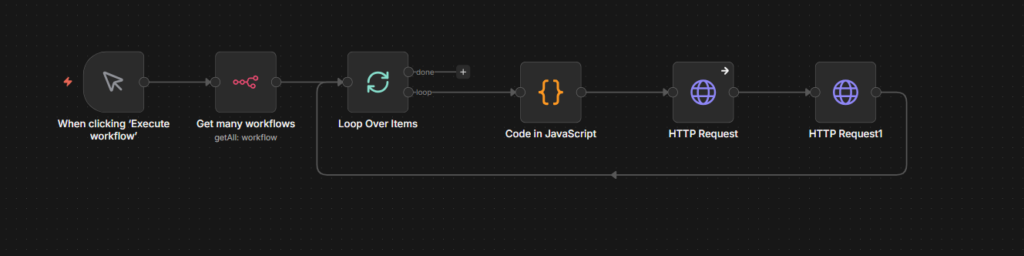
    This guide walks you through building an automated backup workflow that runs on a schedule, pulls all your n8n workflow via the API, and commits each one as a JSON file to your GitHub repo.

    Why GitHub For Backup

    GitHub is the best default choice for most self-hosted users.

    Every backup is a commit with timestamp. You get full version history. You can restore any workflow to any point in time. And it’s free for private repos.

    What you need,

    • A self-hosted n8n instance with API access enabled
    • A GitHub account
    • A new private GitHub repository created for backups (public repos expose your workflow logic)
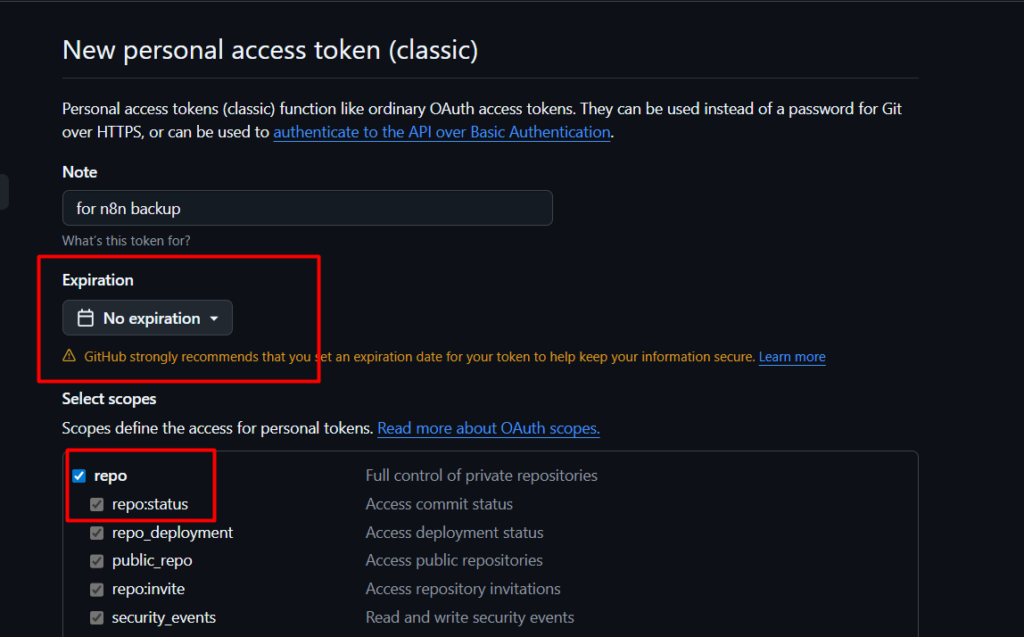
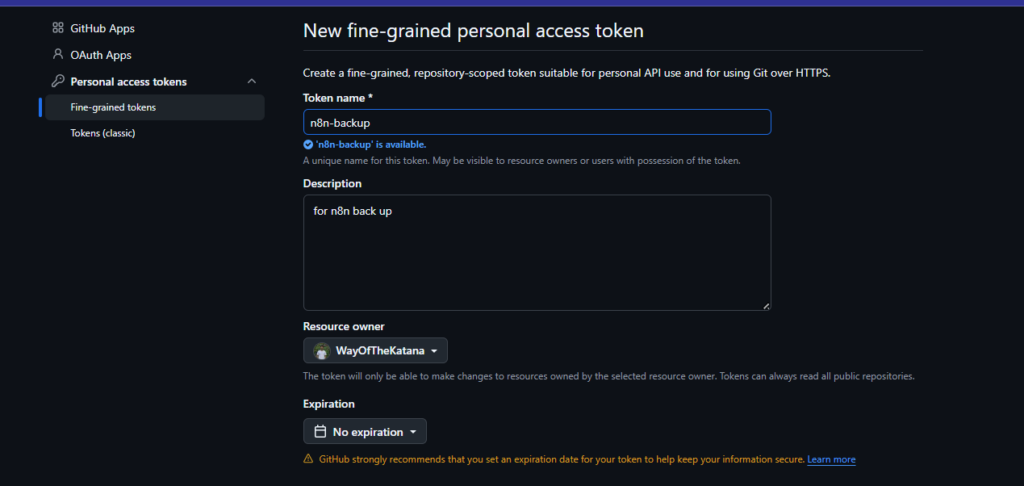
    • A GitHub Personal Access Token with repo scope

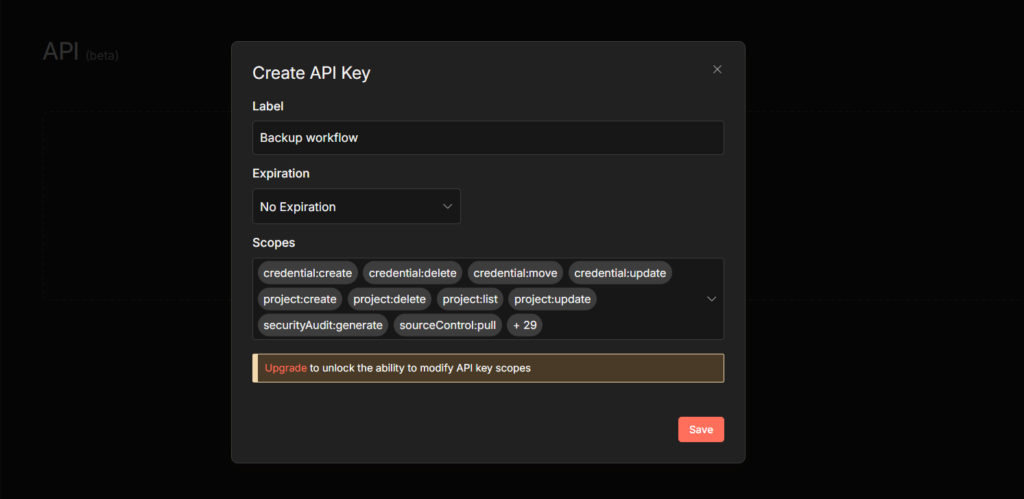
    To create your n8n API Key: In n8n, go to Settings > API > Create API Key (Copy this and keep it safe)

    To generate GitHub token

    • Go to GitHub > Settings > Developer Settings
    • Personal Access Token > Tokens (classic) > Generate new token
    • Check the repo scope. Copy the token immediately – You won’t see it again. same goes for n8n as well.

    Building the Backup Workflow

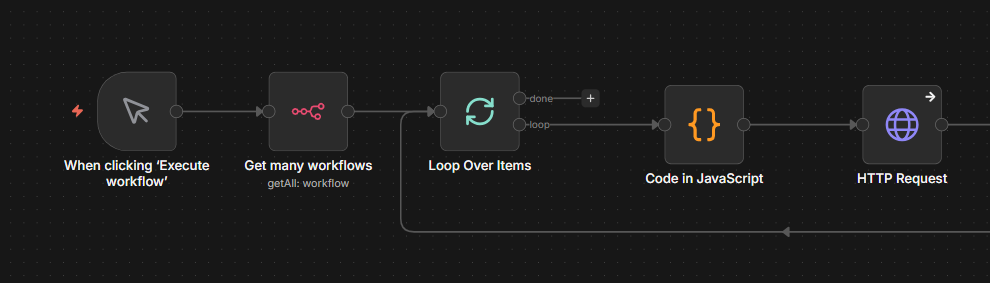
    Step 1: Add a Scheduled trigger or Manual trigger

    Since this is a tutorial, so I go with the manual trigger, for production, I’d go with Scheduled trigger. Set it run daily midnight or whenever your instance is least active. You can adjust the frequency later.

    Step 2: Fetch All Workflows

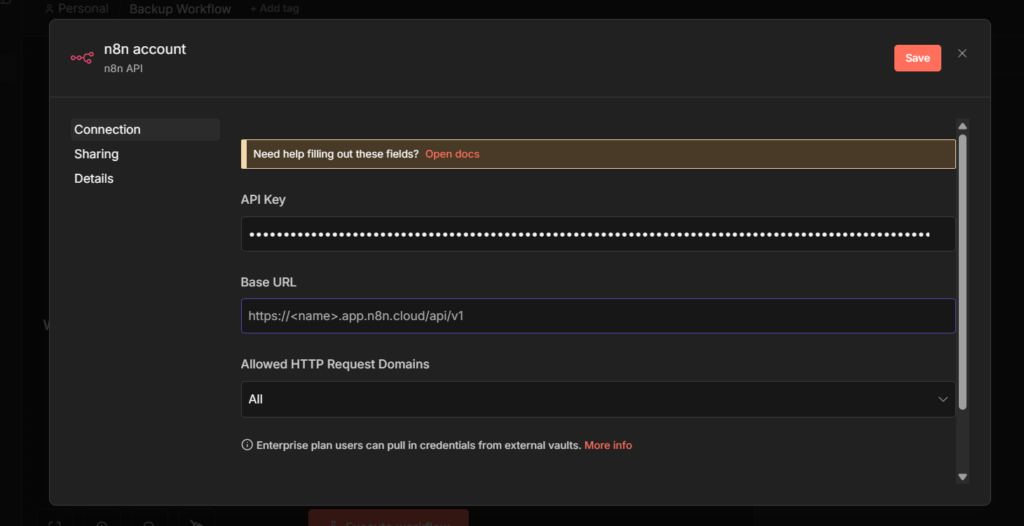
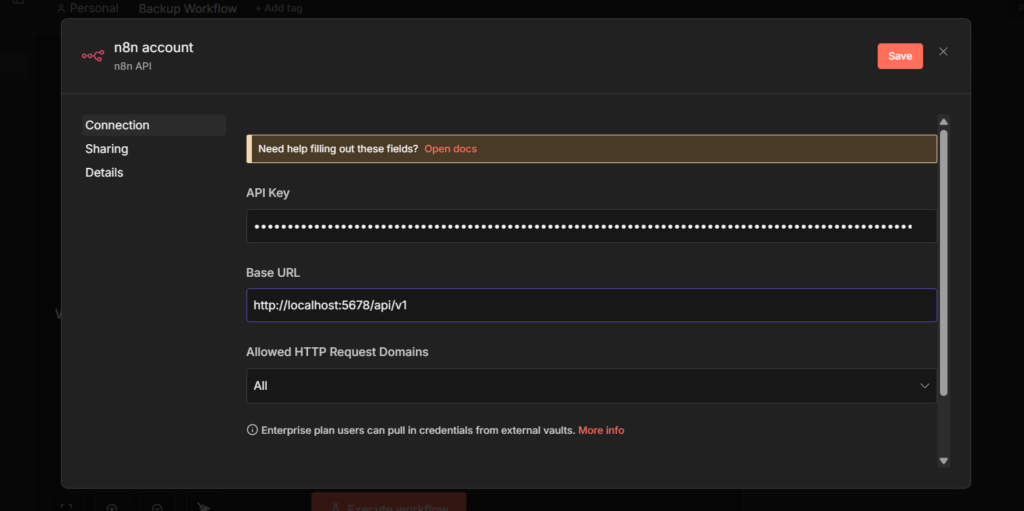
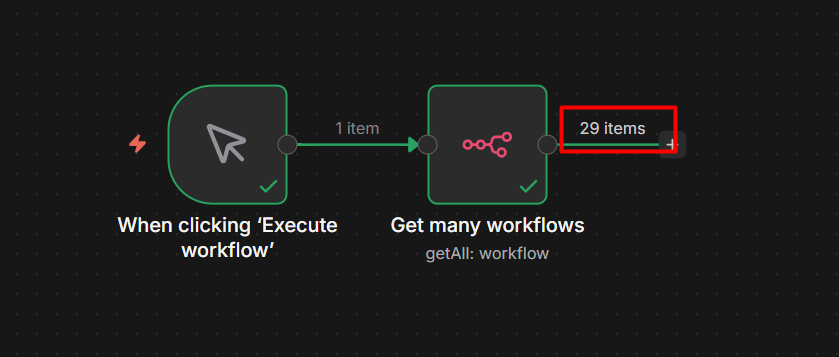
    Add a n8n node. Set resources to workflow and operation to Get many. Connect your n8n API credentials here.

    In the base URL add your name or else if your using self-hosted locally then add this http://localhost:5678/api/v1 – If it’s self-hosted on a VPS then it should be like this http://YOUR_VPS_IP:5678/api/v1

    Basically, In whatever URL you type in your browser to open n8n, just add /api/v1 at the end. That’s your base URL.

    This node hits your instance’s REST API and returns every workflow, Active, Inactive, literally all of them. Nothing gets missed.

    I retrieved 29 items, which means connection is working.

    Step 3: Loop Over Each Workflow

    Add a Loop Over Items node. This processes one workflow at a time, which matters because you’ll be making individual GitHub API calls per workflow (If you’re new to loops in n8n, here’s how the loop node works)

    Step 4: Prepare the File Content

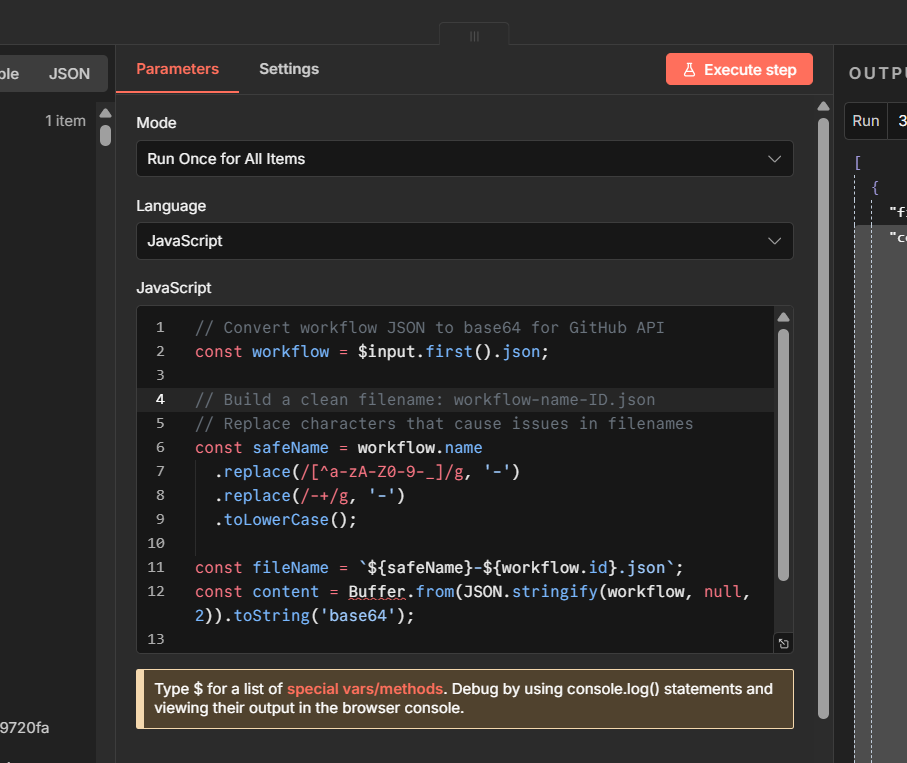
    Add a Code node. You need to convert the workflow JSON to base64, because the GitHub API requires base-64 encoded content when creating or updating files.

    // Convert workflow JSON to base64 for GitHub API
    const workflow = $input.first().json;
    
    // Build a clean filename: workflow-name-ID.json
    // Replace characters that cause issues in filenames
    const safeName = workflow.name
      .replace(/[^a-zA-Z0-9-_]/g, '-')
      .replace(/-+/g, '-')
      .toLowerCase();
    
    const fileName = `${safeName}-${workflow.id}.json`;
    const content = Buffer.from(JSON.stringify(workflow, null, 2)).toString('base64');
    
    return [{ json: { fileName, content, workflowId: workflow.id } }];

    This output two things you’ll need in the next steps fileName and content

    Step 5: Check if the File Already Exists on GitHub

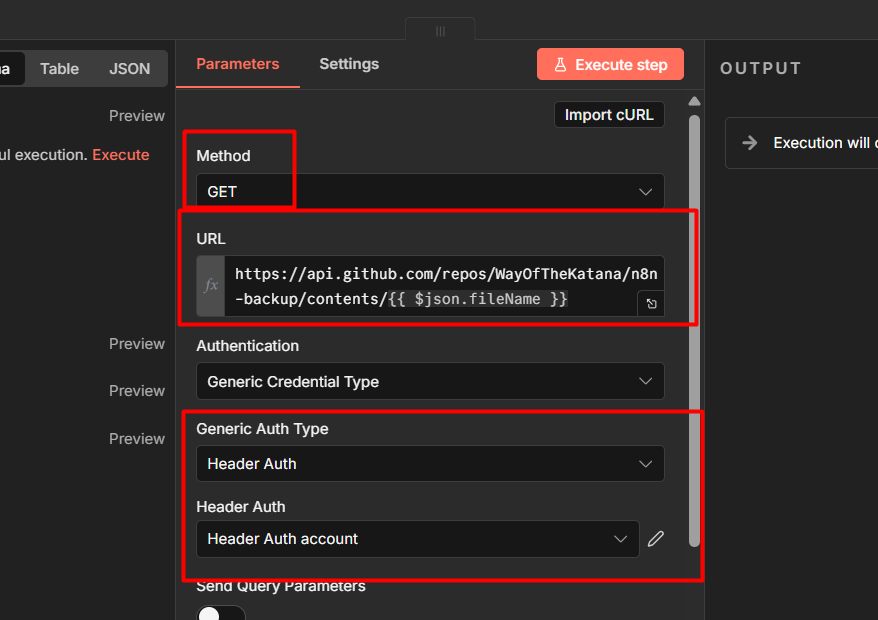
    Add an HTTP request node with these settings

    • Method: Get
    • URL
    https://api.github.com/repos/YOUR_USERNAME/YOUR_REPO/contents/{{ $json.fileName }}
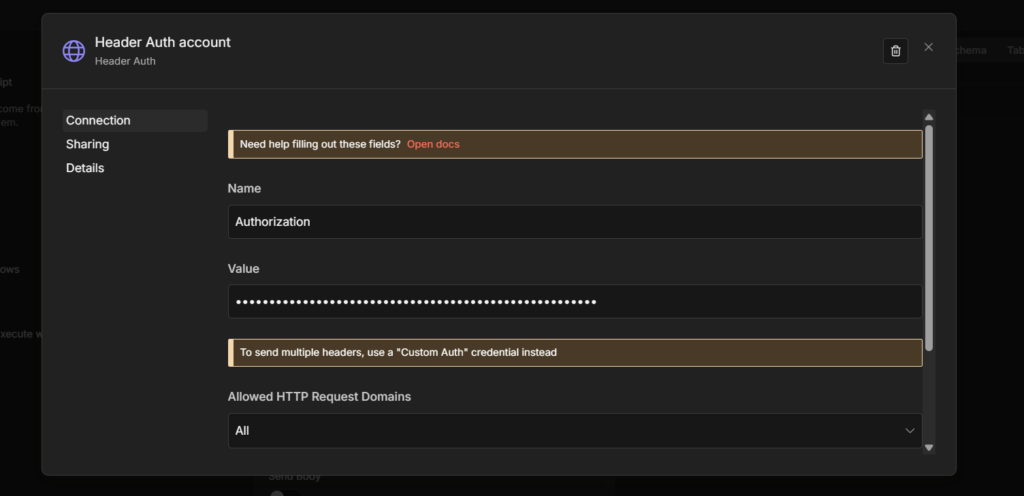
    • Authentication: Header Auth > Name: Authorization, Value: Bearer YOUR_GITHUB_TOKEN
    • Go to setting tab > On Error > Continue

    A 404 response here means the file doesn’t exist yet – that’s expected on first run. Setting on Error to Continue means the workflow keeps going instead of stopping.

    Step 6: Create or Update a File

    Add another HTTP request node next to the previous one.

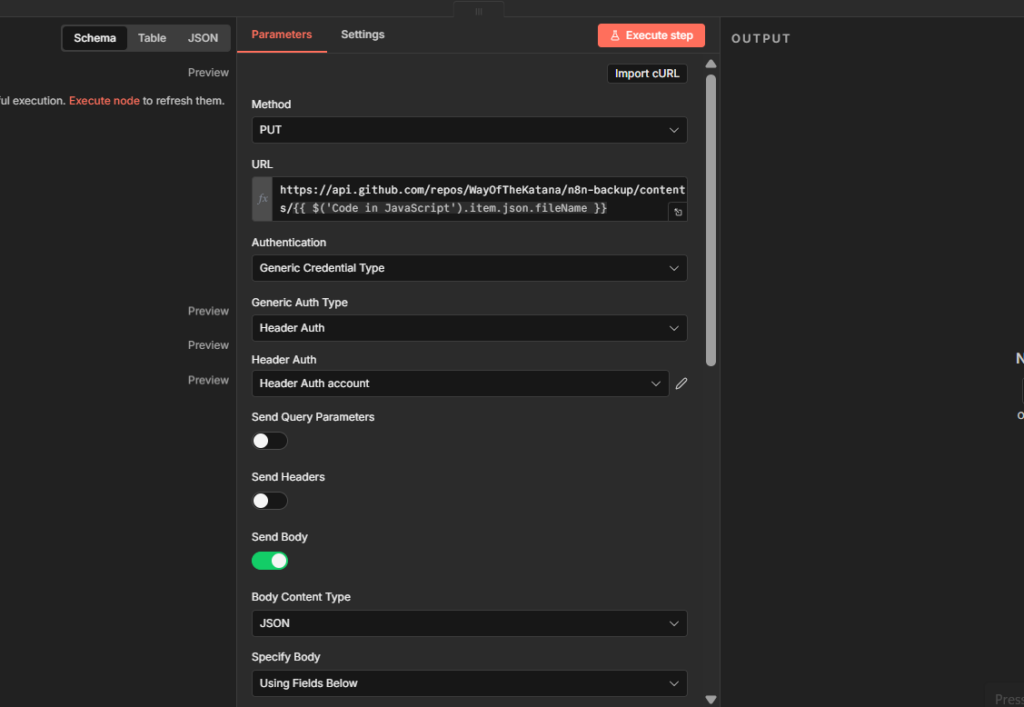
    • Method: Put
    • URL:
    https://api.github.com/repos/YOUR_USERNAME/YOUR_REPO/contents/{{ $('Code in JavaScript').item.json.fileName }}
    • Authentication: same Header Auth Credentials as Step 5, no change.
    • Body Content Type: JSON
    • Specify Body: Using Fields below

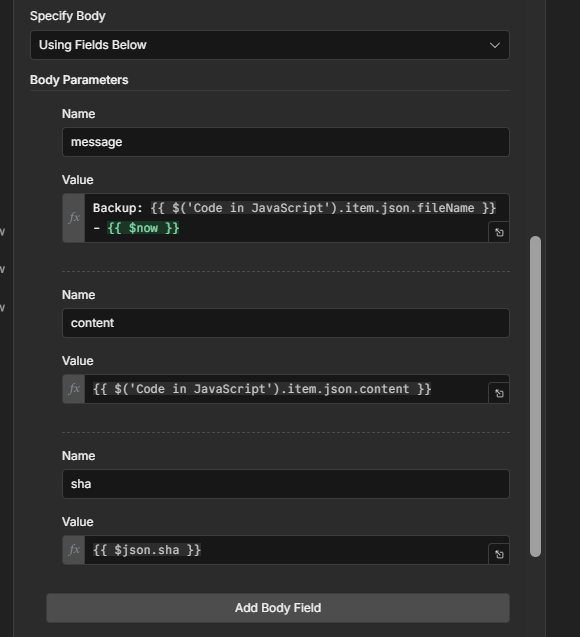
    Add these fields individually.

    • name: message
    • value:
    Backup: {{ $('Code in JavaScript').item.json.fileName }} - {{ $now }}
    • name: content
    • value
    {{ $('Code in JavaScript').item.json.content }}
    • name: sha
    • value: {{ $json.sha }}

    The sha field handles both cases automatically. When the file already exists, the previous GET request returns the sha and it gets passed here. When the file is new, the GET returns nothing and $json.sha is simply empty – which is exactly what GitHub expects for file creation. No IF node needed eventually, no extra complexity.

    Step 7: Publish the Workflow

    Publish the workflow. From now on, every day your n8n instance will back itself up to your GitHub repo – one JSON file per workflow, with a full commit history you can restore from at any point.

    My Final Thoughts

    The backup workflow itself is straightforward once it’s running – but there are two things worth keeping in mind.

    First, this protect you from workflow-level mistakes. Accidental edits, deletions, broken changes – covered.

    It doesn’t protect against a full server or database failure. If you’re self-hosting, a database-level backup of your SQLite or Postgres instance is a separate thing worth setting up alongside this.

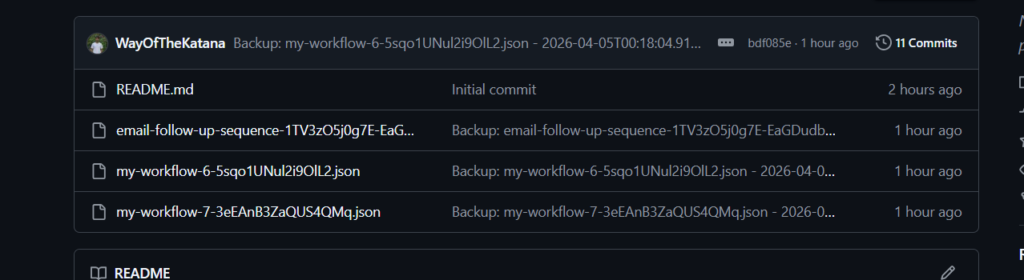
    Second, check your GitHub repo after the first run to confirm files are actually there.

    A workflow that runs without errors isn’t the same as a workflow that’s actually backing up correctly. Verify once, then trust the schedule.

    That’s it. One workflow, runs daily, commits everything to GitHub. You’ll forget it exists until the day you actually need it – which is exactly how it should work.

  • How to Use Summarization Chain in n8n

    How to Use Summarization Chain in n8n

    Most people find the Summarization Chain node the same way – they’re building an AI workflow, they see it in the node panel, and they have no idea what it actually does or how it connects to anything.

    The official docs tell you what the parameters are. They don’t tell you when to use Map Reduce vs Stuff, what the output looks like when it comes out, or why your text isn’t getting summarized even though the node ran without errors.

    That’s what this covers.

    What is Summarization Chain

    A Summarization Chain is a pre-built sequence of operations from Langchain – a popular AI framework – where each step passes its output to the next, all wired together to accomplish one specific task. In this case, that task is taking long text, breaking it into manageable pieces, sending those pieces to a language model, and returning a condensed summary.

    What the Summarization Chain Node Actually Does

    The Summarization Chain is an AI node – part of n8n’s LangChain integration. It takes text as input, sends it to a language model, and returns a natural language summary.

    Before anything else, get clear on what it is not: there’s also a core node in n8n simply called “Summarize”. That one has nothing to do with AI. It aggregates data like a pivot table, counting rows, summing values, grouping fields. Completely different tool.

    The Summarization Chain is also not an Agent. Chains in n8n have no memory. Each execution is stateless – the node takes text in, returns a summary out, and forgets everything. If you need the model to remember previous messages or carry on a conversation, you need an AI Agentic workflow instead.

    For one-shot summarization tasks – “take this article and give me a 3-sentence summary” – the chain is exactly the right tool.

    The Three Ways to Feed It Data

    When you open the Summarization Chain node, the first setting you’ll see is Data to Summarize. This dropdown has three options, and everything else in the node changes based on which one you pick. This is where most people get confused.

    Node Input (JSON) – Use this when the text you want to summarize is already flowing through your workflow as a JSON field. If you pulled content from an HTTP Request, read rows from Google Sheets, or received data from a webhook, this is your option. You point the node at the field that contains the text, and it handles the rest.

    Node Input (Binary) – Use this when the previous node passed along a binary file – a PDF, a Word document, an uploaded file. The node reads the binary data directly. You don’t need to extract the text first.

    Document Loader – Use this when you want to connect a sub-node (like the Default Data Loader) that pulls in documents from an external source. This option unlocks the sub-node connection point at the bottom of the Summarization Chain node.

    Here’s a quick reference for common situations:

    What you’re summarizingInput mode you use
    Text from an HTTP Request or webhookNode Input (JSON)
    Rows from Google SheetsNode Input (JSON)
    PDF file from Google DriveNode Input (Binary)
    Multiple documents via a loader sub-nodeDocument Loader

    Once you pick Node Input (JSON), you’ll see a Chunking Strategy setting appear. This controls how the node splits your text before sending it to the model. Simple is fine for most cases. set Character per chunks to around 3000 and Chunk Overlap to 200. The overlap means consecutive chunks share some content at the boundaries, which helps the model produce coherent summaries across chunks.

    Map Reduce, Stuff, or Refine – Which One to Use

    By default, the Summarization Chain uses Map Reduce. To see or change the method, click Add Option and select Summarization Method and prompts.

    Here’s what each method actually does and when to use it:

    MethodHow it worksBest forWatch out for
    Map ReduceSummarizes each chunk separately, then combines the summaries into a final resultLong documents, articles, multi-page contentFires parallel API calls – can cause timeouts with local models like Ollama
    StuffSends all the text in one single API callShort text, single emails, brief contentFails silently if the text exceeds the model’s context window
    RefineSummarizes the first chunk, then iteratively passes each new chunk alongside the running summaryWhen you need coherence across a long documentSlowest method – makes sequential API calls, one per chunk

    Map Reduce is the right default for anything longer than a few hundred words. It’s what n8n recommends and what handles chunking most reliably.

    Use Stuff when you’re certain the text is short enough to fit in one LLM call – a single email, a short review, a product description. It’s faster and cheaper.

    Use Refine only when you’ve tried Map Reduce and the output feels disconnected. It’s the most token-intensive option.

    One Known UI issue with Map Reduce: When you enable Summarization Method and Prompts in Map Reduce mode, the two prompt fields shown in the UI are displayed in the wrong order. The first field you see is actually the Final Prompt to Combine (the prompt used to merge all chuk summaries into the final output), and the second is the Individual Summary Prompt (the prompt used on each chunk). The labels say the opposite. If you’re customizing these prompts, double-check which field you’re editing – It’s the reverse of what the UI shows.

    Let’s Build It: Summarize Articles from an RSS Feed

    This workflow reads the latest articles from an RSS feed, summarizes each one, and gives you the output you can route into Slack, Notion, or anywhere else. It uses Node Input (JSON) – the most common setup.

    You’ll need an AI credentials connected in n8n. If you haven’t set that up yet, then make sure to check the credentials and service guide here.

    Step 1: Add a Manual or Schedule Trigger

    If you’re setting up a schedule trigger, Set it to run once daily. This keeps API costs predictable during the testing, you’re not burning tokens every time you manually trigger the workflow.

    Step 2: Add an RSS Read Node

    Adding RSS Read node to the n8n

    Connect it to the trigger. Set the URL to any feed you want – for testing, https://hnrss.org/frontpage (Hacker News) works well.

    configuring RSS read node

    Configure it as:

    • Feed URL: your RSS source
    • Limit: leave at default for now

    This outputs one item per article, each with fields like title, link, and content.

    Step 3: Add a Limit Node

    Adding limit node next to the RSS read to limit the links

    Connect it after the RSS Read node. Set keep items to 2

    configuring limit node

    During testing, don’t summarize 50 articles at once. Test with 2, confirm everything works, then remove the limit when you’re ready to go live.

    Step 4: Add the Summarization Chain Node

    Adding Summarization Chain in n8n

    This is the main node. Connect it after the Limit node.

    Summarization Chain configuration

    Configuration:

    • Data to Summarize: Node Input (JSON)
    • Input: Click the expression editor and map it to the content field from the RSS node. for Hacker News this is {{ $json.content }}. For other feeds it might be {{ $json.description }} or {{ $json['content:encoded'] }} – check your RSS node output to confirm the field name.
    • Chunking Strategy: Simple
      • Character Per Chunk: 3000
      • Chunk Overlap: 200
    • Click Add Option – Summarization Method and Prompts
    • Summarization Method: Map Reduce
    • Leave the prompt fields at their default to start. Once it’s working you can customize them. Just remember the UI Swaps the label order – the top field is the Final Prompt, the bottom is the Individual Summary Prompt.

    Step 5: Connect the Chat Model Sub-Node

    Adding chat model to Summarization Chain

    Click the + icon on the Model connection point at the bottom of the Summarization Chain node. Search for Gemini and add Gemini Chat Model.

    In the Gemini Chat Model settings:

    • Credential: select your gemini credential
    • Model: 2.5 flash works well here – it’s fast, cheap, and more than capable for summarization.

    Step 6: Run it and Check the Output

    Summarization Chain output

    Execute the workflow. Click the Summarization Chain node after it runs.

    The output will look like this:

    Summarization Chain final output

    The summary lives inside response.text. This trips people up the first time – the output isn’t just a plain string, it’s nested inside the response object.

    To use the summary in the next node, reference it with

    {{ $json.response.text }}

    So if you’re sending to Slack, you message field would be

    {{ $json.title }}: {{ $json.response.text }}

    That’s the complete workflow. Manual trigger > RSS Read > Limit > Summarization Chain > Wherever you want the summaries to go.

    To understand more about how data flows between nodes like this, the n8n workflow nodes and data flow guide has a solid breakdown.

    When to Use This Instead of AI Agent

    The rule is simple. If the task is “text goes in, summary comes out” use the Summarization Chain. It’s purpose-built for that, it’s straightforward to configure, and it costs fewer tokens than routing through an agent.

    Use an AI Agent when you need any of the following like memory across multiple interactions, the ability to call external tools or APIs during the tasks, or multi-step reasoning where the model decides what to do next. Agents handle complexity. Chains handle one defined task.

    For batch summarization, processing a list of articles, emails, or documents in a workflow – The Summarization chain is the right choice every time.

  • How to Use Telegram Bot in n8n (Send Messages Receive Them)

    How to Use Telegram Bot in n8n (Send Messages Receive Them)

    Telegram is one of the best notification layers you can add to an n8n workflow. It’s Free, instant, and works on every device, and the bot API is genuinely simple to work with.

    There are two ways people use it. Pushing messages out to Telegram from a workflow (alerts, reports, notifications), and receiving messages from Telegram to trigger a workflow. This post covers both + practical implementations that saves your time.

    Before we dive into the workflows, you’ll need two things. a Telegram account, and n8n instance, If your just getting started, n8n cloud is the easiest choice and recommended – no server setup, and webhook work out of the box. If you’re self hosting locally, it takes a bit time to configuration, but don’t worry – I’ve covered those steps as well.

    Step 1: Create Your Bot With BotFather

    configuring botfather for the first time

    Every Telegram bot starts here. BotFather is Telegram’s official bot for creating and managing other bots.

    Open Telegram and search for @BotFather. Start a conversation and send /newbot or you can just click on Open App to Create a new bot.

    BotFather will ask you two things

    creating a new telegram bot
    • A display name – This is what users see in the chat header. Can be anything. Example: My n8n bot
    • A username – must be unique across all of Telegram and must end in bot. Example: my_n8n_alerts_bot
    verifying bot username

    Once you confirm both, BotFather sends you a bot token that looks like this

    Generating the telegram bot token

    7512938401:AAFx9Kd2mNpQrTvWxYzAbCdEfGhIjKlMnO – This is for just an example.

    Copy that token and keep it somewhere safe. You’ll paste it into n8n in the next step.

    If you’re building a bot for group chat, do one more thing before leaving BotFather. Send /setprivacy, select your bot, then choose Disable. By default, Telegram bots in groups only receive messages that directly mention them. Disabling privacy mode lets the bot see all messages in the group, which is almost always what you want when building automation workflow.

    Or else, you can directly to the Thread settings and just toggle it. Simple as pie. We cover all the methods 🙂

    Editing bot group privacy in telegram

    Step 2: Connect Telegram to n8n

    In n8n, Go to credentials, and add credentials – search for Telegram API.

    Connecting telegram to n8n

    Paste your bot token into Access Token field. Give the credentials a clear name like My Telegram Bot so you can identify it later across multiple workflows. Save it, n8n tests the connection automatically.

    Getting Your Chat ID

    Almost every telegram node configuration requires a Chat ID. This is the unique identifier for the conversation your bot will send messages to. Your personal chat with the bot, a group or a channel.

    The easiest way to get it, send your bot any message in Telegram, then open this URL in your browser (replace with your actual token)

    https://api.telegram.org/bot<YOUR_TOKEN>/getUpdates

    Look for the chat object in JSON response. The id field inside it is your Chat ID. For personal chats it’s positive number. For groups, prefix it with a - when you use it in n8n.

    retrieving the chat ID from the telegram chat in n8n

    The other way is use the Telegram trigger node in n8n (Already covered in the Use Case 2) When a message comes in, it automatically provides the Chat ID in the output – no manual lookup needed though.

    For more on setting up credential across different services. The n8n credentials guide covers the full process.

    Use Case 1 – Sending Notification to Telegram

    This is the most common setup. Something happens in another app, n8n sends you a Telegram message about it.

    The example here is a Google Sheets row being added > Telegram alert. The trigger doesn’t matter much – you can swap it for a Schedule trigger, a Webhook, a Gmail trigger, anything. The Telegram node at the end works the same way regardless.

    Step 1: Add Your Trigger

    For this example, use simply manual trigger.

    Step 2: Add the Telegram Node

    Click + after the trigger and search for Telegram. Select Send a Text Message.

    connecting a send message telegram node in n8n

    Configuration:

    • Select the Telegram credential you created
    • paste your Chat ID (the number you retrieved above)
    • Write your message or maybe you can just pull the data from anywhere else.

    Now you send messages to your bot.

    showing the telegram output with n8n

    Step 3: Turn Off the n8n Attribution

    By default, n8n appends a small “This message was sent automatically via n8n” line to every telegram message. Most people don’t want that in production.

    removing the attribution for telegram messages

    To remove it: Additional Fields > Add Field > Append n8n Attribution > toggle off.

    removed n8n attribution in n8n

    That’s the full outbound notification workflow. Trigger > Telegram Send message > done. Test it by executing the workflow manually and checking your telegram chat.

    Use case 2 – Receive Messages and Respond

    This flips the direction. Instead of n8n pushing messages out, Telegram messages come in and trigger your workflow. The Telegram trigger node listens for incoming messages via webhook that n8n registers automatically when you activate/publish the workflow.

    One important catch: If you’re using n8n cloud or self-hosting on a VPS, webhook works out of the box. But if you’re running n8n locally, Telegram can’t reach your machine from the internet. To solve this, you need to expose your localhost using a tool like ngrok, which creates a secured public tunnel. Just set the ngrok HTTPS URL as your webhook URL when starting n8n and the Telegram Trigger will work normally.

    Read here: Webhooks in n8n explained

    Here’s the configuration if you’re using locally hosted n8n with docker to expose Telegram Trigger.

    • Make sure to read the Webhooks in n8n explained and understand the context of how Webhooks working in n8n
    • Start ngrok in your terminal ngrok http 5678
    • Copy the HTTPS forwarding URL (e.g., `https://xxxx.ngrok-free.dev`)
    • Stop your current n8n container
    • Restart it with the WEBHOOK_URL environment variable added docker run … --env=WEBHOOK_URL="https://xxxx.ngrok-free.dev" … n8nio/n8n

    Once restarted, your Telegram Trigger webhook will register successfully. The free ngrok plan gives you a new URL every time you restart it. That means you need to update WEBHOOK_URL and restart your container each time.

    Part A – Simple Reply Bot

    This is a foundation workflow. Get this working first before we add any logic to it.

    Step 1: Add the Telegram Trigger

    Create a new workflow. Add a Telegram trigger node as first step.

    listening to telegram trigger webhook

    Configuration:

    • Your telegram credentials
    • Updates to watch, select Message

    Click Listen for Test Event, then open telegram and send your bot any message, something like hello. The Telegram Trigger node will show the incoming payload in the output panel.

    telegram webhook payload in n8n

    the two fields you’ll use constantly

    chat.id – the chat ID of whoever sends the message

    text – the actual message text they typed

    The Chat ID from the trigger is dynamic – it automatically point back to the person who sent the message. You never need to hardcode Chat ID in a reply workflow.

    Step 2: Add the Telegram Send Message Node

    Click + after the trigger and add Telegram > Send message node.

    Configuration:

    • Your telegram credentials.
    • Chat ID
    • Text: whatever you want the bot to reply.

    For a simple echo bot that repeats what user said

    mapping chat ID to telegram node

    You said: {{$json.message.text}}

    or a fixed response maybe, like “Thanks for your message, I’ll reply shortly”

    Execute the workflow, send your bot a message in Telegram, and you should see the reply come back within a second or two. That’s the full loop. Receive, Process, Reply

    Publish the workflow when you’re ready to go live. n8n registers the Telegram webhook automatically at that point.

    testing telegram bot in n8n

    Part B: Command Based Bot

    command based telegram bot in n8n

    Now that part A works, extend it with a Switch node to route different commands to different actions. This is the pattern behind most real Telegram bots.

    The idea: user sends /status or /help, the bot does something different for each.

    Step 1: Add a Switch Node

    Insert a Switch Node between telegram trigger and send message node.

    configuring the expression rule in n8n for telegram bot

    Set Mode to Rules – Add two rules.

    • Rule 1: {{ $json.message.text }} equals /status – Output 1
    • Rule 2: {{ $json.message.text }} equals /help – Output 2
    adding fallback output in switch node

    Add a third output for anything else. Set it as Fallback output. This catches messages that don’t match any command.

    Read more

    Step 2: Build the /status Route

    adding statuses for switch node

    On the /status output, add an HTTP Request node. Point it any public API that returns useful data. A simple example – current bitcoin price.

    testing telegram bot in n8n

    Step 3: Build the /help Route

    On the /help output, skip the HTTP request. Just add the Telegram send message node directly.

    • Chat ID:
    • Parse Mode: HTML
    • Format your text
    <b>Available commands:</b>
    
    /status — get the current BTC price
    /help — show this message
    telegram bot

    Step 4: Build the Fallback Route

    On the fallback route, add a final Telegram send message node.

    • Text: Sorry, I don't recognize that command Send /help to see what I can do

    Publish the workflow now, send /status to your bot – It should definitely respond with the price. Send /help – it should reply with the command list. Send anything else besides these commands, then it will send I don’t recognize it based on what you’re prompted on the fallback route.

    telegram bot command based in n8n

    That’s working command-based bot. From here you can replace HTTP request with anything, a google sheet maybe, a database query or AI agent’s response. The Switch route – reply pattern will be same. If you want to just wire an LLM into one of the routes, check it out our AI Agent guide here – Shows exactly how to set that up

    One Bot, One Active Webhook

    • Telegram only allows one Webhook URL per bot at a time
    • Two workflows using the same bot token = only the latest activated one receives the messages, other silently stops without any errors
    • As a fix: Use a single active Telegram Trigger and route logic inside it using IF or Switch nodes.
    • Need separate workflows? Create separate bots in BotFather, each with it’s token.

    Telegram Trigger Stuck or Not Firing (self-hosted n8n)

    • Telegram Trigger uses webhooks; Telegram’s servers must reach your n8n instance via a public HTTPS URL
    • Running locally or behind a reverse proxy without HTTPS/Websocket support = Trigger silently fails or get stuck
    • This is a network config issue, not Telegram one. Check your webhook setup and ensure HTTPS is properly configured

    Let’s Wrap This Up,

    Telegram and n8n is one of those combinations that just works.

    You get a free, reliable messaging layer on top of any automation you build, without dealing with email deliverability, app push notification complexity, or paid SMS services.

    Start simple. Get the outbound notification working first, send yourself an alert from a trigger you actually use. Then move to the reply bot once that feels solid.

    The command based pattern in Part B scales further than it looks. Most production bots are just that same Switch node pattern with more routes and smarter logic behind each one.

    The only real friction is the webhook setup on localhost, and now you know exactly how to handle that with ngrok and the Docker environment variable approach.

    From here, the natural next step is wiring an AI agent into one of your bot routes so it can handle freeform questions, not just fixed commands. That turns a simple command bot into something that feels genuinely intelligent to whoever is using it.

  • n8n Airtable Integrations (Connect, Read, Create and Update)

    n8n Airtable Integrations (Connect, Read, Create and Update)

    Airtable sits at an interesting spot – It’s more structured (steroid) than a spreadsheet but more approachable than a proper database.

    That makes it a natural fit for storing leads, content pipelines, project data and anything else needs columns, filters, and views without spinning up Postgres.

    Connecting it to n8n is straightforward and we will go in-depth

    • Which scopes your credential needs
    • Why Update and Delete require a Record ID you have to fetch first.
    • Why the Airtable trigger isn’t real-time

    skip these would cost you hours of debugging empty records and trigger that never fires.

    Let’s get started, setup the credentials.

    Setting Up Your Airtable Credential

    Airtable removed it’s legacy API in february 2024. If you’re following an older tutorial that shows an API Key field in Airtable’s account settings, that method no longer exists. The only options now are Personal Access Token (recommended) and OAuth 2.

    Step 1

    • Go to airtable.com/create/tokens and click on the Create token

    Step 2

    • Give it a name, for now I’ll add as “The Owl Logic”
    • Add these three scopes
      • data.records:read – read records from tables
      • data.records:write – create, update, and delete records
      • schema.bases:read – read table structure so n8n can list your bases and columns

    That third scope is the one almost everyone misses. Without it, n8n connects successfully but the base dropdown stays empty. You end up with a valid credential that can’t actually do anything useful in the UI.

    Step 3

    Under Access, select which base or bases this token can access. You can grant access to all bases in a workspace or limit it to specific ones.

    I selected the Add all resources to ensure a current and future bases are connected.

    Step 4

    Click Create token, copy it immediately (Airtable only shows it once), so make sure to copy and paste it on a notepad or somewhere safe.

    Step 5

    • Go to n8n > Create credentials > Airtable Personal Access Token
    • Paste the Personal Access Token

    Well, it’s working but this is totally different from Google Spreadsheet.

    Reading Records (List All vs. Filter by Formula)

    Both operations use Resource: Record > Operation: Search.

    The difference is whether you filter at the Airtable level or pull everything and filter in n8n.

    Pulling everything and filtering with an IF node works, but it’s wasteful. If your table has 500 records and you only need 12, you’re passing 500 items through your workflow for no reason. Filter by Formula handles the selection in Airtable before the data reaches n8n.

    To use it: open the Airtable node > add the Filter By Formula option > enter your formula

    Basically, In the Filter By Formula Section, I called the column as {status} that equals to “writing”, This way you can grab all the writing items to the node.

    Field names are case-sensitive and must match exactly. If your column named Email Address, then formula must use {Email Address}. using {email address} or {emailAddress} leads to an error.

    For no filter at all, leave the formula field empty . The node returns every record in the table.

    Creating Records

    Resource: Record > Operation: Create

    The node offers two mapping modes:

    Map Automatically – n8n takes the field names from your incoming data and maps them to Airtable columns with matching names. This only works when your data field name already match your Airtable column names exactly (again, case-sensitive)

    Map Each Field Manually – you specify each Airtable column and map it to an expression. More steps, but explicit. You know exactly what’s going where.

    Records created but fields are empty? This is a field name mismatch. The record was created, but the column names didn’t match so Airtable ignored the data. Open your Airtable table, copy the exact column name character-for-character (including spaces and capitalization), and update your field mapping in n8n.

    Updating and Deleting Records

    This is where most beginners gets stranded.

    You cannot update or delete a record by field value. Both operations requires the Airtable Record ID – a string like recABCDEF12345678 that Airtable assigns to every row internally. You don’t see it in the default grid view, but it exists for every record.

    This means Update and Delete always take two steps: first find the record to get its ID, then act on it.

    Step 1: Search for the Record

    Resource: Record > Operation: Search > Filter By Formula or You can Return All.

    When this executes, each returned record includes an id field alongside your data fields. That id is the Record ID.

    Step 2: Update Using ID

    Resource: Record > Operation: Update > ID

    Now, I’m going to map the ID to ID (using to match) and changes the Post Idea from previous context to a new updated idea which is the “New Complete Beginner”

    It changed.

    Delete works the same way – Search first, then pass the ID to Delete Operation

    One thing to watch: If your search returns multiple records, the update only processes the first one by default. Make your formula specific enough to return a single record. If you genuinely need to update all matching records, you’ll need Loop Over Items to process each one.

    Using the Airtable Trigger

    The Airtable Trigger doesn’t use webhooks. It polls – it checks your table on a schedule and looks for records that have changed since the last check. This means it’s not real-time. Depending on how you configure it, there can be a 1 – 15 minute delay between a record being created or changed in Airtable and your workflow starting.

    If you need instant response to Airtable changes, the trigger isn’t the right tool. Use a form, webhook or another event source to feed data into n8n directly instead of polling Airtable for it.

    For use cases where a small delay is acceptable – daily syncs, batch processing, schedule enrichment then the trigger works well.

    3 Most Common Errors That Break Airtable Workflows in n8n

    1. Bases dropdown is empty after connecting the credential

    The schema.bases:read scope is missing from your Personal Access Token. Fix: go back to Airtable’s token settings, add the missing scope, and save. You don’t need to recreate the token in n8n, just update the scopes in Airtable and the existing credential will pick them up.

    2. 429 Too Many Requests — records stop mid-loop

    Airtable’s rate limit is 5 requests per second per base, and 50 requests per second across all bases per access token. When you loop over records and create or update them one by one, you hit this quickly with larger datasets.

    Fix: add a Wait node set to 200ms inside your loop. That keeps you under 5 requests per second. For larger batches where you need to stay well under the limit, 500ms is safer. See the rate limiting guide for more detailed approach.

    3. Update node fails with “Record ID required”

    You’re passing field data to the Update operation without an id value. Fix: add a Search step before the Update, filter to the specific record you want, and use {{ $json.id }} as the ID field in the Update node. The two-step pattern (Search → Update) is required, there’s no way around it.

    My Final Thoughts

    Airtable and n8n make a strong pair once you understand how they actually communicate. The credential scopes determine what n8n can see.

    The Record ID determines what you can change. The trigger polls on a schedule, not in real-time. Get those three things right and most of the confusion disappears.

    To recap what matters most: always include schema.bases:read when creating your Personal Access Token, use Filter By Formula to keep your workflows lean, treat Update and Delete as two-step operations, and add a Wait node inside loops before you hit rate limits rather than after.

    From here you can start layering Airtable into real workflows, routing new leads from a form, syncing a content pipeline, updating project statuses from Slack. The patterns you learned here scale directly to those use cases.

  • How to Use the Simple Memory Node in n8n (Beginner’s Guide)

    How to Use the Simple Memory Node in n8n (Beginner’s Guide)

    You built your first AI Agent in n8n. It responded well, sounds smart, and handles questions exactly how you configured it.

    Then you type “What did I just tell you?

    And it says “I don’t have information about that

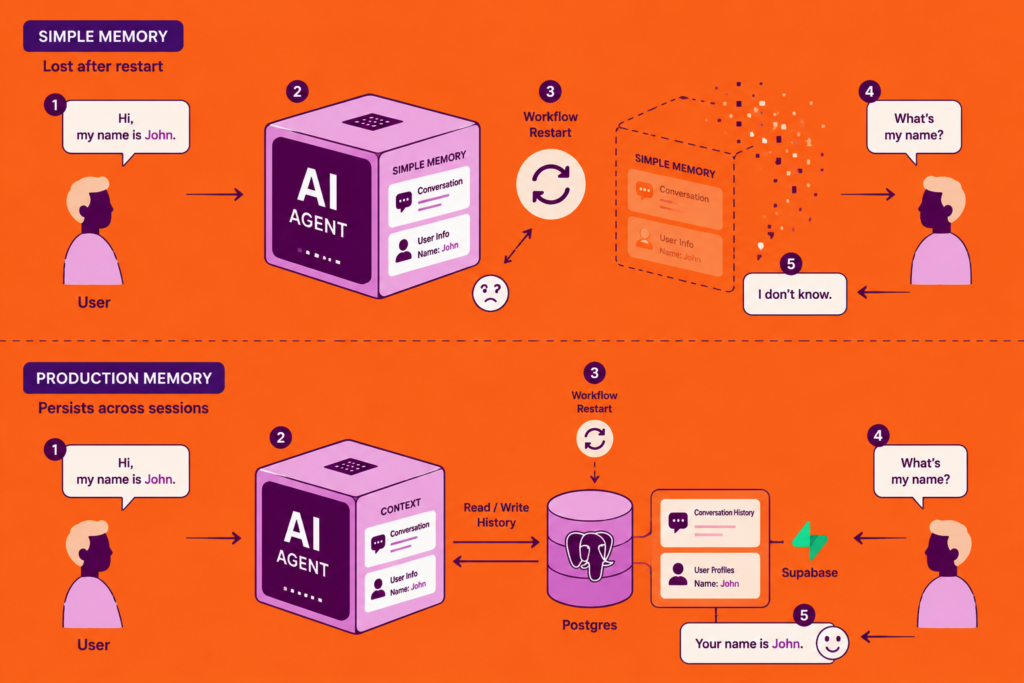
    That’s not a prompt problem. Your agent has no memory of it. Every single message it receives feels like the first one, a completely fresh conversation with no context of what came before.

    The Simple Memory fixes this. Here’s how to set it up correctly, what the settings actually mean, and the two mistakes that will silently break your workflow if you skip this post.

    What the Simple Memory Actually Does?

    When you send a message to an AI Agent in n8n, the request goes to an LLM like Claude or Gemini.

    The LLM processes that one message and sends back a response. That’s it. No memory of previous turns each API call is completely independent by design.

    The Simple Memory sites between your chat trigger and your AI Agent and solves this by keeping a rolling of log of recent conversation exchanges.

    Before each new message goes to the LLM, n8n injects the recent chat history into the request automatically. The LLM now has context.

    One important thing to understand upfront is, This memory lives inside your n8n instance’s process. It’s not saved to a database. If your n8n instance restarts, all conversation history clears. For prototyping and internal tools, that’s usually fine. For production chatbots with real uses, I’ll cover that at the end.

    How to Add Simple Memory to an AI Agent

    If you already have a workflow with an AI Agent node set up, adding memory takes less than 5 seconds.

    Step 1

    connecting AI Agent to n8n

    Open your workflow on the canvas. Find your AI Agent node.

    Step 2

    Connecting simple memory node to n8n workflow

    At the bottom of the AI Agent node, you’ll see a connector labeled Memory. Click it.

    Step 3

    A panel opens with available memory nodes. Select Simple Memory

    A new node appears connected to your AI Agent via the memory connector.

    Step 4

    Configuring simple node in n8n

    Click into the Simple Memory node to configure it. You’ll see two things

    • Session Key: The identifier that groups messages into a conversation. When you’re using the On Chat Message trigger, n8n fills this automatically from the sessionId passed in the request. You don’t need to touch it.
    • Context Window Length: How many recent exchanges to keep in memory. The default is 5.

    Step 5

    Save your workflow and test it. Open the chat, tell the agent your name, send a few more messages, then ask it to recall something you said earlier.

    It will remember.

    If you don’t have an AI Agent workflow yet. Start here: How to Build an AI Agent in n8n

    What “Context Window Length” Actually Means?

    This setting trips up almost everyone at the first time.

    Context Window Length counts exchanges, not individual messages. One exchange = one message from you + one reply from the AI. That’s two messages stored.

    If you set it to 5, the agent keeps the last 5 exchanges – 10 messages total in the memory.

    Context Window LengthExchanges RememberedMessages in Context
    112 (1 user + 1 AI)
    5 (default)510
    101020

    Why does this matter? Because every message in the context window gets sent to the LLM on each new request. A window of 10 means 20 messages worth of tokens on every call. At scale, that adds up fast in both cost and response latency.

    For most use cases, the default of 5 works well. If your conversations are short and task-focused (book an appointment, answer a product related questions), you can drop it to 3. If you’re building something more conversational where users reference things from much earlier, bump it up to 8 or 10 – just know you’re trading off token cost for context depth.

    2 Common Errors and How to Fix Them

    “No sessionId” error

    This one shows up when you’re triggering your AI Agent from something other than On Chat Message trigger, a Webhook, a Scheduled trigger, or a manual test run.

    This Simple Memory node expects a session identifier to know which conversation it’s working with. The On Chat Message trigger provides this automatically. Everything else doesn’t.

    How to fix it for testing? Open the Simple Memory node and manually type a static value into the Session Key field – something like my_test_session. This tells the node to treat all requests as part of one conversation. It works fine for building and debugging.

    How to fix it for production? If you’re triggering your agent from a webhook, you need to pass session identifier in the request and map it to the Session Key field. For a customer support bot, that might be the user’s email address or account ID. For a telegram bot, It’s the chat ID. Whatever uniquely identifies a conversation for your use case.

    {{ $('Webhook').item.json.body.userId }}

    Map that expression to the Session Key field and every user gets their own isolated memory. See how to handle errors in n8n if you want to add proper error handling around sessions that fail to resolve.

    Two memory nodes reading from the same session

    If you add more than one Simple Memory node to the same workflow without changing their Session Keys, they both read from and write to the exact same memory. This causes weird behavior, one part of your workflow may overwrite context that another part needs.

    The fix is simple, give each Simple Memory node its own unique Session Key. Something like workflow_a_session and workflow_b_session keeps them separate.

    One Limitation You Must Know Before Going Live

    Simple Memory does not work if your n8n instance runs in queue mode.

    Queue mode is a self-hosted setup where multiple worker processes share the load. When a workflow executes, n8n routes it to whichever worker is free. The Simple Memory node stores data inside the worker’s process memory, not in a shared database. If two consecutive messages from the same user land on different workers, the second worker has no idea what the first one stored.

    The result isn’t an error. The agent just loses memory mid-conversation, silently with no warning.

    Who this affects: If you’re running self-hosted n8n with Redis and multiple workers enabled, this is your setup. If you’re on n8n Cloud or a Single-instance self-hosted setup, you’re fine.

    What to do instead: Switch to the Postgres Chat Memory node. It stores conversation history in a database that every worker can access.

    When to Replace The Simple Memory

    Simple Memory is the right starting point. Zero configs, nothing to provision, works immediately.

    But there are two situations where you’ll need to replace it.

    You’re going to production with real users. Simple Memory clears on restart. If your n8n instance ever updates, redeploys, or crashes, every active conversation loses it’s history. Users will notice. For anything facing real users, migrate to the Postgres Chat Memory node before you launch.

    You’re running in queue mode. As covered above, Simple Memory and queue mode don’t work together. Postgres is the standard replacement here too (or Redis Chat Memory).

    The migration is straightforward. Set up a Postgres database, add your credentials to n8n, and swap the Simple Memory node for the Postgres Chat Memory node. n8n creates the required table structure automatically on first run.

    Redis Chat Memory is also an option if you need very fast read/write performance for high-traffic real-time applications. For most teams, Postgres is the simpler and durable choice though.

    Once you have memory working correctly, the next thing worth exploring is what happens when you need the agent to manage that memory – Injecting system context, clearing history on demand, or inspecting what’s currently stored. That’s what the Chat Memory Manager node is for, and it connects to whichever memory node you’re already using.

    Check it out here: Building a Rate Limiter in n8n with Upstash Redis

    Final Thoughts

    None of this requires being an expert. It requires being willing to build something, break it, understand why, and built it better.

    The developers who create genuinely useful AI agents aren’t the ones who read the most about AI. They’re the one who ship something working, notice where it falls short, and keep iterating.

    You now know how memory works in n8n. You know the tradeoffs, the failure modes, and when to upgrade. That puts you ahead of most people who just drop a node and assume it works.

    Go build something worth remembering

  • How to Use Slack in n8n – Send Messages and Trigger Workflows

    How to Use Slack in n8n – Send Messages and Trigger Workflows

    There are two ways to authenticate with Slack in n8n, and they behave completely different.

    Pick the wrong one and your messages will come from your personal account instead of a bot, or your Slack Trigger will stop firing in production without any obvious error.

    This post covers both use cases , sending messages from n8n to Slack, and triggering workflows from Slack events along with the four errors that catch almost everyone. The most common ones.

    But you need to understand how these credentials works.

    This is part of my complete n8n beginner guide — where I cover everything from install to AI agents.

    Bot Token or OAuth2? Pick Your Credential Before You Start

    This is the decision that determines everything else. Most tutorials skip it and explain it only after something goes wrong.

    What you’re trying to doCredential typeToken
    Send messages as a botAccess Tokenxoxb- (Bot User OAuth Token)
    Trigger workflows from Slack eventsOAuth2 APIClient ID + Client Secret
    Send messages as yourselfOAuth2 APIxoxp- (User OAuth Token)

    For most automation setups, you want the Access Token method with a bot token. This sends messages from a named bot, not from your personal Slack profile.

    OAuth2 is required for the Slack Trigger node. It doesn’t work with the Access Token method. If you want both, a workflow that listens for Slack events AND sends replies – you’ll need two separate n8n credentials: one OAuth2 for the trigger, one Access Token for the send node.

    Setting Up Your Slack App (Do This Once)

    Both credential types require a Slack app. You create it once and then pull different tokens from it depending on what you need.

    creating an app in slack

    Step 1: Go to api.slack.com/apps and click Create New AppFrom scratch.

    selecting from scratch in slack apps

    Step 2: Give your app a name (something like “n8n Bot”) and select the workspace where you want it to work. Click Create App.

    Selecting a new app name and picking the workspace

    Step 3: In the left sidebar, go to OAuth & Permissions. Scroll to the Scopes section and add your Bot Token Scopes.

    OAuth permission in slack
    Selecting the bot token scopes

    Minimum scopes to send messages:

    • chat:write – post messages to channels
    • channels:read – list channels so you can pick one in n8n
    Adding more scopes to bot token scopes

    If you’re also setting up the Slack Trigger, add these too:

    • channels:history – read messages in channels
    • reactions:read – detect emoji reactions
    • users:read – resolve user IDs to names

    Step 4: Scroll up to OAuth Tokens for Your Workspace and click Install to Workspace. You need to be a workspace admin to do this.

    Installing the OAuth Token to the Workspace

    Step 5: After installing, copy the Bot User OAuth Token. It starts with xoxb-. Keep this — it’s your Access Token credential.

    Allowing the app permissions to the slack workspace

    Token rotation warning. Slack may present a “Token Rotation” option when you create the app. Do not enable it. Token rotation makes your xoxb- token expire every 12 hours. Workflows that were running fine will start failing silently in production. The critical part: once you enable token rotation, you cannot turn it off. You’d need to create an entirely new Slack app. Leave this off.

    Bot User OAuth Token

    Sending Messages from n8n to Slack

    With your xoxb- token copied, here’s how to wire it up in n8n.

    In n8n Credentials, create a new Slack credential. When it asks for the authentication method, choose Access Token. Paste your xoxb- bot token. Save it.

    Pasting the Bot Auth Token to Slack API credentials

    In your workflow, add a Slack node. Open it and configure:

    Adding Send a message slack node in n8n
    Explaining the configs of Send a message node
    • Resource: Message
    • Operation: Send
    • Credential: the Access Token credential you just created
    • Channel: #your-channel-name or paste a channel ID
    • Text: your message content

    A realistic message with dynamic data from a previous node looks like this:

    New lead from {{ $json.name }}
    Email: {{ $json.email }}
    Source: {{ $json.source }}
    Submitted: {{ $now.format('MMMM D, YYYY') }}
    
    Or Else, Just say
    
    HELLO WORLD! 

    Click Execute Node. If it works, great. If you get not_in_channel, see the troubleshooting section below — the fix takes 10 seconds.

    Read this,

    The bot must be invited to the channel. A Slack bot cannot post to any channel it hasn’t been explicitly added to. Go to the channel in Slack and type /invite @YourBotName. (e.g., mine is /invite @The Owl Logic Bot) This is a Slack permission rule, not an n8n limitation. Once invited, rerun the node and the message will go through.

    Slack Bot :)

    Triggering Workflows from Slack Events

    This direction is more involved. You’re telling Slack to call n8n whenever something happens, a message arrives, someone mentions your bot, a reaction is added.

    But here’s the hiccup. To make this trigger workflow work, You need to have a Self-hosted n8n or n8n Cloud. I recommending the n8n cloud since you won’t be having any issue and less prone to configurations.

    Even though If you’re working in localhost, then you have to expose your localhost webhook URL to ngrok by tunneling. You can check it out here Webhook in n8n for Beginners

    Step 1: Create an OAuth2 Credential in n8n

    In n8n Credentials, create a new Slack OAuth2 API credential. It will ask for a Client ID and Client Secret. Get these from your Slack app:

    Select Slack OAuth 2 API
    Add Client ID and Secret for Slack Trigger in n8n

    In your Slack app settings → Basic InformationApp Credentials section. Copy the Client ID and Client Secret into n8n.

    Basic information, Client ID and SEcret

    n8n will show you an OAuth Callback URL. Copy it.

    Pasting the credentials of Slack ID and Secret

    Step 2: Register the Callback URL in Slack

    Back in your Slack app → OAuth & PermissionsRedirect URLsAdd New Redirect URL. Paste the callback URL from n8n. Click Add, then Save URLs.

    Redirect URL, Prefer the production URL

    Step 3: Add the Slack Trigger to Your Workflow

    Add a Slack Trigger node to a new workflow. Select the OAuth2 credential. Choose which event to listen for:

    • Bot / App Mention — fires when someone types @YourBotName in a channel
    • New Message Posted to Channel — fires on every message in a channel
    • Reaction Added — fires when someone adds an emoji reaction

    For most bots, Bot / App Mention is the right choice. It’s targeted — the trigger only fires when your bot is explicitly called, not on every message in the channel.

    Step 4: Connect the Webhook URL to Slack

    With the Slack Trigger node open, copy the Webhook URL shown in n8n. There are two versions.

    • Test URL (contains /webhook-test/) — only works when you’re actively listening in n8n editor
    • Production URL (contains /webhook/) — works only when the workflow is Active

    In your Slack app → Event Subscriptions → toggle Enable Events to on → paste the webhook URL in the Request URL field. Slack will immediately try to verify it.

    Enabling the Event Subscriptions in Slack for n8n Webhook

    One webhook URL per Slack app. Slack allows only a single Request URL registered per app. You cannot have the test URL and the production URL active at the same time. While building and testing: use the Test URL, with n8n listening. Before going live: swap to the Production URL in Slack’s Event Subscriptions, then activate your workflow.

    Once the URL verifies, subscribe to the bot events you want. For Bot/App Mention, add app_mention under Subscribe to bot events.

    Step 5: Add the Signing Secret

    This is optional but strongly recommended. It ensures n8n only processes requests that genuinely came from Slack — not from someone who guessed your webhook URL.

    In your Slack app → Basic Information → copy the Signing Secret. In your n8n Slack credential → paste it into the Signature Secret field.

    Step 6: Activate the Workflow

    Toggle the workflow to Active in the top right. Until it’s active, the Slack Trigger won’t receive anything even if the Production URL is registered.

    Invite your bot to a channel (/invite @YourBotName), then mention it: @YourBotName hello. Check your workflow’s execution history — you should see the trigger fired with the message data.

    4 Errors That Break Slack Integrations in n8n

    These show up constantly in the n8n community forum. Each one has a specific fix.

    1. not_in_channel error

    Your bot hasn’t been invited to the channel. Fix: in Slack, go to the channel and type /invite @YourBotName. Every channel requires a separate invite.

    2. Messages sending from your personal account, not the bot

    You created an OAuth2 credential and used it for the Slack node. OAuth2 acts on behalf of your user profile. Fix: create a separate Access Token credential using your xoxb- bot token, and use that for the Slack node instead.

    3. Workflow ran fine in testing, silently fails 12 hours later in production

    Token rotation is enabled on your Slack app. The xoxb- token expires every 12 hours. Fix: you cannot disable token rotation once it’s on. You need to delete the Slack app and create a new one — this time leaving token rotation off during setup.

    4. Slack Trigger fires in testing but not in production

    Two possible causes. First: the workflow isn’t active — toggle it to Active in n8n. Second: the Test URL is still registered in Slack’s Event Subscriptions. When you activate the workflow, you also need to manually update the Request URL in your Slack app from the Test URL to the Production URL.

    Using Slack as an AI Agent Approval Channel

    Slack node can be used as a human-in-the-loop step inside AI Agent workflows.

    When an agent is about to take a high-stakes action like sending a bulk email, deleting a record, posting to a production channel, it can pause and route an approval request to Slack.

    The approver clicks approve or deny directly in Slack, and the agent continues or stops.
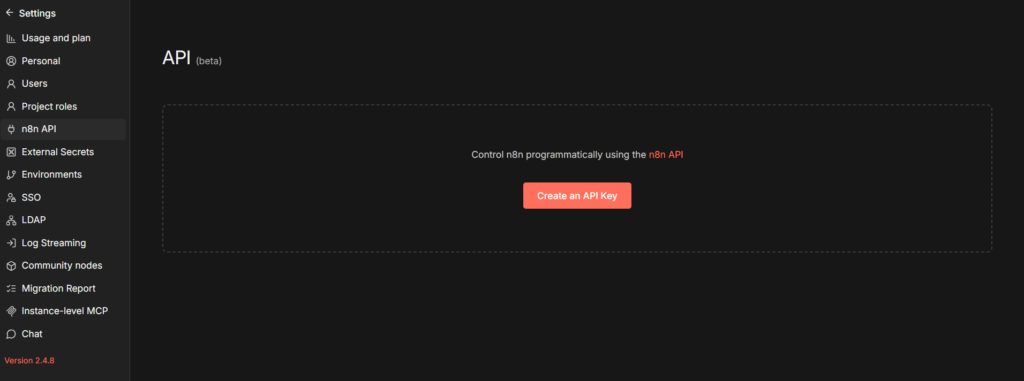
    This is configured at the tool level in the AI Agent node.
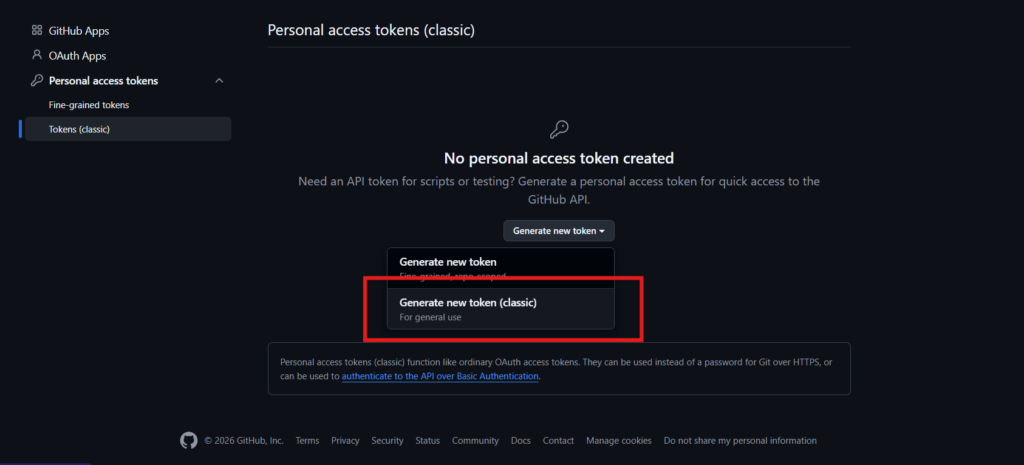
    The Slack node becomes a gated tool that requires sign-off before execution. If you’re building AI agent workflows, this is worth knowing about – it removes the need for fragile prompt-based guardrails like “only do this if you’re absolutely sure.

    The Slack node is one of the most-used integrations in n8n for a reason, having your automation post results directly to where your team already works is genuinely useful.

    Once the credentials are set up correctly, the node itself is straightforward. The setup is the hard part, and now you’ve done it once.