Blog

  • Micro Niche vs Broad Niche Blog: Which Actually Works in 2026?

    Micro Niche vs Broad Niche Blog: Which Actually Works in 2026?

    When I launched The Owl Logic, the niche was almost embarrassingly specific: n8n tutorials.

    Not automation broadly. Not no-code tools. Not “AI productivity.” Just one workflow builder that most people had never heard of.

    That specificity felt like a limitation. It wasn’t.

    The site found its footing. And while I was deep in building automations and writing tutorials, I kept running into something I wasn’t expecting – better methods for using AI inside content workflows.

    Things that worked in ways the generic “use AI for content” advice never covered. Gold methods, honestly. Stuff I’d discovered because I was building things from scratch and paying close attention.

    The blog you’re reading now is the proof.

    I didn’t stay in that tight n8n corner forever. I widened into blogging, content systems, AI for writers, and this site itself.

    But the expansion followed the logic. Each new category connected back to the core. The authority I’d built in the narrow space made the wider one credible – not just to Google, but to readers.

    That’s the model. Not micro vs broad as a permanent identity you pick once and live with. Width is a phase. You earn it.

    The short answer

    Start with a micro niche. When you’re new, narrow is far easier to rank for and build authority in – you become “the site about X” fast, instead of competing with giants on broad terms.

    You won’t run out of topics; a good micro niche has dozens of beginner questions you haven’t touched yet. Then, once you have traction, expand into adjacent topics.

    Broad niches only work if you already have authority or budget. So: micro now, broaden later. That’s not a compromise — it’s the sequence that actually works.

    Why narrow wins when you’re new to blogging

    When you’re a new blog with no domain authority, no backlinks, and no track record, you’re not competing on a level playing field.

    Broad niches mean going up against sites that have been publishing for years, have thousands of articles, and have accumulated trust signals that took time to build.

    You won’t outrank them on “productivity tips” or “how to make money online.” Not in year one. Probably not in year two.

    A micro niche changes the math entirely.

    When your entire site covers one specific thing – one tool, one skill, one clearly defined audience, every article you publish reinforces that you’re the source on that thing. That signal compounds fast.

    Google starts to understand your site. Readers do too.

    This is what topical authority means at the beginner level.

    It isn’t a technical trick.

    It’s just focus. The more tightly your content clusters around one topic, the clearer the signal, and the faster you start ranking for the terms your readers actually search.

    Spread too wide too early, and you’re telling every algorithm: “I write about all kinds of things.” That’s not a strong signal for anything.

    Narrow tells a specific story, and specific stories win the ranking race when you’re starting from zero.

    The other factor: micro niches naturally target longer, more specific keyword phrases. Lower competition. That means a newer domain can actually show up on page one, instead of getting buried by established sites chasing the same broad terms.

    A related question worth thinking through before you even pick a direction: How to Choose a Blog Niche – because the choice between micro and broad only matters once you’ve found a niche worth choosing. And if you’re still deciding whether a niche blog is even the right frame for what you want to build, personal blog vs niche blog covers that upstream question cleanly.

    But what if I run out of topics?

    This is the fear. I hear some version of it constantly: “My niche is too specific. I’ll write ten posts and have nothing left.”

    Here’s the honest answer: if you can’t find at least 30 beginner questions inside your niche, the niche isn’t too small – it’s too vague.

    A sharp, specific niche actually unlocks more topics, not fewer. Because you can go deep in a way a generalist site can’t.

    Think from the reader’s side. If your niche is “sourdough bread for beginners,” there’s a beginner asking how to start a starter, why their loaf is dense, what hydration means, how long fermentation takes, what tools they actually need, how to store it, what to do when the crust is too hard, and a dozen variations on each of those.

    You won’t run out. You’ll run out of time before you run out of ideas.

    The same dynamic played out at The Owl Logic.

    One automation tool produced more content ideas than I had hours to write.

    Every workflow, every common error, every “how do I actually do this” question – each one was an article.

    The constraint of the niche forced specificity, and specificity is exactly what beginners search for.

    Running out of topics is a fear, not a fact. The bloggers who actually run dry picked a topic they didn’t know well enough – not a topic that was too narrow.

    When to expand, and how to do it right

    Expanding your niche doesn’t mean starting over. It means growing outward from what you built, along the connections that already exist.

    Here’s the signal I used: when readers started asking me about things adjacent to the core material, not just “how do I build this workflow” but “how do I use it for content, how do I organize the output, how do I write better prompts for this” that was the expansion moment.

    The audience was pulling me outward because the original content had earned their trust.

    I hadn’t run out of ideas. I’d built enough credibility that new territory was mine to claim.

    That’s the right time to widen. Not month two, when you’re anxious and impatient. Not whenever you’re bored with your original topic.

    When you’re ranking for things, people are sharing posts, you’re getting questions you can’t fully answer yet – that’s the signal.

    And the expansion works when it follows the logic, not just the traffic opportunity. I didn’t pivot to a lifestyle blog.

    I moved to content strategy, blogging systems, AI workflows things that connected directly to what a reader who learned automation from me would naturally want next.

    The through-line stayed intact. That’s not accidental. That’s the point.

    Before adding a new topic cluster, run this test: would a reader of your existing content naturally want this? If yes, you’ve found a real expansion.

    If the connection feels like a stretch, it is one. Stretches dilute the authority you built. Logical extensions compound it.

    One catch: your domain has to let you

    There’s a prerequisite to “broaden later” that almost nobody mentions, and it’s locked in on day one: your domain name has to allow it.

    The Owl Logic could widen because it’s a personal brand.

    The name isn’t welded to any single topic – automation, content, AI workflows, blogging all sit under it without anything feeling off.

    The brand stretched because it was built to stretch.

    Now imagine I’d done the “smart SEO” thing and registered an exact-match niche domain instead, something like specific-tool-tutorial.com. Early on, that name might win a sliver of keyword relevance.

    But the day I wanted to write about anything beyond that one tool, the brand would fight me.

    Every broader article would read as off-topic on a site whose name promises one narrow thing.

    You can’t grow into a wider niche when your domain is shouting a narrower one. The name boxes you in, and you can’t rename your way out without throwing away everything you built.

    So if there’s any chance you’ll broaden later, and if the plan is micro-now-broaden-later, there is – pick a brandable domain over an exact-match niche one.

    Exact-match buys you a little early relevance and locks the door behind you.

    A flexible brand costs you nothing and leaves the door open. The narrow niche is the phase. The domain is the thing you don’t get to redo.

    What topical authority actually means for a beginner

    You’ll hear “topical authority” used like it’s an advanced SEO concept. For a new blogger, it’s simpler than that.

    Topical authority means: Google and your readers think of you as a reliable source on a specific subject. You earn it by covering that subject thoroughly at the beginner level – not by writing thousands of posts, but by leaving no obvious beginner question unanswered.

    The depth matters more than the volume.

    A micro niche makes this achievable. A broad niche makes it nearly impossible until you’re big enough to staff it.

    The most common mistake isn’t going too narrow.

    It’s going narrow on the surface while publishing inconsistently, two posts on the core niche, three on something adjacent, one on something else entirely.

    That breaks the topical signal before it has a chance to compound. Commit to the niche. Cover it properly. Then expand.

    Micro isn’t the destination. It’s the mechanism that gets you to broad without wasting years competing on terms you can’t win yet.

    Frequently asked common questions

    Will I run out of topics in a micro niche?

    Almost certainly not, if you picked a topic with real beginner interest. The narrower the niche, the deeper you can go on each subtopic, and beginners generate more specific questions than generalists ever do. Map out 30 potential article ideas before you commit to a niche. If you can hit 30 without straining, you have more than enough runway.

    Can I expand my niche later?

    Yes, and that’s the plan. Starting micro doesn’t lock you in forever. Once your site has real traction (you’re ranking, you have readers, you’ve built topical authority in your starting cluster), you expand outward into adjacent territory.

    The key is that the expansion follows logical connections, not just traffic opportunities. Authority travels along content that makes sense together.

    Is a broad niche bad for a new blog?

    Not bad, just very difficult. Broad niches work when you already have domain authority, budget for volume, or an existing audience.

    Without those, you’re competing against sites that have years of head start.

    A new blog in a broad niche will struggle to rank for anything meaningful early on, which makes it hard to build momentum. Start narrow, earn the authority, then broaden. That sequence works. The reverse rarely does.

  • How to Choose a Blog Niche in 2026 (Without Overthinking It)

    How to Choose a Blog Niche in 2026 (Without Overthinking It)

    When I was working out what The Owl Logic would be about, I didn’t start from a list.

    No spreadsheet of profitable niches. No trending-topics rabbit hole.

    I started from the other direction, what had I actually spent the last 15+ years doing online? Writing contents with grammarly, building mini-tools for businesses, marketing, and the tools I build with and the problems I solve every week. That’s where the site started.

    The logic wasn’t complicated: pick things I know well enough to be useful, pick things I genuinely won’t abandon six months in, and pick a space where people actually spend money. Automation and productivity tools aren’t a charity sector, there’s real commercial activity there. I had real experience. I won’t get bored.

    Most posts you’ll read about choosing a niche don’t work that way.

    They hand you 100 ideas and call it help. The result is more paralysis, not less, because now you have 100 doors and no key. What you need isn’t more options. You need a filter.

    The 3-Part Filter (My Specialized Filter)

    Choose the intersection of three things:

    • A topic you won’t quit in six months
    • A space where people spend money
    • Something genuinely useful you can say

    Not perfect at all three. Just clearing all three.

    Passion without commercial signal is a journal, meaningful for you, hard to build anything on.

    A profitable niche you have nothing real to say about produces thin content that doesn’t last. And if you pick something you’ll drop in three months, the whole project collapses before it has a chance to matter.

    Good-enough beats perfect here. You can narrow a niche. You can pivot later. What you can’t do is start a blog you won’t write.

    Before you get deep into niche research, it’s worth knowing what kind of blog you’re actually building – if you’re torn between a personal brand and a niche site, personal blog vs. niche blog is worth reading first, because that decision shapes how you apply the filter.

    Passion vs. Profit: You’re asking wrong question?

    Most beginners frame this as a binary: do I follow my passion, or do I follow the money?

    That’s not the question. The real question is whether you can clear both gates at once.

    The passion gate isn’t asking whether you’re obsessed with a topic. It’s asking whether you’ll still be writing about it when the traffic is flat and the results are slow – which, at the start, they will be.

    Consistency is the actual input. If you need excitement to keep going, pick something that generates it naturally.

    The profit gate isn’t asking whether you can slap affiliate links on anything. It’s asking whether the audience you’re writing for buys things.

    Personal finance is a good example – people spend money on budgeting apps, courses, and financial products.

    Vintage TV trivia isn’t – most people in that space aren’t buyers. You might love the topic. That doesn’t make it commercial.

    Here’s the reframe: passion vs. profit is the wrong axis. You’re looking for the overlap. If you can’t find it, you haven’t run out of passion or profit – you haven’t found the right niche yet.

    How narrow is narrow enough?

    Most beginners either go too broad (“health,” “finance,” “technology”) or get so specific they box themselves into a corner before they’ve written ten posts.

    The practical answer: start at the right level of specificity. Broad enough that you have six months of content ideas without stretching. Narrow enough that your ideal reader recognizes themselves immediately.

    “Personal finance” is too broad. “Personal finance for recent college graduates” works. “AI tools for small businesses” works. “Parenting” is too broad. “Screen-free activities for toddlers under 3” works – it’s specific without being a dead end.

    Running the Filter – Real Examples

    Here’s what the 3-part filter looks like applied:

    Passes all three gates:

    • Personal finance for beginners – high commercial intent, and if you’ve managed debt or saved through a tough stretch, you have something genuine to say
    • Productivity and tools – strong commercial signal, sustainable if you’re actually into systems
    • Budget travel – commercial (flights, gear, accommodation), and real experience beats researched advice every time

    Fails the filter:

    • Celebrity gossip – low commercial intent, and “something useful you can say” is near-zero unless you’re a journalist with insider access
    • Your hobby of collecting vintage video games – passion, but thin commercial signal and a small buyer pool

    The filter doesn’t tell you the right niche. It tells you whether a candidate niche is worth committing to. Run it on two or three candidates. The one that clears all three gates most cleanly is your answer.

    You can pivot. but that’s not a reason to stall.

    One reason beginners overthink the niche decision is they’re treating it like it’s permanent.

    It isn’t.

    Plenty of successful blogs started in one space and drifted – or deliberately shifted – as the writer’s authority and interests evolved.

    What you pick at the start sets your first six months of content. That’s it. If the niche turns out to be wrong, you’ll know it from the inside after writing it, not from a list you read before you started.

    The cost of picking wrong is months of learning. The cost of not picking at all is infinite.

    Apply the filter. Pick the one that clears all three gates. Start writing.

    If you’re still asking whether blogging is even worth attempting right now, that question is worth settling first – here’s the honest breakdown.

    Frequently asked common questions

    What is the best blog niche for beginners?

    There isn’t a single best niche, there’s a best niche for you, and it’s the one that clears all three gates: topic you won’t quit in six months, audience that spends money, something genuinely useful you can say. That said, niches with strong beginner commercial activity include personal finance, productivity and tools, budget travel, and home improvement. Any of these work if you actually have something real to contribute. None of them work if you don’t.

    Can I change my niche later?

    Yes, and more bloggers do than they admit. A niche isn’t a contract. If you’ve built content and an audience in one space, shifting takes thought – you’ll lose some readers, but it happens.

    The honest reason not to lean on this: “I can always pivot” becomes a reason to never commit. Pick something you can commit to now, knowing you have the option to adjust later. Don’t pick something you’re already planning to abandon.

    Should I pick a niche I’m passionate about or a profitable one?

    Both. Not one or the other.

    A niche that’s only passionate is a journal. A niche that’s only profitable produces content you’ll stop writing the moment results get slow.

    The filter exists precisely because you need both, plus something genuine to say. If you can’t find the overlap right away, keep looking. It exists.

    Once you’ve picked your niche, the next question is what to actually do with it. How to write a blog post is where to go from here.

  • Realistic Blogging Goals: What to Actually Expect in Year One

    Realistic Blogging Goals: What to Actually Expect in Year One

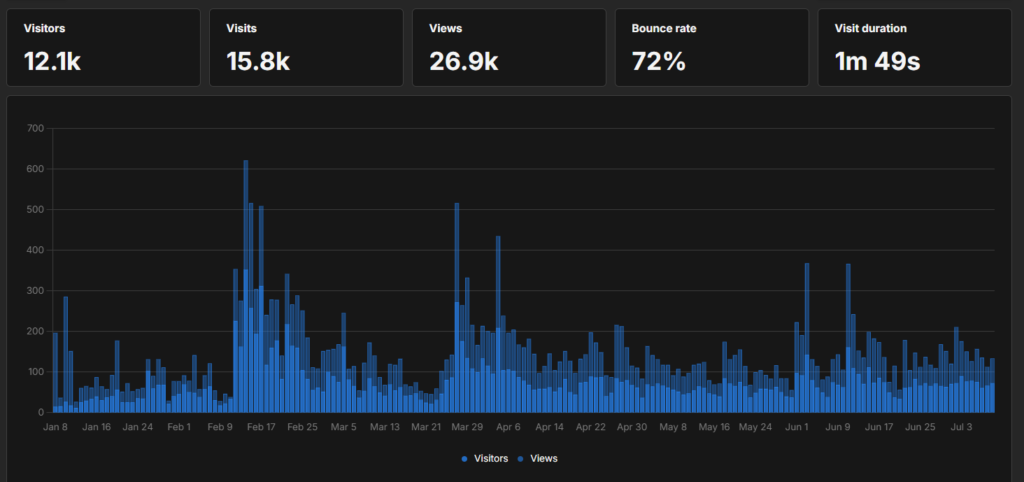
    When I launched my blog, the early weeks were super quiet – exactly the way everyone warns you they’ll be. And the traffic that did trickle in early? It didn’t come from Google. It came from going out and getting it myself.

    That’s year one. Not a launch that takes off.

    A slow ramp that stays flat longer than feels fair, then bends upward late, and the traffic you get before the bend is mostly traffic you went out and earned by hand.

    If you’re reading this because you’re staring at your own stats wondering am I behind, or is this normal or Do I need to change my perspective on Blogging goals? – that’s the exact question this post answers.

    The honest answer for your blogging goals

    Little traffic for the first few months, SEO starting to compound around months 6–12, and often little or no income until late in the year. The real win in year one isn’t money – it’s publishing 20–40 solid posts and building the habit.

    If you expect viral traffic or quick income, you’ll quit. Expect a slow, compounding curve and you’ll still be here when it pays off.

    The shape of a normal year one

    These are honest ranges, not promises – your niche, your effort, and how much you promote swing them hard. But this is the curve most new blogs actually ride:

    • Months 1–3: Near silence from Google. A new site has earned no trust, so search sends almost nothing, a trickle on a good day. Income is effectively zero. This is where most people quietly conclude they’re failing. They’re not. The engine just hasn’t warmed up.
    • Months 4–6: The first signs of life. A few posts start ranking for low-competition terms, search traffic creeps from a trickle to a thin but real stream, and maybe you see your first few dollars. Still mostly flat, but no longer dead.
    • Months 7–12: Compounding starts to show. Older posts climb, new posts rank a little faster because the site has some trust now, and traffic that crawled to hundreds can start reaching into the thousands. Income often shows up here too, but realistically it’s small. First-real-money territory, not replaces your 9-5 salary.
    6 months of blogging

    Now the part that’s the whole lesson. The traffic I had in those early months was above what a typical Google-only year-one blog sees – and the reason is simple: (check the above stats)

    I didn’t wait for search. I went and got the traffic myself, from communities like Reddit, facebook, bluesky and etc, while the SEO compounded quietly underneath.

    So if your search numbers look like “Months 1–3” up there, you are not failing. You’re dead-on the normal curve. You can choose to beat it the same way.

    Why it’s slow? and why slow isn’t the problem

    Blogging is slow by game with lots of hard work.

    Google has to learn it can trust your site, and that trust is earned over months of consistent, useful content – never bought with one big burst of effort.

    So the early curve stays flat no matter how talented you are.

    Slow isn’t the failure. Expecting fast is.

    When you walk in expecting traffic by week three, the normal slow ramp reads as proof you’re bad at this, and you quit during the exact stretch that was about to pay off.

    That’s the number-one way new blogs die; I broke it down in why most blogs fail in year one. Right expectations aren’t a nicety here.

    They’re the thing that keeps you in the game long enough to reach the compounding. (And if you’re still asking whether the payoff is even real, that’s is blogging worth it in 2026.)

    In year one, money is the wrong scoreboard

    Here’s the reframe that changes how the whole year feels: if you measure year one by income, you’ll feel like a failure for ten months straight because the income mostly isn’t there yet, and that’s normal, not personal.

    So measure the things you actually control and that actually build the asset:

    • Publish 20–40 solid posts. This is the real year-one target. It’s the content base everything else compounds on top of.
    • Build the habit. A publishing rhythm you can hold for a year is worth more than any single post that pops. The habit is the engine.
    • Learn your reader. By month twelve you should understand what your audience actually wants far better than you did on day one. That knowledge compounds too.

    Hit those three and the traffic and money arrive in year two — paid out of the trust you spent year one earning.

    “Am I behind?” – almost certainly not

    The anxious question under all of this is is my slow progress normal, or am I just failing? In nearly every case: normal. Barely any traffic for the first few months, near-zero early income, a handful of posts that go nowhere – that’s the standard experience, not a red flag.

    You’re only genuinely behind in one situation: you’ve stopped publishing, or you’re a year in with no consistent body of content.

    Slow growth on a blog you’re still feeding is just blogging working as designed. Stay in it.

    Frequently asked common questions

    How much traffic should a blog get in the first year?

    From Google alone, honestly very little for the first several months – often only tens to low hundreds of visits a month until SEO begins compounding around months 6–12. By the end of year one, somewhere from a few hundred to a few thousand monthly visitors is a realistic range, swinging heavily on niche and effort.

    You can go well beyond that by promoting outside Google – early on, communities like Reddit can bring in real readers while your search traffic is still building.

    When does a blog start making money?

    Usually late in year one at the earliest, and even then it’s typically small. Meaningful income generally lands in year two, once you have enough ranking content and traffic to monetize properly. Expecting real money in the first few months is the fastest route to disappointment, and quitting.

    Is slow blog growth normal?

    Yes , it’s the default. A blog’s traffic curve stays flat for months, then bends upward as SEO compounds. Slow early growth almost never means you’re failing; it means the engine hasn’t warmed up yet. The only real failure is quitting during the flat stretch, right before it starts to climb.

  • Should You Blog Anonymously or Use Your Real Name?

    Should You Blog Anonymously or Use Your Real Name?

    When I started The Owl Logic, I almost hid.

    I wasn’t a famous expert. Nobody knew who I was. And there I was, about to put my name on advice and publish it where anyone could read it and judge it.

    The thought was super-loud: who am I to be telling people anything? For a moment, blogging anonymously felt safer.

    A pen name. No face. Nothing to be embarrassed about if it flopped.

    I put my real name on it anyway, Shajid Shafee. And looking back, the urge to hide had almost nothing to do with privacy. It was fear of being judged dressed up as a privacy question.

    If that’s the feeling pulling you toward an anonymous blog, read this first because hiding is usually the wrong fix for it.

    The honest answer

    Use your real name if you want authority, networking, and a personal brand; you build credibility by showing up, not by waiting until you’re an expert. Blog anonymously or under a pen name only for genuine reasons privacy, a sensitive niche, or separating it from your career.

    That’s legitimate and just know anonymous blogs work harder to earn trust and are tougher to monetize as a personal brand.

    The question most posts skip

    Most articles on this topic go straight to a pros/cons table. Anonymous: privacy. Real name: trust. Pick your side.

    That’s not wrong. But it misses the reason most beginners are actually asking.

    The real driver isn’t privacy, it’s credibility anxiety.

    It’s the voice that says I haven’t earned the right to be seen yet. 

    Going anonymous is the brain’s attempt to solve that.

    You take your name off it, and if people judge the work, at least they’re not judging you.

    The question isn’t really “anonymous or real name?” It’s “do I have the right to say anything at all?”

    I know this because I felt it when I started.

    “I’m not an expert. Nobody knows me. Who am I to give advice?” That’s imposter syndrome, and anonymity feels like the cure.

    Here’s the problem: it isn’t. Anonymity doesn’t fix the fear. It just removes the thing that would’ve made the work pay off.

    Why hiding backfires

    A blog earns money and opportunity through trust (I always think blogging as a business).

    Not the kind of trust that comes from credentials or follower counts, the simpler kind.

    Readers need to believe there’s a real, accountable person behind what they’re reading.

    Take the name away and you’ve made that harder. A faceless site has to work twice as hard to feel credible, and most don’t get there.

    Then there’s the personal brand problem.

    The connections, the networking, the people who reach out because they read your stuff and want to hire you, collaborate with you, or follow what you do next – none of that happens to “Anonymous Blog #4192.”

    Your name is the thing those opportunities stick to. It’s the same reason I’d argue for building around a person rather than a pure content site – the person is the asset.

    Strip the person out and you’ve got a directory, not a brand. (I covered that tension in more detail in personal brand blog vs. niche blog.)

    The trade-off is worse than it sounds on paper. You avoid a little discomfort now and forfeit most of the upside later. That’s a bad deal.

    The right (I’d say proper) fix: document, don’t teach

    Here’s the reframe, and it’s the whole point of this post.

    You don’t need to be an expert to write.

    You just need to be one honest step ahead of the person reading.

    Most beginners assume they need to teach from authority. Which means waiting until they’re qualified. Which means never starting. Which means the blog never exists.

    The shift that actually works: stop trying to teach and start documenting.

    Write what you’re learning, not what you’ve mastered.

    “Here’s what I tried. Here’s what happened. Here’s what I’d do differently.”

    That’s not a lower standard, it’s harder to fake than performed expertise, and readers can smell the difference.

    You don’t wait until you’re an expert and then start publishing. You publish your way into authority.

    Consistently showing up, being honest about where you are, and writing one step ahead of someone who hasn’t started yet, that’s what builds trust.

    And it builds around you, not around a pen name that can’t shake a hand or do a podcast or take credit for a result.

    If you’re still weighing whether any of this is worth the effort at all, I covered that in is blogging worth it in 2026. Short answer: yes, but how you show up matters more than the volume.

    When anonymous or a pen name actually makes sense

    Anonymity isn’t always the wrong call. It’s the wrong call when fear is driving it. It’s the right call when the reason is real.

    Decide by your goal, not your nerves.

    • Privacy or safety is a genuine concern. You don’t want your full identity, your home life, or your family tied to a public presence. That’s a personal, legitimate choice, and the trade-off is worth it when the need is real.
    • The niche is sensitive. Mental health, personal finance struggles, relationship issues, adult topics, there are subjects where attaching your name creates real professional or social risk. A pen name makes sense here, and plenty of serious blogs operate this way.
    • You need to separate it from your career. You have a day job or an existing professional reputation you don’t want this blog surfacing next to, at least for now. Some people run two things separately until the blog is established, then decide whether to connect them.

    These are all valid reasons, and anonymous blogs can absolutely work. But go in clear-eyed: an anonymous blog earns trust more slowly, and it’s tougher to monetise around you specifically.

    You can still build authority around a brand name, it just has a lower ceiling if the plan ever involves anything personal-brand shaped such as consulting, speaking, a name people follow rather than a site they bookmark.

    The question to ask yourself honestly,

    “Am I hiding for a real reason, or am I hiding because I’m scared?” One of those gets easier with time. The other doesn’t.

    Common questions

    Can you blog anonymously and still make money?

    Anonymous works if you’re monetizing through ads, affiliates, digital products , income attached to the content. It breaks down if you’re monetizing yourself – consulting, direct offers, personal-brand deals. Those need people to know who’s behind the work. So: ad/affiliate model, anonymous is fine. Personal-brand model, use your name.

    Is it better to use your real name on a blog?

    Real name builds trust faster and turns the blog into an asset that follows you. Exceptions: genuine privacy needs, sensitive niches, or wanting distance from your career. Otherwise, if fear of judgment is the only thing stopping you, use your real name. The discomfort passes, the decision compounds.

    How do I blog anonymously safely?

    Pen name from day one. Domain privacy protection at registration (verify current cost with your registrar). Separate email and social accounts for the blog. Watch for identifying details in photos, locations, personal stories, one slip connects the dots. Only worth the discipline if you have a real reason to stay anonymous, not just nerves.

  • Should You Start One Blog or Multiple Blogs? (2026)

    Should You Start One Blog or Multiple Blogs? (2026)

    I’ve been venturing around the internet for over fifteen years.

    In that time I picked up experience across several different but connected things such as automation, productivity, the tools I build with, writing.

    On paper those look like separate niches.

    In practice they’re all the same thread: one person’s way of thinking about building things online.

    So when I started The Owl Logic, the choice was right in front of me. Spin up a separate blog for each topic, or put everything under one roof.

    I went with one domain and multiple categories – a personal brand, not a single-topic site. That was a deliberate decision.

    Most “one blog vs many” advice gives you a blanket rule and moves on.

    The real answer depends on a single test, and once you see it, the decision makes itself.

    The honest answer

    Start with one blog. As a beginner, running multiple sites splits your time, budget, and authority across blogs that each need years to grow – so they all stagnate together.

    If your interests connect by a common thread, put them as categories under one domain instead of separate sites; that concentrates your authority and still lets you cover everything.

    The only time separate blogs make sense is when your topics are genuinely unrelated — and even then, master one first before starting a second.

    Focus beats diversification when you’re new.

    Why one blog wins when you’re starting out

    Every blog is a separate mouth to feed. Its own domain, its own hosting, its own year-long climb to earn Google’s trust, its own pile of content before it ranks for anything.

    Run one and that’s already a serious commitment.

    Run three and you’ve tripled the workload while cutting the attention each one gets down to a third.

    The authority problem is worse, though.

    When you publish consistently on one site, every post strengthens the whole thing – your best articles lend credibility to your newest ones, and the domain as a whole gets stronger over time.

    Split that across three separate sites and each one starts from zero, alone, fighting for trust on its own.

    You’ve taken the one advantage that compounds and divided it by three. but it comes up with a risk well, I have explained why in below section.

    For a beginner, that math is how all three blogs stall at once.

    There’s a cost angle too. Three domains, three hosting plans, three sets of tools, or three free plans stretched thin.

    It adds up fast before any of them are earning. One domain lets you put every resource into one thing until it’s working.

    The real test: are your niches actually connected?

    Here’s where the blanket advice falls apart. “Always run one blog” isn’t the full answer either.

    The real question is whether your topics share a thread.

    Mine do. Automation, productivity, writing, the tools I use – they’re different categories, but they point at the same kind of person doing the same kind of thing: building something online, mostly solo, trying to be efficient about it.

    A reader who comes for one of those topics could plausibly care about the rest, because it’s all the same world.

    The thread isn’t the topic. It’s the perspective.

    (I went into this in depth over at personal brand blog vs niche blog – worth reading alongside this one if you’re trying to figure out what shape your site should take.)

    Now picture the opposite: a food recipe blog and a personal finance blog under one domain.

    Those don’t connect. There’s no shared reader, no shared thread, no perspective that makes them belong together.

    A visitor lands and can’t tell what the site is about. Neither can Google. That’s not a broad blog, that’s two unrelated projects stapled together.

    Those deserve separate homes.

    (But I got your thought here, Maybe food recipe blog, can create partial financial type of blog because shopping advice, and yeah that may sounds like a worth shot – Yes. PERSPECTIVE)

    So here’s the test: could one reader plausibly care about all of it?

    Yes → one blog with categories.

    No → separate projects.

    It’s a blunt test. That’s what makes it useful.

    One domain, many categories – how to do it

    If your topics pass the connection test, categories are the move.

    You cover everything you care about, all of it builds a single compounding pile of authority, and none of your energy escapes to a site that starts over from zero.

    The key is keeping the categories tight enough that the site still has an identity.

    A personal brand can hold several topics as long as you’re the obvious thread.

    Your perspective is what makes “automation” and “blogging” belong on the same domain, not a rigid topic rule, but your specific way of thinking.

    Lead with that, and the breadth becomes a strength instead of a smell.

    When multiple blogs actually make sense

    Two situations earn a second blog.

    The topics genuinely don’t connect

    If you’re serious about two worlds with no shared reader the food-and-finance problem separate sites are honestly the right call.

    Forcing them together dilutes both. The reader who finds your recipes doesn’t want a budgeting guide in their feed, and Google reads the mismatch. Build them separately.

    You’ve already mastered the first one

    Once a blog is established, earning, and running well, a second becomes a real option rather than a distraction.

    Not before. Starting three sites at once is three slow failures.

    Starting one, earning the right to expand, and then building a second from a position of experience and income – that’s how it actually works.

    Frequently Asked Common questions

    Can I have multiple niches on one blog?

    Yes, if they connect. The test is whether a single reader could plausibly care about all of them.

    If they share a thread (your topic, your audience, your perspective), run them as categories under one domain.

    That concentrates authority instead of splitting it.

    The only time multiple niches don’t belong together is when they’re genuinely unrelated – no shared reader, no shared thread.

    Is it bad to run multiple blogs?

    For a beginner, usually yes. Each blog needs its own time, budget, and years of authority-building, so running several splits your effort and they tend to stall together.

    Multiple blogs can make sense once you’ve mastered one and have the bandwidth, or when your topics are so unrelated they genuinely can’t share a site.

    How many blogs should a beginner start?

    One. Put all your time, energy, and content into a single site until it’s working.

    Cover multiple interests as categories under that one domain if they connect.

    A second blog is something you earn by making the first one work – not something you start alongside it.

  • Why Most Blogs Fail In Year One (And How to Avoid It)

    Why Most Blogs Fail In Year One (And How to Avoid It)

    I failed at blogging for years. Not once or twice like 10+ blogs, launched with some version of enthusiasm, pushed for a few weeks or a few months, watched nothing happen, walked away.

    I’d done it so many times I’d basically forgotten what a blog was even for. It became a thing I started and abandoned, not a thing I ran.

    Then I started one more blog. And for the first time, it didn’t die but it grew.

    Nothing about me changed in between.

    I didn’t get smarter, better at writing, or more talented.

    I changed one thing: I stopped waiting for Google to notice me and went and got the traffic myself, mostly from social channels like Pinterest, Quora, Reddit and etc, while the SEO slowly started to compound in the background.

    And I didn’t quit.

    That’s the entire difference between the blogs that failed and the one that didn’t.

    That’s what this post is really about. Because most blogs don’t fail because the person wasn’t good enough.

    They fail for a reason that’s far more boring, and far more fixable.

    The honest answer

    Most blogs fail for one core reason:

    People quit in the first 6–12 months, right before SEO traffic compounds. It’s almost never talent.

    Under that sit the fixable causes, no clear niche, ignoring what searchers actually want, posting inconsistently, and never promoting outside Google.

    The fix is two-part: treat blogging as a 12–18 month slow game so you don’t quit during the slow stretch, and drive early traffic yourself, relevant communities, places your readers already are – instead of sitting and waiting for Google to find you.

    Survive the compounding gap and you’ve already beaten most blogs.

    The real reason: you quit right before it works

    Here’s the part nobody frames honestly. A new blog earns almost nothing for months. Not because the content is bad. Because Google has to learn to trust it, and that trust builds slowly – over a year, not a weekend.

    Months 1 through 6 feel like shouting into an empty room.

    You publish, you wait, not much happens.

    Then months 6 through 12 arrive, and that’s where most people, exhausted and quietly convinced it’s never going to work, walk away.

    The cruel part: they quit right before the compounding kicks in.

    the hockey stick journey in a nut shell in blogging

    The traffic curve on a blog isn’t a straight line. It’s flat, flat, flat — then it bends upward (like a hockey stick).

    That bend happens somewhere in the 9–18 month window for most sites, depending on how competitive the niche is and how consistently they’ve been publishing.

    Quit during the flat part and you’ll swear blogging is dead.

    It wasn’t dead. You left early.

    So the thing everyone calls “blogging failure” isn’t really a talent problem. It’s a survivorship problem.

    The blogs that “made it” aren’t necessarily better, they’re the ones still standing when the curve finally bent.

    I wrote about this specific dynamic in is blogging worth it in 2026, the short version is that it works, if your approach does. But approach starts with not quitting.

    The fixable mistakes sitting underneath

    Quitting is the meta-reason.

    But people quit because of things that are completely fixable, problems that make the slow stretch feel hopeless when they didn’t have to.

    No clear niche

    A blog about everything is a blog about nothing – to readers and to Google.

    You can’t build trust with an audience that doesn’t know what you’re about, and you can’t rank for topics you haven’t earned authority in.

    Pick a lane narrow enough that someone can actually describe what your blog is for in one sentence.

    Ignoring search intent

    This is writing what you feel like instead of what people actually search for.

    If nobody’s looking for your topic, nobody finds it. Ranking in search isn’t about writing quality alone, it’s about matching real questions that real people type and then answering them better than what’s currently sitting at the top.

    Most of how to write a blog post that ranks comes down to this one thing.

    Inconsistency

    Three posts in week one, then silence for a month, then a burst, then silence again.

    The compounding only works if you keep feeding it. Publishing is the input; traffic is the delayed output.

    A steady, modest pace, one post a week, even one a fortnight, beats a heroic burst followed by a ghost town every time.

    No promotion

    Publishing and waiting for Google is the slowest possible path, especially in year one when Google doesn’t trust you yet.

    You need to bring the traffic yourself while the SEO builds.

    Reddit, forums, communities, email, places where your future readers already are.

    None of these require talent. They require knowing they’re the traps before you fall into them.

    How to avoid it (what actually worked)

    Two things kept The Owl Logic alive where my earlier blogs died. Neither of them was a secret.

    Commit to the timeline before you start. I decided before launching that this was a 12–18 month game, not a 12-week one.

    That single expectation change is what stops you from quitting in month 8 when results feel slow.

    You can’t be crushed by slow results you already planned for. The people who quit aren’t weaker, they just expected a different timeline.

    Set the right one at the start and the slow stretch stops feeling like failure.

    Drive your own traffic instead of waiting. This is the bigger one.

    A brand-new blog usually sees near-zero traffic for months, but you don’t have to accept that.

    I went where my readers already hang out, Reddit threads, conversations already happening around the topics I was writing about, and brought them in directly.

    That early traffic does two jobs at once: it gives you real readers and real momentum (which is what actually keeps you going), while Google slowly warms up to your site in the background.

    By the time the SEO starts compounding, you’re not starting from zero. You’ve already got proof the thing works.

    You don’t have to white-knuckle your way through a silent first year.

    Manufacture the early signs of life yourself, stay long enough for the compounding to take over, and you’ve already done what most bloggers couldn’t.

    Frequently asked common questions?

    What percentage of blogs fail?

    Most blogs die from neglect, not competition – the person just stops.

    There’s no reliable stat for how many (online numbers are mostly unsourced guesswork), but the large majority quit within the first year. That’s a fixable problem, unlike losing a search ranking war.

    Why do new bloggers quit?

    Because the early months demand real effort while paying almost nothing back, and the compounding that makes blogging worth it doesn’t show up until months 6–12.

    People quit during the flat stretch – right before the curve bends. Add in unrealistic expectations (expecting traffic in week three, expecting Google to find you immediately) and the gap between hope and reality is what burns people out.

    It’s rarely that the blog was bad. It’s that they didn’t know how the timeline actually worked.

    How long before a blog gets traffic?

    From Google alone, often 6–12 months before meaningful, compounding search traffic arrives.

    Sometimes longer in competitive niches.

    But you don’t have to wait that long for any traffic – by promoting in relevant communities such as reddit, quora, facebook from from day one, you can pull real readers in the first few months while SEO builds underneath.

    That early traffic matters more than most people think, because it’s often what keeps a new blogger going long enough to reach the compounding stage. The two strategies aren’t competing. They’re layered.

  • The PARA Method Explained (With Real Examples)

    The PARA Method Explained (With Real Examples)

    Most people organize their files and notes the same way they were taught to organize a school binder.

    • Marketing stuff in the marketing folder.
    • Health stuff in the health folder.
    • Work stuff in the work folder.

    It feels logical. It mirrors how a physical filing cabinet works.

    The problem shows up the moment you need to actually use something.

    You’re working on a product launch and the relevant information is scattered, some in a “marketing” folder, some in a “clients” folder, some in a “2024” folder.

    You know it exists. Finding it takes longer than it should.

    Tiago Forte’s PARA method fixes this by flipping the organizing question. Instead of asking what is this about, it asks how actionable is this right now.

    That single shift is what the whole system is built on.

    What PARA actually is

    Para top level

    PARA is an organizational framework for your digital life. It stands for Projects, Areas, Resources, and Archives – four categories that, between them, can hold everything you’ll ever need to organize.

    It works in any tool: Notion, Obsidian, Google Drive, Apple Notes, plain folders on your desktop.

    The structure is the same regardless of where you implement it.

    Here’s the short version:

    • Projects – things you’re actively working on right now, with a clear finish line
    • Areas – ongoing responsibilities you maintain over time, with no finish line
    • Resources – topics you’re interested in and might reference later
    • Archives – anything from the above three that’s no longer active

    That’s the entire system. Four folders at the top level, and everything else lives inside them.

    Breaking down each category

    Projects

    para projects

    A project has two things: a goal and a deadline. When it’s done, it’s done.

    Examples of actual projects:

    • Launch the new pricing page by end of month
    • Write and publish three blog posts this quarter
    • Set up automated invoice reminders before Friday
    • Renovate the spare bedroom

    What makes something a project isn’t its size – it’s that you’re actively working on it right now and it has a finish line. Once it’s complete, it moves to Archives.

    Areas

    Para Areas

    An area is an ongoing responsibility with no end date. You don’t complete it. You maintain it.

    Examples of actual areas:

    • Health (you’re never “done” with your health)
    • Finances (ongoing, always)
    • Team management (as long as you have a team)
    • The Owl Logic (a blog you maintain indefinitely)

    The distinction matters more than it sounds.

    A lot of people set up PARA, feel good about it for two weeks, and then quietly stop using it.

    The most common reason: they put areas inside projects. “Health” becomes a project. “Marketing” becomes a project.

    But they have no finish line, so they never get archived, never feel done, and the whole system starts feeling cluttered and unresolved.

    If something will still exist in your system a year from now, it’s an Area, not a Project.

    Resources

    Para resources

    Resources are things you find useful or interesting that don’t belong to a current project or area, but you want to keep for future reference.

    Examples of actual resources:

    • A collection of articles about copywriting frameworks
    • Notes from a course on SQL you took six months ago
    • A list of tools you evaluated but didn’t pick yet
    • Bookmarks on automation patterns you want to try

    Resources are organized by topic, not by actionability.

    They’re the closest thing in PARA to a traditional folder structure, but they’re clearly separated from your active work, which keeps them from polluting your Projects and Areas views.

    Archives

    Para archives

    Archives is where things go when they stop being active – not when they stop being useful.

    • A completed project gets archived.
    • An area you’re no longer responsible for gets archived.
    • A resource topic you’ve lost interest in gets archived.

    The key is that archived doesn’t mean deleted. It means out of your active view until you need it again.

    This is what makes PARA sustainable long-term.

    Most organizational systems collapse because nothing ever leaves, everything just accumulates until the system becomes unnavigable.

    In PARA, archiving is a first-class action, not an afterthought.

    Organize by actionability is the core idea

    The reason most folder systems fail isn’t laziness. It’s that organizing by topic creates the wrong mental model for knowledge work.

    When you file something under “marketing,” you’ve described what it is. But you haven’t told yourself anything about what to do with it, or when.

    PARA organizes by how active something is right now.

    • Projects are the most active.
    • Areas are always-on but lower urgency.
    • Resources are background.
    • Archives are dormant.

    This maps directly to how your attention actually works – you need different things at different times, and the system makes that visible.

    Forte describes it as organizing for action, not for storage. The folder structure is a reflection of your current priorities, not a filing cabinet for past decisions.

    Where people get confused

    Confusing Projects and Areas is by far the most common mistake. Here’s a quick test:

    Ask yourself: can this be completed?

    • “Fitness” – can’t be completed. That’s an Area.
    • “Run a 5K in under 30 minutes by March” – has a finish line. That’s a Project.
    • “The Owl Logic” – ongoing blog, no end date. That’s an Area.
    • “Write and publish the PARA method article” – specific deliverable. That’s a Project.

    If you can’t imagine what “done” looks like, it’s an Area. If done is obvious, it’s a Project.

    Treating Resources as a junk drawer is the second common failure. Resources should be organized by topic with enough structure that you’d actually find things again. If you’re dumping everything loosely into Resources because you’re not sure where else it goes, the folder becomes useless fast.

    Over-engineering the setup before you have anything to organize.

    Forte’s own advice here is useful: don’t migrate everything at once. Start with what you’re working on right now, set up Projects and Areas for those things, and let the system fill in naturally over time.

    The people who try to reorganize their entire digital life in a weekend almost always abandon it by week three.

    A practical example: solo builder using PARA

    Here’s what a realistic PARA setup might look like for someone building and running a small SaaS product alongside a blog:

    Projects

    • Ship v2.0 release before end of June
    • Write 4 blog posts for Q2
    • Set up email onboarding sequence

    Areas

    • Product (ongoing development and maintenance)
    • Blog (content, SEO, growth)
    • Finances (invoicing, subscriptions, taxes)
    • Health

    Resources

    • SaaS pricing research
    • Email marketing examples
    • Automation tools I’m evaluating
    • SEO frameworks and notes

    Archives

    • v1.0 launch materials
    • Old client proposals
    • The course notes from that SQL tutorial

    Notice that “Blog” is an Area, not a Project. It’s ongoing. But “Write 4 blog posts for Q2” is a Project – specific, time-bound, completable. Both exist in the system, at different levels, which is exactly the point.

    Is PARA worth setting up?

    For most people, yes – with one caveat.

    PARA is genuinely useful if you’re managing multiple responsibilities simultaneously and your current system (or lack of one) means things fall through the cracks or take too long to find.

    The actionability-first structure works well for knowledge workers, solo builders, and anyone juggling more than two active projects at a time.

    It’s less useful if your work is highly task-list-driven with little reference material, or if you’re already using a system that works for you.

    PARA isn’t the only valid approach, and the best system is always the one you’ll actually maintain.

    The friction of setting it up is low.

    The real investment is the habit of deciding – every time something new comes in which of the four categories it belongs to.

    That decision-making discipline is the actual skill PARA teaches. The folder structure is just the scaffolding.

    If you’re building something independently and managing your own time, that discipline compounds fast.

    It’s related to a broader problem most solo builders run into – why solo builders build forever and never launch.

    Getting clear on what’s a Project versus what’s just an ongoing Area is part of what helps with that.

    For how to think about organizing your working environment at the tool level, the Obsidian folder structure post covers how PARA maps specifically to a note-taking setup if that’s the direction you want to go.

  • The Zettelkasten Method – Explained (With a Real Example)

    The Zettelkasten Method – Explained (With a Real Example)

    Most people have a note-taking problem that looks like a storage problem.

    They open Notion after three months and find 200 saved articles, 40 half-finished bullet lists, and a folder called “Ideas” with nothing actionable inside.

    The notes are all there. They just don’t connect to anything.

    They don’t generate new thinking. They sit.

    The Zettelkasten method is a direct response to that.

    It was built to solve exactly this, not to store information better, but to make stored information useful over time.

    What Is the Zettelkasten Method?

    The Zettelkasten method is a personal knowledge system where every note contains exactly one idea, written in your own words, and explicitly linked to related notes.

    “Zettelkasten” is German for “slip box”

    The method works because of two rules that most note-taking ignores: atomic notes (one idea per note, nothing more) and deliberate linking (every note connects to at least one other). Over time, these connections form a network of your own thinking – one that surfaces ideas you’d forgotten and generates new ones you hadn’t considered.

    You don’t need index cards. The same principles work in Obsidian, Logseq, Notion, or a plain text folder.

    The Three Types of Notes You Actually Need

    There are three note types worth knowing before you get started.

    • Fleeting notes (fast, throwaway captures)
    • Literature notes (one source summarized in your own words)
    • Permanent notes (one-fully formed idea, written clearly enough to make sense)

    The ratio matters – you’ll have lots of fleeting notes, fewer literature notes, and even fewer permanent notes.

    That bottleneck is intentional.

    If you want the full breakdown of what each type looks like in practice, read How to Take Smart Notes (That You Actually Revisit)

    How to Write Your First Permanent Note (With a Real Example)

    This is the step every beginner’s guide describes but none actually shows.

    Here’s what a real permanent note looks like.

    Say you read a chapter on decision-making under uncertainty and one idea stuck: that most bad decisions come from confusing the quality of a decision with the outcome of a decision.

    A decision made with bad information can get a lucky outcome.

    A decision made with solid reasoning can still go wrong.

    Here’s what a permanent note for that idea looks like:

    Note ID: 2026-06-13
    Title: Good decisions and good outcomes are not the same thing

    The quality of a decision is determined by the reasoning and information available at the time it was made – not by what happened afterward.

    A coin flip that lands heads is not evidence that flipping coins is a good strategy.

    Judging past decisions purely by outcomes makes it impossible to learn from them accurately.

    This matters for post-mortems: the goal isn’t to blame bad outcomes, it’s to find bad reasoning.

    Links: [[Hindsight bias]], [[How to run a useful post-mortem]]
    Source: Annie Duke, Thinking in Bets, Chapter 2

    Notice what’s in there: the idea in your own words, why it matters, and where it connects.

    Notice what’s not there: bullet points copied from the book, vague summaries, or quotes you highlighted but didn’t think about.

    Writing a permanent note like this takes 5–10 minutes.

    That’s the friction. It’s also the point, the thinking happens during the writing.

    How to Link Notes (and Why That’s the Whole Point)

    The links in a Zettelkasten are not tags or categories.

    They’re specific connections between two ideas, with a reason for the connection.

    In Obsidian, you write [[Note title]] to create a link. In Logseq, it’s the same syntax.

    In a paper system, Luhmann wrote the ID of the related card directly on the current one.

    The tool doesn’t matter – the thinking behind the link does.

    When you write a new permanent note, ask: what else in my system does this connect to? Not “what folder does this belong in?” but “what other specific idea does this relate to, and why?” If you can’t name another note, that’s fine – but look.

    The habit of searching your existing notes before filing a new one is what keeps the system from becoming another graveyard.

    Over time, notes with many incoming links naturally become your most developed thinking – the ideas you’ve returned to, built on, and connected widely.

    Those clusters become starting points for writing, for projects, for decisions.

    If you’re using Obsidian and want to see how folder structure interacts with this kind of linking, the post on Obsidian folder structure covers how to set that up without overcomplicating it.

    What Tool Should You Use?

    The honest answer: it mostly doesn’t matter, and picking the wrong one is less costly than not starting.

    • Obsidian is the most popular choice for Zettelkasten right now. It stores everything as plain text files on your own computer, supports bidirectional linking natively, and has a graph view that shows your note connections visually. Free for personal use.
    • Logseq is similar but built around a daily journal structure. Good if you prefer a more linear capture flow before processing into permanent notes.
    • Notion works, but the linking is clunkier and the structure pushes you toward databases rather than connected ideas. Fine if you’re already there.
    • Paper index cards still work exactly as Luhmann used them. Slower, but the physical act of writing forces you to think before you write.

    Start with Obsidian if you have no preference. If you’re already in Obsidian and want to see how it handles visual note-mapping, the post on Obsidian + Excalidraw shows a useful extension for that.

    The One Mistake That Kills Most Zettelkastens

    Collecting instead of connecting.

    Most people set up Obsidian, start clipping articles, saving highlights, and bookmarking pages, and call that their Zettelkasten.

    It isn’t. That’s a well-organized reading list.

    The Zettelkasten only becomes useful when you process what you capture: when you take a fleeting note and ask “what do I actually think about this?” and then write a permanent note that answers that question.

    And then link it to something else you’ve already written.

    If your system has 200 notes and you’ve never written a permanent note from scratch, you have a collection.

    The method starts when you begin converting that collection into connected thinking – one note at a time.

    The fix is simple: cap your capture. For every five articles you save, write one permanent note. That ratio forces processing.

    It also makes you pickier about what you save in the first place.

    How to Actually Start Today

    You don’t need to understand the full system before writing your first note. Here’s the shortest path:

    1. Open whatever app you have – Obsidian, Notion, even a text file.
    2. Think of one idea you’ve read or thought about recently that actually stuck with you.
    3. Write it out in your own words. One idea. Two to four sentences. No quotes.
    4. Add one link or question: what does this connect to, or what does it make you want to think about next?
    5. Save it. That’s your first permanent note.

    Do that three times this week. Not thirty. Three. The system builds from real notes, not from a perfect setup.

  • The Complete Beginner’s n8n Guide to Workflow Automation

    The Complete Beginner’s n8n Guide to Workflow Automation

    n8n is one of the few genuine bits of magic I’ve experienced in automation.

    The problem is, when I started learning it, there weren’t many resources beyond YouTube videos, and a lot of those built workflows with 50 nodes for something that could’ve been done in 10.

    n8n keeps growing too, and I wouldn’t be surprised if some of what takes 10 nodes today gets done in 5 a year or two from now.

    There wasn’t enough material out there for someone without a technical background, so I taught myself everything from scratch.

    I documented all of it in Obsidian, every way to install n8n, Docker, npm, all of it, every core module I had to actually master, every dark corner nobody bothered writing about.

    I went through all of it to automate my own businesses.

    That’s why this guide exists.

    Not another video where someone tells you to comment “workflow” and DM them for the file.

    Not another overcomplicated tutorial stacking nodes you don’t need.

    This is everything I learned the hard way, laid out in the order you’ll actually need it. Consider this your one source of truth to get onboard with n8n properly.

    What Is n8n? The Short Answer

    n8n is an open-source workflow automation tool that connects apps, APIs, and AI models through a visual, node-based editor, no code required.

    You build a workflow by chaining nodes together:

    • a trigger node starts it (a schedule, a webhook, a new row in a spreadsheet),
    • action nodes do the work (send an email, call an API, update a database),
    • logic nodes control which path the data takes (conditions, loops, merges).

    You can self-host n8n for free on your own server, or use n8n Cloud if you don’t want to manage infrastructure yourself.

    Getting comfortable with n8n comes down to five things, in order:

    • installation,
    • the core building blocks,
    • credentials,
    • error handling
    • connecting real services.

    Everything else builds on top of that foundation.

    Should You Use n8n? Where It Actually Fits

    Before you install anything, it helps to know what you’re getting into.

    n8n sits between two extremes.

    On one side you’ve got tools like Zapier, dead simple, but expensive once you scale past a handful of zaps, and limited in how much logic you can build into a single flow.

    On the other side is custom code, total control, but you’re writing and maintaining everything yourself.

    n8n gives you most of the control without most of the coding.

    You still get a visual canvas, but you can drop in actual JavaScript when a node can’t do what you need, build conditional branches, loop through datasets, and call any API directly.

    If you’re trying to decide between n8n and Make specifically, since they’re the two closest competitors, I broke that comparison down here.

    This guide assumes you’re starting from zero.

    If you already know what n8n is and just want to get it running, skip ahead to installation.

    Step 1: Get n8n Running, Self-Hosted vs. Cloud

    Before you install anything, you need to make one decision: self-hosted or Cloud.

    Self-hosting means running n8n on your own server, a VPS, a Raspberry Pi, your own machine. It’s free, you control your data completely, and there’s no execution limit.

    But it also means you’re the one keeping the server updated, handling SSL, and fixing it when Docker decides not to cooperate.

    I cover the full decision framework, cost, control, and when each option actually makes sense, in this guide to choosing between n8n self-hosted and Cloud.

    If you’re not technical, or you just don’t want infrastructure to be your problem, n8n Cloud removes that entire layer.

    You sign up, you get the same workflow editor, and updates, backups, and uptime become someone else’s job.

    For most non-technical beginners, that trade is worth it, the hours you’d spend keeping a server alive are better spent actually building workflows.

    Once you’ve made that call, installing the self-hosted version, Docker or npm, Windows or Mac, is covered step by step in my 2026 install guide.

    I walk through both methods since Docker trips up more beginners than it should.

    Step 2: Build Your First Workflow

    Once n8n is running, resist the urge to immediately build something ambitious.

    Build something tiny first, a manual trigger that creates a piece of data and shows it back to you. That’s it.

    first workflow

    I walk through that exact first build, step by step, in my hello-world workflow guide.

    It takes about five minutes, and it’s the fastest way to get comfortable with how the canvas, nodes, and execution panel actually work before you add any real complexity.

    Step 3: Understand How n8n Actually Thinks

    Every workflow in n8n breaks down into the same three pieces:

    • a trigger that starts things,
    • action nodes that do the actual work,
    • logic nodes that control which path the data takes.

    Data flows from node to node as JSON, and the next node always receives whatever the previous one output.

    sequential order in n8n

    This is the single most important concept to understand before you build anything real, not memorize, understand.

    I go through every node type, what each one does, and a hands-on exercise to watch data transform in real time in my full breakdown of n8n workflows, nodes, and data flow.

    Step 4: Connect Your Credentials

    n8n needs permission to act on your behalf, to send emails through your Gmail, post in your Slack, write to your Google Sheet.

    That permission comes from credentials, and setting them up correctly the first time saves you from re-authenticating every other node you build.

    credentials in n8n

    My credentials and service setup guide covers exactly how to connect the services you’ll use constantly.

    And if you’ve already set up credentials and noticed they keep expiring every week or two, that’s a specific OAuth token problem with a specific fix, I cover it here.

    Step 5: Plan Before You Build

    The biggest mistake I see beginners make isn’t a technical one, it’s opening the canvas before they know what they’re actually trying to build.

    You end up with workflows that work in testing and fall apart the moment real data hits them.

    Before you build anything beyond hello-world, spend ten minutes mapping out the trigger, the steps, and the failure points on paper first.

    I lay out the exact process I use in this guide to planning an n8n workflow before you touch a single node.

    Step 6: Give Your Workflows a Brain

    Most real automation isn’t a straight line, it’s a decision tree.

    Send a different email if the order is over $100.

    Skip a step if a field is empty.

    n8n IF node data flow sketch diagram

    Route a message differently depending on which channel it came from.

    That’s what IF and Switch nodes are for. I cover both, with working examples, in this guide to building conditional logic in n8n.

    Step 7: Work With Real Data

    At some point you’ll need to reference data from a previous node, combine two fields, or transform a value before it’s used somewhere else.

    That’s what expressions are, and they trip up almost every beginner the first time they see the syntax.

    I wrote the guide I wish existed when I was learning this: a complete, practical walkthrough of n8n expressions, from the basics to the patterns you’ll actually reuse.

    Step 8: Process Things in Bulk

    Sending one email is easy.

    Sending the same email to 500 contacts without crashing your workflow or hitting a rate limit is a different problem entirely, and that’s where loops come in.

    Loops aren’t something you need on day one, but you will need them eventually. I cover exactly when you actually need one, and when you don’t, in this guide to using n8n’s Loop Over Items node.

    Step 9: Handle It When Things Break

    Every workflow you build will eventually fail.

    An API will go down for twenty minutes, a website will change its structure, a field you expected will come back empty.

    That’s not a sign you did something wrong, it’s just what happens at scale.

    What separates a fragile workflow from a production-ready one is whether it can detect the failure, recover, and keep running.

    I cover the three techniques that handle 90% of real-world error scenarios in how to handle errors in n8n like a pro.

    Step 10: Trigger Workflows From Outside

    So far, everything’s been triggered manually or on a schedule. Webhooks flip that, instead of your workflow checking if something happened, the other app tells you the moment it does.

    I walk through setting one up for real, including sending WordPress form submissions straight into Google Sheets and testing it locally with ngrok, in my full guide to webhooks in n8n.

    Step 11: Talk to Any Service

    Not every service has a dedicated n8n node.

    When that happens, the HTTP Request node is what connects you to literally anything with an API.

    It’s more advanced than the nodes you’ve used so far, and I’d genuinely hold off on it until you’re comfortable with the basics above.

    When you’re ready, my guide to the HTTP Request node walks through connecting to any API, step by step.

    Step 12: Connect the Tools You Already Use

    This is where n8n starts paying for itself, connecting the apps you’re already using every day.

    Pick whichever one matches your actual stack and start there, you don’t need all four.

    Step 13: When a Spreadsheet Isn’t Enough

    Google Sheets and Airtable work great until your data gets relational, or you need real queries, or you’re processing thousands of rows and Sheets starts choking.

    That’s the point where I moved to Supabase, Postgres without having to manage Postgres yourself.

    I cover the full integration, from setup to actual queries, in my n8n and Supabase guide.

    Real Workflows Worth Building First

    Once the fundamentals click, the fastest way to actually learn n8n is to build something with a real, immediate use. Two places I’d start.

    A follow-up email sequence is one of the most useful first “real” workflows you can build, it touches triggers, waits, and conditional logic all at once.

    If you’re still looking for ideas, I put together 50 boring, repetitive tasks you can automate with zero coding.

    Most beginners find at least five of these apply directly to something they’re already doing manually.

    Keep Things Reliable at Scale

    Once your workflows are doing real work, two problems show up that beginners rarely see coming.

    The first is rate limits, most APIs cap how many requests you can send per minute, and exceeding that breaks your workflow.

    I cover throttling and retry logic here, plus a more advanced setup using Upstash Redis as a dedicated rate limiter if you’re running multiple workflows against the same API.

    The second is workflows getting too big and tangled to maintain.

    Sub-workflows solve that by letting you build reusable, modular pieces instead of one giant canvas.

    And once you’ve built workflows you’d be upset to lose, back them up. I run mine through GitHub automatically, here’s the exact setup.

    Add AI to Your Workflows

    This is where n8n’s growth has been fastest.

    AI agent workflows let you build something that doesn’t just follow fixed steps, it reasons about what to do next.

    If you’re ready to build your first one, I cover the full step-by-step build in this guide to AI agent workflows in n8n.

    Two nodes you’ll run into immediately: the Simple Memory node, which lets your agent actually remember context across a conversation, and the Summarization Chain, which condenses long content before you feed it to a model.

    Before you start, read what I wish I knew before building my first AI agent in n8n, it’ll save you from a few mistakes I made the hard way.

    Is n8n Still Right for You?

    By this point you’ve got enough n8n under your belt to know whether it’s actually the right tool for what you’re trying to do.

    If you came from Zapier and you’re wondering whether the switch was worth it, here’s the honest comparison.

    And if n8n still doesn’t feel right after everything above, I tested through 50+ workflows before settling on my actual stack, here are the five alternatives actually worth considering.

    I’ll also say this honestly: a lot of people give up on n8n in the first few weeks, and it’s usually for the same handful of reasons.

    I wrote about exactly why, and how to not be one of them, here.

    Final Thoughts

    I’m not going to pretend n8n is simple.

    It isn’t, not at first.

    But the curve is shorter than it looks from the outside, and most of what makes it feel hard is just not knowing which of the hundreds of nodes you actually need for your specific problem.

    That’s really what this guide is, the map I wish someone had handed me when I started.

    Pick the section that matches where you’re stuck right now, go deep on that one guide, then come back here for the next step. Every workflow you build from here gets easier than the last one.

  • How to Take Smart Notes (That You Actually Revisit)

    How to Take Smart Notes (That You Actually Revisit)

    Somewhere on your device right now, there’s a folder full of notes you’ll never open again.

    Maybe it’s a Notion workspace with colour-coded databases.

    Maybe it’s a pile of markdown files.

    Maybe it’s voice memos you were absolutely going to transcribe. The notes exist.

    You can see them. But you don’t go back to them, and some part of you already knows that.

    This isn’t a discipline problem.

    It’s a design problem.

    Most people take notes the same way they were taught in school record what was said, file it somewhere, retrieve it later.

    That system made sense when the goal was passing an exam.

    It doesn’t work when the goal is building on ideas over time.

    Smart notes work differently. The point isn’t storage. It’s thinking.

    What makes a note “smart”

    A smart note does one thing a regular note doesn’t: it means something when you read it six months later, without needing the original context to make sense of it.

    how to take smart notes

    Most notes fail this test. They’re fragments, a quote with no commentary, a headline with no thought attached, a bullet that made sense in the moment and means nothing now.

    You wrote it for your present self. Your future self has no idea what to do with it.

    A smart note is written for future you.

    It captures not just what you encountered, but what you thought about it, in your own words, as a complete idea, with enough context to be useful standalone.

    That’s the whole principle. Everything else is implementation detail.

    The three types of notes that actually work

    Sönke Ahrens, in How to Take Smart Notes, breaks note-taking into three types. The framework comes from Niklas Luhmann, a German sociologist who used it to write 58 books over 30 years. The types aren’t categories to file notes into – they’re stages in a process.

    Fleeting notes

    Fleeting notes are raw captures.

    • A thought in the shower.
    • A line from a podcast you’re half-listening to.
    • A sentence that struck you while reading.

    These go anywhere – your phone, a scrap of paper, a quick voice memo. They’re temporary.

    Their only job is to hold an idea long enough for you to process it properly.

    You should clear them daily or weekly.

    Most people’s note-taking stops here.

    They capture and never process. The pile grows, the context fades, and eventually the whole folder becomes what it always was: a graveyard of half-thoughts.

    Literature notes

    what you write after engaging with a source, a book, an article, a talk.

    The rule is simple:

    • write in your own words. Not a copy of what the author said. Your interpretation of it. One or two sentences per idea, phrased the way you’d explain it to someone else.

    Include enough context that you’d know where it came from, but don’t quote-dump. The act of rephrasing is where understanding actually happens.

    Permanent notes

    the ones that matter long-term.

    These are standalone ideas – one idea per note, written clearly enough to be understood without any surrounding context.

    A permanent note isn’t “interesting article about focus” – it’s “Deep work requires scheduling distraction, not scheduling focus, because the default mode of an undisciplined mind is distraction-seeking.” Specific. Arguable. Your voice.

    Permanent notes connect to other permanent notes.

    That’s what makes them useful over time.

    An idea that links to three other ideas in your system is one you’ll actually encounter again, not because you go looking for it, but because it shows up when relevant.

    Why you stop revisiting notes (and what fixes it)

    There are two reasons notes stop getting revisited, and they compound each other.

    The first is context collapse

    You wrote the note when the context was live in your head.

    Three months later, the context is gone.

    The note says “look into this more”, look into what more? It says “great framework for X”, which framework, what was X? Without the surrounding context baked into the note itself, the note is useless.

    You’d need to re-read the source to understand your own capture.

    The fix is writing notes as if you’re leaving them for a stranger.

    Not a cryptic reminder to yourself, a full thought, self-contained. This takes longer at capture time.

    It saves enormous time every time you go back.

    The second is there’s no pull

    Notes in a folder have no gravity.

    Nothing surfaces them unless you deliberately go searching.

    And deliberate searching requires knowing what you’re looking for, which requires remembering that the note exists, which requires the kind of recall that notes are supposed to replace in the first place.

    The fix is connection. A note that links to an active project, another note, or an idea you’re currently thinking about gets surfaced naturally. A note with no connections is just a file.

    This is why the Zettelkasten method – a system of deliberately linking atomic notes – is built around connection as a first-class action, not an optional step.

    What a smart note actually looks like

    Here’s the difference in practice.

    Regular note (from an article about deep work):

    Cal Newport — deep work. Schedule focus blocks. Distraction bad.

    Smart note (from the same article):

    The core argument in Newport’s deep work framework isn’t “focus more” – it’s that distraction is the default state and requires active scheduling to contain. Scheduling focus blocks treats distraction as the exception. Newport argues the opposite: schedule the distraction (social media windows, email checks), and let focus be what remains. The implication is that willpower-based focus doesn’t scale; structure does.

    The second one is usable.

    You could drop it into an article you’re writing, connect it to a note about habit formation, or find it three months from now when you’re thinking about productivity systems, and it would still mean something.

    The first one is a reminder that you read something once.

    The habit that actually makes this work

    The system only works if you process captures before the context is gone.

    A daily 10-minute pass through your fleeting notes is enough.

    Not a full review session, just a quick triage.

    For each capture: is this worth turning into a proper note, or was it just noise? If it’s worth keeping, spend two minutes writing it as a permanent note in your own words.

    If it’s not, delete it.

    Most people skip this step because it feels like extra work.

    It is extra work upfront. But it’s the work that makes every other note valuable.

    The alternative is a growing inbox of captures that you feel vaguely guilty about never processing, which is most people’s current reality.

    The other habit that matters:

    • when you write a new permanent note, spend 30 seconds asking what existing note it connects to. Not a folder category, a specific idea you’ve already written down. Link them.

    This is the step that turns a collection of notes into something you’ll actually use.

    Where this fits with your broader system

    Smart notes and knowledge organisation are different problems, and conflating them is where most systems break down.

    Smart notes are about how you write and process individual ideas. Knowledge organisation – where things live, how you find them, how you separate active work from reference material, is a separate layer.

    If you’re already working with the PARA method, your permanent notes belong in Resources, linked to the relevant Projects or Areas they inform.

    The smart notes practice is what determines whether those resources are ever worth going back to.

    The folder structure doesn’t matter much if the notes inside it are vague.

    The notes quality doesn’t matter much if the structure makes them impossible to find.

    Both layers have to work.

    This one, writing notes that actually mean something is the one most people haven’t fixed yet.

    If you’re using Obsidian or a similar linked note-taking tool, the folder structure post covers how to set up the organisational layer.

    What you’re building the habit to fill it with is what this post is about.

    The one shift that changes everything

    Stop writing notes to remember things.

    Start writing notes to think with.

    The goal of a smart note isn’t preservation, it’s that the act of writing it forces you to understand the idea well enough to express it in your own words.

    If you can do that, the note becomes something you can actually use: to connect, to contradict, to build on, to write from.

    The notes you revisit aren’t the ones in the best-organised folder.

    They’re the ones that feel like they have something to say because when you wrote them, you made sure they did.