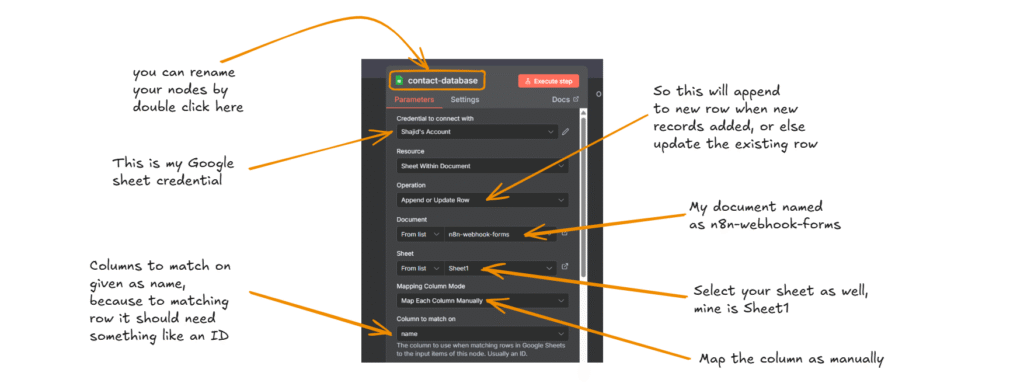
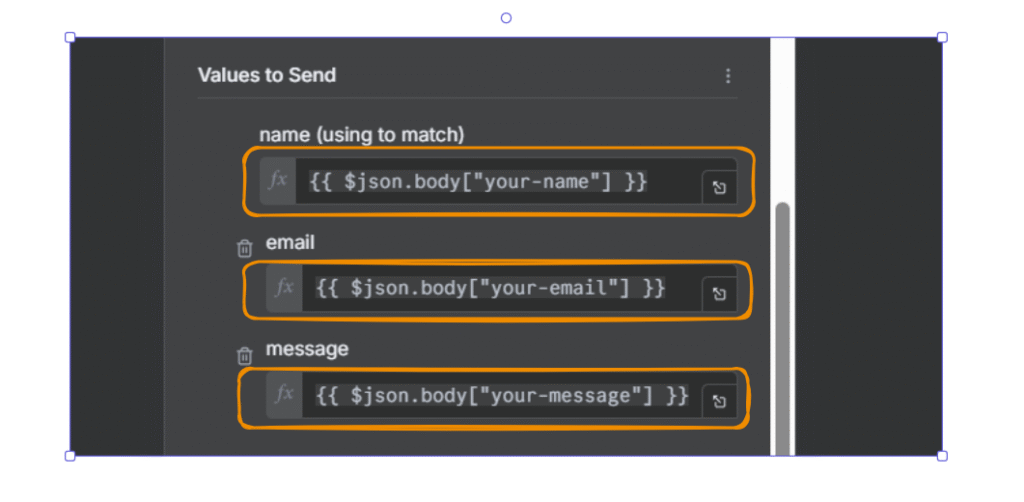
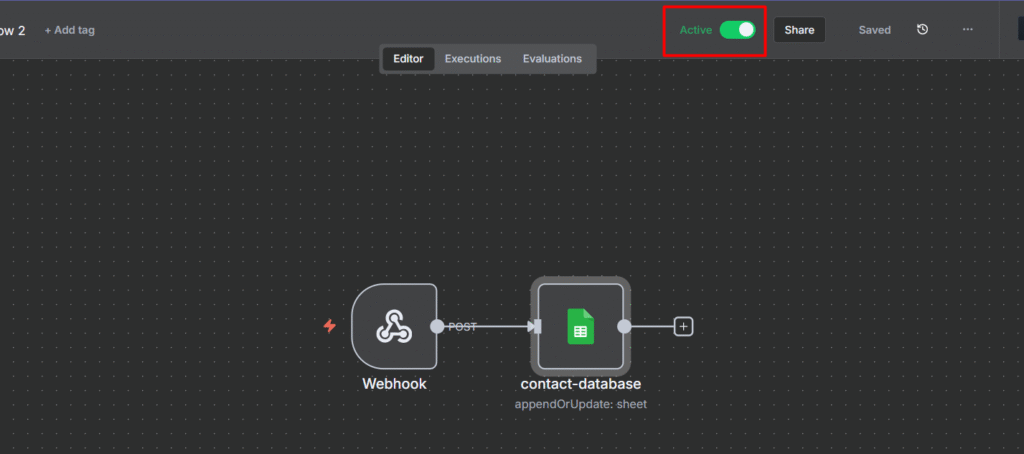
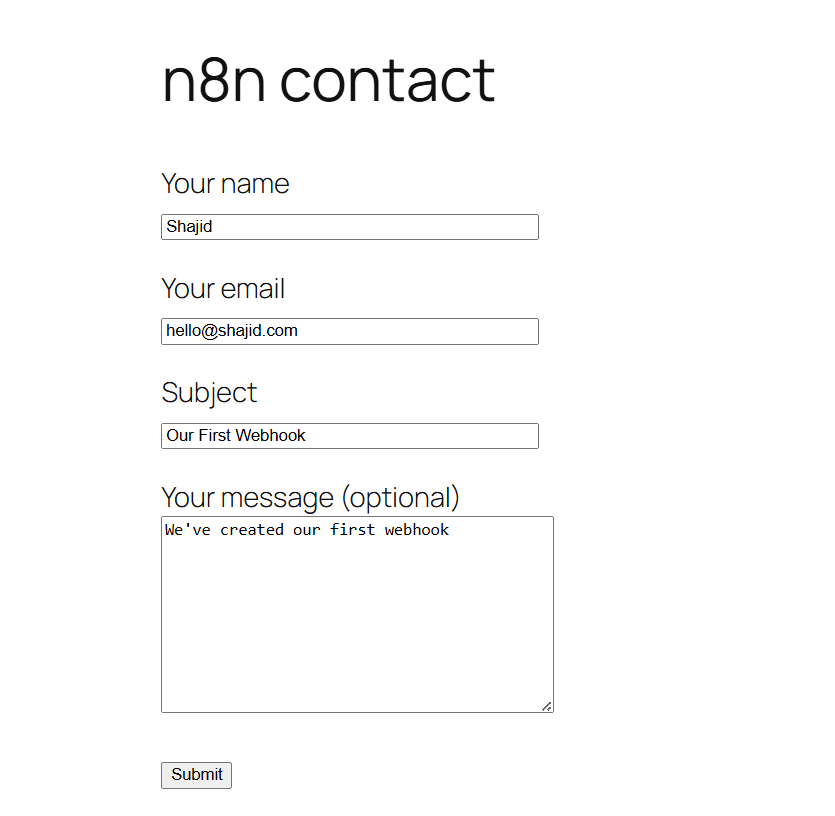
I integrated Google Sheets with n8n, and now everything runs on autopilot. EVERYTHING.
In this post, I’m going to show you exactly how to integrate Google Sheets to n8n. Step by step. This is a beginner friendly guide that assumes zero prior automation experience.
Prerequisites
Before we integrating Google Sheets with n8n, make sure following ready.
1. An n8n account or Self-hosted instance.
You’ll need access to n8n to build your workflow. You’ve got two options
n8n cloud (Recommended for beginners): Sign up for free account at n8n.cloud. No installation required, and you start building workflows immediately.
Once your Google OAuth credentials are connected to n8n, come back here continue with the integration workflow.
4. A Google Sheet to Work With
Create a simple Google Sheet to to test the integration. You can use existing spreadsheet or create a new one with simple data.
5. Basic Understanding of Spreadsheets
You don’t need a coding experience here. If you know how to use Google Spreadsheet (rows, columns, basic data entry), you’re ready to go.
Step 1: Setting Up Your First Google Sheet Workflow
Create a New Workflow
Log in to your n8n account
Click on “New Workflows” in the left sidebar
You’ll see a blank canvas – this is where your automation playground
Add a Manual Trigger
Every n8n workflow needs a trigger to start it. For testing purposes, We’ll use a manual trigger, which lets you run the workflow whenever you click the execute button.
Why manual trigger? We want to test everything manually before setting up automated triggers like, schedules, or webhooks. This gives full control during the learning phase.
Rename Your Workflow
Rename the workflow to something useful, Always use clear, descriptive names. When you’re managing 10+ workflows, you’ll thank yourself for this habit.
Step 2: Connect Your Google Sheets Node
Configuring Google Sheets Node
Click on the “+” icon next to your manual trigger.
In the search bar, “Google Sheets”
Click on the “Google Sheets” to add it to your editor.
You’ll see the node configuration panel open on the right side.
There are many operations for sheets, Append, Update, Delete, Create, Get and etc.
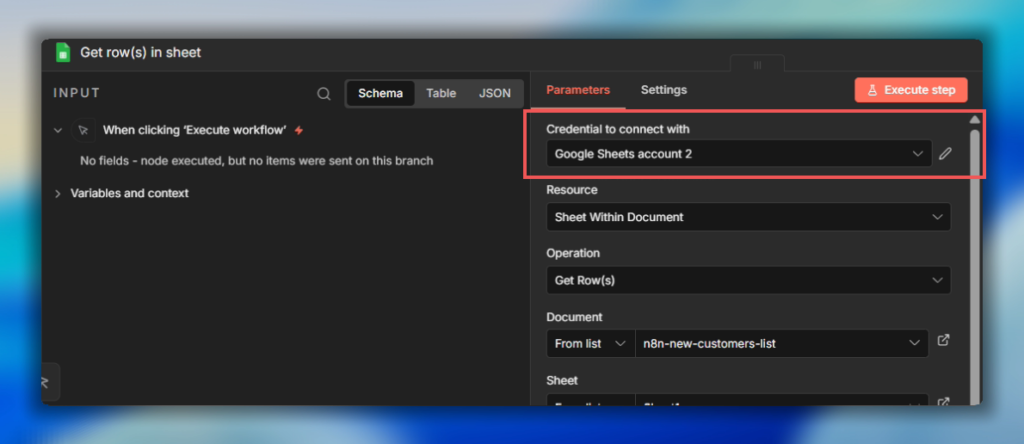
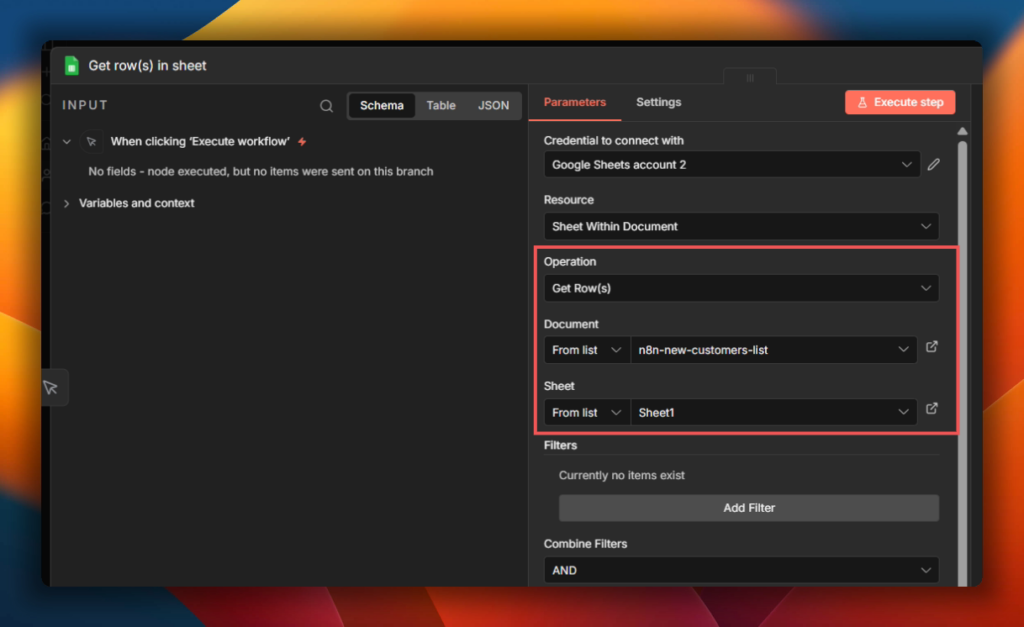
For this tutorial, we are going to use GET operation Get row(s) to read what is inside on the Google Sheets.
Credentials to Connect With
Click on the “Credentials to connect with” dropdown and select your Google OAuth credentials that you’d already setup.
From List: Choose from your recent Google Sheets (easiest)
By URL: Paste the full Google Sheets URL
By ID: Use the spreadsheet ID from the URL
For beginners, select “From List” and choose your test spreadsheet from the dropdown.
Sheet: Select Your Sheet Tab
If your spreadsheet has multiple tabs (Sheet 1, Sheet 2, etc). Select which one you want to read from.
In my case, I’m using Sheet 1.(the default tab name)
Step 3: Execute The Workflow
Time to see the magic happen! let’s run this workflow and fetch Google Sheets data.
Run Your First Test
Make sure both nodes are connected (you should see a line in between them)
Click “Execute Workflow”
What happens next?
n8n will connect your Google Sheet, fetch all the rows, and display the data in the output panel below the Google Sheets node.
Congratulations You’ve just fetched (read) data from Google Sheets to n8n.
What you can do from here?
Now that you have sheet data flowing into n8n, the automation possibilities are endless.
Filter and process the data using n8n’s built-in nodes
Send data to other apps like Gmail, Discord, Slack, etc
Transform the data with code, AI or data manipulation nodes
Trigger action based on specific values in your sheet
Append new data back to same or different sheet
Common Google Sheets Operations Explained
Now that you’ve successfully read data from Google Sheets, let’s explore the other essential operations you’ll use most frequently. Understand these will give you the foundation to build any Google Sheets automation with n8n.
Append Row – Adding New Data
When you want to add new entries to the bottom of your spreadsheet (like logging form submission, new leads or daily reports).
How it works?
Add a Google Sheets node to your workflow
Select “Append Row” from operations dropdown
Choose your spreadsheet (document) and sheet
Map the data you want to add to each column
Update Row – Modifying Existing Data
When you need to change information in specific rows (like updating order status, making tasks complete, or changing contact details).
How it works
Add a Google Sheet node
Select “Update Row” from Operations
Choose your spreadsheet (document) and sheet.
Specific which row to update (or use column matching to find the right row)
Map the new values for each column
Important: You need a way to identify which row to update. You can either use
The row number (if you know it)
Match by unique column value (like email or order ID)
Append or Update Row – Smart Data Handling
When you’re not sure if a record already exists. This operation check first, then either updates the existing row or creates a new one.
How it works
Same structure as choosing sheet nodes.
Choose your spreadsheet (document) and sheet
Define the column to check for existing records (like email or ID)
Map your data
Why this is so powerful? This prevents duplicate entries while keeping your data up-to date automatically.
What You’ve Learned
Let’s recap what you’ve learnt in this tutorial
Set up Google Sheets integration with n8n – You connected your Google account and configured OAuth credentials to enable secure communication between n8n and Google Sheets.
Created your first automation workflow – You build a working n8n workflow from scratch, understanding how nodes connect and execute
Successfully fetched data from Google Sheets – You use the “Get Row(s)” operation to pull spreadsheet data into n8n, which is the foundation for any Google Sheets automation
Understood the essential operations – You now know the difference between, Append, Update and Append & Update. When to use each one.
Your Turn & Share Your Progress
The best way to solidify what you’ve learned is to build something yourself.
Got your workflow working? Awesome, here’s what you have to do next?
Experiment freely – try combining different operations, break things, and rebuilt them.
Start small, then scale – don’t jump straight into complex 20-node workflows. Master simple 2 – 4 node flows first.
Document your workflows – Use n8n’s notes feature to add comments explaining what each node does.
Build something real – The best practice project is one that solves an actual problem you have. What manual tasks could you automate today?
Sub-workflows let you call one workflow from another workflow. Instead of rebuilding same automation in multiple places, you build it once and reuse it like a component.
Why it really matters?
Let’s say you’re validating customer addresses (for an example). You check if the street address exists, verify the postal code format, and make sure the city matches the state.
That’s maybe 6-8 nodes doing the validation.
Now you need the same validation in three different workflows – one for new orders, one for customer profile updates, and one for shipping.
Without sub-workflows, you copy those 6-7 nodes into all three workflows.
Order workflow: has address validation nodes
Profile workflow: has the same address validation nodes (copied)
Shipping workflow: has the same address validation nodes (copied)
When the postal service changes their validation rules, you have to update all three workflows.
With sub-workflows, you build one address validation workflow. Then your other three main workflows just call it. Update the validation once, and all three workflows automatically use the new rules.
But sub-workflows aren’t always the answer. Sometimes they add complexity you don’t even require. perhaps a simple IF node or loop does the job better.
This guide shows you when sub-workflows actually help.
This is an advanced topic in n8n – If you’re a beginner, better to read our Complete Beginner’s n8n Guide first to understand this topic.
When to Use Sub-Workflows in n8n
Use sub-workflows when you’re dealing with one of these situations
Reusable logic across workflows – When you’re copying the same node group into multiple workflows. Data validations, API calls with specific error handling, report generation, anything you do more than once is a candidate.
Memory issues in a massive workflows – Workflows with 50+ nodes can hit memory limits. Breaking them into smaller sub-workflows gives each piece it’s own execution context
Modular testing – Testing a 50-node workflow means running all 50 nodes. Testing a 10-node sub-workflow in isolation is faster and catches issues earlier.
Human-in-loop – Need approval, sub-workflows handle these cleanly and return the approval result to the parent.
Don’t use sub-workflows when
Simple branching is enough – An IF node handles “do X if true, Y false” that’s totally fine. Don’t build a sub-workflow for a 3-node branch
If you’re never going to reuse it, and then don’t use it.
How Sub-Workflows Work
A sub-workflow is just a regular n8n workflow that another workflow calls.
The parent workflow sends data to the child workflow. The child does it work. The it sends results back to the parent.
Here’s what happens
Parent workflow hits a Execute Sub-workflow node
Data get passed to the child workflow
Child workflow runs from start to finish
Final output returns to the parent
Parent continues with the returned data
By default, the parent wait for the child workflow to complete. The workflow execution pauses at Execute Sub-workflow node until the child finishes.
I checked that Sub-workflow executions don’t count toward your monthly execution quota if you were in n8n cloud. n8n only counts the parent workflow execution. This means you can call sub-workflows as much as you want without burning through your plan limits.
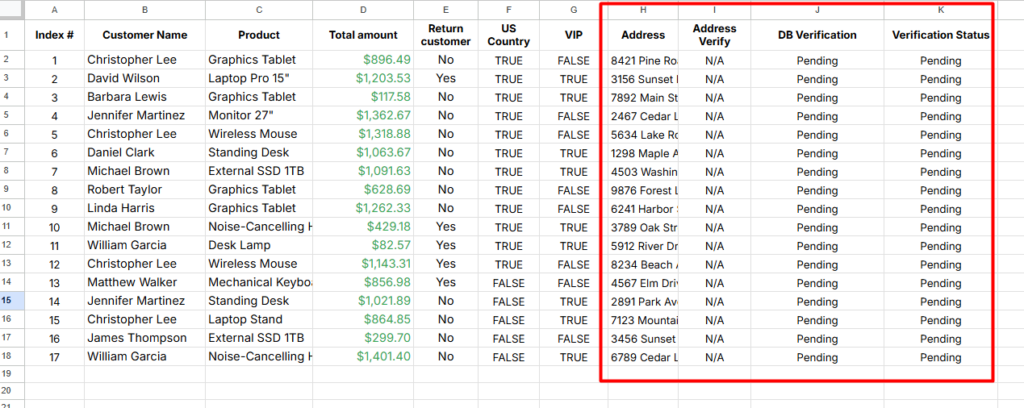
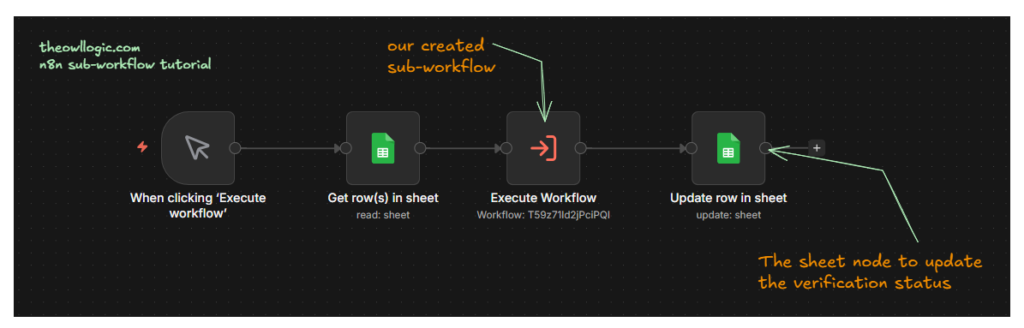
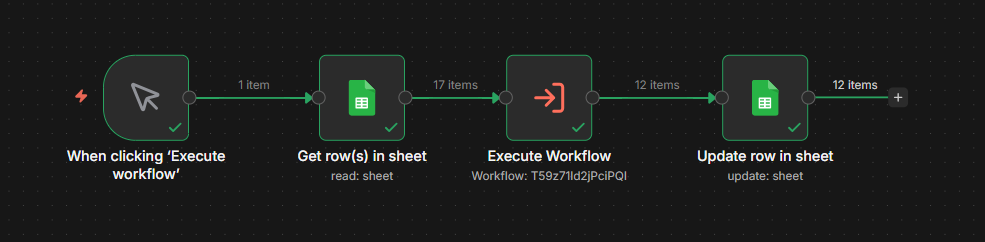
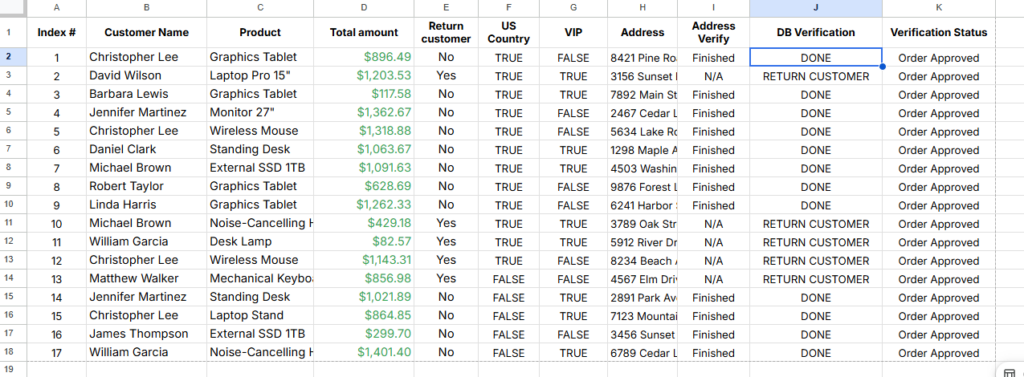
We’ve lists of customer data, We need to verify their address and update the Verification Status as Order Approved
Let’s create the workflow
Add a Manual trigger
Read the sheet – Spreadsheet with customer detail
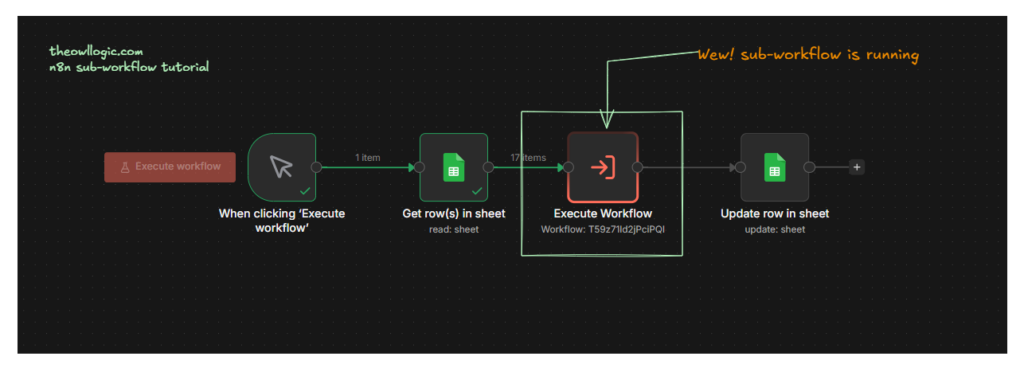
Execute the sub-workflow – We validate the address in a different workflow
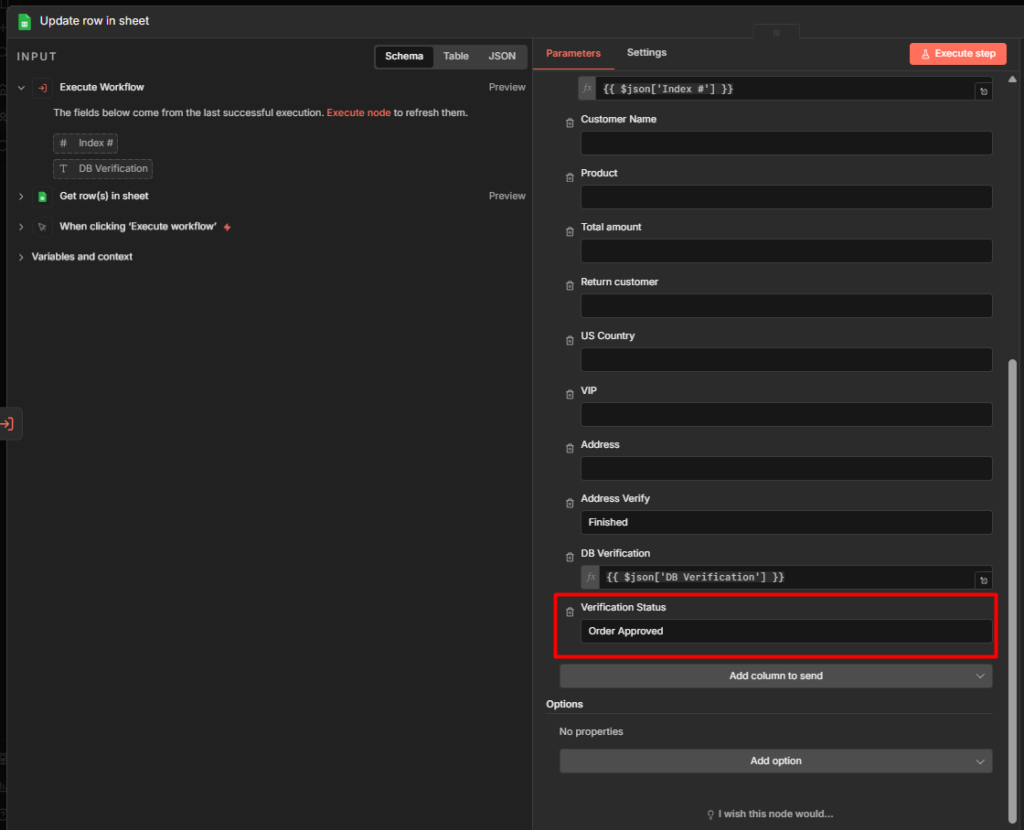
Update the Verification Status as Order Approved (This is the final output)
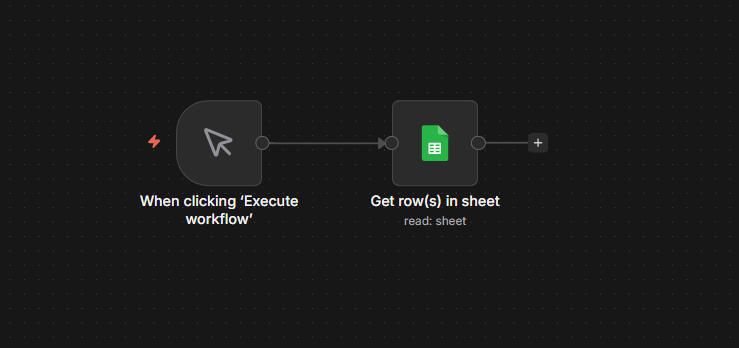
1. Add a Manual Trigger + Google Sheet (Read)
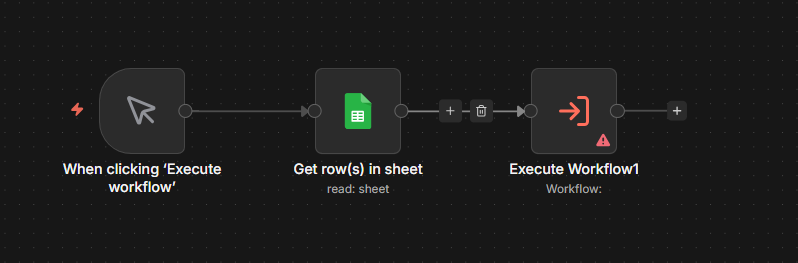
2. Add Execute Workflow Node
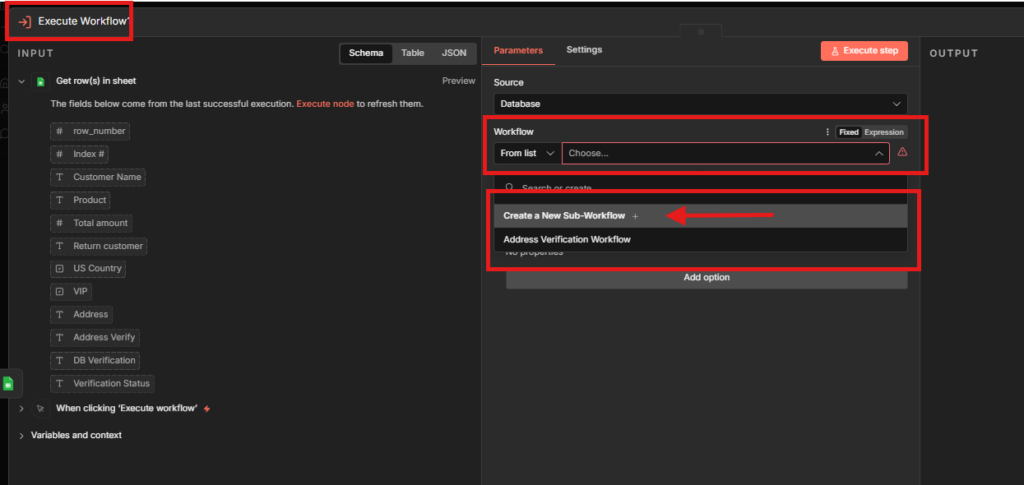
Go to Execute Workflow node, and select the Workflow, either Create a new Sub-Workflow or use the existing one. I create a new.
Once you selected the created a new, then n8n will opening up a new tab with that workflow.
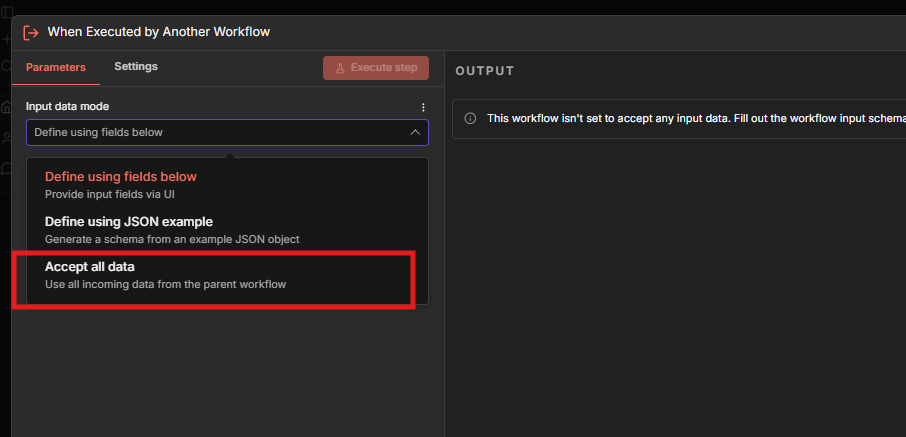
In the new created sub-workflow, you have to add the Input data mode, for this tutorial, I go with Accept all data which means fetch all incoming data from the parent workflow.
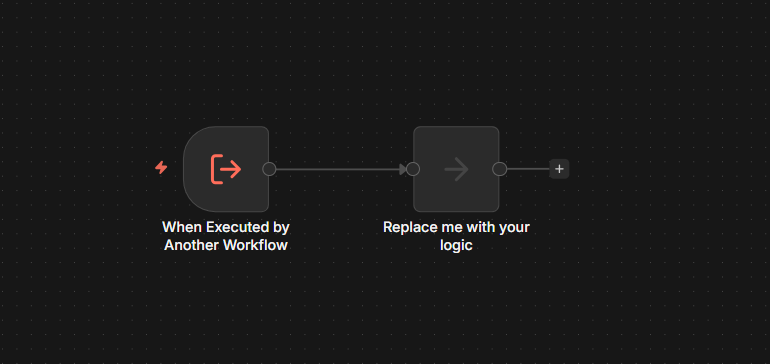
Now you’ll see like this in your sub-workflow. and make sure to Save and Publish your sub-workflow otherwise it will throw errors.
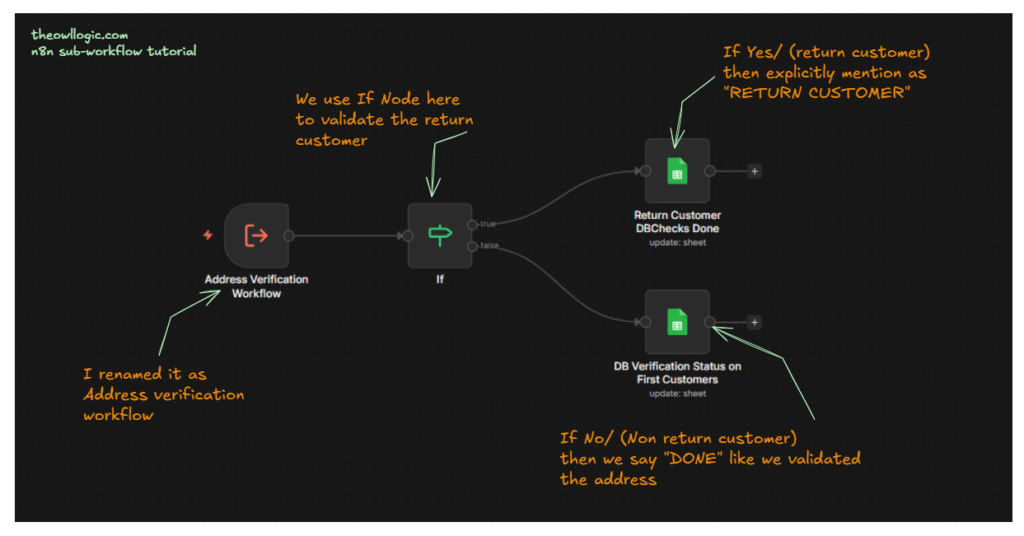
3. Adding the Core Logic
We need to validate only for new customers,
in our customer sheet, there is a column called “Return Customer”
which means we can validate it with. If return customer is “Yes” then we don’t need to validate his/her address.
If it’s “no” then we need to just validate it.
4. Connecting Final Sheet Update Node
Now, we are going to connect the final the sheet node to update the verification status to Order Approved
Go to Update row in a sheet – make sure to match the columns, and change the verification status to Order Approved.
5. Execute the Parent Workflow
Well, the sub-workflow is executing on its own and the parent workflow on-halt because child-workflow must pass down the data to the parent.
What happened in the sub-workflow? aye, let’s see it.
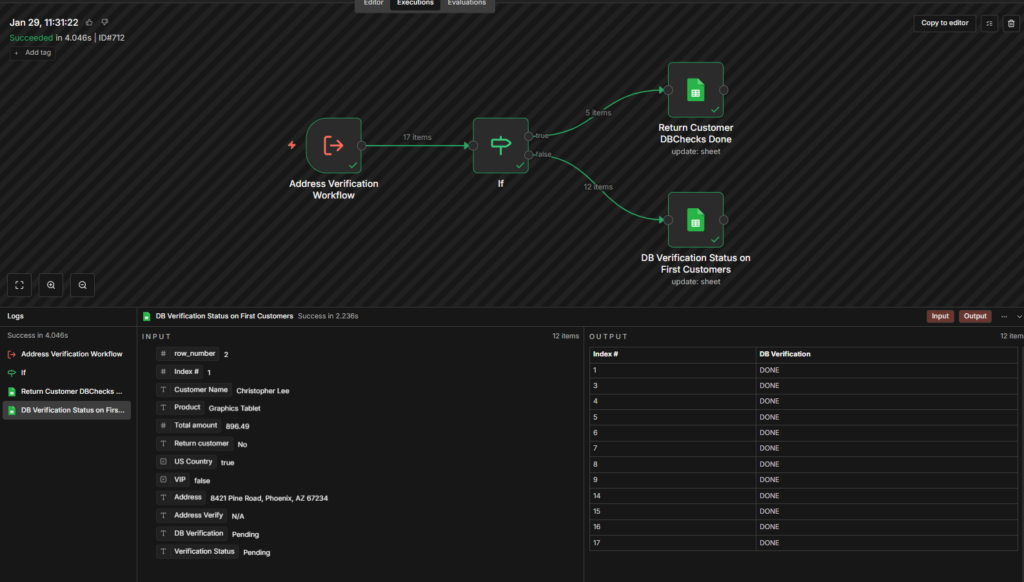
Go to your sub-workflow, and executions to see all the data output.
this is the final output, and yeah, This is not a big tutorial workflow, yet this gives you a glimpse on when to use sub-workflow.
Passing Data Between Workflows
The trickiest part of sub-workflows is getting data in and out correctly.
Sending Data to the Sub-Workflow
When the parent workflow calls a sub-workflow, it passes data through the execute Sub-workflow node.
In our tutorial example, the parent workflow reads 17 customer records from Google Sheets. When it hits the Execute Sub-Workflow node, those 17 records get sent to the child workflow.
The child workflow receives this data in it’s trigger node – the Execute Sub-workflow Trigger (also called as “When Executed by Another Workflow)
// Parent sends these 17 customer records:
[
  {
    "Customer Name": "Christopher Lee",
    "Product": "Graphics Tablet",
    "Return Customer": "No",
    "Address": "8421 Pine Road"
  },
  {
    "Customer Name": "David Wilson",
    "Product": "Laptop Pro 15",
    "Return Customer": "Yes",
    "Address": "3156 Sunset Lane"
  }
  // ... 15 more records
]

// Child workflow receives all 17 records in the trigger node
If you set the Execute sub-workflow mode to “Run once with all items“, the sub-workflow gets all 17 records in one executions.
If you set it to “Run once for each item“, the sub-workflow runs 17 times – once per customer record.
Receiving Data From The Sub-Workflow
Here’s where people get confused, (yes, I did too, so please you don’t)
The Sub-Workflow’s last node output becomes the parent workflow’s Execute Sub-Workflow node output.
Not the input. Not some middle node. The final node.
In our tutorial, the sub-workflow ends with two Google Sheet updates nodes (one for return customers, one for new customers). The combined output from both update operations return to the parent workflow.
Sub-workflow updates appropriate columns for each group
Sub-workflow returns all 17 updated records to parent
Parent workflow receives 17 records with updated verification data
Parent workflow updates final “Verification status” column to “Order Approved”
Frequently Asked Questions (Real)
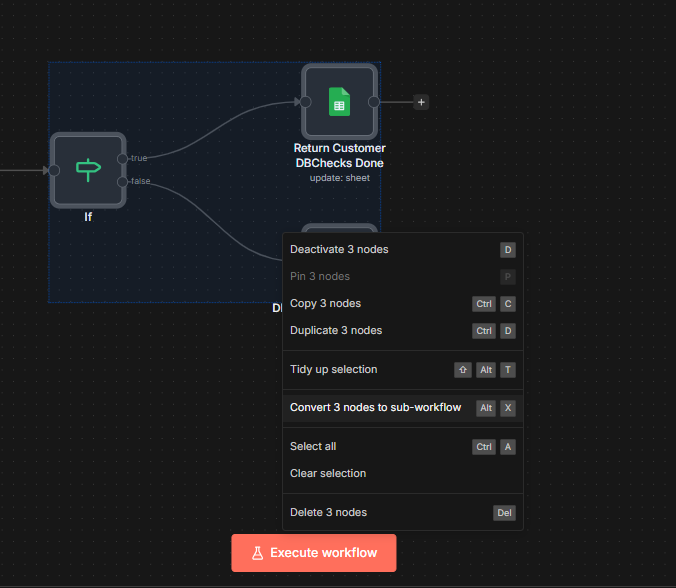
I’ve an existing nodes in placed primary workflow? How do I copy instantly?
Yes, you can do this, make sure to highlight the nodes you want, and right click, select the option as create sub-workflow. This way faster than manual setup when refactoring existing workflows.
Or press alt + x
What You Just Learned
Sub-workflows solving specific-problems, reusing logics, breaking up massive workflows or isolating testable components
They’re not always the answer. Sometimes an IF node does the job better. Sometimes keeping everything in one workflow is simpler.
But when you find yourself copying node groups between workflows, or when your workflow canvas looks like a tangled mess, that’s when sub-workflows shine.
Start with something simple. Extract your most-copied logic into a sub-workflow. See how it feels. The expand it from there.
Here’s something no one tells you when you’re learning n8n. 80% of the time, you don’t need Loop Over Items (split it batches) node.
I started my n8n workflow by building it connecting dots, so I added this node (loop over items) to the editor, and I was passing data from point A to B to C iteratively, and sending one by one without getting interrupted, then I removed the “Loop over items”, surprisingly it worked but faster.
Certain nodes will only process the first item and ignore the rest.
This guide will show you exactly when Loop over items is necessary with real use case scenarios, when it is completely unnecessary to add, and how to avoid the mistakes that broke my workflows when I was learning.
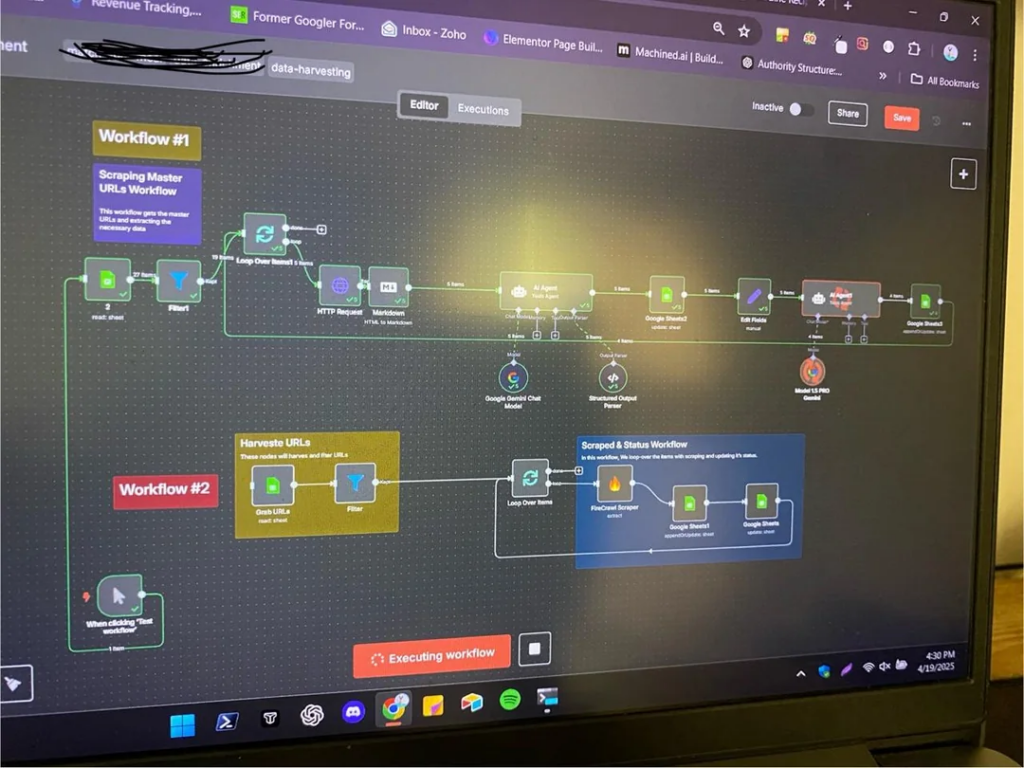
This is first time I ever posted a workflow on reddit, and I received 162k views and 400+ upvotes. I think this is 10 months ago, and I used first time ever Loop over items.
How n8n Actually Processes Multiple Items?
Most n8n nodes process ALL items automatically. That’s built into how n8n works.
Say you pull 100 rows from Google Sheets. Each row becomes an “item” in n8n. When that data hits your next node, maybe a slack node that post messages. n8n automatically runs that Slack node 100 times. One message per item.
You don’t build a loop. You don’t configure anything special. It just happens.
This is different from Make.com(formerly Integromat). In Make, use an iterator to process items one by one through entire workflow.
In n8n, each node processes all items, then passes results to next node.
Most beginners (past me) assume they need Loop over items because that’s how worked in Make. They actually don’t. n8n already handles it.
Run it, look at the output. You’ll see 5 items, all processed, no loop needed.
The 3 Scenarios Where You Need Loop
Scenario #1: Rate Limiting & API Throttling
APIs limit how many requests you can make per minute. Gmail allows 100 emails per minute. Most APIs cap at 60-120 requests per minutes. Some are trickier.
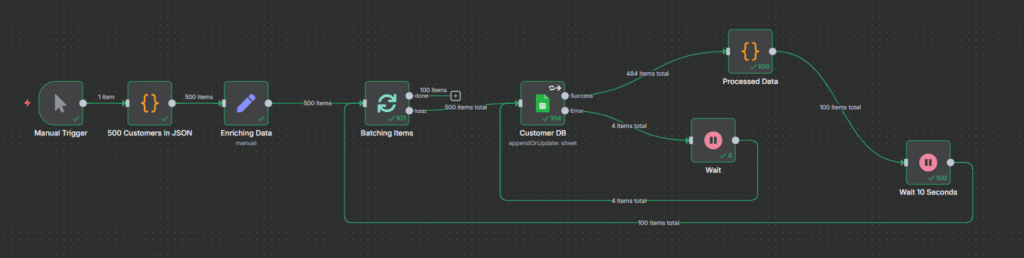
If you’ve 500 items and n8n’s default behavior processes them all at once, you’ll hit that limit. Your workflow fails. The APIs returns error, sometimes it process, other’s don’t.
Solution
Option 1: You need to add wait (1 minute) to the end of node.
Option 2: Batch your items 1 or 10. (totally depends on your requirement)
If you’re calling external APIs for many items, you probably need this. Everything else in n8n handles multiple items automatically, but external APIs don’t care about n8n architecture – They’ll block you for too many requests.
Scenario #2: Node Exceptions (Nodes that Don’t Auto Loop)
Some nodes only process the first item by default design. It’s not a bug, and it’s how those specific nodes work.
The most common example: RSS Feed Read Node
You give it an array of 5 RSS URLs. Most nodes would fetch all 5 feeds. RSS feed read node? Only fetches the first one and ignore the rest.
Why? The RSS Feed read node expects a single URL, fetches the feed, and returns multiple items (contents). It’s designed for “One feed in, many contents out” – not “many feeds in”
If you need to read multiple RSS feeds, then you need to connect with Loop over items.
n8n’s official doc maintains a list of node exceptions. Before assuming thing up, check if you node is on that list.
Other nodes that might need loops
Certain webhooks nodes that expects a single request
Some database nodes with specific query patterns
Custom nodes that process items differently
Scenario #3: Pagination with Unknown Page Counts
APIs that return paginated data sometimes don’t tell how many pages are exist.
They just say here “page 1”, “page 2” without revealing total pages.
well, let’s move on with a workflow here. This is going to be a little bit advanced workflow, and though you would need to understand these before you move to this workflow, otherwise you can still try it out with me and see whether you understood or else check it out the references here.
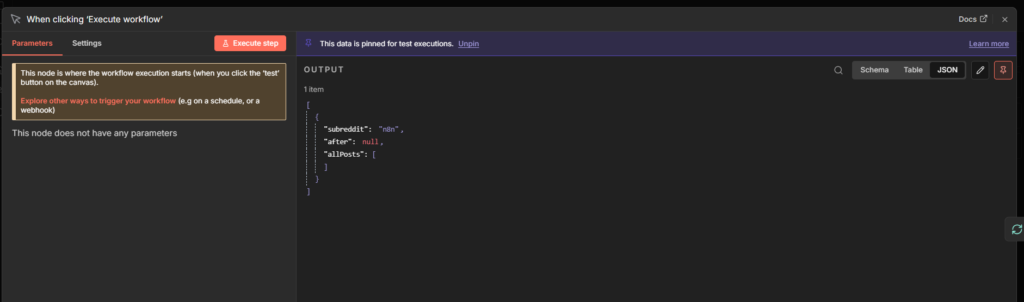
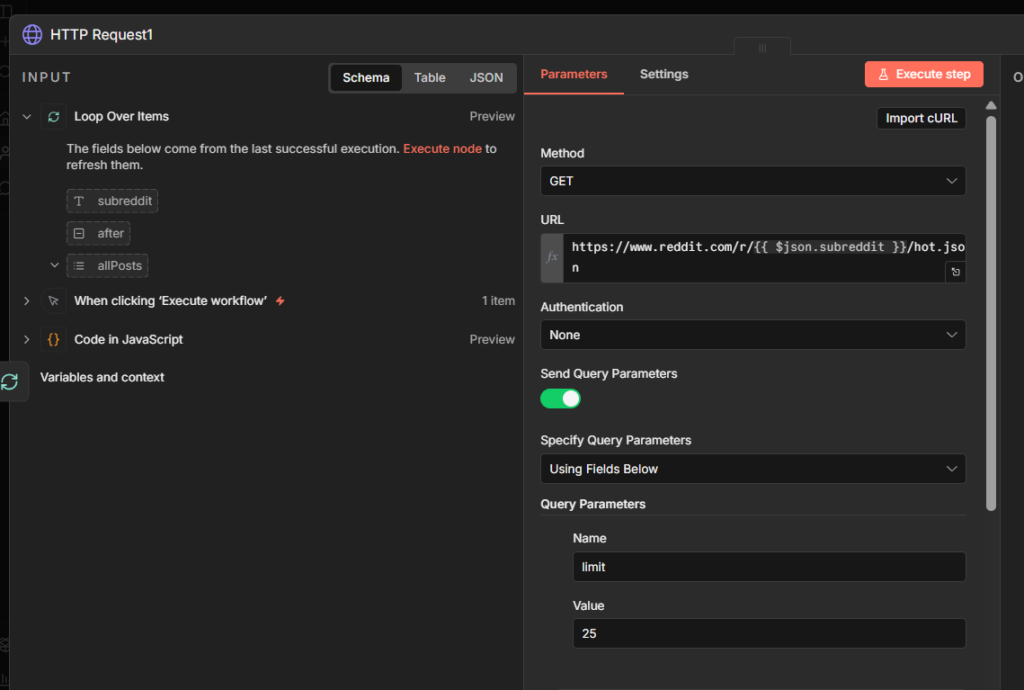
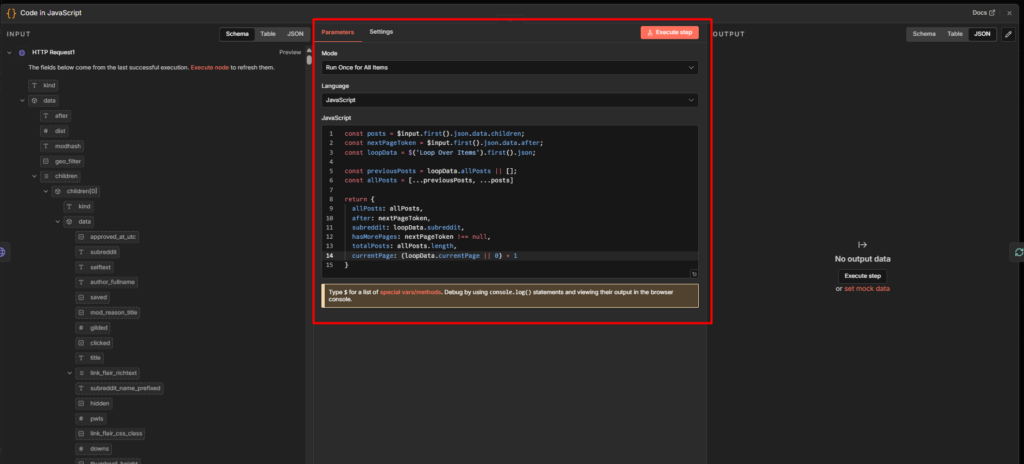
So what we are doing here is, we are going to send a request to n8n subreddit to fetch posts, and we are limiting to 25 posts, that’s why we are creating a limit = 25
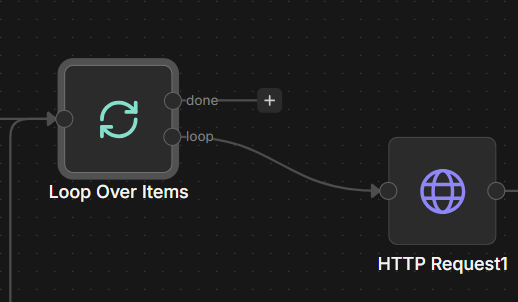
This is how it should look like. Please be make sure to compare your workflow with the image.
Code review: When the workflow starts, you begin with an empty bag (allPosts: []). you also have instructions on which sub-reddit to visit (subreddit: "n8n") and a note that says “start from the beginning” (after: null)
HTTP request node goes to reddit, and says “give me 25 posts from r/n8n starting from the beginning “.
Reddit responds with 25 posts AND a special ticket that says “if you want more posts, come back with this ticket: t3_abc123”
Now your Code node runs. It looks at three things.
First: It grabs those 25 new posts.
Second: It grabs that special ticket for getting more posts later
Third: it checks your shopping bag to see what you already collected from previous trips. on the first tip, array is empty, on the second trip, your array has 25 posts, on the third trip, it has 50 posts.
Now we can fetch posts from reddit based on pagination by limiting.
Quick Troubleshooting
Loop processes the same item every time?
You’re using .first() inside the loop. This literally means “always grab the first item” – not the current one.
// ❌ Wrong - always returns first item
{{ $('Google Sheets').first().json.email }}

// ✅ Right - returns current item
{{ $json.email }}
Loop never stops?
You’re missing an exit condition. Every loop needs a way out. Like, we need to safety limit the fetches data. Make sure to test with small datasets first.
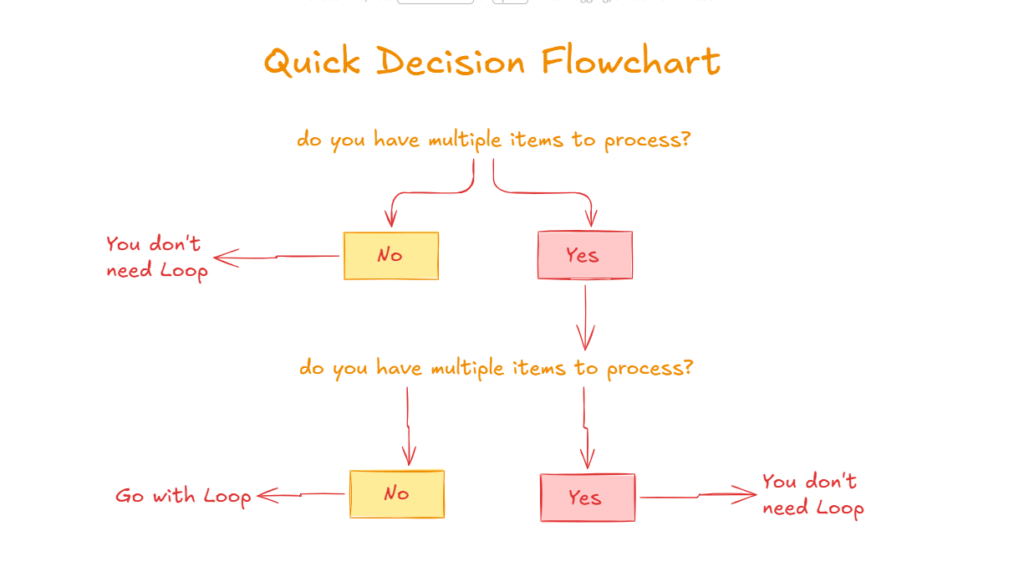
Quick Decision Flowchart
Use this every time you think you need Loop Over items
Start – Do you have multiple items to process?
No – You don’t need any loop
Yes – Next,
Does the next node automatically process all items?
Yes – No Loop Over Items needed
No – Next,
Check these 3 reasos
Need rate limiting – Loop Over items with batch size + Wait node
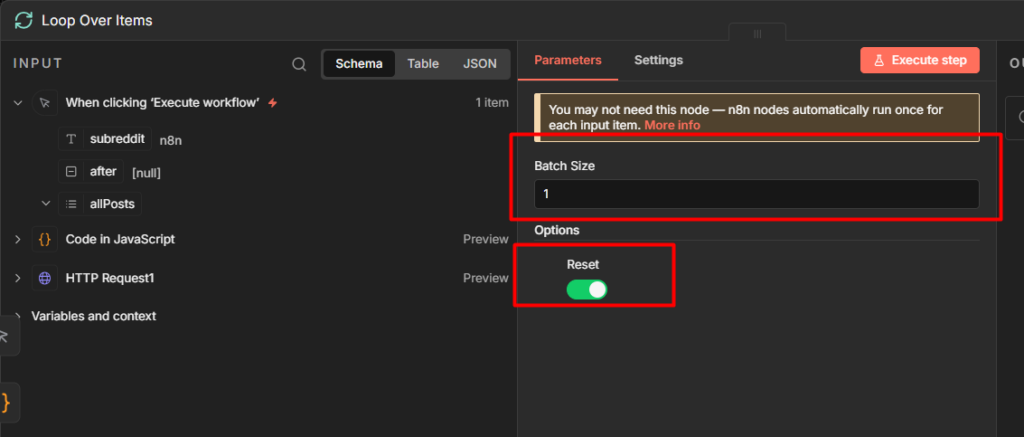
Node exception (RSS, etc) – Loop Over items with batch size 1
Pagination scenario – Loop Over Items with reset option on.
None of the above – reconsider workflow
Still not sure, Test without Loop over items first. If items 2-100 aren’t processing, then add it.
When to Skip Loop Over Items Entirely
You do NOT need Loop over items for,
Standard data processing: Google Sheets, databases, Airtable – they all return multiple items. n8n processes them automatically.
AI/LLM operations: OpenAI node, Claude node – they handle batching internally.
Most HTTP requests: Unless the API specifically has rate limits you’re hitting, n8n will make all requests.
Basic transformations: Code nodes, Set nodes, Filter nodes – all process multiple items by default.
Email to small groups: Sending 50 emails? n8n handles it. Sending 500? Now you might need rate limiting.
The rule: If you can’t explain in one sentence WHY you need Loop Over Items (using one of the three scenarios), you don’t need it.
Final Thoughts
Loop Over Items is powerful when you need it. But I’ve reviewed dozens of community workflows, and 80% of them have unnecessary Loop Over Items nodes, and some add another loop inside the main loop. I’ve zero idea, what they are trying to accomplish.
The pattern I follow is build without it first. Only add when I hit one of three situations – rate limit, node exceptions, or pagination
You workflow will be simpler. It will run faster. And when you DO need Loop over items, you’ll know exactly why.
Workflows becomes useful when they make decisions.
You need to route customer emails differently based on domain, process high-value orders separately, or send urgent tickets to different teams.
That’s conditional logic – having your workflow ask questions and take different action based on the answers.
I’ll show you how to build decision-making into your n8n workflows using IF nodes, switch nodes and conditional expressions. more importantly, I’ll show you how to troubleshoot when things don’t work as expected, because that’s where most people get stuck.
The IF node looks at your data and splits it into two paths: true and false. Data that matches your condition goes down the true path. Everything else goes down the false path.
Here’s what make this powerful: both branches can have completely different workflows attached. Your true branch might send a Slack message while your false branch updates a database. The IF node routes each piece of dat to where it needs to go.
The data itself doesn’t change when it flows through an IF node. If you send in a customer record, that exact same customer record comes out, just on either true or false output.
IF node inspects the data and makes a routing decision, but the data stays intact.
Understanding how data flows through conditional nodes is critical. I cover the fundamentals in my guide on how n8n workflow nodes handle data, but here’s the quick version, when an IF node receives multiple items, it evaluates each one individually. Some items might go true, others false. Both outputs can have data at the same time.
Key Takeaways
Learn how to filter and route data using IF and Switch nodes with real customer scenario (Example of real use case provided)
Find out why your condition fails (data type, mismatches, case sensitivity) and how to fix them
mixed AND/OR logic using expressions when the UI dropdown isn’t enough
Download the workflow JSON below to import and test it in your n8n instance, or follow the step by step guide
How to Setup Your First IF Node
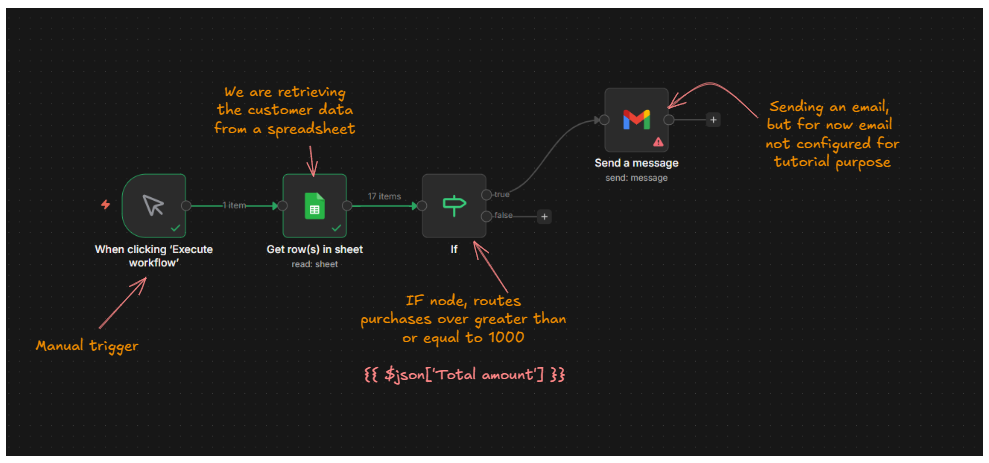
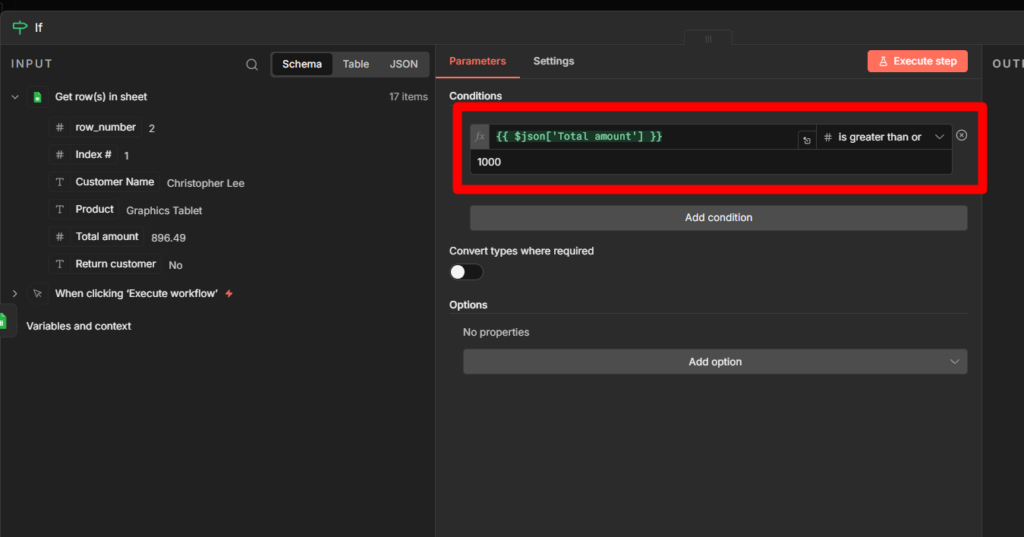
Let me walk through a practical example, filtering customer orders, Let’s assume, we are going to give a discount for those who have purchased above $1000 for upcoming holiday season, and we are going to send them emails. Well, we have a lists of customer db with purchasing value. Let’s break down the core objectives.
Our goal is,
Find customers who had purchased over $1000
Get their email address.
Start email sequence for Holiday season reminder with VIP 20% Offer above $1200 purchases.
Don’t do anything to those who purchased below $1000
What do you think it will happen now? you got any guesses here.
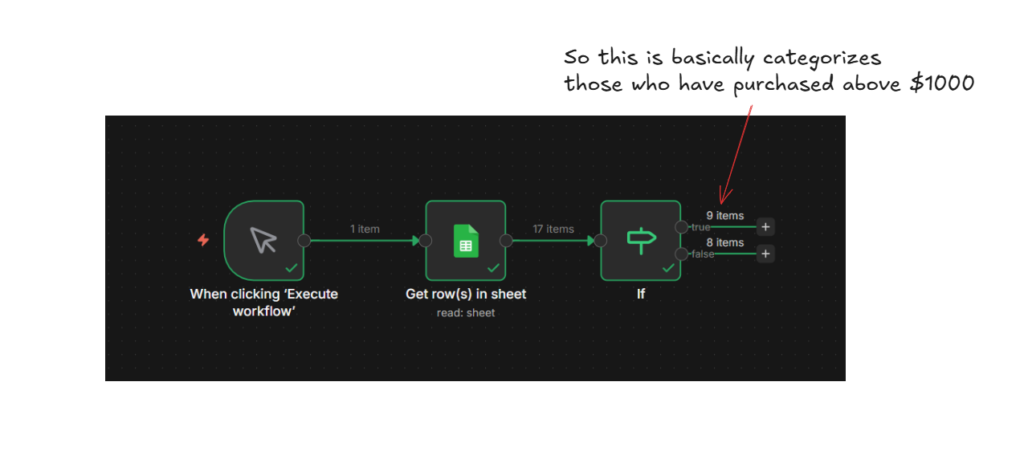
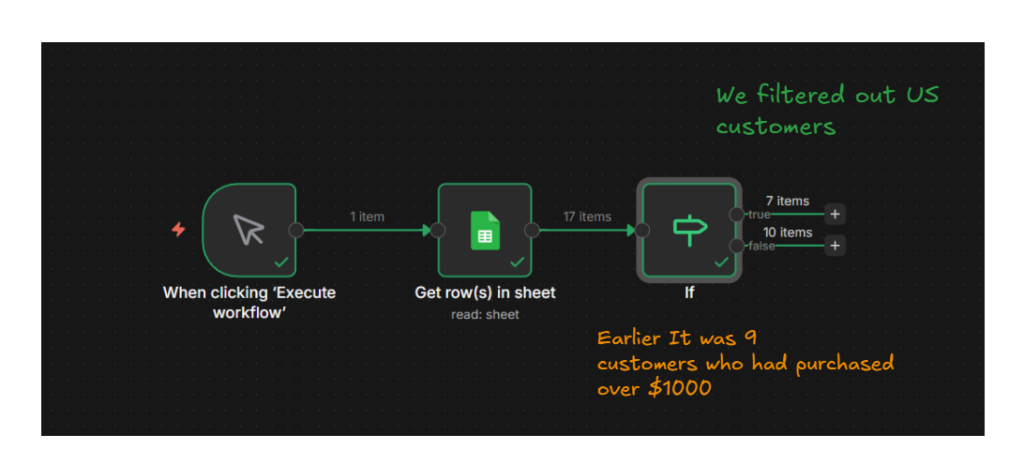
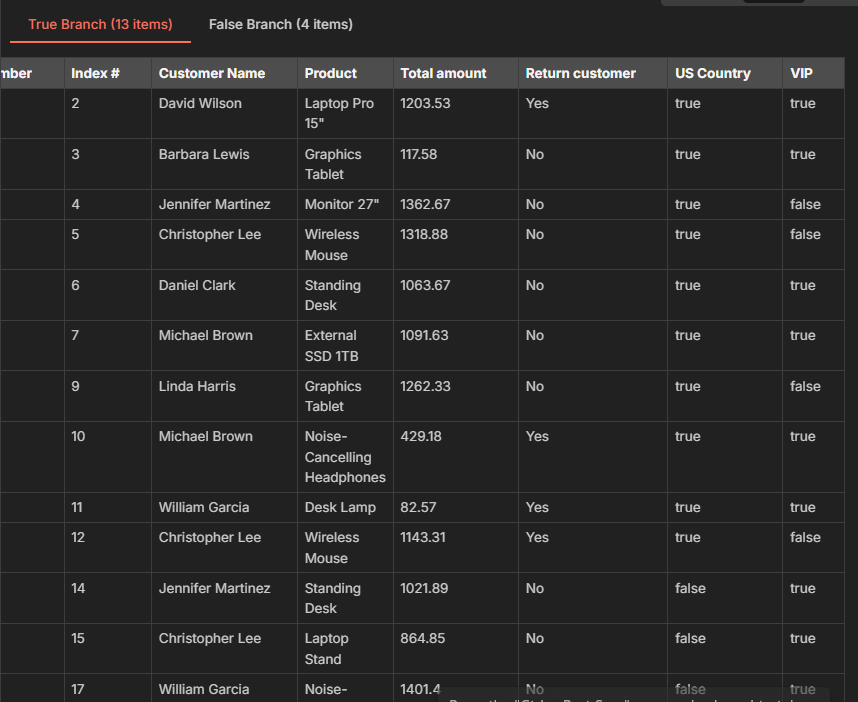
Yes, you get 9 customers who had purchased over $1000, and then you can add any node, like gmail, to send them a message with coupon code, or whatsoever.
Same for false branch too, either you can send to sheets or whatsoever, that’s totally up to you how you want to manipulate the data you have.
Understanding Data Types and Comparison Operators
Every comparison in an IF node requires you to select a data type. This tells n8n how to interpret the values.
Comparing “1000” as a string different from comparing 1000 as a number.
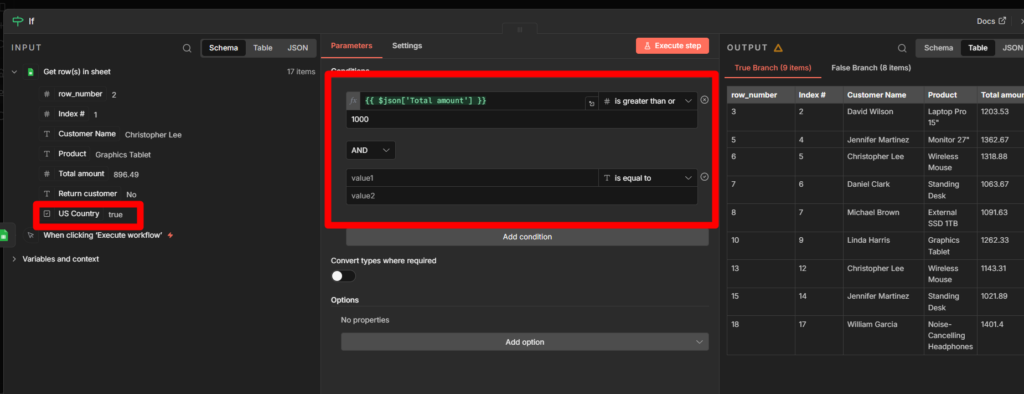
Let’s expand our customer workflow (what we did earlier with IF) We filtered by purchase amount, but what if we only target US customers? or customers who haven’t received the emails recently?
Each of these checks different data-type.
Choosing the Right Data Type
String: Text data like names, emails, or country codes. Use this when comparing text, even if the text contain numbers (like phone number or zip codes)
Number: Numeric values for mathematical comparisons. Purchase amounts, quantity, age, or any value you need to compare them mathematically.
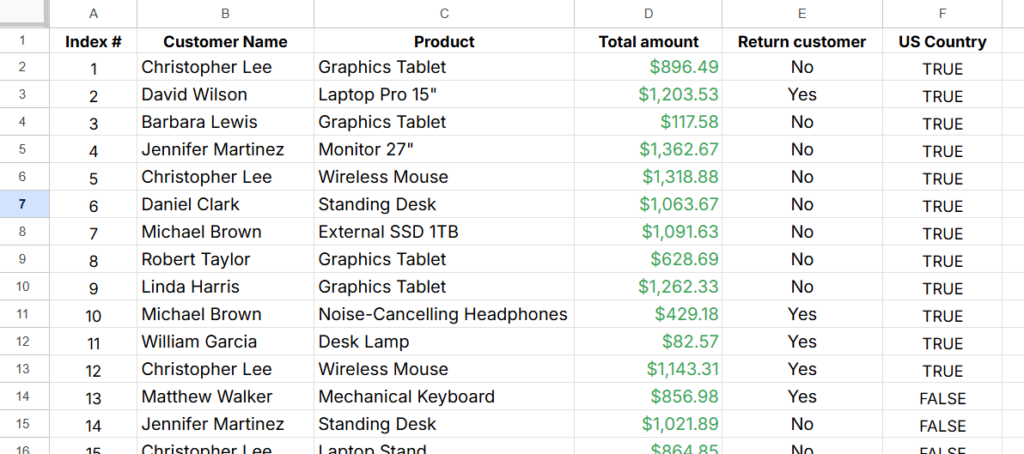
Boolean: True or False values. Use this when checking if something else enabled, or active. for an example: John doe is a US customer, so in the sheet there is a column header with US country, true.
Date & Time: Timestamps and dates. Use this when comparing if something happened before or after specific times.
// Number - what we already did
{{ $json.purchaseAmount }} larger than 1000

// String - check if customer is in US
{{ $json.country }} equals "US"

// String - check email domain
{{ $json.email }} contains "@gmail.com"

// Boolean - check VIP status
{{ $json.isVIPMember }} equals true

// Date & Time - check recent activity
{{ $json.lastPurchaseDate }} after "2026-01-23"
Common Operators Mistakes (And How to Avoid Them?)
Using “equals” when you need “contains” – You want to check if customer uses Gmail.
Don’t check if email equals “gmail.com”. The full gmail is “customerx@gmail.com”, which doesn’t equal “gmail.com”. Use contains instead.
// Wrong
{{ $json.email }} equals "gmail.com"  // Never matches

// Right
{{ $json.email }} contains "@gmail.com"  // Matches customer@gmail.com
Comparing numbers stored as strings: your database might return purchase amount as strings, If your data "1000" (with quotes), that’s a string.
Comparing it as a number might not work because n8n tries to convert, but it is unpredictable.
Check your actual data type in the expression editor. If you see quotes around the number, convert it first.
{{ Number($json.purchaseAmount) }} larger than 1000
or just use string comparison if that makes more sense for your data.
{{ $json.purchaseAmount }} equals "1000"
Date format mismatches – Dates come in many formats. n8n expects ISO 8601 Format (2026-01-15T10:30:00Z) for reliable comparisons. If your dates look like “01/15/2026” or “January 15, 2026”, you’ll need to convert them first.
Case sensitivity: String comparisons are case-sensitive by default. “US” doesn’t equal “us”. If you need case-insensitive matching, convert both values to lowercase first:
{{ $json.country.toLowerCase() }} equals "us"
Building Workflow #2 With New Data
I hope, I didn’t bore you guys, you need to learn and understand this to keep your head clean when you manipulating or mapping data. let’s go.
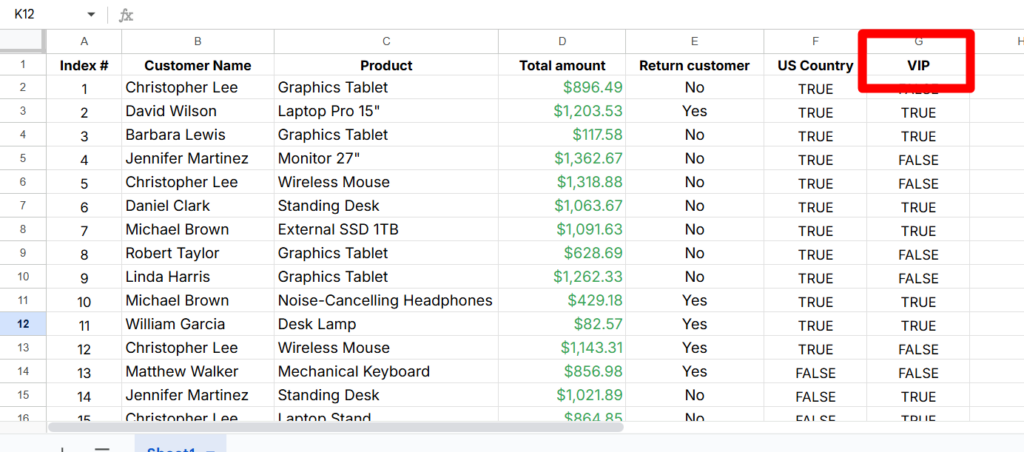
Now our sheet has US Country on F Column , and I added boolean value TRUE / FALSE.
Our objective is to send emails to those who purchased over $1000 US customers.
Now we need to map the US country to value.
Here’s the steps you need to take.
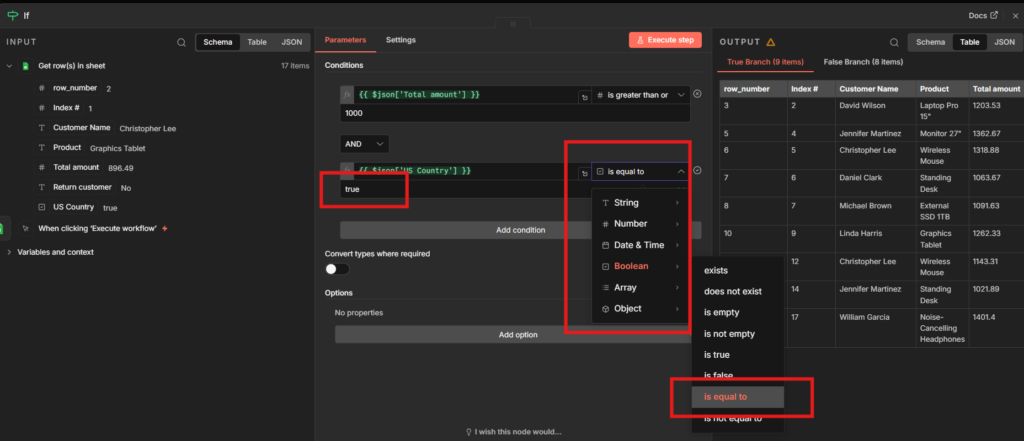
Drag the US country parameters, directly to the value, then n8n automatically detects it’s data type.
After that you need to select whether it is true or false.
I select “TRUE” because that’s my core objective.
You can execute the workflow now.
Yay, we got it. but n8n do all the heavy lifting for your when you drag and drop the parameters, still, you need to understand what is happening behind the scenes.
Data Type Reference
Data Type
Common Operators
When to Use
String
equals, contains, starts with, ends with
Email domains, country codes, status values
Number
larger, smaller, equals, between
Purchase amounts, ages, quantities
Boolean
equals (true/false)
Active status, feature flags, yes/no fields
Date & Time
after, before, between
Last purchase date, signup date, deadlines
Building Multiple Conditions (AND/OR Logic)
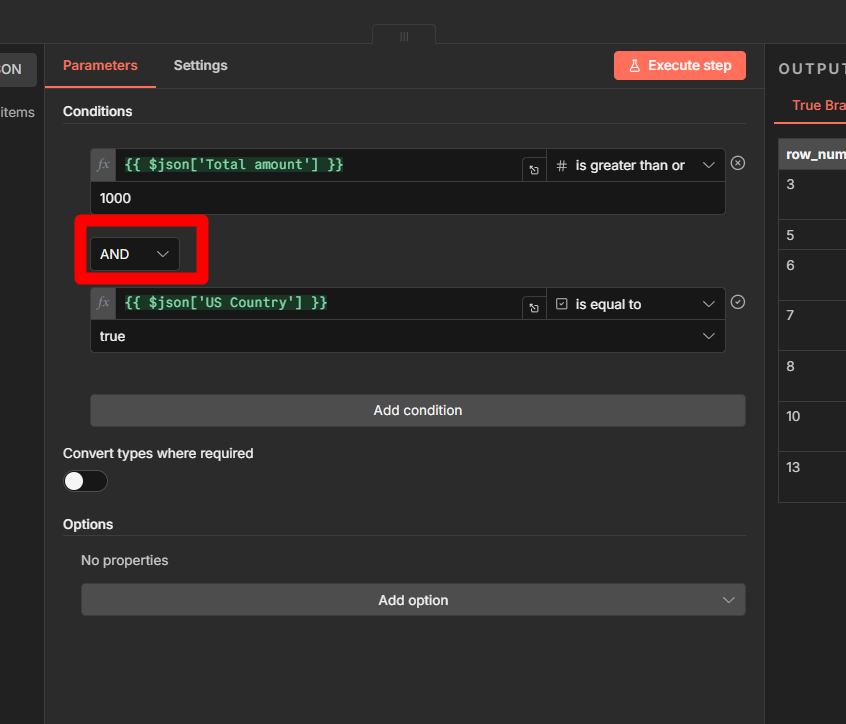
In the previous section, we added a second condition to our IF node using the AND operator. Wait, where did I add that?
Yes, It is basically chaining if the conditions are equals then it will provide us filtered data. so we checking greater than or equals to 1000, and customer need to be in United states, if both conditions are satisfies, then n8n passed the appropriate data to next node.
What AND Logic Does?
Customer A: $1200 purchases, US customer – Both true – Goes to true output
Customer B: $1200 purchase, UK customer – One false- goes to false output
Customer C: $800 purchase, US customer – One false – goes to false output
Customer D: $800 purchase, UK customer – Both false – goes to false output
Only Customer A gets the email, AND logic is strict, everything should match.
Understanding OR Logic
Now let’s change the business rule. Marketing team wants include VIP members even if they are spent less than $1000.
Let’s practically work on this in a workflow I guess, that would seems easier to understand.
Workflow #3 AND OR Logic Combined
so as we said, we need to add a new rule here. We are going to add a new column as VIP.
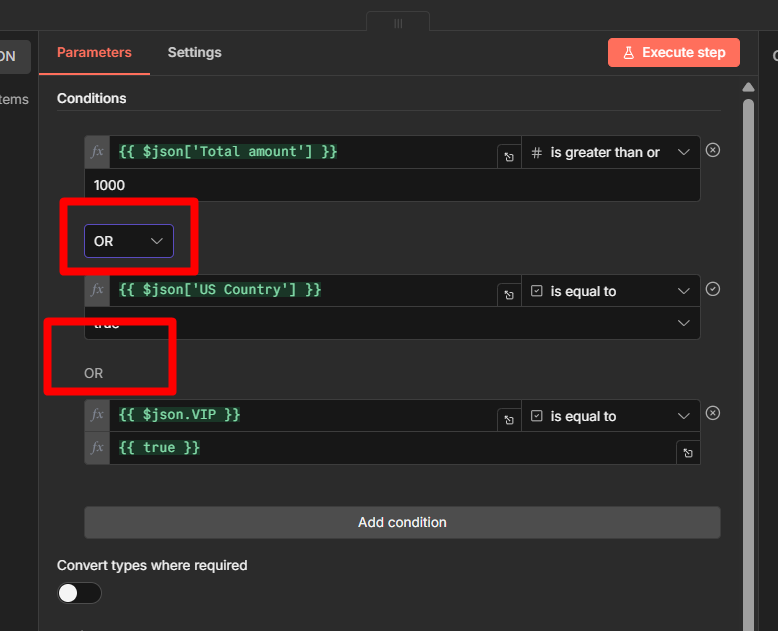
Here’s where the IF Node UI gets tricky. You can’t mix AND or OR operators in the dropdown. When you change the dropdown, n8n changes ALL the operators.
If you have three conditions connected by AND and change one dropdown to OR, all three becomes OR.
Alright, so how do we gonna solve this?
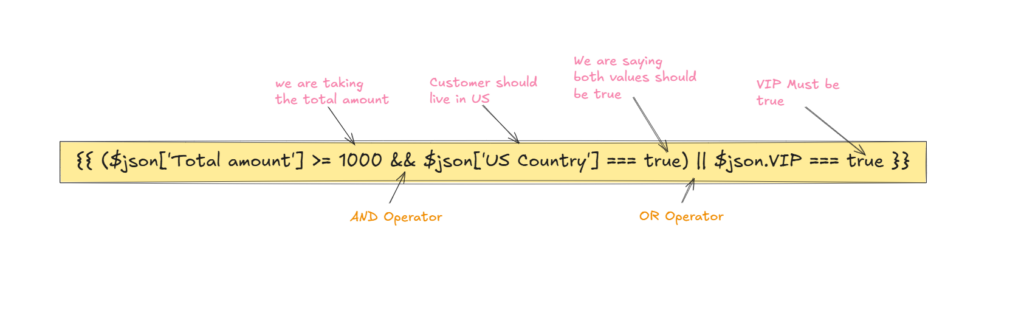
We use expressions. Instead of multiple conditions with dropdown, we write the entire logic as a single expression
Our new business rule is: Send email if customer has (amount >=1000 AND is a US customer) OR VIP customer.
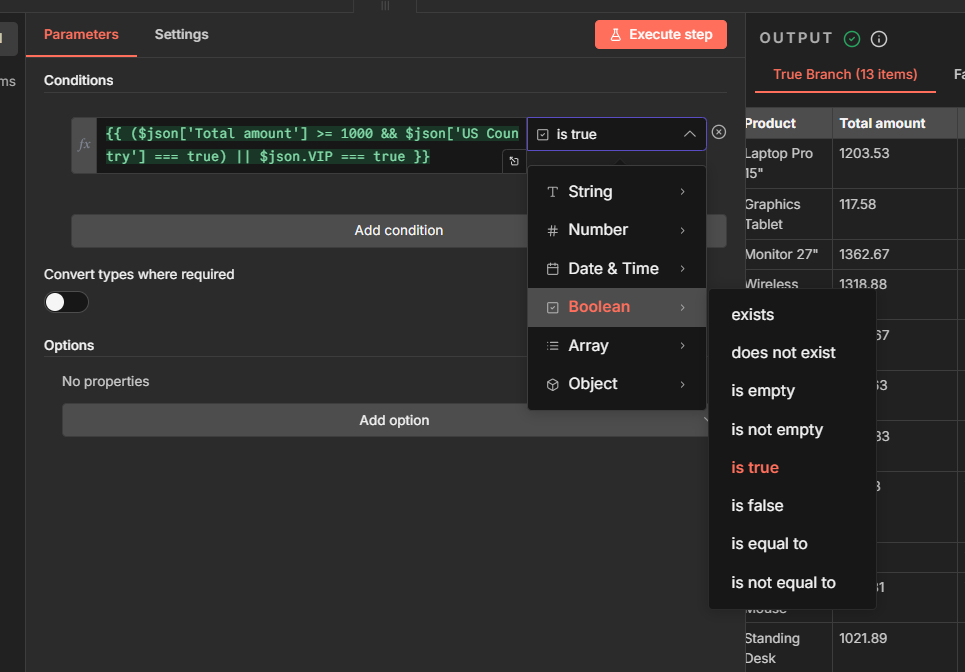
so we are adding an expression stating in the codeblock, and we are expecting a boolean value, which means it should true or false, In our case we need to our values to be true. so we are setting up the values which is boolean is true.
let’s execute and see.
We get 11 customers who match our logic, some because they are high-value US customers, some because they’re VIP customers, and some because they meet both criteria.
Switch Node: Route Data to Multiple Paths
IF node splits your workflow to two directions.
Switch splits into as many direction as you need.
When to use Switch nodes?
So, basically I wanted to give you with the examples of the current workflow, that we are sending customers emails who purchases over $1000 and US based.
Sort customers by spending tiers (Gold, Bronze, Silver)
Route support tickets by priority (Low, Medium, High, Urgent)
Send different emails based on locations (US, UK, Asia, EU)
Handle different product categories with unique logic.
alright, now you maybe asking, “yeah, we can use it with IF Nodes right?”
Yes, but you should know that when to use IF Nodes?
Simple yes/no answers.
Just two paths needed
Binary choices (approved, rejected, or active/inactive)
Switch has two modes,
Rules mode: Visual condition (what we’ll use)
Expression mode: Write code to calculate output number
We’ll use visual mode since it’s more practical for our users.
Workflow #4 Routing by Customer Tier
Let’s route our customers to different email campaigns based on spending levels, In marketing, we should not always treat always who spend higher, even though who spend lower. Engagement is the key.
We have three customer tiers
Bronze: $0 – $500
Silver: $501 – $1000
Gold: $1001+
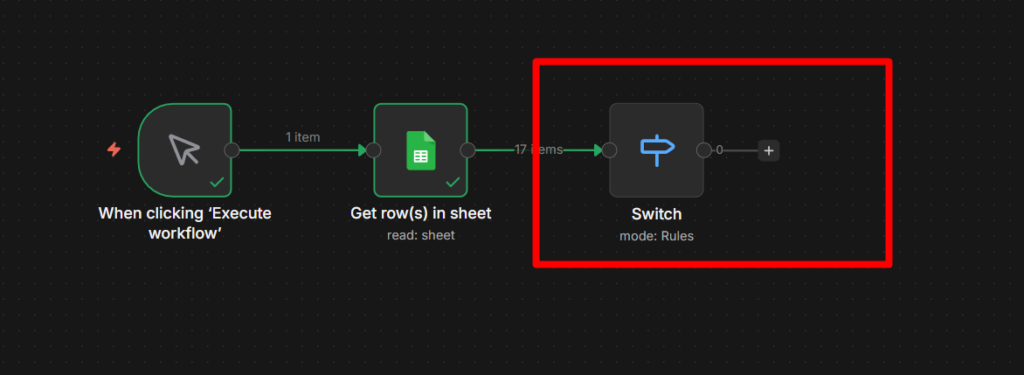
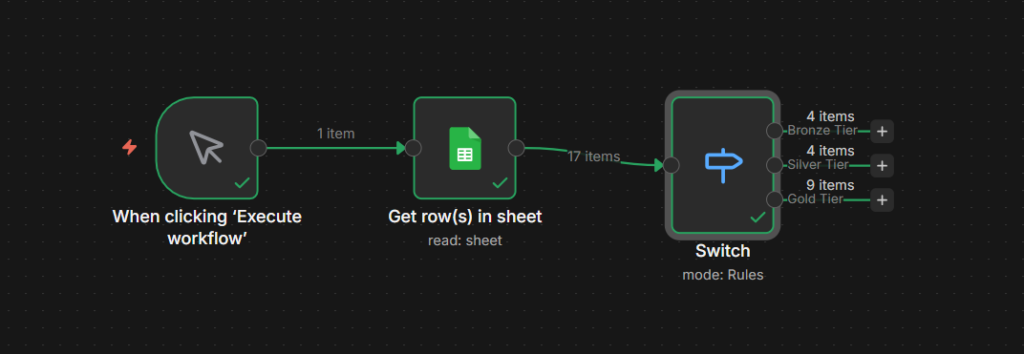
Connect the switch node to the sheets.
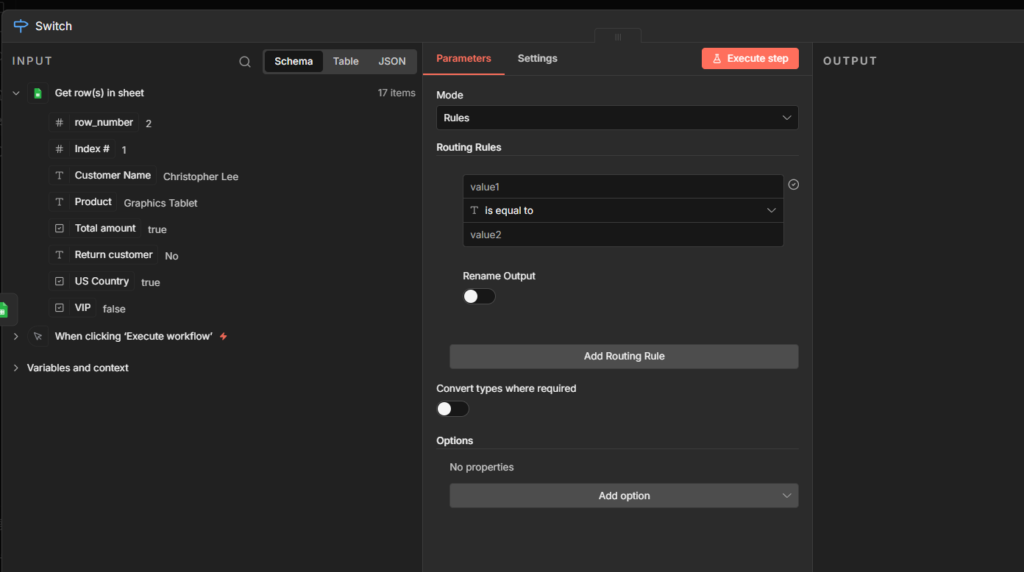
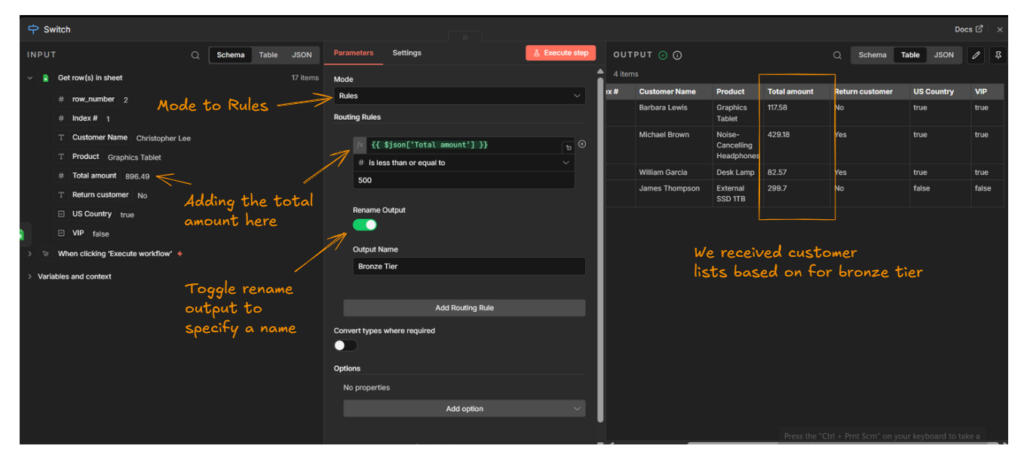
You’ll get this interface, sometimes you won’t see the parameters on the left side node, which means you have to execute them individually to to see the output data of the previous node. Check the reference image below for your understanding
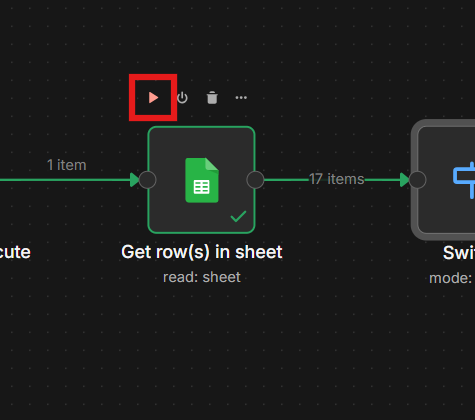
Click on that “Play” icon to execute that node, but not the workflow. Got it. let’s move to the next phase.
You have to configure this as it is for your criteria or business needs, for now I wanted to create the bronze tier, and it’s done.
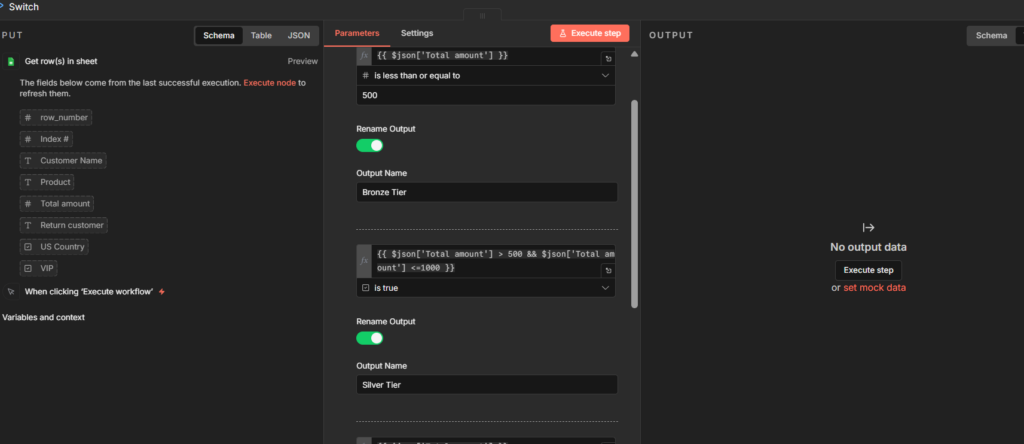
Let’s create other tiers as well – click on the Add routing rule to create another route for “Silver tier”
but silver tier is tricky, I’ll let you to solve it, if you couldn’t find the answer then scroll down.
In this scenario, we have to check two comparisons for silver tier
It should greater than 500
and less than 1000
But, you cannot write two comparisons in a single field, that’s where we have to use expressions here.
Finally I was able to get the customers list based on tier types, this is how you have to use Switch nodes appropriately. By blending expressions and with help of UI as well like dragging and mapping.
I hope you understood this module clearly, but I prefer to read multiple times, and try with different scenario. This way you can build a great things in the future easily.
I do believe in one thing certainly that mastering basics can do anything.
Q. Why isn’t my IF node working even though my condition looks correct?
The most common issue is a data type mismatch. If you’re value stored as as text “1000” but you comparing it as numbers, the condition will fail. Check your data type in the IF node dropdown, or toggle on the convert types where required option
Q. Can I use OR logic IF Node dropdown?
Yes, if it’s for a single comparison, but you cannot mix with OR + AND operators, to do this multiple comparisons, then you have to use chain comparisons with expressions. e.g `|| &&”
Q. My Switch node is sending customers to the wrong output
Switch sends data to the FIRST matching rule by default. If you have any overlapping conditions (like checking silver tier before the gold tier), customers might match the wrong rule first. Always order your switch rules to specific to least specific for best case scenario.
Final thoughts
You’ve already learned how conditional logic works in n8n. Now it’s time to build your own workflows. Start simple, and correlate with your ideas. Send us your Switch related workflows to us to review.
Send it to: hello@theowllogic.com
Now go build something useful, for additional references, you can check below the resources.
Building workflows in n8n without expressions similar to driving with first gear, well you can move forward, but you’re missing out the other gears that you can travel faster. It’s like totally missing out 90% of the utility power.
Similar to the above analogy, you’re totally missing out if you’re not using expressions.
I learned this in a hardway when I built my first “real-real” workflow.
Grabbed data from a webhook, tried to send it to Google Sheets. Workflow ran perfectly in testing. Once deployed it immediately threw error.
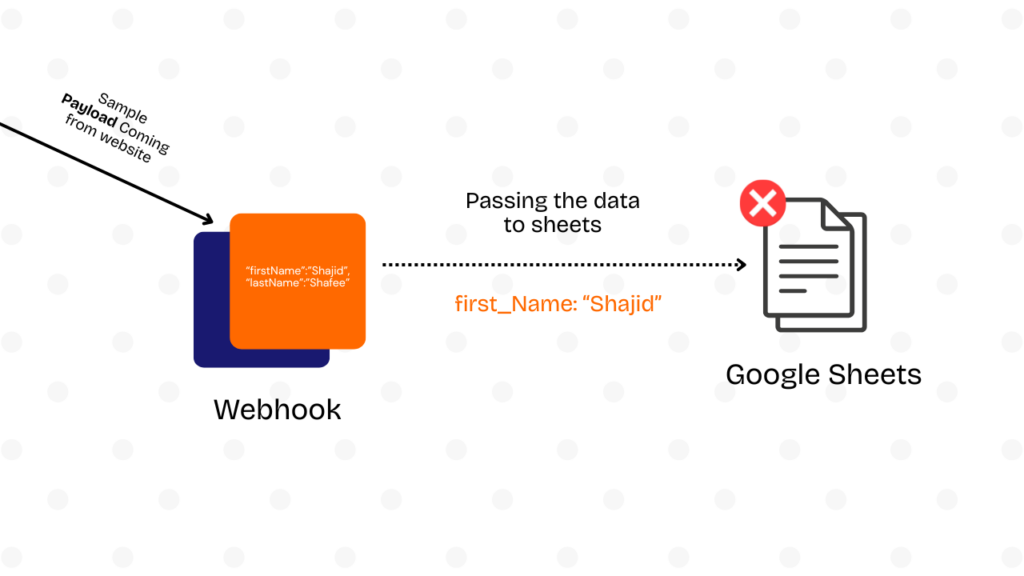
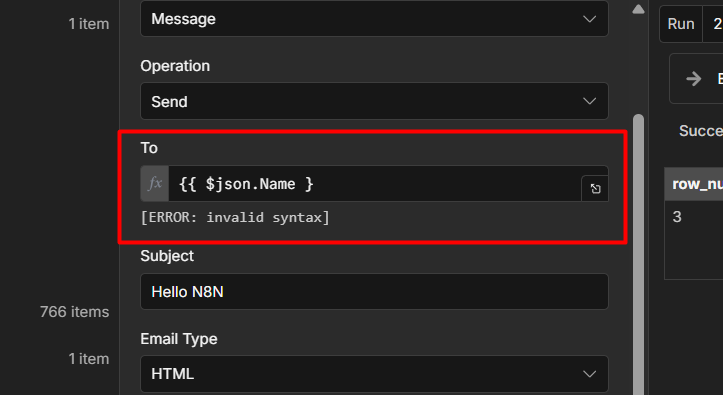
The problem? The webhook sometimes sent firstName and sometimes first_Name. Sometimes the email field was nested under body.contact.email, other times just email. My rigid workflow couldn’t handle the variations.
That’s when I discovered aha there is expressions. Not just {{ }} syntax everyone mentions, but the actual pattern for handling messy, real-world data. The difference between workflows that run once during testing versus workflows that survive actual production use.
This guide shows you the expressions I wish I’d learned on day one or two. Not theoretical syntax, but copy-paste patterns you’ll actually use when webhooks send inconsistent data, APIs return nested objects, and you need to transform 500 items without crashing.
What are n8n Expressions? (And, Why They Are Important)
Here’s the simplest way to think about expressions.
They turn static workflow parameters into dynamic ones that adapt to your actual data.
Without expressions, every value in your workflow is hardcoded.
Want to send an email? You’d type “john@example.com” directly into recipient field. That works exactly once, for exactly one person.
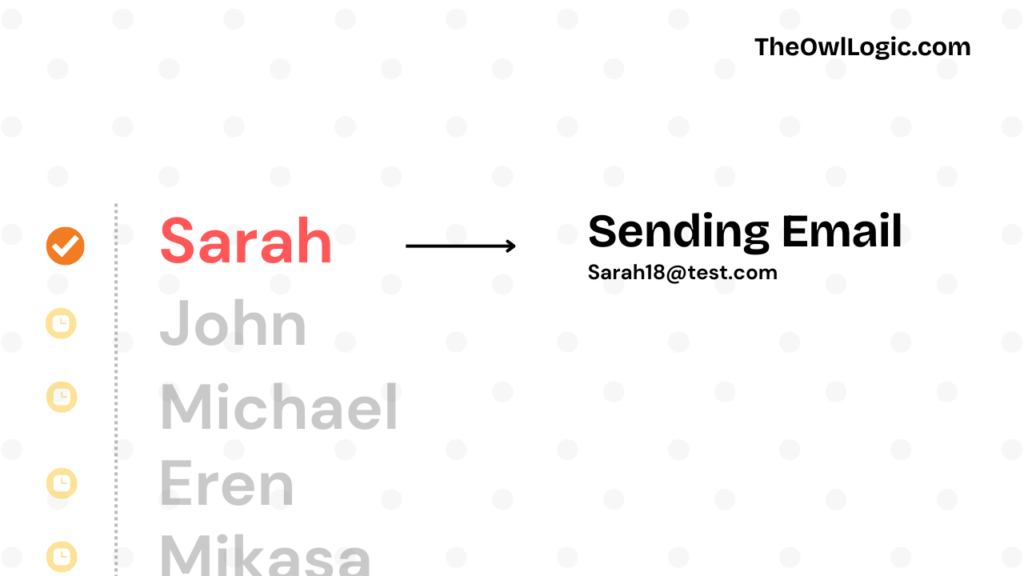
With expressions, you tell n8n “grab the email from the data that just came in” Same workflow now handles John, Sarah, and 10,000 other people without changing a single thing. Well, you got me there, but you can ask? Shajid, we can directly map the key, then whatever the John, Sarah, Michael could come in automatically? That’s correct. but We are going beyond just mapping by drag and drop values. Keep reading.
Under the hood, n8n uses Tournament, a templating language it developed specifically for workflow automation.
Tournament provides the {{ }} syntax and handles JavaScript execution. n8n extends Tournament with custom variables ($json, $node, $input), transformation functions, and built-in libraries like Luxon for dates and JMESPath for JSON querying.
The syntax is just double curly braces wrapping JavaScript code
{{ $json.email }}
That’s it. Everything inside {{ }} executes as JavaScript and gets replaced with the result. Static becomes dynamic.
You’ll use expressions constantly because real workflows process dynamic data. Form submission from different people. API responses that change. Customer names, order amounts, timestamps, Any time data flows through your workflow, you need expressions to access it, transform it, and pass it along like baton.
If you’re completely new to n8n, check out Your First Hello-World n8n Workflow to get your bearings first. Once you can build a basic workflow, expression are your next step.
Expression Syntax Fundamentals (The {{ }} The Wrapper)
The rule is simple.
If you want n8n to evaluate code instead of treating it as plain text, wrap it in {{ }}.
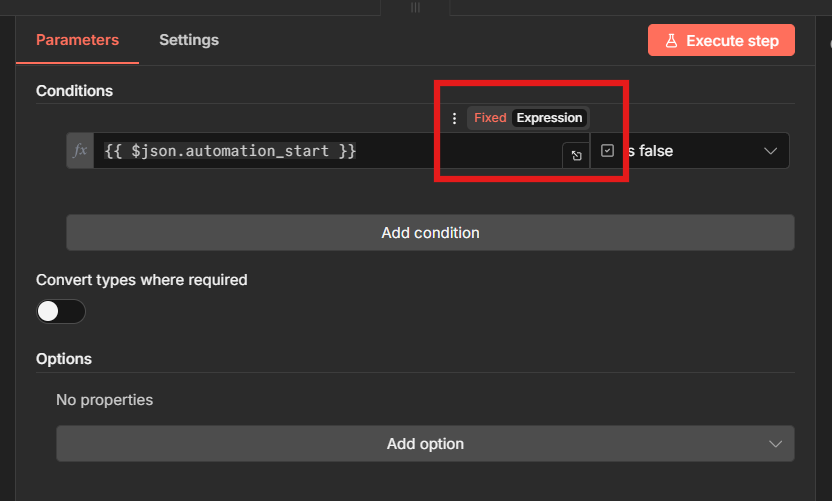
Click any parameter field in n8n and you’ll see a toggle between Fixes and Expression modes.
Fixed mode is for static values.
Expression mode is where the magic happens.
Inside those curly braces, you’re writing JavaScript. n8n executes it and replaces the expression with whatever it returns.
Common beginner mistake is forgetting the wrapper entirely.
If you see an “expression not recognized” error, you either forgot the {{ }} or you’re still in Fixed mode. Toggle to Expression mode first, then make sure your code is wrapped properly
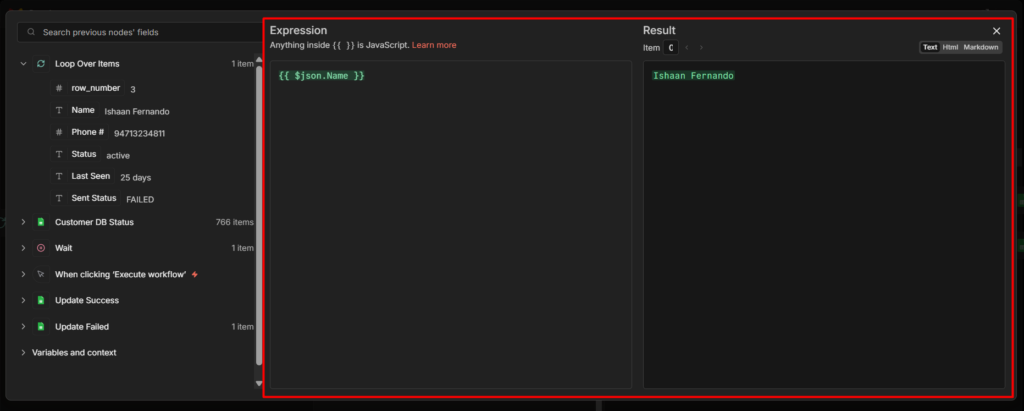
The expression editor (click the little expansion icon) gives you syntax highlighting and autocomplete. Use it when you’re writing anything longer than a simple field access. Inline mode works fine for {{ $json.email }} but for complex transformation, the editor saves you from syntax errors, and confusion.
Accessing Data: Your First Expression ($json Explained)
Every node in n8n receives data from the previous node. That data lives in $json. Think of it as “the current item I’m working with”
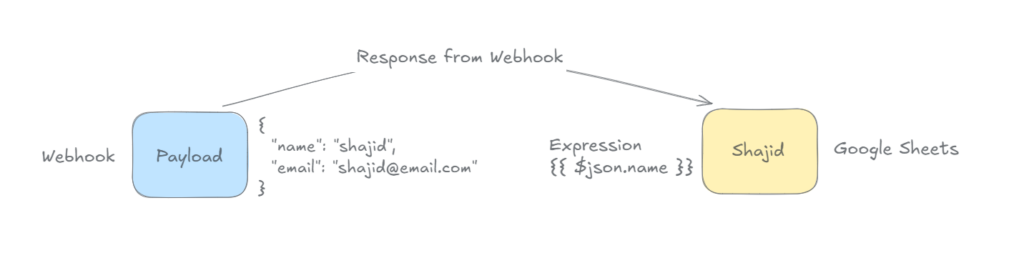
When a webhook fires, form data comes in. That data is now $json. When an HTTP request returns a response, that response is $json. When you read a row from Google Sheets, that row is $json.
Here’s where beginners hit their first real problem. Webhooks are the most common way to start n8n workflows, and webhook data always comes nested under body. You’ll see this structure constantly.
The mistake? Trying {{ $json.email }}. That field doesn’t exist at the root level. You need {{ $json.body.email }}.
When your webhook expressions return undefined, check the actual data structure first. Click the node, look at the output tab, see where your fields actually live. Then write your expression to match that structure.
These are one-line operations. Clean, readable, fast.
The Code node wins when your logic get complex
// This needs the Code node:
const activeItems = $input.all().filter(item => item.json.active);
const total = activeItems.reduce((sum, item) => sum + item.json.price, 0);
const average = total / activeItems.length;

return {
  json: {
    count: activeItems.length,
    total: total,
    average: average
  }
};
You need variables to store intermediate results. You’re looping through items. You’re building a new object from scratch. These are Code node tasks.
Performance-wise, expressions and Code nodes run at similar speed for small operations. The real difference is maintainability.
Expressions keep your workflow visual and easy to scan. Code nodes hide the logic inside a black box.
Use expressions when you can, Code when you must.
One more thing: Expressions execute per item. If you’re processing 100 items, an expression runs 100 times. The Code node can process all 100 items at once using $input.all(). For complex multi-item logic, Code node is often cleaner.
Beyond $json, n8n gives you several built-in variables for different scenarios.
$input – Working with Multiple Items
Most expressions use $json, which represents the current single item. But workflows often process multiple items at once. That’s where $input comes in.
// Get all items from previous node
{{ $input.all() }}

// Get first item only
{{ $input.first().json.email }}

// Get last item
{{ $input.last().json.name }}

// Current item (usually same as $json)
{{ $input.item.json.id }}
When would you use this? Your workflow fetches 50 customer records from a database. You want to send one email that lists all 50 names. You can’t use $json.name here, that’s only the current item. You need $input.all() to access every item at once.
Another common pattern is you have multiple items but only care about the first one. Maybe you’re looking up a user by email and database returns a list. Use $input.first().json to grab that single record.
$node["Node Name"] Cross Node Data Access
Sometimes you need data from a node that’s not directly before the current one. Maybe you fetched user details in earlier HTTP request node, then did some processing, and now you need that original user data again.
// Reference data from a specific earlier node
{{ $node["HTTP Request"].json.userId }}

// Node names with spaces need brackets
{{ $node["Get User Data"].json.email }}
Note: node names are case-sensitive. {{ $node["http request"] }} won’t find a node named “HTTP Request”. Copy the exact name from your workflow.
“Referenced node is unexecuted” error means that node hasn’t run yet. Check your workflow path. If nodes run conditionally (through an IF node, for example), the referenced node might be on a path that didn’t execute.
$now – Timestamps and Dates
n8n includes Luxon for date handling, and $now gives you the current timestamp
// Current Unix timestamp
{{ $now }}

// Format as readable date
{{ $now.toFormat('yyyy-MM-dd') }}

// Calculate future dates
{{ $now.plus({ days: 7 }).toISO() }}

// Calculate past dates
{{ $now.minus({ months: 1 }).toFormat('yyyy-MM-dd') }}
This is useful for timestamping records, scheduling future actions, or filtering data by date ranges.
// Using + operator
{{ $json.firstName + " " + $json.lastName }}
// "John" + " " + "Doe" = "John Doe"

// Building URLs
{{ "https://api.example.com/users/" + $json.userId }}

// Template literals (backticks) for cleaner syntax
{{ `Hello ${$json.name}, your order #${$json.orderId} is ready` }}
Template literals are cleaner when you’re mixing text and variables. The backtick syntax (`) lets you drop variables directly into strings without concatenation. They also support multi-line text:
// Multi-line email template
{{ `Hi ${$json.name},

Your order #${$json.orderId} is ready for pickup.
Total: $${$json.total}

Thanks for your business!` }}
The backtick approach is especially useful when building formatted messages, HTML content, or API payloads where readability matters.
Extracting parts of text
// First 10 characters
{{ $json.description.substring(0, 10) }}

// Everything after position 5
{{ $json.code.substring(5) }}

// Split on space, get first part
{{ $json.fullName.split(" ")[0] }}
// "John Doe" → "John"
{{ $json.email.includes("@gmail.com") }}
// Returns true or false
Use this in IF nodes to route data based on content. Gmail users go one path, everyone else goes another.
n8n Specific String Methods
n8n extends JavaScript with custom transformation methods that make common data cleaning tasks easier. These methods are unique to n8n and aren’t available in standard JavaScript.
Method
Description
Example
extractEmail()
Extract email from text
{{ "Contact: user@example.com".extractEmail() }}
.extractDomain()
Extract domain from URL/email
{{ "https://example.com/path".extractDomain() }}
.toTitleCase()
Convert to Title Case
{{ "hello world".toTitleCase() }}
.toSentenceCase()
Capitalize first letter only
{{ "HELLO WORLD".toSentenceCase() }}
.toSnakeCase()
Convert to snake_case
{{ "Hello World".toSnakeCase() }}
.removeMarkdown()
Strip markdown formatting
{{ "**bold** text".removeMarkdown() }}
.hash()
Generate SHA256 hash
{{ "password123".hash() }}
.isEmpty()
Check if string is empty
{{ $json.field.isEmpty() }}
.isNotEmpty()
Check if string has content
{{ $json.field.isNotEmpty() }}
These methods are particularly useful for cleaning user input from forms:
// Extract email from messy contact field
{{ $json.body.contact.extractEmail() }}
// "Please contact me at john@example.com or call" → "john@example.com"

// Standardize company names
{{ $json.company.toTitleCase() }}
// "ACME CORP" → "Acme Corp"

// Create URL-friendly slugs
{{ $json.title.toSnakeCase() }}
// "My Blog Post Title" → "my_blog_post_title"
String Transformation Quick Reference
Operation
Method
Example
Result
Uppercase
.toUpperCase()
{{ "hello".toUpperCase() }}
HELLO
Lowercase
.toLowerCase()
{{ "HELLO".toLowerCase() }}
hello
Trim spaces
.trim()
{{ " text ".trim() }}
text
Replace text
.replace(old, new)
{{ "hello".replace("h", "j") }}
jello
Replace all
.replaceAll(old, new)
{{ "a b a".replaceAll("a", "x") }}
x b x
Check contains
.includes(text)
{{ "hello".includes("ell") }}
true
Get length
.length
{{ "hello".length }}
5
Substring
.substring(start, end)
{{ "hello".substring(0, 3) }}
hel
Split to array
.split(separator)
{{ "a,b,c".split(",") }}
["a","b","c"]
Array Operations (Working With Lists)
Arrays are everywhere in n8n. API responses return lists of items. Webhooks send arrays of selections. You’ll need these operations constantly.
Getting array length
{{ $json.items.length }}
// Returns number of items in the array
This is perfect for displaying comma-separated lists in emails or notifications.
Filtering arrays
// Get only active items
{{ $json.users.filter(u => u.active) }}

// Get items over a threshold
{{ $json.products.filter(p => p.price > 50) }}
Filter returns a new array containing only items that match your condition. The u => u.active syntax is an arrow function – u represents each item as you loop through.
Map transforms each item in an array. You’re taking a complex object and pulling out just one field from each.
Chaining operations
// Get active users' emails as comma-separated string
{{ $json.users
  .filter(u => u.active)
  .map(u => u.email)
  .join(", ")
}}
This is where arrays get powerful. Filter first to narrow down items, map to extract the field you need, join to create readable output. Three operations, one expression.
Checking if array includes something
{{ $json.tags.includes("urgent") }}
// Returns true if "urgent" is in the array
Here’s a real-world example that combines several of these, and this comes in handy.
// Webhook receives form with checkboxes
{
  "body": {
    "interests": ["automation", "productivity", "ai"],
    "name": "John"
  }
}

// Create readable text from interests
{{ "User " + $json.body.name + " is interested in: " + $json.body.interests.join(", ") }}

// Output: "User John is interested in: automation, productivity, ai"
Operation
Method
Example
Result
Get length
.length
{{ [1,2,3].length }}
3
Access item
[index]
{{ ["a","b","c"][1] }}
b
Join to string
.join(separator)
{{ ["a","b"].join(", ") }}
a, b
Filter items
.filter(condition)
{{ [1,2,3].filter(n => n > 1) }}
2
Transform items
.map(transform)
{{ [1,2,3].map(n => n * 2) }}
[2,4,6]
Check includes
.includes(value)
{{ ["a","b"].includes("a") }}
true
Find first match
.find(condition)
{{ [1,2,3].find(n => n > 1) }}
2
Get subset
.slice(start, end)
{{ [1,2,3,4].slice(1, 3) }}
[2,3]
Advanced JSON Querying with JMESPath
When you’re working with deeply nested JSON or need to query complex data structures, dot notation can get messy fast. JMESPath is n8n’s built-in solution for powerful JSON querying without reaching for the Code node.
JMESPath (JSON Matching Expression paths) lets you extract, filter, and transform JSON data using a query language specifically designed for this purpose. n8n includes it by default.
// Extract all order totals from array of orders
{{ $jmespath($json, "orders[*].total") }}

// Input:
{
  "orders": [
    {"id": 1, "total": 99.99},
    {"id": 2, "total": 149.50}
  ]
}
// Output: [99.99, 149.50]
The [*] syntax means “all items in this array.” Much cleaner than looping with map.
Filtering arrays
// Get only active users
{{ $jmespath($json, "users[?active==`true`]") }}

// Get products over $50
{{ $jmespath($json, "products[?price > `50`]") }}

// Get orders from specific customer
{{ $jmespath($json, "orders[?customerId==`12345`]") }}
The [?condition] syntax filters arrays. Note the backticks around values – JMESPath requires them for literals.
This is powerful for cleaning up API responses before sending them to another service. Extract only what you need and rename fields in one expression.
When to use JMESPath vs dot notation
Use dot notation for simple field access:
{{ $json.user.email }} // Simple, clear
Use JMESPath when you need to,
Query arrays without explicit looping
Filter data based on conditions
Extract and reshape nested structures
Avoid writing complex Code node logic
Real world example – processing Stripe webhook
// Stripe sends nested invoice data
// Extract all line item descriptions where amount > $100

{{ $jmespath($json.body.invoice, "lines.data[?amount > `10000`].description") }}

// Gets descriptions of all line items over $100 (Stripe uses cents)
JMESPath won’t replace all your array operations, but for complex queries on nested data, it’s significantly cleaner than chaining multiple maps and filters.
Working with Objects
Objects are everywhere in n8n – API responses, database records, form data all come in as JavaScript objects. Beyond basic field access, you’ll need these operations for combining data, checking properties, and transforming structures.
Accessing objects properties dynamically
Sometimes you don’t know the exact field name ahead of time. Maybe it’s based on user selection or comes from another node.
// Static access (you know the field name)
{{ $json.user.name }}

// Dynamic access (field name comes from data)
{{ $json.user[$json.selectedField] }}

// If selectedField = "email", this accesses $json.user.email
Iterating over object properties
// Get all property names (keys)
{{ Object.keys($json.settings) }}
// {theme: "dark", lang: "en"} → ["theme", "lang"]

// Get all values
{{ Object.values($json.settings) }}
// {theme: "dark", lang: "en"} → ["dark", "en"]

// Get key-value pairs
{{ Object.entries($json.settings) }}
// {theme: "dark", lang: "en"} → [["theme", "dark"], ["lang", "en"]]
Object.entries() is particularly useful when you need to loop through properties in a Code node or build custom output.
Spread syntax (...) is cleaner than manually copying properties. Later properties override earlier ones if there are duplicate keys.
Checking if properties exist
// Check if property exists
{{ "email" in $json.user }}
// Returns true if user object has email property

// Check using hasOwnProperty (more precise)
{{ $json.user.hasOwnProperty("email") }}
The in operator checks the entire prototype chain. hasOwnProperty() only checks the object itself. For workflow data, they usually give the same result.
Practical example – combining data from multiple nodes:
// Merge user details from database with form submission
{{
  {
    ...($node["Database Query"].json),
    ...($json.body),
    updatedAt: $now.toISO()
  }
}}

// Database returns: {userId: "123", status: "active"}
// Form sends: {body: {email: "new@example.com", phone: "555-1234"}}
// Result: {userId: "123", status: "active", email: "new@example.com", phone: "555-1234", updatedAt: "2026-01-18T..."}
This pattern is common when updating records – grab existing data, merge new data, add a timestamp.
Numbers and Math Operations
Number operations are straightforward. Just remember that JavaScript follows standard math precedence (multiplication before addition, etc.).
The toFixed() method is crucial for dealing with money. JavaScript’s floating point math creates weird results like 0.1 + 0.2 = 0.30000000000000004. Use toFixed(2) to clean that up.
Comparisons
{{ $json.stock > 0 }}  // true if stock is positive
{{ $json.price >= 100 }}  // true if price is 100 or more
{{ $json.quantity === 0 }}  // true if quantity is exactly 0
These return true or false, perfect for IF nodes.
Number Operations Quick Reference
Operation
Method
Example
Result
Add
+
{{ 10 + 5 }}
15
Substract
-
{{ 10 - 5 }}
5
Multiply
*
{{ 10 * 5 }}
50
Divide
/
{{ 10 / 5 }}
2
Round to decimals
.toFixed(n)
{{ (10.567).toFixed(2) }}
“10.57”
Round to integer
Math.round()
{{ Math.round(10.5) }}
11
Round up
Math.ceil()
{{ Math.ceil(10.1) }}
11
Round down
Math.floor()
{{ Math.floor(10.9) }}
10
Absolute value
Math.abs()
{{ Math.abs(-10) }}
10
Maximum
Math.max()
{{ Math.max(10, 20, 5) }}
20
Minimum
Math.min()
{{ Math.min(10, 20, 5) }}
5
Working with Dates and Time (Luxon Basics)
n8n includes Luxon for date handling. You don’t need to import anything – it’s already available.
Most expressions are one-liners. But sometimes you need variables or multi-step logic. That’s where IIFE (Immediately Invoked Function Expression) comes in.
The syntax looks intimidating but it’s just wrapping your code in a function that executes immediately:
{{
  (() => {
    // Your code here with variables
    return result;
  })()
}}
The (() => { ... })() wrapper creates a function scope where you can use variables and multiple statements.
This calculates the number of months between two dates and rounds the result. Too complex for a single line, but IIFE makes it possible without switching to a Code node.
The ternary operator format is condition ? valueIfTrue : valueIfFalse. You can chain them, but it gets messy fast. For more than 2-3 conditions, use IIFE:
When to stop and use Code node instead: If your IIFE exceeds 10 lines or needs loops, switch to Code node. Expressions should remain readable at a glance. Complex logic belongs in Code nodes where you have proper debugging and structure.
Common Expression Errors (And How to Fix Them)
Error Message
Common Cause
Quick Fix
“Cannot read property of undefined”
Accessing missing/null field
Use optional chaining: {{ $json.field?.property }}
“Referenced node is unexecuted”
Node hasn’t run yet
Check workflow execution order
“Invalid syntax”
Typo, missing bracket, wrong mode
Use expression editor, check brackets balance
“Expression not recognized”
Missing {{ }} wrapper or Fixed mode
Toggle to Expression mode, add wrapper
Webhook data shows undefined
Not accounting for body nesting
Use {{ $json.body.field }} instead of {{ $json.field }}
Error “Cannot read property of undefined”
What it means: You’re trying to access a field that doesn’t exist in your data.
Common causes
The field name is misspelled (JavaScript is case-sensitive)
The data structure is different than you expected
Previous node returned empty results
The field is optional and doesn’t always exist
Fix with optional chaining
// Before (breaks if email is missing):
{{ $json.user.email }}

// After (returns undefined instead of crashing):
{{ $json.user?.email }}

// With fallback value:
{{ $json.user?.email || 'no-email@example.com' }}
The ?. operator stops execution if user doesn’t exist instead of throwing an error. The || operator provides a default value if the field is undefined or empty.
Error “Referenced node is unexecuted”
What it means: You’re trying to access data from a node that hasn’t run yet.
This happens when you reference $node["Node Name"] but that node is on a workflow path that didn’t execute. Maybe it’s after an IF node and went down the other branch. Maybe it’s disabled.
Fix: Restructure your workflow so the node you’re referencing always executes before you try to access its data. Or handle the missing data with optional chaining.
Real World Workflow Examples (Building Blocks With n8n Expressions)
Scenario 1: Processing Contact Form Submissions
// Webhook receives:
{
  "body": {
    "firstName": "john",
    "lastName": "doe",
    "email": "JOHN@EXAMPLE.COM",
    "message": "  Need help with automation  "
  }
}

// Clean and format for CRM:

// Full name (capitalize first letter of each)
{{ $json.body.firstName.charAt(0).toUpperCase() + $json.body.firstName.slice(1) + " " + $json.body.lastName.charAt(0).toUpperCase() + $json.body.lastName.slice(1) }}
// "john doe" → "John Doe"

// Or use n8n's custom method (cleaner):
{{ ($json.body.firstName + " " + $json.body.lastName).toTitleCase() }}

// Email (lowercase, no spaces)
{{ $json.body.email.toLowerCase().trim() }}
// "JOHN@EXAMPLE.COM" → "john@example.com"

// Message (remove extra whitespace)
{{ $json.body.message.trim() }}
// "  Need help with automation  " → "Need help with automation"
Scenario 2: E-Commerce Order Processing
// Calculate order total with tax
{{ ($json.subtotal * 1.08).toFixed(2) }}

// Tag high-value orders
{{ $json.subtotal >= 1000 ? 'VIP' : 'Standard' }}

// Format order date for display
{{ DateTime.fromISO($json.orderDate).toFormat('MMM dd, yyyy') }}
// "2026-01-18T00:00:00.000Z" → "Jan 18, 2026"

// Create order summary using template literal
{{ `Order #${$json.orderId} - ${$json.items.length} items - Total: $${$json.total}` }}
// "Order #12345 - 3 items - Total: $156.99"
Scenario 3: Multi Node Data Combination
// Combine user data from earlier node with current order
{{ $node["Get User"].json.name + " ordered " + $json.productName }}
// "Sarah ordered Premium Plan"

// Mix webhook data with database lookup
{{ $json.body.email + " (Customer ID: " + $node["Database Query"].json.customerId + ")" }}
// "user@example.com (Customer ID: C-001)"
```

These scenarios mirror actual automation workflows. You can adapt these patterns directly to your use cases.

## Quick Reference Cheat Sheet

Keep these patterns handy for quick lookup.

**Data Access:**
```
Current node data: {{ $json.fieldName }}
Nested data: {{ $json.parent.child.field }}
Spaces in names: {{ $json["Field Name"] }}
Previous node: {{ $node["Node Name"].json.field }}
All items: {{ $input.all() }}
First item: {{ $input.first().json.field }}
```

**Common Transformations:**
```
Uppercase: {{ $json.text.toUpperCase() }}
Lowercase: {{ $json.text.toLowerCase() }}
Combine text: {{ $json.first + " " + $json.last }}
Template literal: {{ `${$json.first} ${$json.last}` }}
Array length: {{ $json.items.length }}
Join array: {{ $json.tags.join(", ") }}
Current date: {{ $now.toFormat('yyyy-MM-dd') }}
Round money: {{ ($json.price * 1.1).toFixed(2) }}
Extract email: {{ $json.text.extractEmail() }}
Title case: {{ $json.name.toTitleCase() }}
```

**Conditionals:**
```
Simple if/else: {{ $json.active ? 'Yes' : 'No' }}
Check exists: {{ $json.email?.includes("@") }}
Fallback value: {{ $json.name || 'Unknown' }}
```

**Advanced:**
```
JMESPath query: {{ $jmespath($json, "users[*].email") }}
JMESPath filter: {{ $jmespath($json, "items[?price > `50`]") }}
Object keys: {{ Object.keys($json.settings) }}
Merge objects: {{ { ...$json.user, ...$json.prefs } }}
What’s Next? From Expression to Workflows
You now know how to access data $json, transform strings and arrays, handle dates, query JSON with JMESPath, work with objects, and fix common errors. That covers 90% of the expressions you’ll write.
The next level is knowing when to stop using expressions. If you’re writing 15-line IIFEs with nested loops, that logic belongs in a Code node. Expressions keep workflows readable. Code nodes handle complex transformations.
Practice with simple expressions first. Grab a field, make it uppercase, combine two fields. Build muscle memory. Then tackle transformations – filtering arrays, calculating totals, formatting dates. The syntax clicks after you’ve used it a few times.
Master data extraction before moving to transformations. Get comfortable accessing fields, then start manipulating them. That progression works better than trying to learn everything at once.
When you’re ready to build complete workflows with these expressions, start here
When I started my n8n journey, credentials weren’t an issue for me, it was all plug and play and everything seemed to work, then I stopped workflow for few weeks, and started the workflow again, then I got credential error. I was like! what! what just happened, then I had to re-authenticate to make it work.
But, what if this issue constantly happen for n8n workflow builder occasionally, that’s pure annoyance. so the builder needs to rinse and repeat. So OAuth2 clients needs to be refresh it’s tokens.
This ain’t a bug in your workflow. It’s how OAuth2 access tokens work by default. They expire after 7 days. Everytime they expire, you need to manually re-authenticate it (This method considered as a fix, but it’s not efficient). For automated workflows that should run without any interruptions.
I’ve seen lots of users had posted their frustration “credentials expiring” in reddit, and community forums.
Alright, let’s fix this credentials expiring issue right now.
Why Do We Need Access & Refresh Tokens?
The Refresh token in Google OAuth2 for n8n acts as a long-term key that allows n8n to generate a short-term access key (access token) without requiring you to log in manually every hour.
Two Types of Tokens
Access token: This is the actual key n8n uses to read your sheets or add google calendar events. For security purposes this key will expire after 1 hour.
Refresh token: This is a special key stored securely in your n8n database. It has only one job, ask Google to get a new token if current refresh token expired.
Next thing, we are gonna see how does this actually works.
When you setting up credentials, This is what will happen.
Initial AuthProcess: You click “Sign in with Google” in n8n.
Exchange: n8n sends your consent code to Google and requests access_type=offline
Storage: Google sends back an Access token and a Refresh token. n8n saves both.
Auto Renewal
n8n attempts to run a node (e.g. Google sheet read)
if Google replies 401 unauthorized (Token expired), n8n automatically pauses
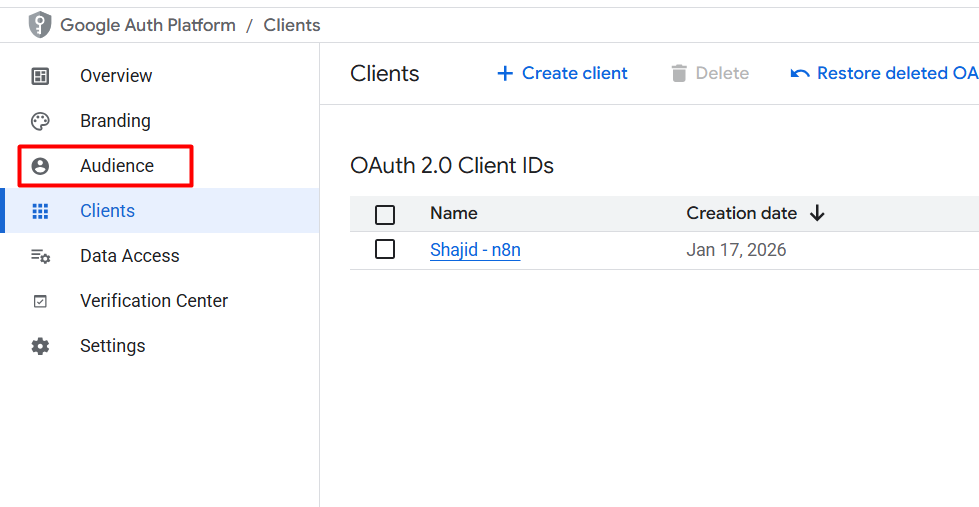
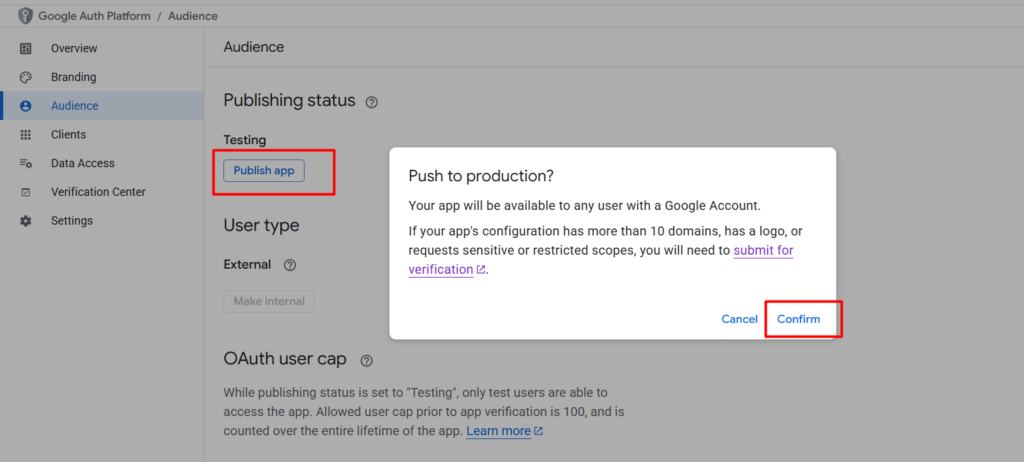
Click the button to Publish App (push to production)
Note: You don’t need to submit your app for verification if you are only using it for yourself (using your own email address). However, you’ll see a warning screen says Google hasn’t verified this app, but you click advanced > Go to App(unsafe) to bypass it.
Configuration Checklist
To ensure the Refresh token mechanism work correctly, Your Google Cloud Console settings must match this criteria.
Redirect URL: Must be exactly https://[YOUR-N8N-DOMAIN]/rest/oauth2-credential/callback or https://localhost:5678/rest/oauth2-credential/callback
Scopes: if you add any new scopes (e.g., adding Gmail to an existing Drive credentials), the old Refresh token may become invalid. You must re-authenticate to generate a new one that covers all the updated scopes.
If you’re setting up n8n credentials for the first time or working with other services, Check our n8n credentials and service guide for step by step instructions across all the major platforms.
Your workflow should now run uninterrupted. No more weekly re-authenticate cycles.
Handling errors gracefully is one of the most important skills you need to master in n8n to keep your workflows running without interruption.
I built a workflow that scraped product data from a website, enriched it through an API, and added everything to Google Sheet. Tested it multiple times. Worked perfectly every time.
Set it to run every hour before going to bed. Felt pretty good about it though.
Next morning, I checked the sheet, same data from yesterday. Nothing new has been enriched, and saw my workflow stopped at 5:12 AM.
The website was down for maintenance. Just a 20-minute blip. But my workflow didn’t recover. Didn’t log error. Didn’t retry. Just stopped.
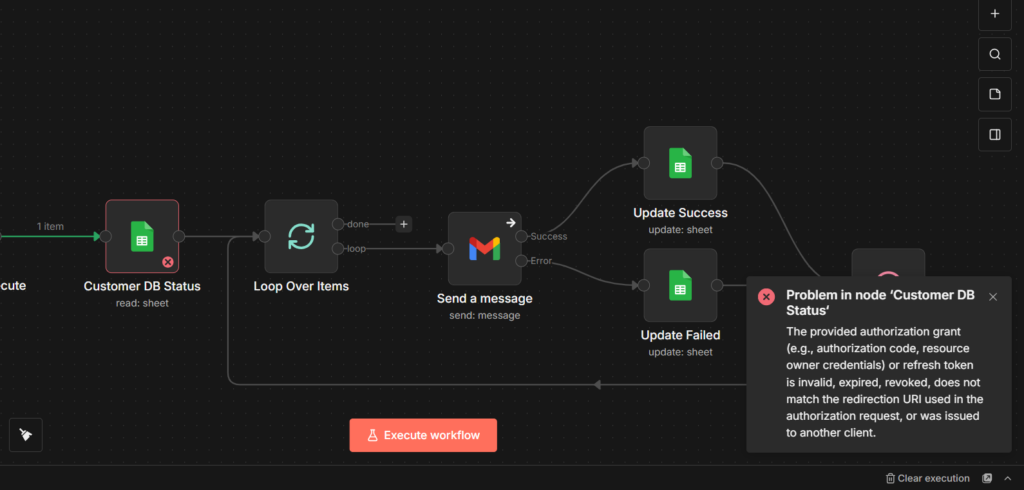
Lost 9 hours of data collection because I didn’t know handle a simple error at that time.
This is the reality of automation without error handling
APIs go down. Websites change their structure. Data comes in unexpected formats. Internet connection issues. Rate limits. Even the most carefully designed workflows WILL encounter problems.
The difference between fragile workflow and a production-ready automation isn’t avoiding errors (that’s impossible in my personal experience). It’s building workflows that can detect problems, recover gracefully, and keep running even when things go wrong.
In this guide, you’ll learn
The most common errors you’ll face in n8n (and why they happen)
How to build workflows that notify you when problems occur
Practical strategies to validate data before it breaks your workflow
Real working examples you can copy and test it immediately
The Most Common n8n Errors (and Why They Happen)?
When building a workflow in n8n, you’ll typically encounter these errors.
Error Type
What it looks like
Why it happens
HTTP failures
ETIMEDOUT, getaddrinfo ENOTFOUND
API is down, internet dropped, or wrong URL.
Auth errors
401 Unauthorized, 403 Forbidden
Expired API keys, missing headers, or stale OAuth tokens.
Rate limits
429 Too Many Requests
You hit your API quota or are requesting too frequently.
Missing data
Cannot read property ‘x’ of undefined
A field doesn’t exist, or previous nodes returned empty results.
Timeouts
Execution timed out, 10000ms exceeded
Processing too much data or the API is too slow.
JSON errors
Unexpected token < in JSON
The API returned HTML (an error page) instead of JSON.
Config errors
Column “Name” not found
Changed Google Sheet headers, deleted Slack channels, or typos.
The Pattern You’ll Notice
most errors fall into three categories
External failures (APIs down, network issues) – Need retry logic
Data problems (missing fields, wrong format) – Need validation
Configuration mistakes (wrong credentials, typos) – Need testing
The 3 Essential Error Handling Techniques
Now that you know what errors to expect, let’s talk about how to actually handle them. You don’t need complex setups or advanced knowledge. These three techniques will cover 90% of your error handling needs.
Technique 1: Error Trigger – Get Notified When Things Break
What it does: Catches any error in your workflow and lets you know immediately via slack, email, discord or wherever you want.
When to use it: Every production workflow. Period. If a workflow runes without you watching it, you need to know when it fails.
Before you setting up Error Trigger, make sure:
Your main workflow uses an automated trigger (e.g, schedule, Webhook, etc)
Your Error Workflow is published/active (not just saved)
Critical nodes don’t have continue on fail enabled in their individual settings
Alright let’s get things step by step, then you would understand what it is.
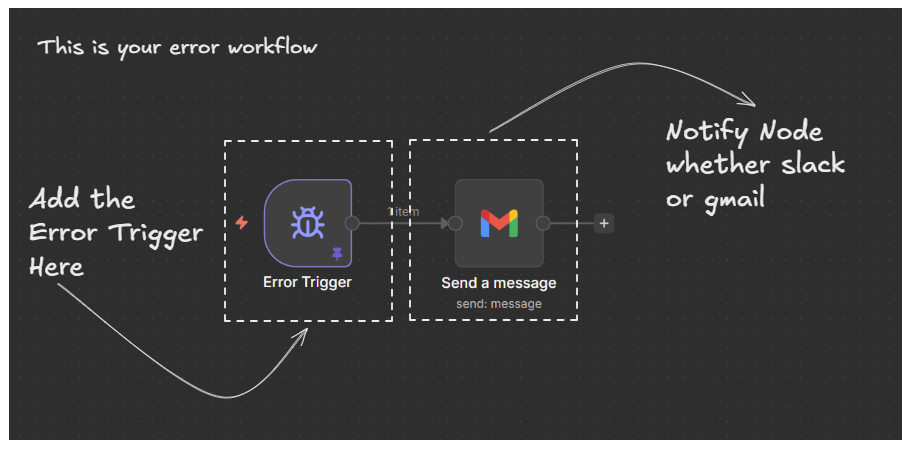
Step 1: Create a workflow and add Error trigger, and also connect node of Gmail or slack to pass the appropriate information to the end-user
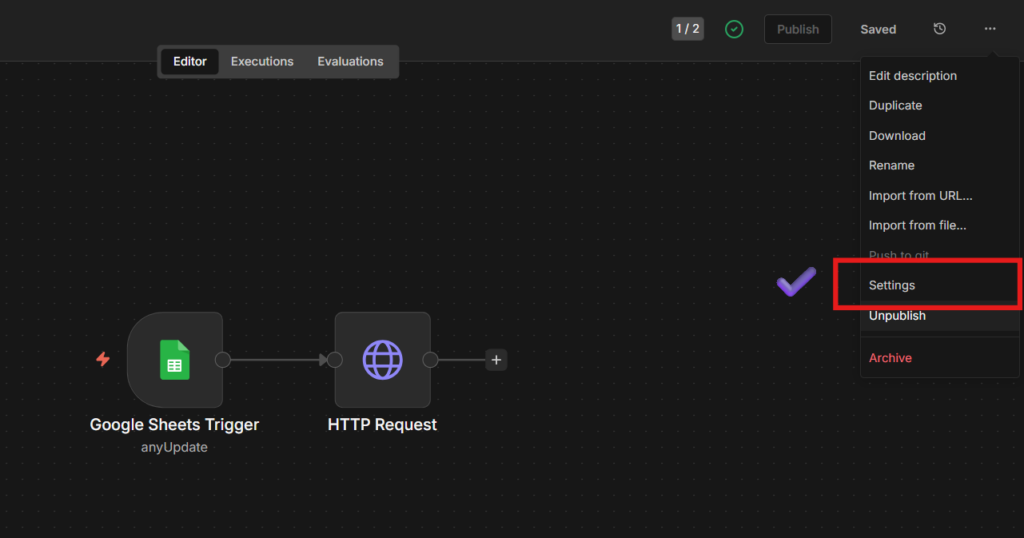
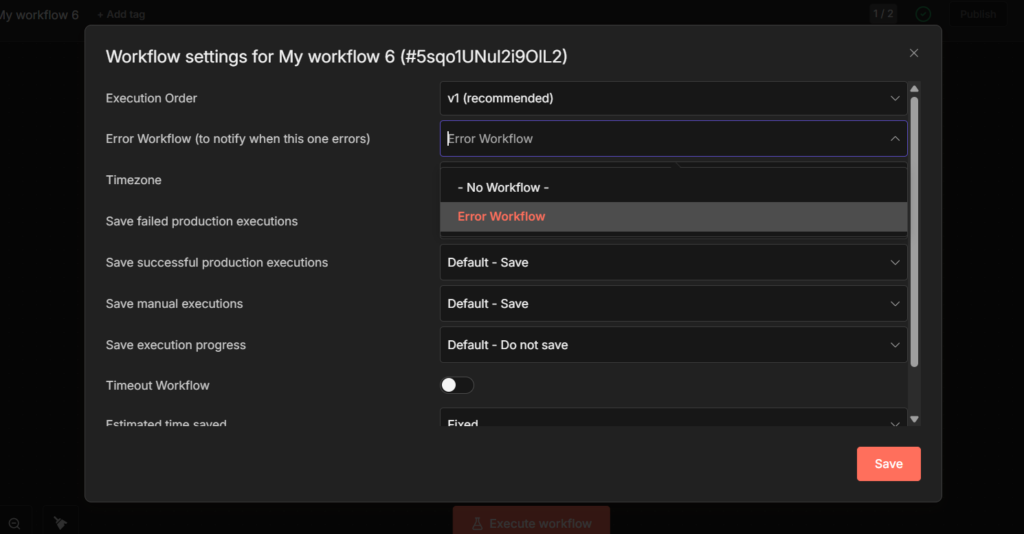
Step 2: Go to Your Main Workflow > Settings > Error Workflow > Select your Error Workflow
That’s it. so whenever you encountered any workflow errors, then Error Workflow will automatically triggers and notify you via an email. It totally depends on what kind of notification node you use, and yet you still can use slack, telegram or whatsapp to reach out with the exact error.
an example of email I received due to an error that I made purposely to show you all how it should work.
Step 3: Test it
Since Error trigger doesn’t work with manual executions, you need to test it with an automated trigger
Add a Schedule trigger to your main workflow (set to run every 1 minute)
Make sure workflow will fail (wrong API URL – In HTTP node, add GET , and change the URL to somewhat like googleyysadas.com
Wait for the scheduled execution
You should receive an error notification
After testing it, you can switch back to your preferred trigger type.
Technique 2: Validate Data Before Processing It (IF Nodes)
Check if data exists and is valid BEFORE you try to use it. Prevents crashes from missing or malformed data.
When to use this: Anytime you’re processing data from external sources (Google Sheets, APIs, webhooks, web scraping) where you can’t guarantee the format of completeness.
Example: Validating customer data
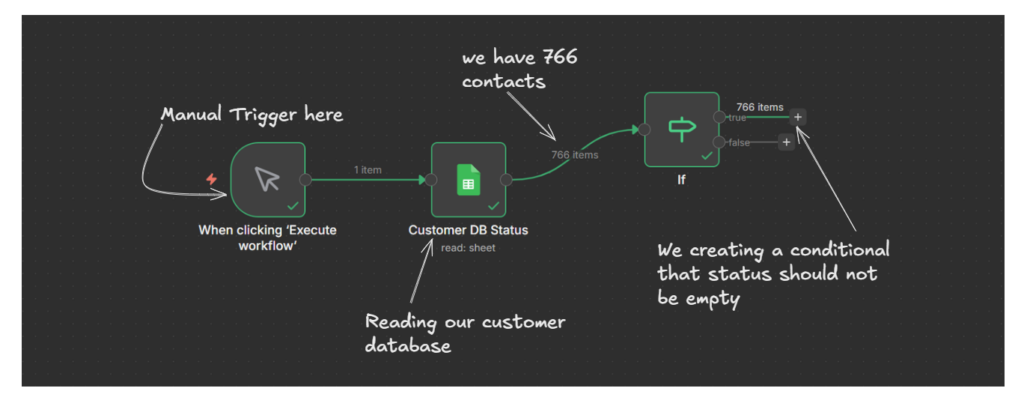
I have a customer database with 766 contacts in Google Sheets. Before sending them automated emails, I need to make sure each contact has a valid status field but not empty.
The Setup:
Manual trigger: to start the workflow
Google Sheets: Reads customer database (766 contacts)
IF Node: Checks “Is status field is empty?”
True Path: 766 items with valid status (process manually)
False Path: contacts with missing status (log or skip)
The Result:
All 766 contacts had valid status fields, so they all went through TRUE path. If any contacts had missing status, they would have gone to false path where you could,
Log them to an “Error Sheet”
Skip processing them
Send a notification about incomplete data.
Without this validation, the workflow would crash the moment it tried to use a missing status field. With validation, it gracefully handles the incomplete data.
Technique 3: Status Tracking With Continue on Fail
I’m going to show you production-ready pattern I use when processing large batches of data. Instead of just letting failures disappear into execution logs, I update my Google Sheets or database to track exactly which items succeeded and which failed.
Pattern: Instead of stopping on the first error, we let the node fail, catch it, and record the results in the database.
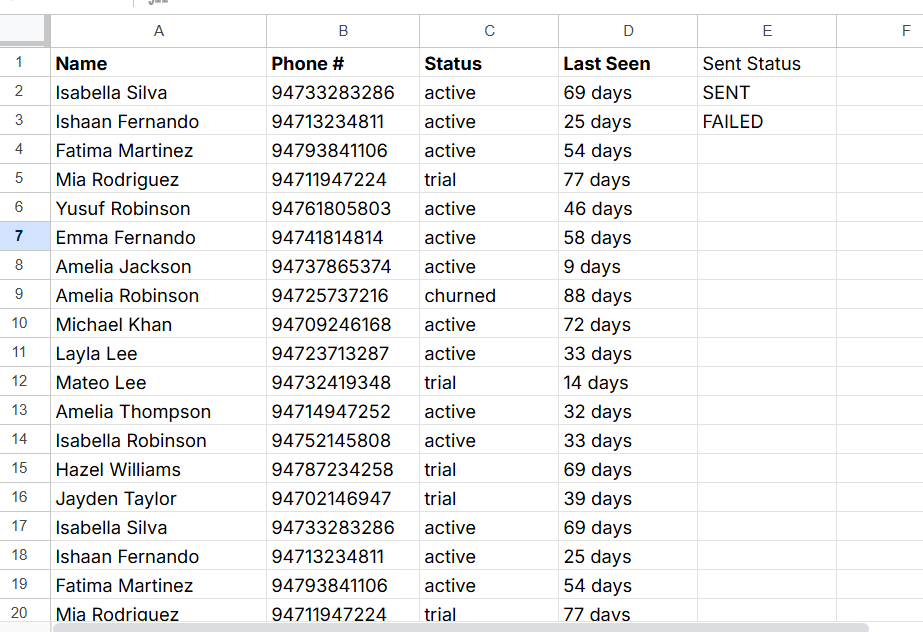
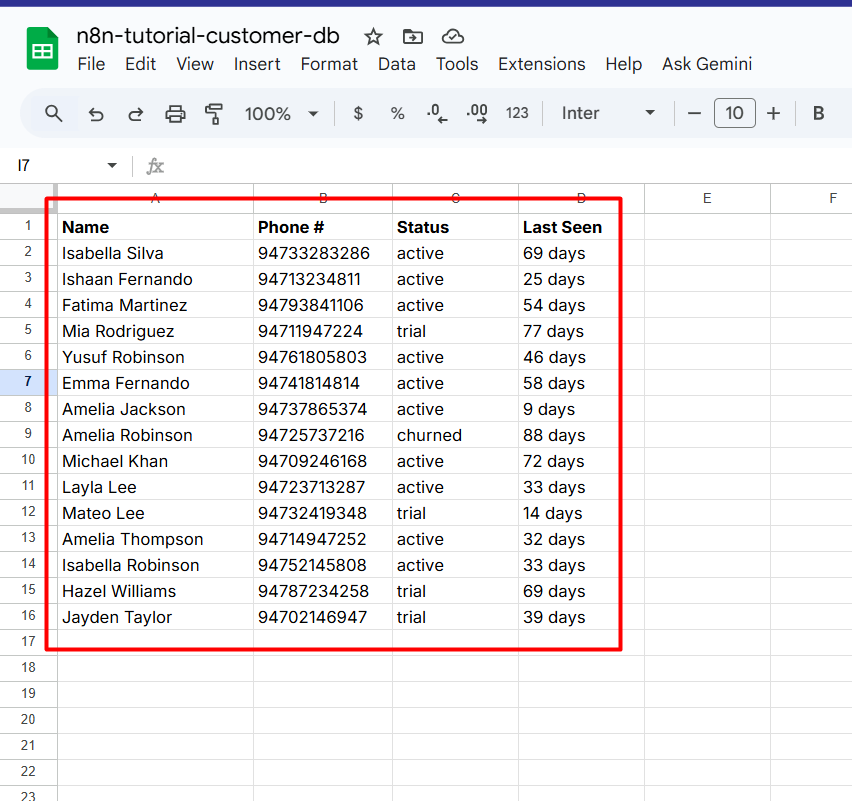
FYI: these Phone # are fake. generated with claude.
The Complete Setup
I have 766 customers contact in Google Sheet. I need to send them all welcome emails, but I know some emails address might be invalid or cause errors. Here’s how I handle it.
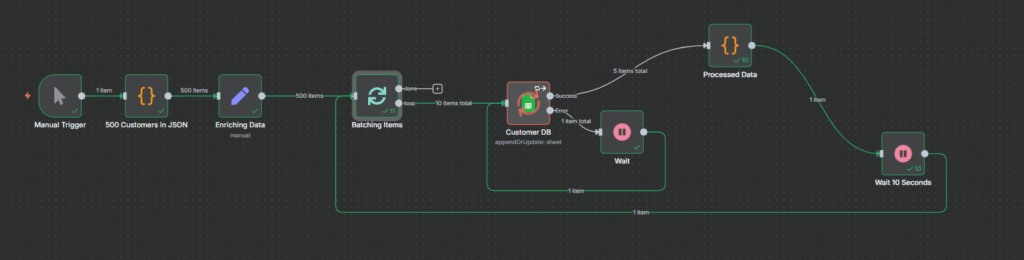
The Workflow breaks down like this
Read all 766 contacts from Google Sheet
Loop over items – Process them in batches (1 by 1 or you can add 50 too)
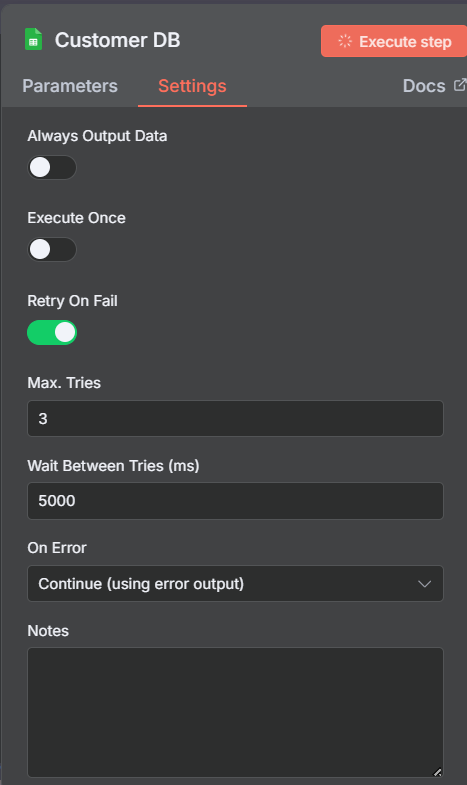
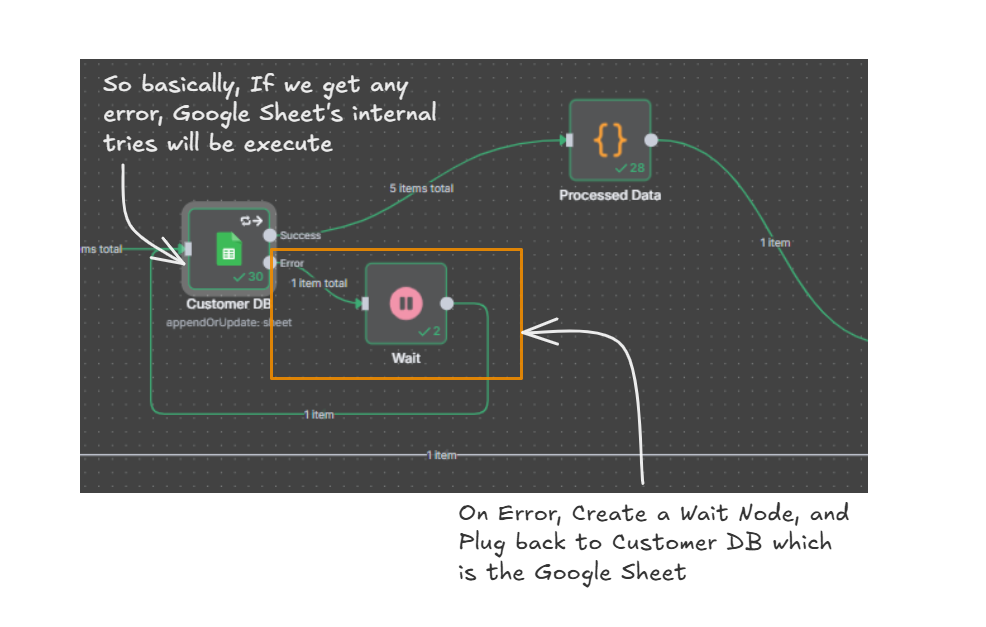
Gmail node with Continue on Fail enabled – This creates two outputs paths
Success path: Email that sent successfully
Error path: Emails that failed
Update success: If email sent successfully, update the sheet with status = SENT
Update failed: if it fails, update the sheet with the status = Failed
Wait 5 seconds: it’s better to give nodes a break.
Loop back: Process the next batch.
Why this works flawlessly?
When I ran with workflow with 766 contacts:
760 emails sent successfully (marked SENT and it was my end-goal for this automation)
6 emails failed (marked Failed)
I got a complete audit trail
So I create a new workflow, and add a schedule trigger to try out failed ones.
This pattern scales. I’ve used it with 50 contacts and with 5000 contacts. Same workflow, just adjust the batch size.
My Final Thoughts
Remember the workflow I told you about? the one that stopped at 5:12 AM and cost me 9 hours of data collection?
I rebuilt the full framework with these error handling I covered today. I saw lots of complex stuffs in the n8n community regards to error handling, but these 3 would be sufficient, perhaps totally depends on the use-cases and different situations.
so my full framework running for couple of months and processed around 50k data and hundreds of errors, yeah obviously that’s goes for all of us. But it never stops anymore. It logs the errors, update sheets (now data-table), notifies me if needed, and keep processing everything else.
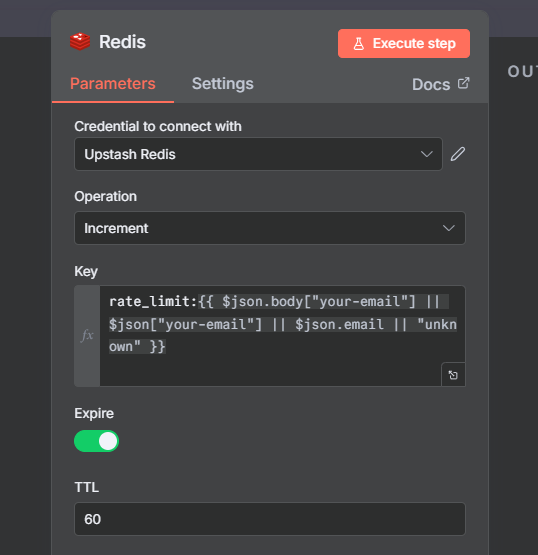
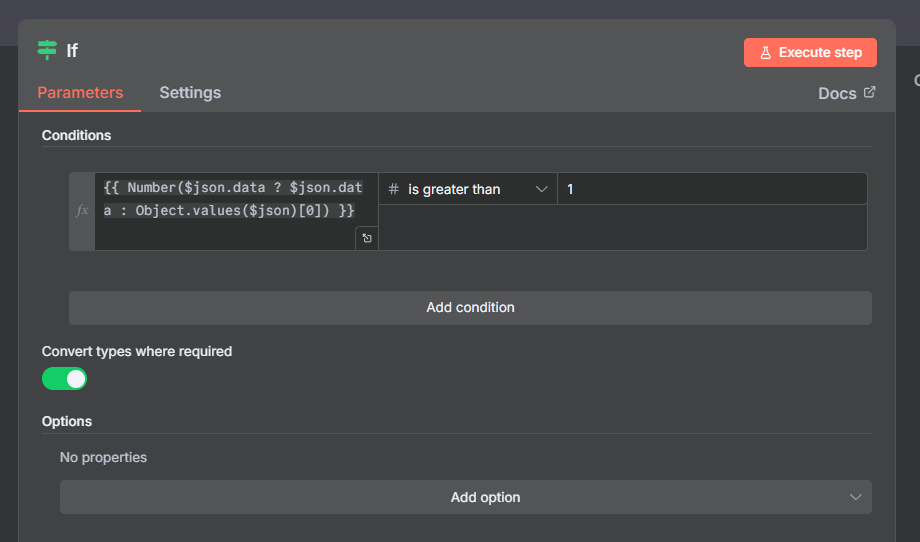
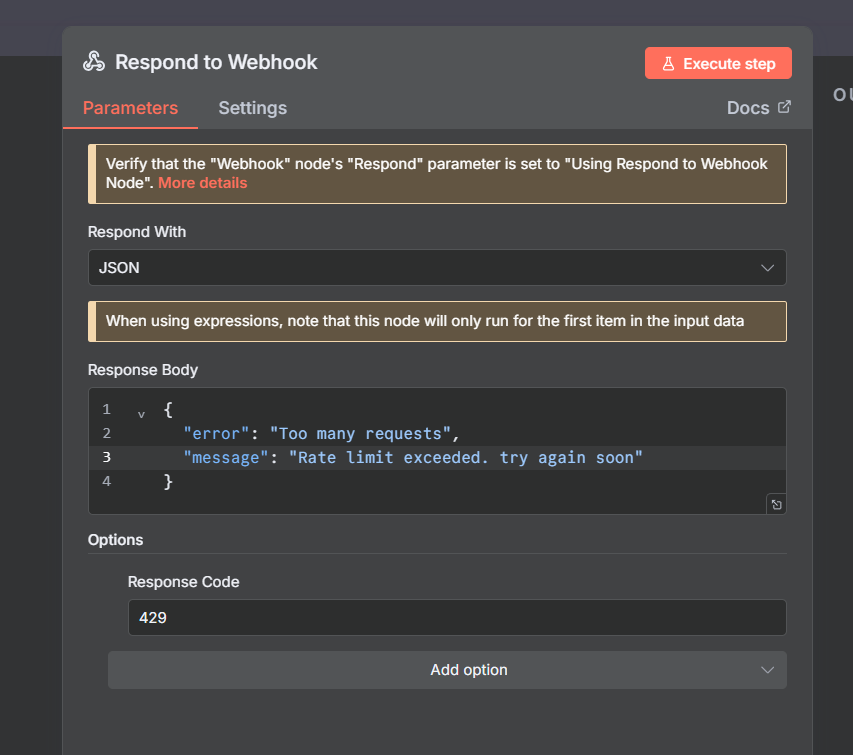
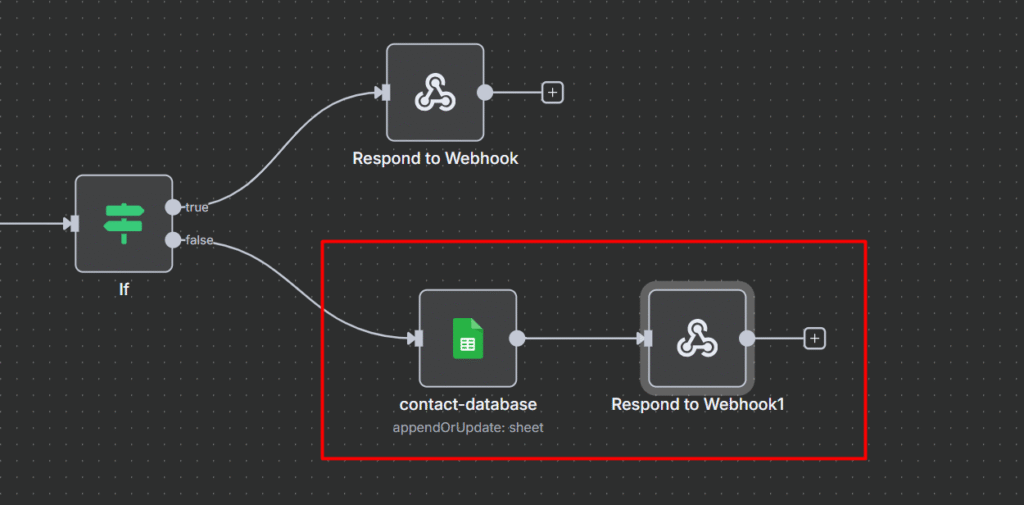
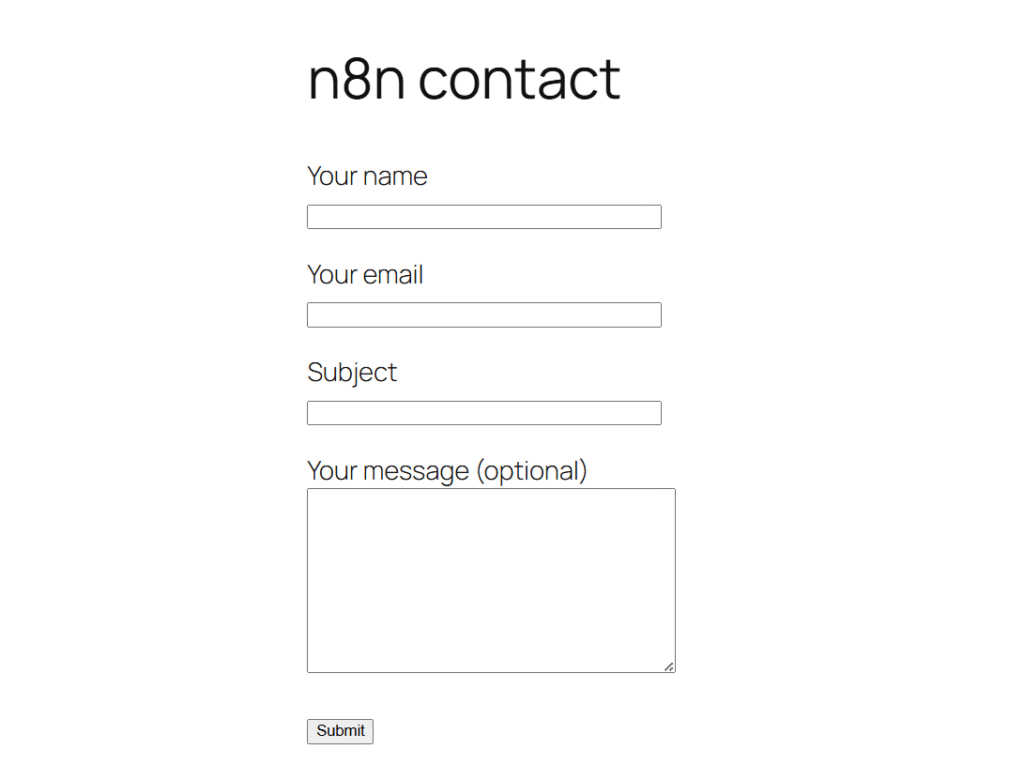
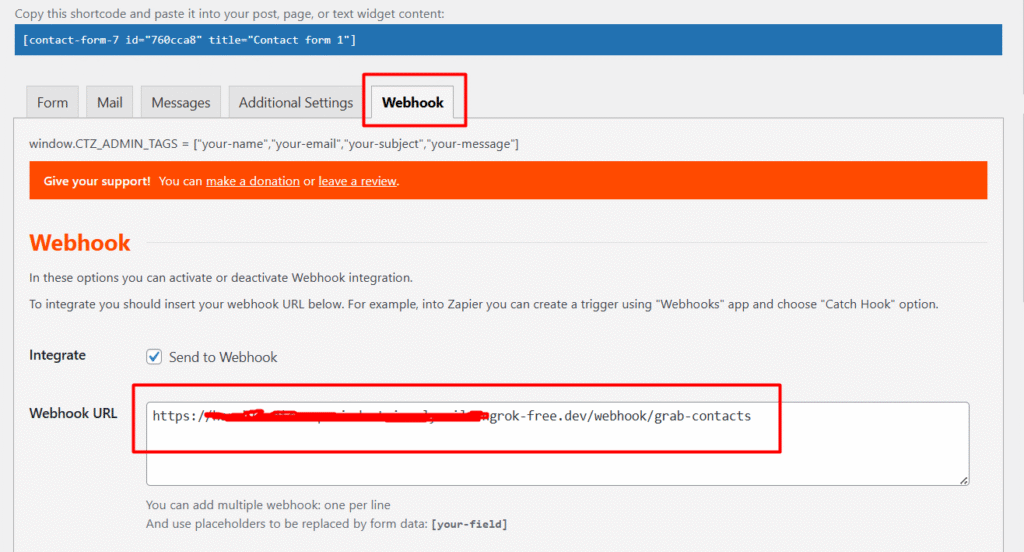
Just assume that you’ve created a custom form in WordPress to obtain leads, and of course, you might encounter some unusual form submissions or spams like 10,000 submissions in a minute, but it’s all are worthless leads – To prevent this, we are going to add a guard, that’s going to strictly allow few people only for a certain time period. That’s what it is.
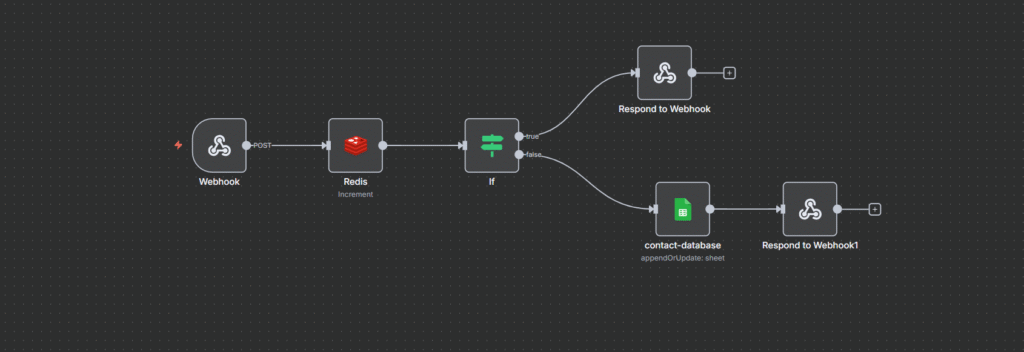
So we are going to build such a handy workflow to handle such attacks efficiently with Upstash + n8n.
Why Redis for Rate Limiting?
I added this sub-heading because one of a commenter in my reddit-post shared the same question? Why redis for rate limiting?
You might be thinking “Can’t I just use n8n’s built-in throttling?”
Aye, sure, for throttling your requests to external APIs, but for protecting such a case I have mentioned above, then you should need a custom solution. That’s where Upstash Redis comes in to the play.
Persistent State: Data lives outside n8n’s memory. Workflow restarts don’t reset your counters. This is critical for production
Speed: In-memory operations happens in microseconds. Your rate checks add virtually zero latency to each requests.
Built-in TTL: Key automatically expires, No clean-up jobs, No database bloat, Set it to 60 seconds. Perfect for time-windowed rate limiting
Per-use tracking: You can rate limit by email, IP, API Key, or any identifier. Each user get their own counter.
Atomic Operations: the INCR command is thread-safe, Multiple simultaneous requests won’t break your counter – crucial when handling concurrent requests.
Why Upstash Specifically?
Serverless (no Redis server to manage or maintain)
Global edge network (low latency worldwide)
Generous free tier. (500k commands per month / 50GB Bandwidth)
Pay as you go – $0.2 / 100k commands
Alright, for our workflow we don’t need the pay as you go, so you can stay for free tier, until you hit the maximum requests. Literally, small to medium sites you’ll stay on the free tier forever.
Understanding Rate Limiting Pattern
Before we dive into the workflow, let’s understand how counter-based rate limiting works, It’s beautifully simple.
Requests comes in > Extract an identifier (email, IP or API Key)
Increment counter in Redis > Add 1 to counter, set TTL if it’s a fresh request
Check the counter > if it’s above your threshold, deny the request
Allow or deny > Either process the requests or return 429 (Too many requests)
The magic is in the TTL (time to live). When you set 60-seconds TTL, redis automatically deletes the key after 60 seconds. No cleanup needed. The counter resets automatically.
so if someone submits your form at 10:00:00, they can’t submit until 10:01:00. Simple, effective and spam-proof.
Real World Example Workflow
To show you how this works in practice, let’s implement rate limiting for a WordPress website contact form that saves to Google sheet.
This exact pattern works for any API endpoint you need to protect.
Custom API endpoints
Webhook receives from external services
Form submissions (any platform, not just WordPress)
User action endpoints (voting, commenting, or ordering)
Data collection endpoints
Our demo scenario
WordPress contact form submission via Webhook.
Data should go to Google Sheet
Limit: 1 submission per email for 60 seconds
This protects our Google Sheets API quota and prevent spam
The Workflow
Let’s break down each node and understand the pattern
Node 1: Webhook Trigger
This is your entry point, The WordPress form submits data here via a webhook. Could be Contact Form 7, WPForms, Gravity Forms or any form plugin that supports webhook.
{
  "body": {
    "your-name": "Shajid Shafee",
    "your-email": "Test@ShajidShafee.com",
    "your-message": "Hey! This is my first feedback".
}
Different form plugins structure their data differently, Some use body.your-email other just use your-email. That’s why we need smart fallback handling in the next step.
Node 2: Redis Increment
Here’s the steps you need to take to configure Redis Node.
Step 1: Go to Upstash.com and create a FREE account
Step 2: Go to your workflow and add a Redis Node
Step 3: In Upstash, Create database. Give a name, and Select US-East-1 AWS for the server location, and use everything for free.
Step 4: Go to Workflow, Configure the Redis node,
Host: Paste the endpoint
Port: 6379
Password: Paste the Upstash database token
Database Number: 0
By adding this save the credentials, you’re good to go
This is where the magic happens. We’re using Redis’s INCR command to atomically increment a counter
Node 4(a): Rate Limited Path (Responded to Webhook)
When someone hits a rate limit, we return a clear response
{
  "error": "Too many requests",
  "message": "Rate limit exceeded. try again soon",
}
This stops the request. No data reaches your Google Sheet. No email notification sent. Just clean block.
Node 4(b): Success Path
When the request passes the rate limit, we process it normally.
Google Sheet Node: Append or update the row
Respond to Webhook: Return success message
Success Response
{ "ok": true, "message": "Form submitted" }
The form displays the message to the user, clean, professional. DONE.
Quick Start Checklist
Ready to implement this or to check whether this pattern is actually working.
Setup
Create upstash account and database
Copy the endpoint and Token
Add redis credential in n8n
Build Workflow
Add Webhook trigger (or any other data source that is sending)
Add Redis increment node with your key structure
Add IF condition to check counter
Add two response nodes 429, and success
Connect your actual processing (Google sheet, Airtable, or database)
Test
Send first request > Should Succeed
Send second request immediately > Should get 429 error
Wait 60 seconds > Should succeed again
That’s it. Production grade rate limiting is ready to serve.
Conclusion
Rate limiting isn’t just for big tech companies or SaaS platforms. With Upstash Redis and n8n, you can implement production grade rate limiting without writing code.
Protect any endpoint from abuse (forms, APIs, webhooks, actions)
Stay within the downstream service quotas (Google Sheet, Airtable, database)
Prevent spam and bot attacks automatically
All for $0.00/month on Upstash free tier
Deploy this workflow in just 15-20 minutes with no infrastructure management
The pattern is dead simple. Increment counter, check threshold, allow or deny. But the application are endless.
Whether you’re protecting a WordPress form, a custom API, a webhook receiver, or user actions – the Redis rate limiting pattern works the same way every time.
Start with the example I showed you, then adapt it to your specific needs and use case. You just connect the dots in n8n.
You’ve built a slick n8n workflow to update 500 customers records in your google sheet, you hit execute, watch the first rows update perfectly, and then BAMM! everything stops.
Error: Rate limit exceeded.
Half your data is updated, and another half isn’t. Literally, your workflow is broken. Sounds familiar? ahem. You just hit an API rate limit.
Maybe you’re a beginner to this space, well, no worries. I’ve got you covered. If you’re just getting started, my complete n8n beginner guide is the best place to build your foundation first
What Are API Rate Limits? ( And Why do they exist)
Think of an API Rate limit like a speed limit on highway. It’s not there to annoy you or make miserable – It’s there to keep you safe and everyone safe.
APIs limit how many request you can make in a specific time period. This prevents server overload, protect against abuse, and yes, sometimes encourages you to upgrade to a paid plan.
To fix this, you need a solution and strategy. Let’s get started
Level 1: Throttling (Split in Batches)
When an API or Google Sheets limits on how many requests you can send per second, you don’t want to flood it – you slow down and batch it.
In this example, we have 500 customers that needs to be written into a Google Sheet. If we send all 500 requests at once, we will hit Google’s rate limit.
So instead, we:
In Loop over items node, you can add batch size to 5 to create a chunks in data.
Batch 5 customers at a time
Write them to the sheet
Wait 10 seconds
Repeat until all 500 are done
Workflow Breakdown
For this workflow, I created a 500 customer sample data in JSON.
Node
Purpose
Manual Trigger
Starts the workflow manually
500 customers in JSON
Stores your dataset (simulated API for tutorial purposes, and for your case, maybe you might have in database or CRM)
Enriching data
Optional: Filters only the fields you care about (name, email and etc)
Batching Items (Split in Batches)
Groups the customers in batches of 5
Customer DB (Google Sheet)
Appends or update each batch
Processed data (function)
Optional: Logs the batch count
Wait 10 Seconds
Prevents rate limiting (Throttle delay)
Loop back
Returns to batching items until all 500 are processed
I hope this example might give you some glimpse of how to rate limit properly using Loop over items (Split in batches) node and Wait node.
Level 2: Retry Logic
In Level 1 throttling, where you slow down requests using delays and batching, then level 2 = Retry handling (Graceful recovery) – where you respond intelligently when rate limits or temporary failures actually happens.
In our previous workflow example, we created our retry handling if Google sheets throws any limit error.
In our Google Sheet Node, go to settings, and toggle Retry On Fail
Keep the Max. tries as 3 and Wait between tries as 5000ms which is 5 seconds.
On Error, select Continue (using error output)
On Error, create a Wait Node and assign 10 seconds.
Plug back the Wait Node to Customer DB (Google Sheet)
By this way, we gracefully handling the errors, in case if we get any rate limit error. perhaps we need to assign 60 seconds for the Wait Node to prevent the rate limit. It totally depends on the API’s rate limit.
As we can see here, green highlighted areas on Error output resolved the rate limiter, and passed on to success route efficiently.
My Personal Tips
Do the Math first
500 customers / 5 per batch x 10 seconds wait = ~16 minutes total. Know your execution time upfront so you’re not surprised.
Check the API Docs
Google Sheets – 100 req / 100 sec
Airtable – 5 req / sec
Notion – 3 req / sec
Each API is different – always check their limits first
Test with Small Batches
Before running 500 records, test with 20.
Catch issues early, iterate faster
Monitor Your Executions
Check n8n’s execution logs regularly
If you see multiple retries, your wait time is too short
Rate limits don’t have to break your workflows. With throttling and retry logic, you can handle them gracefully:
Throttling prevents you from hitting limits in the first place
Retry logic handles the occasional hiccup when limits do hit
Start with these two techniques, and you’ll be handling 99% of rate limit scenarios like a pro.
Think of a webhook as a doorbell for your workflow.
When something happens in one app (like a customer filling out a form, or someone making a payment), that app rings the doorbell, the webhook – which then starts your n8n workflow. No manual clicking. No constant checking. Just instant action.
The old way would be like repeatedly asking, “Did anything happen yet? How about now? Now?” That’s called polling, and it’s slow and annoying.
Webhooks flip the script. Instead of you asking, the app tells you immediately when something happens.
Setting Up Your First Webhook in n8n
Here’s how simple it is,
Step 1: Open n8n and create a new workflow.
Step 2: Click “Add first step” and search for “webhook” node. Add it to your workflow canvas.
Step 3: You’ll see two important things
HTTP Method: Choose POST if you’re receiving data (most common), or GET if you’re just triggering an action.
Path: This creates your unique URL – n8n generates one automatically, but you can customize it.
Step 4: Click “Listen for Test Event” at the top of the webhook node. n8n will now wait for incoming data.
Step 5: Copy the test URL that appears. This is your webhook address where other apps will send data.
That’s it. Your webhook is ready to receive data.
Understanding Test URL vs Production URL
Before we dive into real use cases, you need to understand these two critical URL pattern in n8n.
Test URL (Contains /webhook-test/)
Only for testing inside in n8n
Works when you click “Listen for test event”
Stops after one request
Perfect for quick debugging purpose
Production URL (Contains /webhook/)
For real integrations with external services
Only works if the Workflow is ACTIVE
Always listening 24/7
When Should You Use Webhook in n8n?
Use webhooks when,
You need instant notifications (new orders, form submissions, payment alerts)
You’re connecting apps that don’t have direct integrations.
You want to build custom APIs without coding
You’re tired of manually checking multiple platforms
Skip webhooks when,
You need to pull data on your own schedule (use scheduled trigger instead)
The app you’re connecting doesn’t support webhooks (use polling nodes)
Alright, let’s create a workflow how to use webhook properly.
How to Send WordPress Form Submissions to Google Sheets
Well, this is going to be a good workflow to test it out how webhook actually works. Not only that – I’ll also show you how to make your local n8n setup accessible to the public internet temporarily using ngrok.
Step 1: Set Up the Webhook in n8n
Create a new workflow in n8n
Add a Webhook node as the first step
set the HTTP method to POST (because the form will send data)
Customize the path to something memorable like /grab-contacts
Note down this path – you’ll need it in the step 3
Step 2: Making Webhook URL Publicly Accessible
Explanation: When you run n8n locally (e.g http://localhost:5678), your webhook URL might look like this “http://localhost:5678/webhook-test/abcd123” but this only works on your computer – It’s not reachable from the internet. So if a service like WordPress tries to send data to it, it will fail because WordPress can’t reach your localhost.
So we are going to use a tool called “ngrok” that acts as a secure tunnel between the public internet and your local computer.
Setup your ngrok: make sure once installed, open up the terminal, and ngrok config add-authtoken <your auth token>
Now go to your terminal and type this code ngrok http 5678
Now it created a tunnel you’ll get a forwarding address look like in the above image, https://address.ngrok.free.dev
Step 3: Connect Your WordPress Form
For this tutorial, I made a separate page in WordPress, created a simple form with contact form 7 plugin, and added the shortcode on that page.
Install the plugin called “Contact Form 7” (most popular WordPress Plugin)
Install another plugin called “CF7 to Webhook” – so this plugin is an add-on for Contact Form 7 which enables the Webhook integration.
Go to Your Contact Form 7 settings and find the webhook integration section
Paste your complete production webhook URL in this format https://your-ngrok-url.ngrok-free.dev/webhook/grab-contacts
Optional: Understanding Webhook URL Structure
Your complete webhook URL has three parts
URL: https://your-ngrok-url.ngrok-free.dev (ngrok url) or your localhost. For this tutorial, we go with the ngrok url.
Webhook prefix: /webhook/
Your custom path: grab-contacts
Common mistake: Don’t use /webhook-test – that’s only for testing inside n8n. Always use /webhook/ for external integration.
Step 4: Connecting Google Sheet Node
Insert the next node after the webook as Google Sheet.
Make sure to add the correct credentials
Operations: Append (this adds a new row each time when the new data comes)
Or, If you want to avoid duplicates use Append or Update.
Select your Document and Sheet
Map each column manually.
Column to match on as name because names are going to be unique. (However, email is the correct column to match on to avoid duplicate emails) It’s totally up to you.
Values to send
`{{ $json.body[“your-name”]}}`
`{{ $json.body[“your-email”]}}`
`{{ $json.body[“your-message”]}}`
Step 5: Testing the Workflow
Before testing with WordPress, you MUST activate your workflow.
Click the toggle switch in the top-right corner to turn it “Active“
Once activated, you’ll see the production URL
Go to your form, and submit with the information
In n8n, click the Executions tab at the top
Click on the most recent execution (should be at top of the list)
You’ll see your workflow with green checkmarks if successful
Check your Google sheet – you should see a new row with the form data
Common Troubleshooting Tips
There was an error trying to send your message
Tip: Make sure to activate your workflow, not just listening for test events
ngrok shows the data but n8n doesn’t
Tip: Check the ngrok visual inspector by going to http://localhost:4040 in your browser. If you see the POST request there with 200 OK status, ngrok is working fine. The issue is likely that your n8n workflow is not activated. Always check your executions tab in n8n – If executions are appearing but failing. Click on them to see which node has the error
Data appears in n8n but not in Google Sheets
Tip: Verify whether your Google sheet is connected properly, and you’ve selected the right spreadsheet.
What You Just Accomplished
Congratulations! You’ve just built a production-ready automation that,
Captures form submission in real-time (no-delays)
Automatically saves data to Google sheets
Works 24/7 without any manual interventions
Can be extended with additional nodes (slack notifications, passing the data to CRM and much more)
Start with something simple – maybe auto-saving form submissions or getting Slack alerts. Once you see it working, you’ll find dozens of places where webhooks can save you hours every week.
Well, the best part is? No coding required. Just drag, drop, connect, and let your workflows do the heavy lifting.