Author: Shajid Shafee

  • How to Use Slack in n8n – Send Messages and Trigger Workflows

    How to Use Slack in n8n – Send Messages and Trigger Workflows

    There are two ways to authenticate with Slack in n8n, and they behave completely different.

    Pick the wrong one and your messages will come from your personal account instead of a bot, or your Slack Trigger will stop firing in production without any obvious error.

    This post covers both use cases , sending messages from n8n to Slack, and triggering workflows from Slack events along with the four errors that catch almost everyone. The most common ones.

    But you need to understand how these credentials works.

    This is part of my complete n8n beginner guide — where I cover everything from install to AI agents.

    Bot Token or OAuth2? Pick Your Credential Before You Start

    This is the decision that determines everything else. Most tutorials skip it and explain it only after something goes wrong.

    What you’re trying to doCredential typeToken
    Send messages as a botAccess Tokenxoxb- (Bot User OAuth Token)
    Trigger workflows from Slack eventsOAuth2 APIClient ID + Client Secret
    Send messages as yourselfOAuth2 APIxoxp- (User OAuth Token)

    For most automation setups, you want the Access Token method with a bot token. This sends messages from a named bot, not from your personal Slack profile.

    OAuth2 is required for the Slack Trigger node. It doesn’t work with the Access Token method. If you want both, a workflow that listens for Slack events AND sends replies – you’ll need two separate n8n credentials: one OAuth2 for the trigger, one Access Token for the send node.

    Setting Up Your Slack App (Do This Once)

    Both credential types require a Slack app. You create it once and then pull different tokens from it depending on what you need.

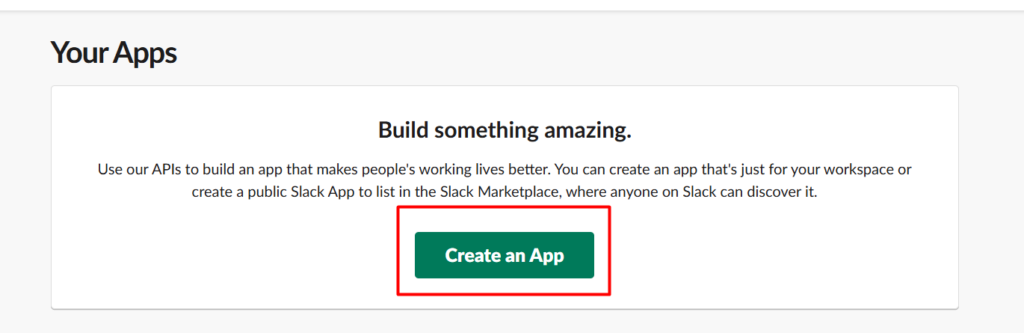
    creating an app in slack

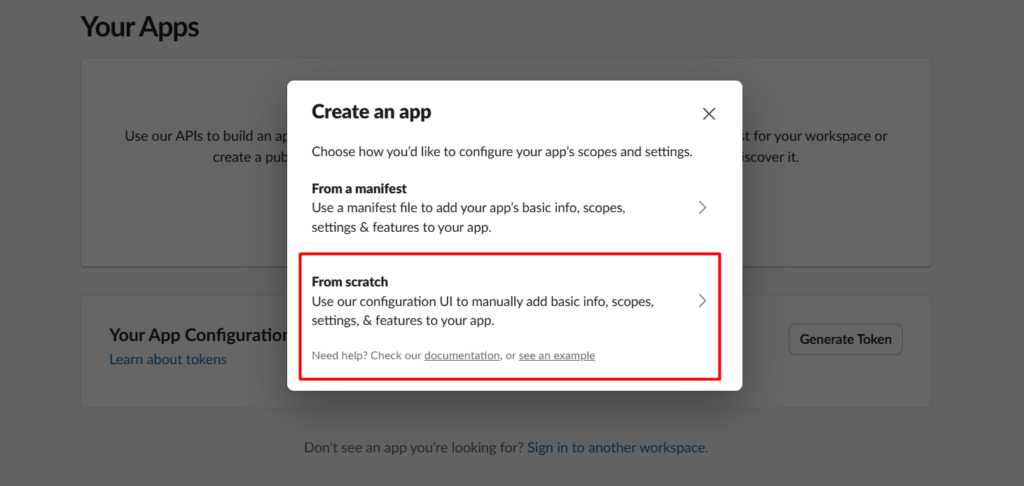
    Step 1: Go to api.slack.com/apps and click Create New AppFrom scratch.

    selecting from scratch in slack apps

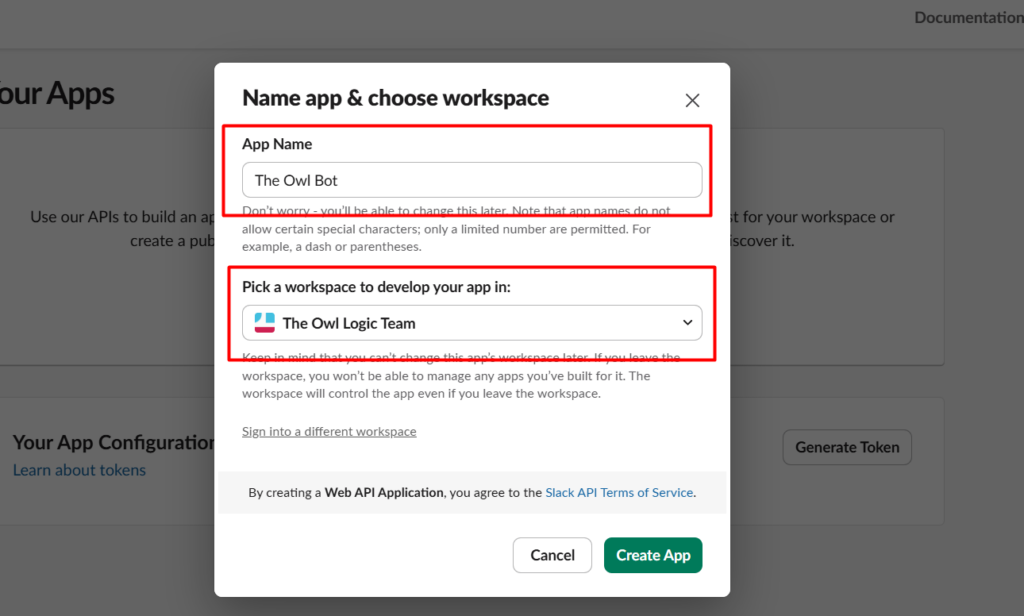
    Step 2: Give your app a name (something like “n8n Bot”) and select the workspace where you want it to work. Click Create App.

    Selecting a new app name and picking the workspace

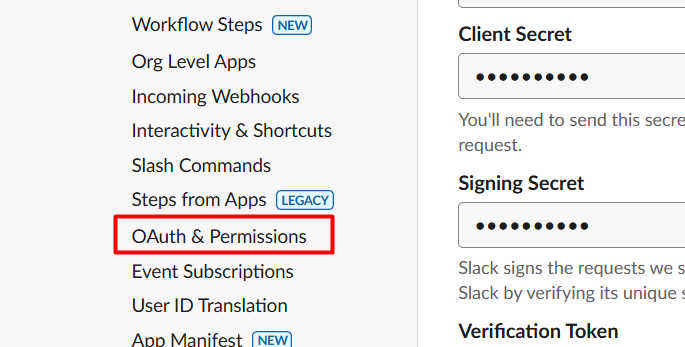
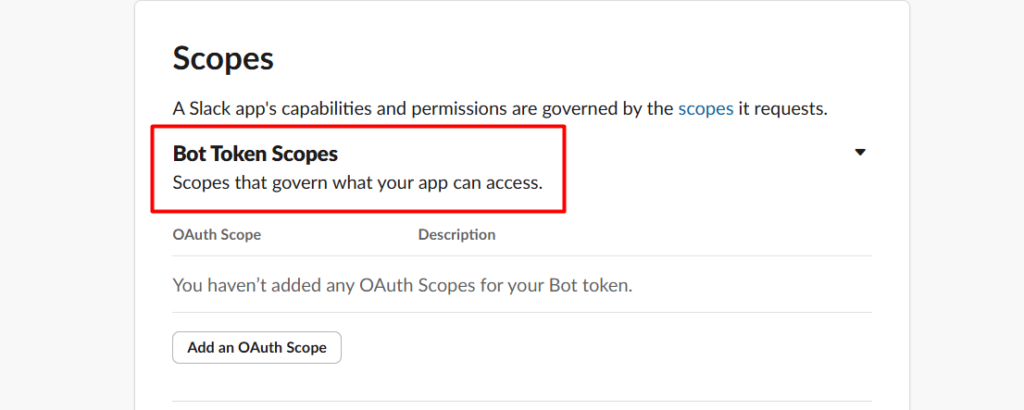
    Step 3: In the left sidebar, go to OAuth & Permissions. Scroll to the Scopes section and add your Bot Token Scopes.

    OAuth permission in slack
    Selecting the bot token scopes

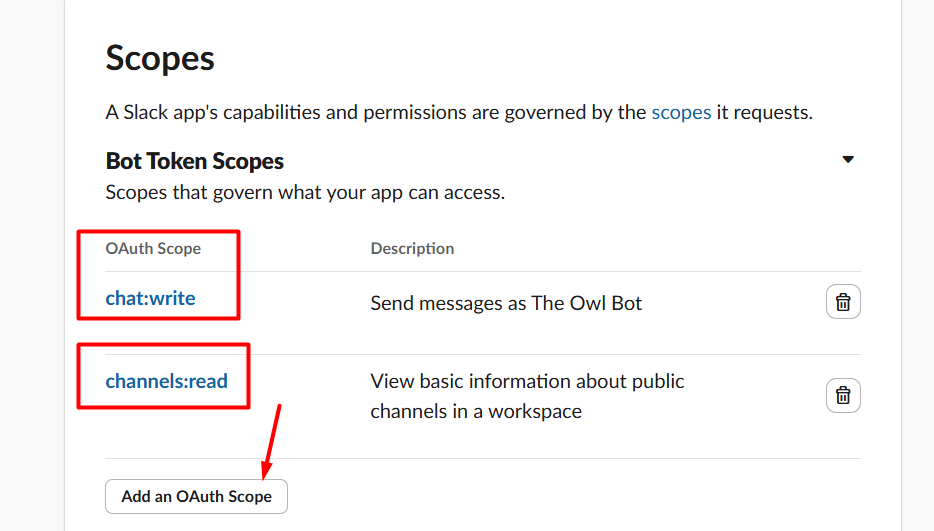
    Minimum scopes to send messages:

    • chat:write – post messages to channels
    • channels:read – list channels so you can pick one in n8n
    Adding more scopes to bot token scopes

    If you’re also setting up the Slack Trigger, add these too:

    • channels:history – read messages in channels
    • reactions:read – detect emoji reactions
    • users:read – resolve user IDs to names

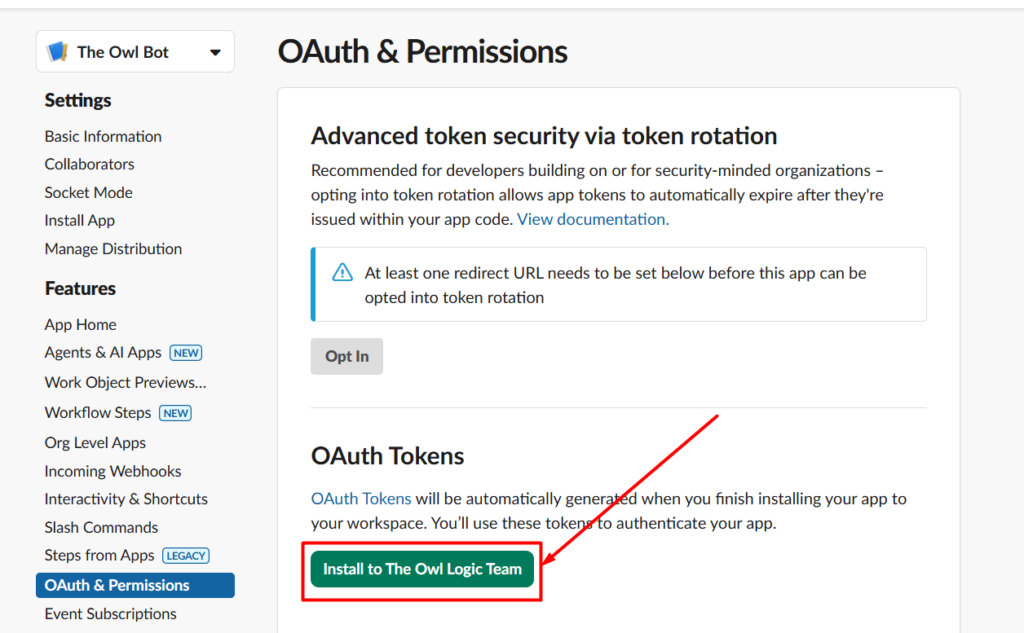
    Step 4: Scroll up to OAuth Tokens for Your Workspace and click Install to Workspace. You need to be a workspace admin to do this.

    Installing the OAuth Token to the Workspace

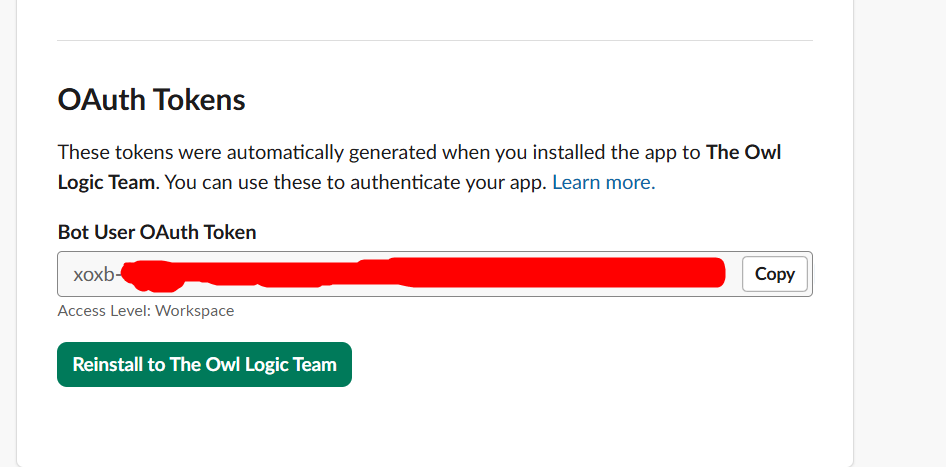
    Step 5: After installing, copy the Bot User OAuth Token. It starts with xoxb-. Keep this — it’s your Access Token credential.

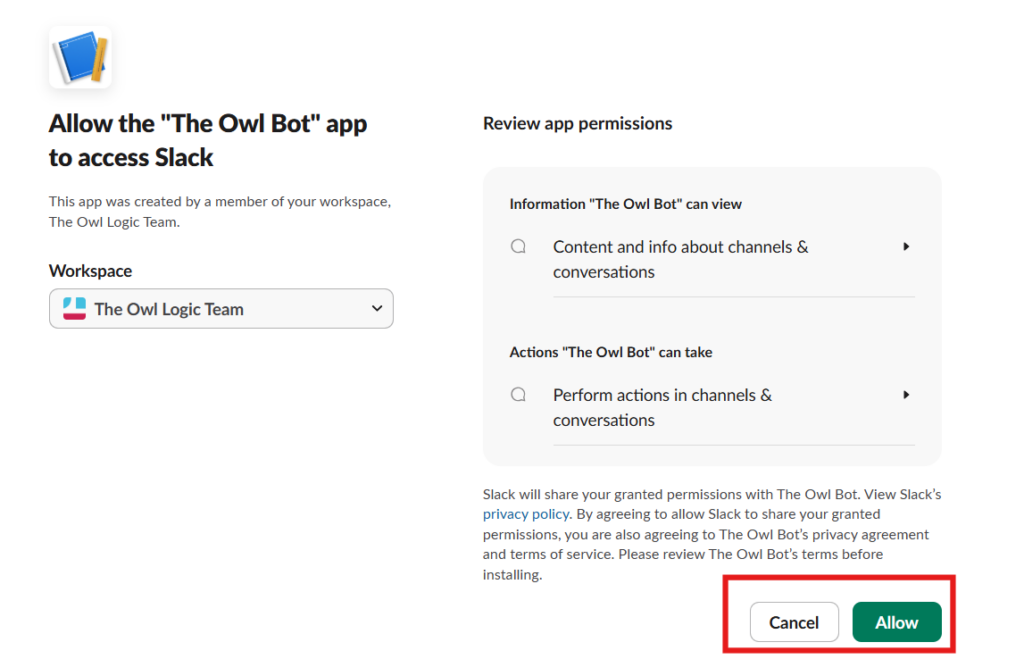
    Allowing the app permissions to the slack workspace

    Token rotation warning. Slack may present a “Token Rotation” option when you create the app. Do not enable it. Token rotation makes your xoxb- token expire every 12 hours. Workflows that were running fine will start failing silently in production. The critical part: once you enable token rotation, you cannot turn it off. You’d need to create an entirely new Slack app. Leave this off.

    Bot User OAuth Token

    Sending Messages from n8n to Slack

    With your xoxb- token copied, here’s how to wire it up in n8n.

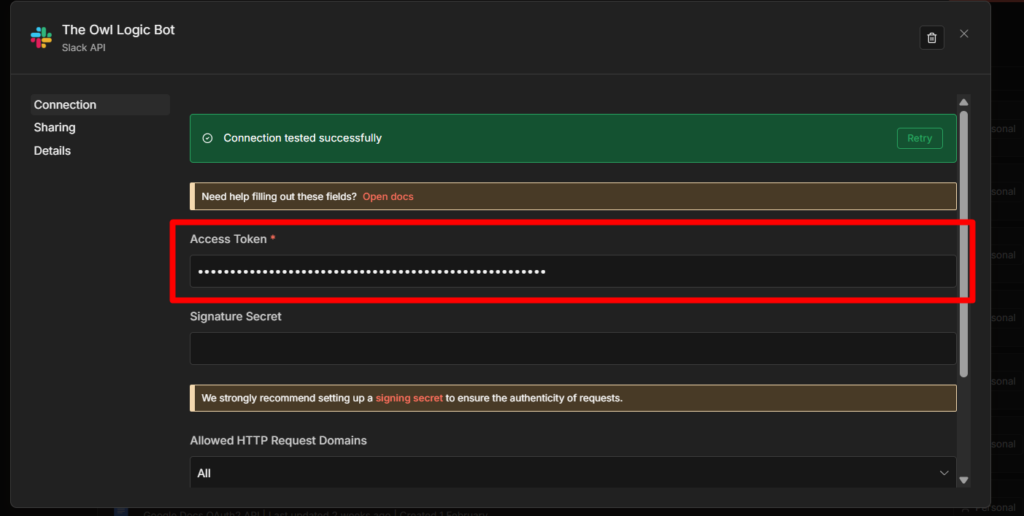
    In n8n Credentials, create a new Slack credential. When it asks for the authentication method, choose Access Token. Paste your xoxb- bot token. Save it.

    Pasting the Bot Auth Token to Slack API credentials

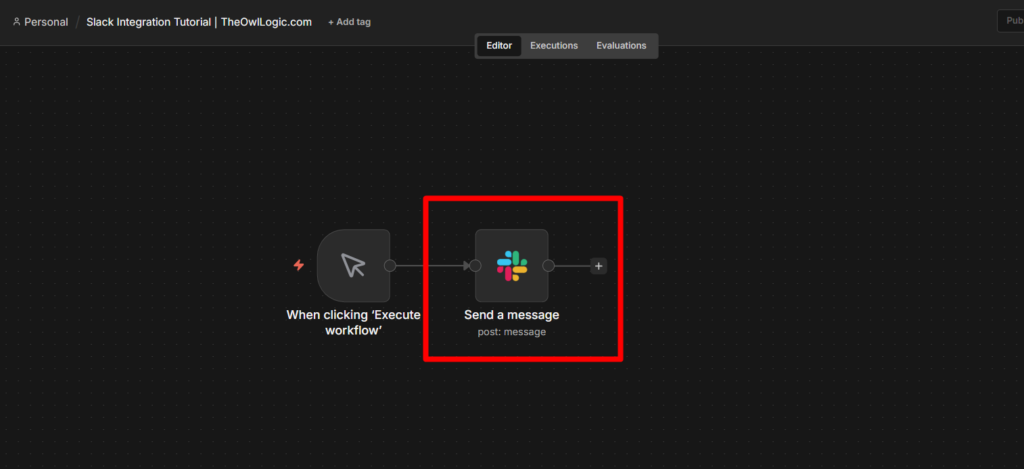
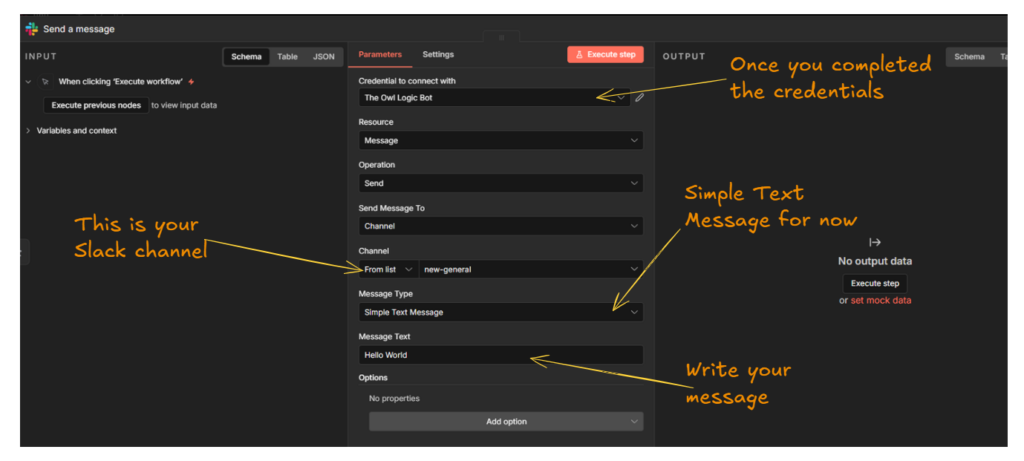
    In your workflow, add a Slack node. Open it and configure:

    Adding Send a message slack node in n8n
    Explaining the configs of Send a message node
    • Resource: Message
    • Operation: Send
    • Credential: the Access Token credential you just created
    • Channel: #your-channel-name or paste a channel ID
    • Text: your message content

    A realistic message with dynamic data from a previous node looks like this:

    New lead from {{ $json.name }}
    Email: {{ $json.email }}
    Source: {{ $json.source }}
    Submitted: {{ $now.format('MMMM D, YYYY') }}
    
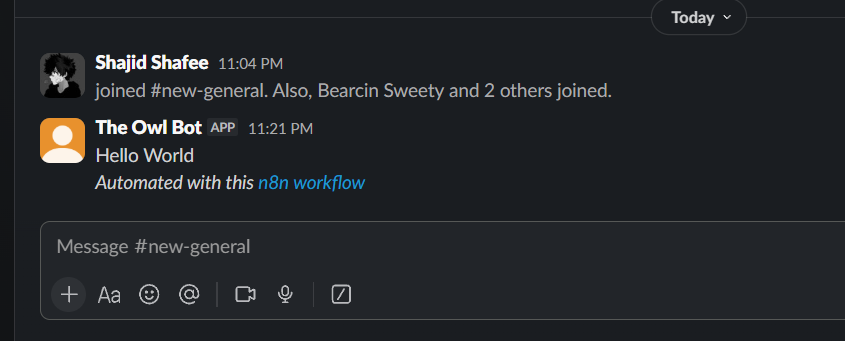
    Or Else, Just say
    
    HELLO WORLD! 

    Click Execute Node. If it works, great. If you get not_in_channel, see the troubleshooting section below — the fix takes 10 seconds.

    Read this,

    The bot must be invited to the channel. A Slack bot cannot post to any channel it hasn’t been explicitly added to. Go to the channel in Slack and type /invite @YourBotName. (e.g., mine is /invite @The Owl Logic Bot) This is a Slack permission rule, not an n8n limitation. Once invited, rerun the node and the message will go through.

    Slack Bot :)

    Triggering Workflows from Slack Events

    This direction is more involved. You’re telling Slack to call n8n whenever something happens, a message arrives, someone mentions your bot, a reaction is added.

    But here’s the hiccup. To make this trigger workflow work, You need to have a Self-hosted n8n or n8n Cloud. I recommending the n8n cloud since you won’t be having any issue and less prone to configurations.

    Even though If you’re working in localhost, then you have to expose your localhost webhook URL to ngrok by tunneling. You can check it out here Webhook in n8n for Beginners

    Step 1: Create an OAuth2 Credential in n8n

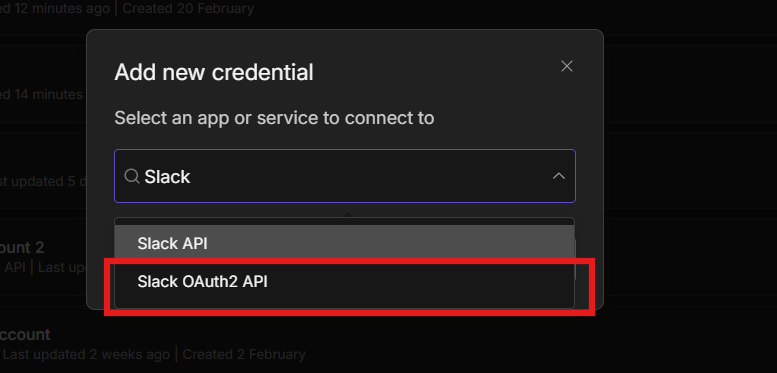
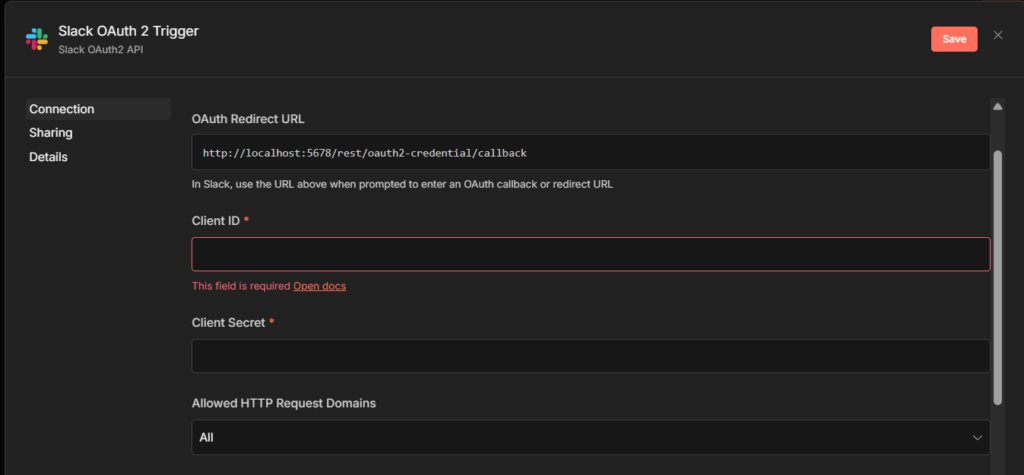
    In n8n Credentials, create a new Slack OAuth2 API credential. It will ask for a Client ID and Client Secret. Get these from your Slack app:

    Select Slack OAuth 2 API
    Add Client ID and Secret for Slack Trigger in n8n

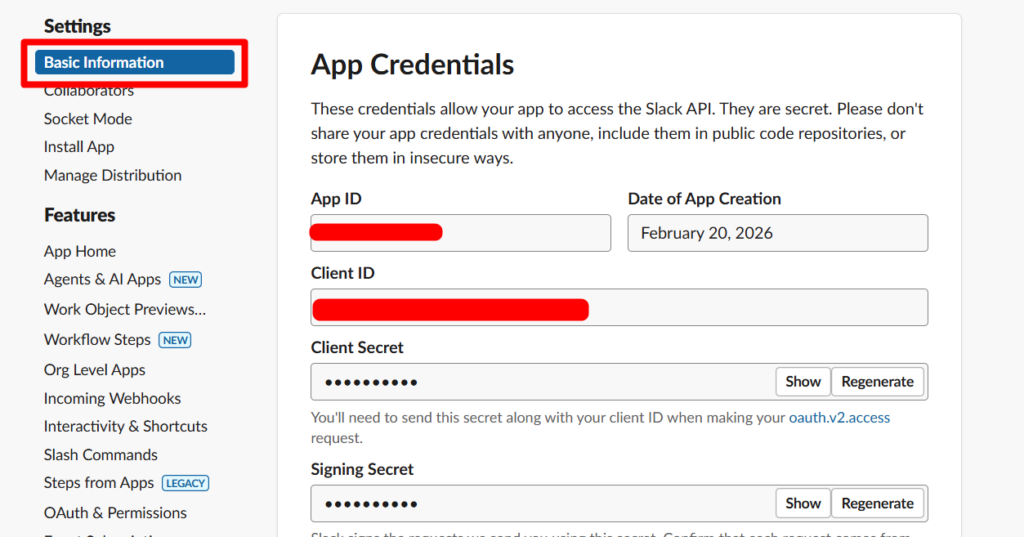
    In your Slack app settings → Basic InformationApp Credentials section. Copy the Client ID and Client Secret into n8n.

    Basic information, Client ID and SEcret

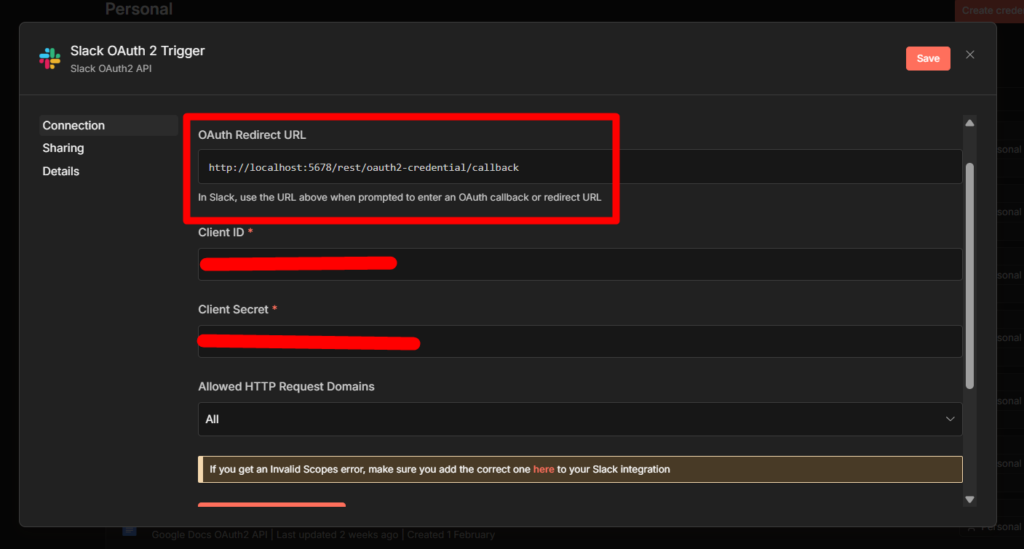
    n8n will show you an OAuth Callback URL. Copy it.

    Pasting the credentials of Slack ID and Secret

    Step 2: Register the Callback URL in Slack

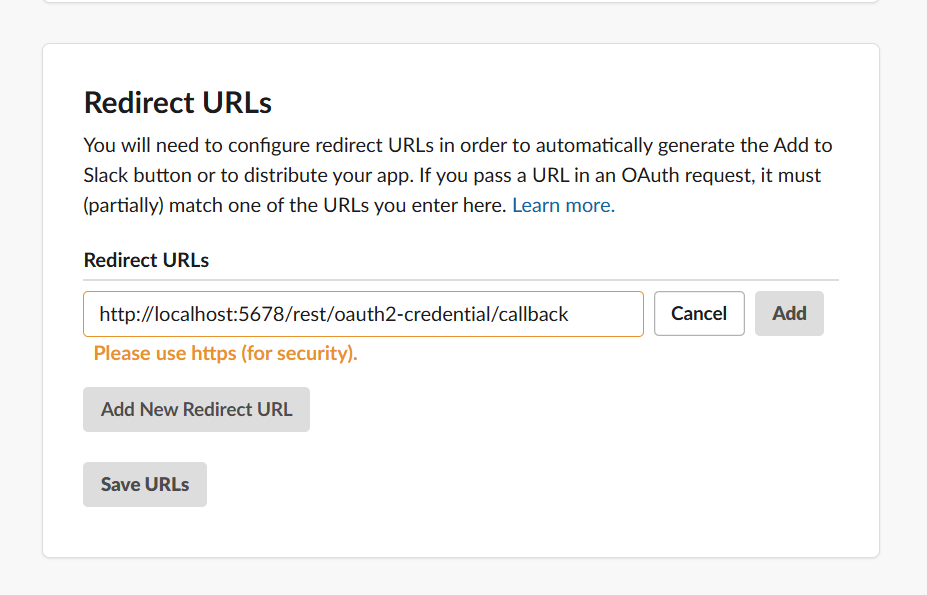
    Back in your Slack app → OAuth & PermissionsRedirect URLsAdd New Redirect URL. Paste the callback URL from n8n. Click Add, then Save URLs.

    Redirect URL, Prefer the production URL

    Step 3: Add the Slack Trigger to Your Workflow

    Add a Slack Trigger node to a new workflow. Select the OAuth2 credential. Choose which event to listen for:

    • Bot / App Mention — fires when someone types @YourBotName in a channel
    • New Message Posted to Channel — fires on every message in a channel
    • Reaction Added — fires when someone adds an emoji reaction

    For most bots, Bot / App Mention is the right choice. It’s targeted — the trigger only fires when your bot is explicitly called, not on every message in the channel.

    Step 4: Connect the Webhook URL to Slack

    With the Slack Trigger node open, copy the Webhook URL shown in n8n. There are two versions.

    • Test URL (contains /webhook-test/) — only works when you’re actively listening in n8n editor
    • Production URL (contains /webhook/) — works only when the workflow is Active

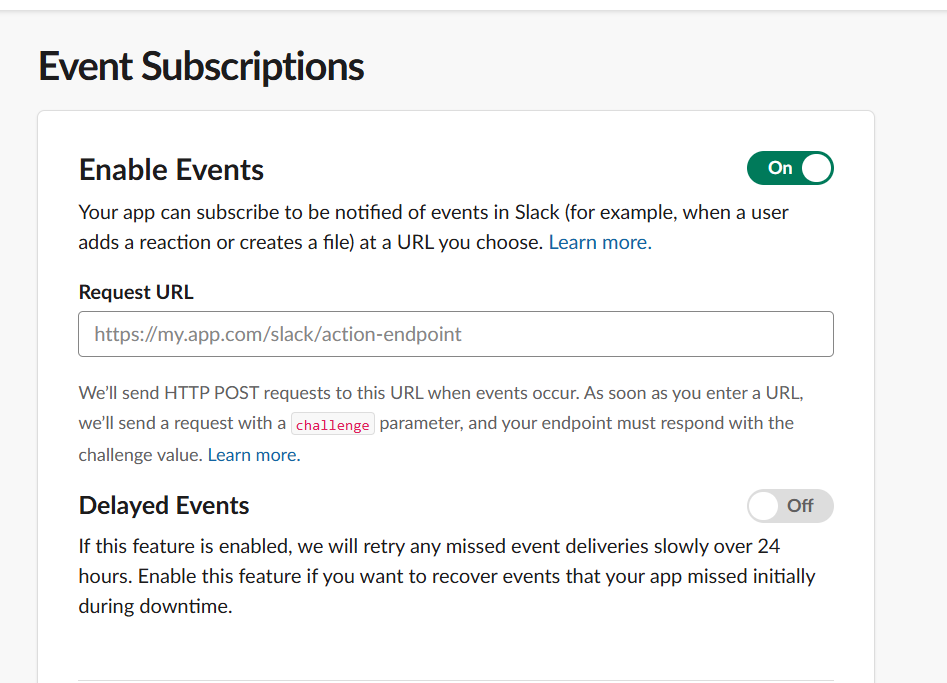
    In your Slack app → Event Subscriptions → toggle Enable Events to on → paste the webhook URL in the Request URL field. Slack will immediately try to verify it.

    Enabling the Event Subscriptions in Slack for n8n Webhook

    One webhook URL per Slack app. Slack allows only a single Request URL registered per app. You cannot have the test URL and the production URL active at the same time. While building and testing: use the Test URL, with n8n listening. Before going live: swap to the Production URL in Slack’s Event Subscriptions, then activate your workflow.
    Once the URL verifies, subscribe to the bot events you want. For Bot/App Mention, add app_mention under Subscribe to bot events.

    Step 5: Add the Signing Secret

    This is optional but strongly recommended. It ensures n8n only processes requests that genuinely came from Slack — not from someone who guessed your webhook URL.

    In your Slack app → Basic Information → copy the Signing Secret. In your n8n Slack credential → paste it into the Signature Secret field.

    Step 6: Activate the Workflow

    Toggle the workflow to Active in the top right. Until it’s active, the Slack Trigger won’t receive anything even if the Production URL is registered.

    Invite your bot to a channel (/invite @YourBotName), then mention it: @YourBotName hello. Check your workflow’s execution history — you should see the trigger fired with the message data.

    4 Errors That Break Slack Integrations in n8n

    These show up constantly in the n8n community forum. Each one has a specific fix.

    1. not_in_channel error

    Your bot hasn’t been invited to the channel. Fix: in Slack, go to the channel and type /invite @YourBotName. Every channel requires a separate invite.

    2. Messages sending from your personal account, not the bot

    You created an OAuth2 credential and used it for the Slack node. OAuth2 acts on behalf of your user profile. Fix: create a separate Access Token credential using your xoxb- bot token, and use that for the Slack node instead.

    3. Workflow ran fine in testing, silently fails 12 hours later in production

    Token rotation is enabled on your Slack app. The xoxb- token expires every 12 hours. Fix: you cannot disable token rotation once it’s on. You need to delete the Slack app and create a new one — this time leaving token rotation off during setup.

    4. Slack Trigger fires in testing but not in production

    Two possible causes. First: the workflow isn’t active — toggle it to Active in n8n. Second: the Test URL is still registered in Slack’s Event Subscriptions. When you activate the workflow, you also need to manually update the Request URL in your Slack app from the Test URL to the Production URL.

    Using Slack as an AI Agent Approval Channel

    Slack node can be used as a human-in-the-loop step inside AI Agent workflows.

    When an agent is about to take a high-stakes action like sending a bulk email, deleting a record, posting to a production channel, it can pause and route an approval request to Slack.

    The approver clicks approve or deny directly in Slack, and the agent continues or stops.

    This is configured at the tool level in the AI Agent node.

    The Slack node becomes a gated tool that requires sign-off before execution. If you’re building AI agent workflows, this is worth knowing about – it removes the need for fragile prompt-based guardrails like “only do this if you’re absolutely sure.

    The Slack node is one of the most-used integrations in n8n for a reason, having your automation post results directly to where your team already works is genuinely useful.

    Once the credentials are set up correctly, the node itself is straightforward. The setup is the hard part, and now you’ve done it once.

  • How to Build an n8n AI Agent Workflow (Step-by-Step 2026)

    How to Build an n8n AI Agent Workflow (Step-by-Step 2026)

    An AI agent in n8n is a workflow that can think through a task, decide what to do, and act without defining every steps in advance.

    AI agents are the final step in my complete n8n beginner guide — if you haven’t covered the basics yet, start there before diving in here

    A normal n8n workflow follows a fixed path. If X happens, do Y. If Z happens, do W. Every branch has to be anticipated and built by you. That works well for structured, predictable tasks, syncing rows from a spreadsheet, sending a confirmational email, posting a Slack message.

    But a lot of real work isn’t structured. Incoming support messages don’t fit neat categories.

    Research tasks depend on what you find along the way. Lead qualification depends on context that’s different for every prospect.

    AI agents handle that kind of work. You give the agent a goal and a set of tools, and it figures out the steps.

    It reads the input, decides which tool to use, uses it, reads the result, and keep going until it has a complete answer.

    Concretely, an n8n AI agent can,

    • Answer questions by searching a knowledge base before responding
    • Triage incoming messages and decide whether to reply, escalate or log them
    • Research a topic by querying APIs and summarizing the findings
    • Enrich CRM records by pulling data from external services and writing it back
    • Draft content, check it against rules you define, and revise until it passes

    This post walks you through building your first one from scratch. By the end you’ll have a working agent, understand how memory actually works (and why Simple Memory burn you in production), and know about two features from early 2026 that most tutorials haven’t caught up to yet.

    Before You Start

    This tutorial assumes you have n8n running and atleast one AI API credentials ready. If you’re not setup yet, here’s what to sort first.

    An n8n instance. You have two options

    A language model API key. This tutorial uses Gemini (free tier available via Google AI Studio). You can also use Anthropic Claude or ChatGPT. Well, all work the same way. (However, we have listed the steps below that you could take to obtain an API key)

    Basic n8n familiarity. You should know what a node is and how to connect them. If you haven’t built anything in n8n yet, start with Your First Workflow in n8n – It takes about just 10 minutes or less.

    Let’s discuss a little bit about what is AI agent, and what makes AI agent feels more powerful than just a n8n workflow.

    What Makes an AI Agent Different From a Regular n8n Workflow

    A normal n8n workflow is like a recipe. Every step is predefined. If email contains “refund” > send template A. If it contains “Invoice” > send template B. The moment something lands outside those rules, the workflow either fails or does the wrong thing.

    An AI agent understand a goal and figures out the step itself.

    The same support inbox handled by an agent looks like this.

    • Read the message
    • Understand the actual issue
    • Check the customer’s history
    • Decide whether to respond directly, look something up or escalate

    The agent adapts. You don’t have to anticipate every edge case in advance.

    The tradeoff is real though, agents are less predictable than fixed workflows. For anything that needs deterministic, auditable results every time, like payroll processing ,database writes – a standard workflow is still the right tool. Agents shine when the input is unstructured and the right action depends on context.

    The 4 Components Every n8n AI Agent Needs

    Every AI agent in n8n built from the same four-part structure, regardless of what the agent actually does.

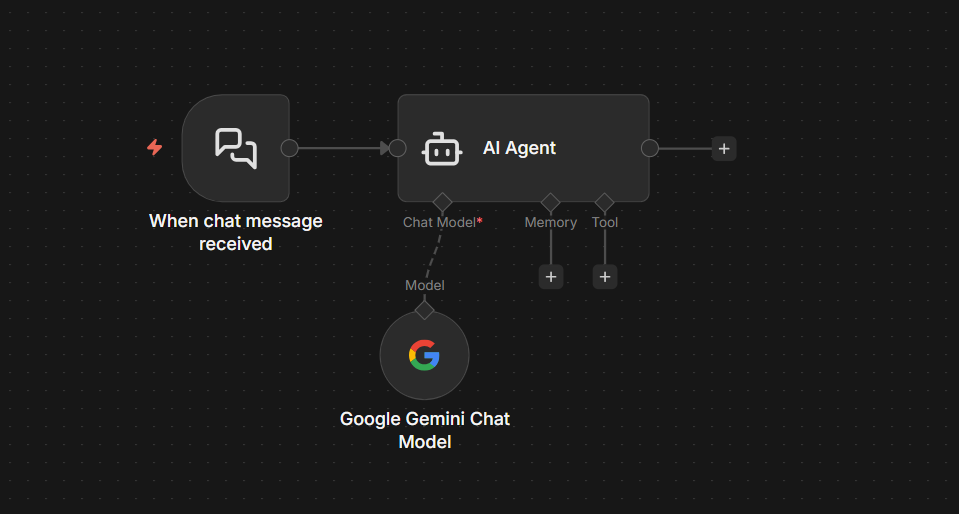
    1. Trigger – What starts the agent. This could be a Chat Trigger (for conversational agents), a Webhook (for integrating with external systems), a Scheduled Trigger, or even a form submission. The trigger passes the initial input to the agent
    2. AI Agent node – The orchestration layer. This node receives the input, sends it to your chosen language model, reads the model’s response, decides which tool to call (if any), calls it, checks the results, and loops until it has a complete answer. It’s the brain.
    3. Sub-nodes – The three types that connect directly to the AI Agent node.
      • Chat Model – The actual LLM (OpenAI GPT, Anthropic Claude, Google Gemini, Kimi K2.5, etc)
      • Memory – How the agent retains context across messages
      • Tools – What the agent can do (Call an API, search the web, run a calculation, query a database)
    4. Output – Where the results goes. This could be a reply in the chat interface, a Slack message, a row appended to Google Sheets, or anything else n8n’s integration library.

    This structure doesn’t change. Whether you’re building a simple Q&A bot or multi-step research agent, these four part are always there.

    Building Your First AI Agent (A Support Triage Bot)

    I’ll use a support triage agent as the example

    • It reads incoming messages.
    • Decides whether to answer directly or escalate, and responds.

    It’s practical, easy to understand, and shows exactly how the agent make decisions.

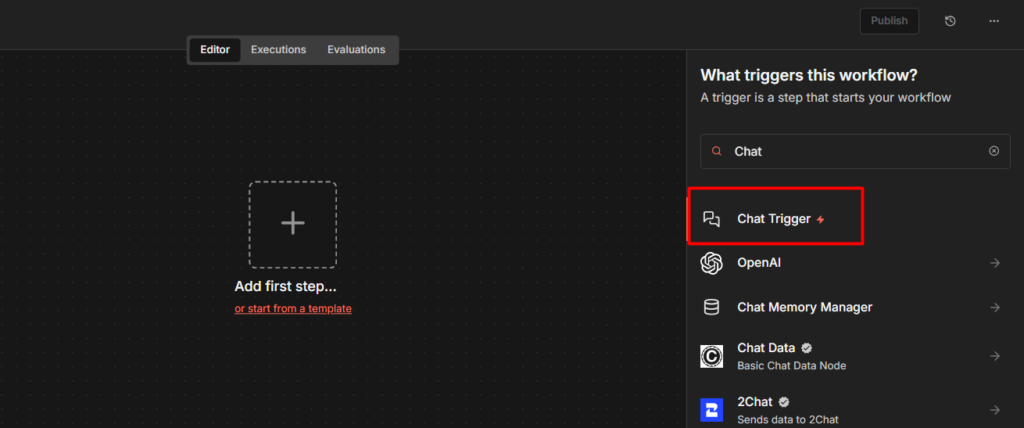
    Step 1: Add a Chat Trigger

    Adding a chat trigger in n8n

    Create a new workflow and add a Chat trigger node. This is the easiest way to start with agents because it gives you built-in chat interface to test with. No external services or webhooks needed while you’re learning the setup.

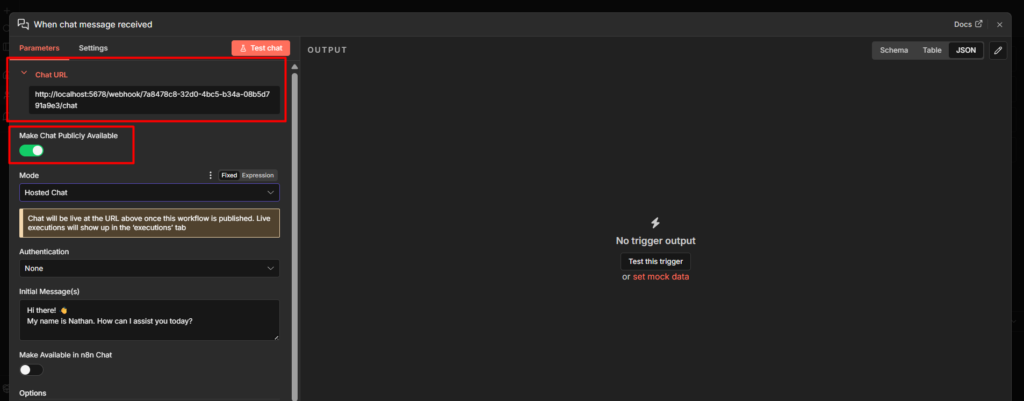
    Chat trigger creates a Chat URL

    The Chat Trigger creates a simple URL where you can open a chat window and send a test messages directly to your agent.

    Step 2: Add the AI Agent Node

    Add the AI Agent node to the Chat trigger

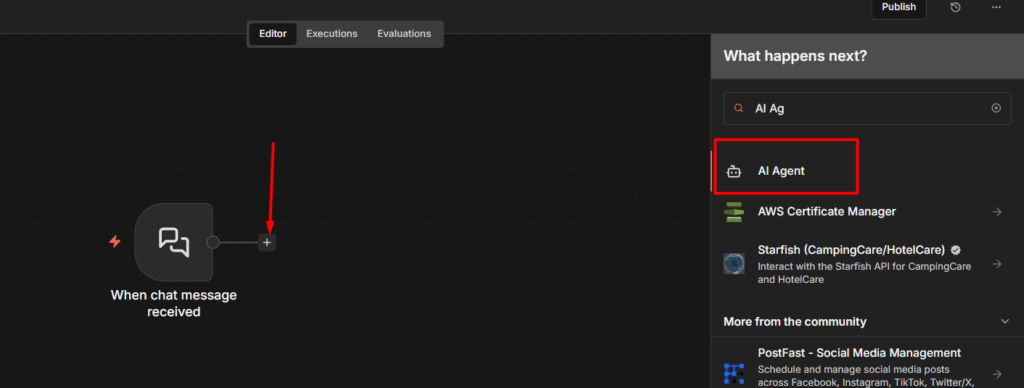
    Click the + button after the Chat trigger and search for AI Agent. Add it to the canvas and connect it to your trigger.

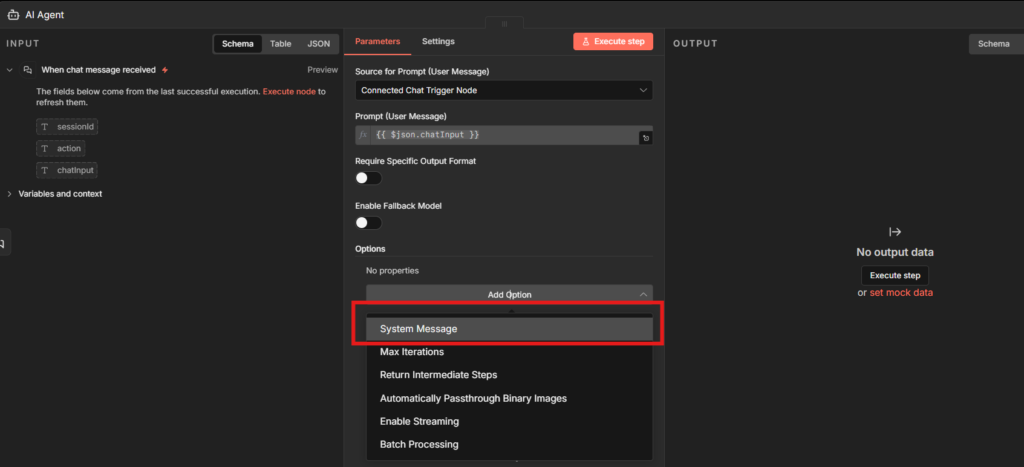
    Adding system message to n8n AI agent

    Open the AI Agent node. The most important field here is the System Message. This is where you define who the agent is and what it’s supposed to do.

    Here’s a real example for the support triage agent

    You are a support agent for a SaaS product. Your job is to:
    
    1. Answer common questions directly if you can (password resets, billing basics, plan information)
    2. If the issue requires account-specific information you don't have, let the user know you're escalating to the team
    3. Always be concise. Don't pad responses with unnecessary filler.
    4. If the user seems frustrated, acknowledge it briefly before answering.
    
    You do NOT have access to account data unless a tool provides it. Don't make up information.

    The last line matters. Without explicit instructions about what the agent doesn’t know, it will sometimes hallucinate account details. Tell it what it can and can’t do.

    Step 3: Connect a Chat Model

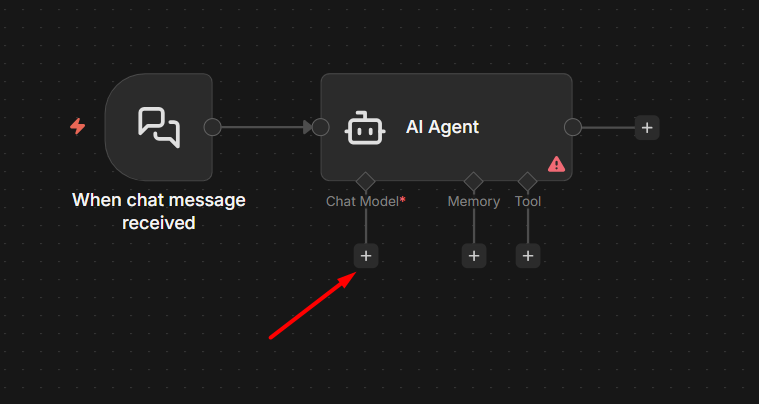
    Connect the Chat Model to AI Agent in n8n

    The AI Agent node won’t do anything without a language model. Hover over the bottom of the AI agent node – you’ll see sub-node connector. Click the Chat Model connector and add a model node.

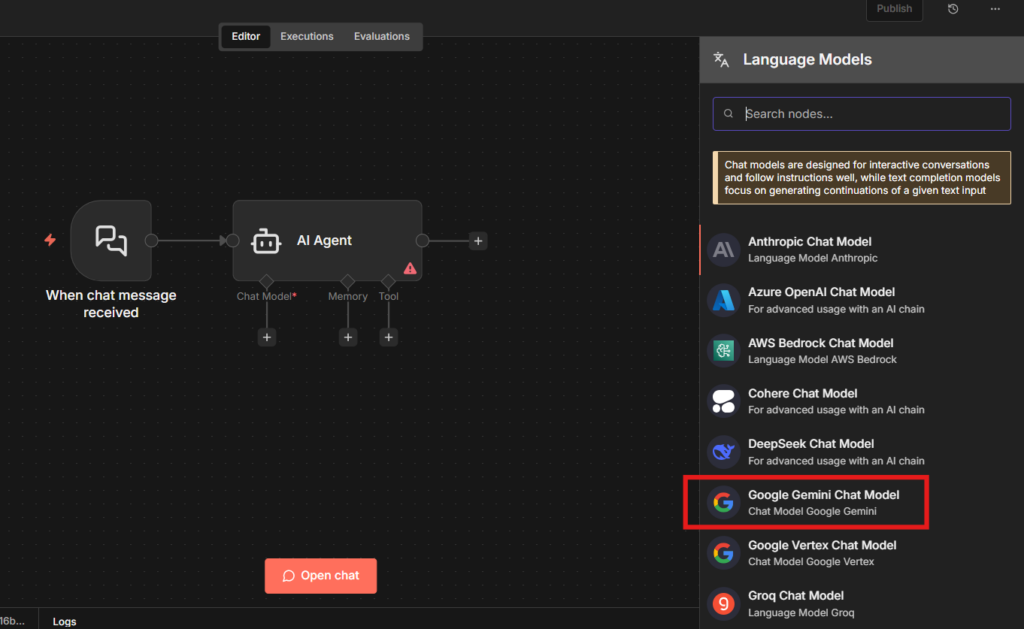
    Connect Google Gemini Chat Model

    For most use cases, I use Gemini, and for starting point Gemini, and Anthropic Claude are good.

    How to obtain Gemini API Key

    You don’t need to manually create a Google Cloud Console project to get a Gemini API key, one will be created automatically when you generate the key.

    If you don’t have the credentials setup yet, the credentials setup guide walks through exactly how to add them (For Google Cloud Console)

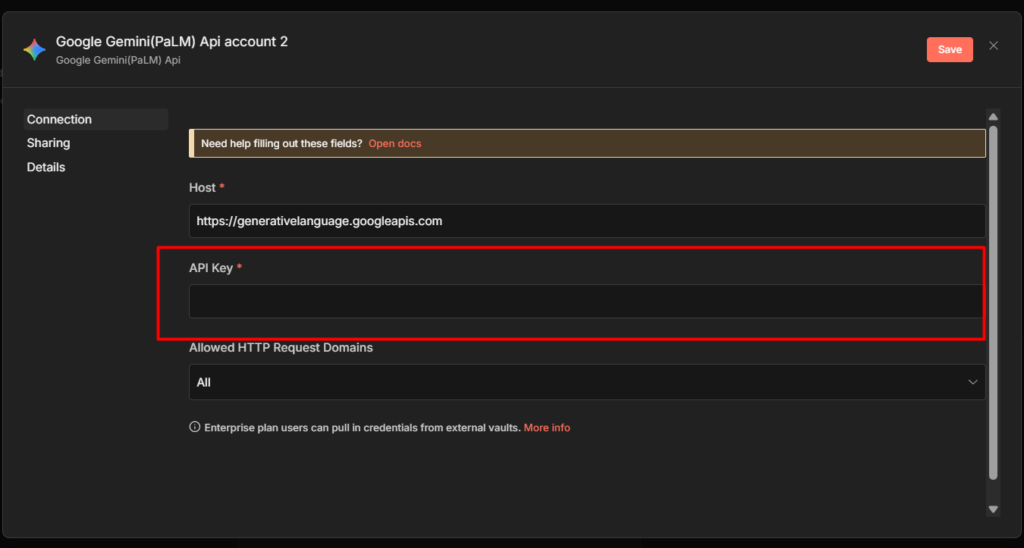
    Place your API Key here

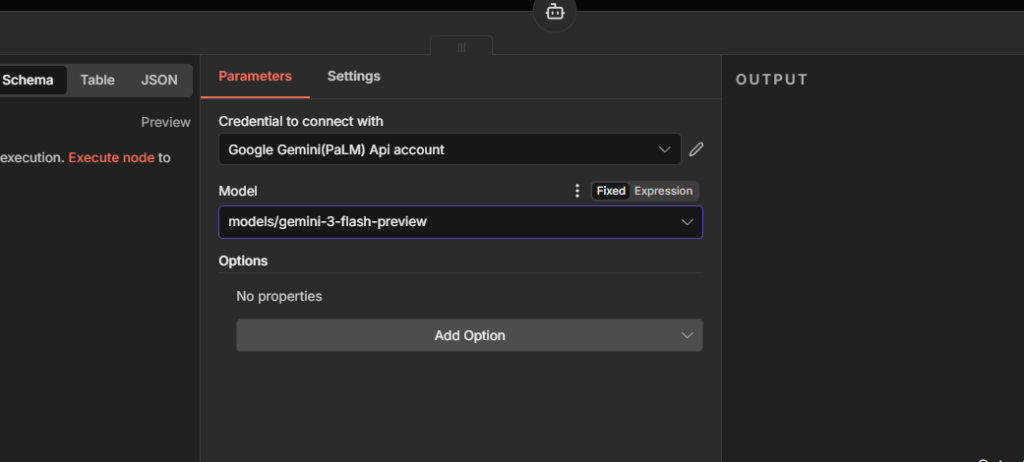
    Paste the Google Gemini API key here to complete the credentials. That’s it and then you will be needed a model though, for this tutorial I go with models/gemini-3-flash-preview

    adding google gemini model to the AI agent

    Connect your chosen model to the AI Agent node’s chat model input.

    Finally connected a chat model to an AI agent in n8n

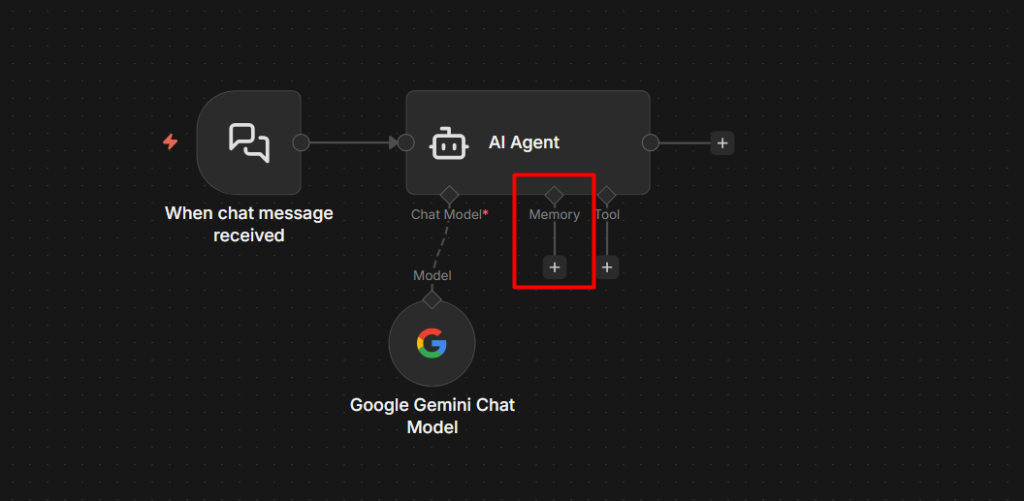
    Step 4: Add a Simple Memory (for Testing)

    Adding a memory to AI agent in n8n

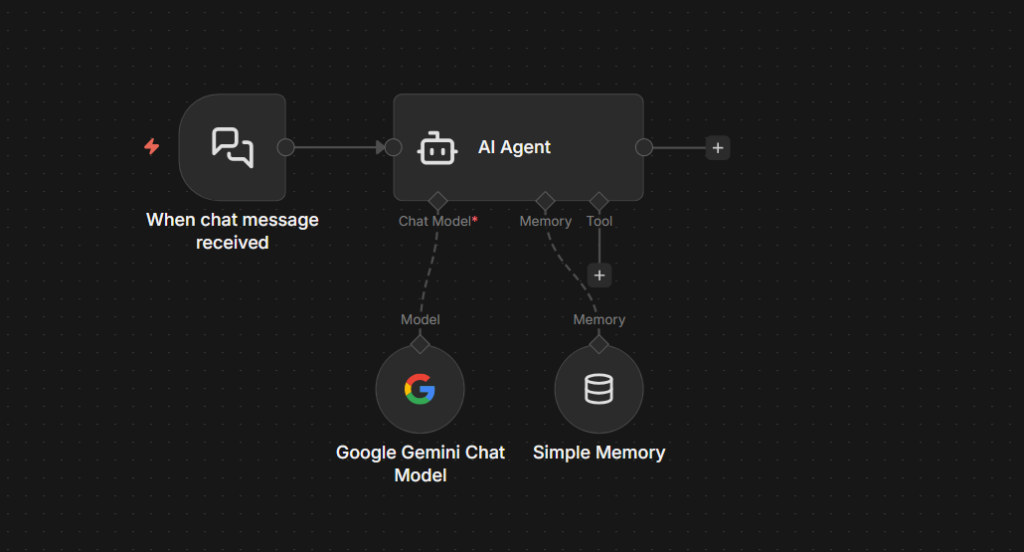
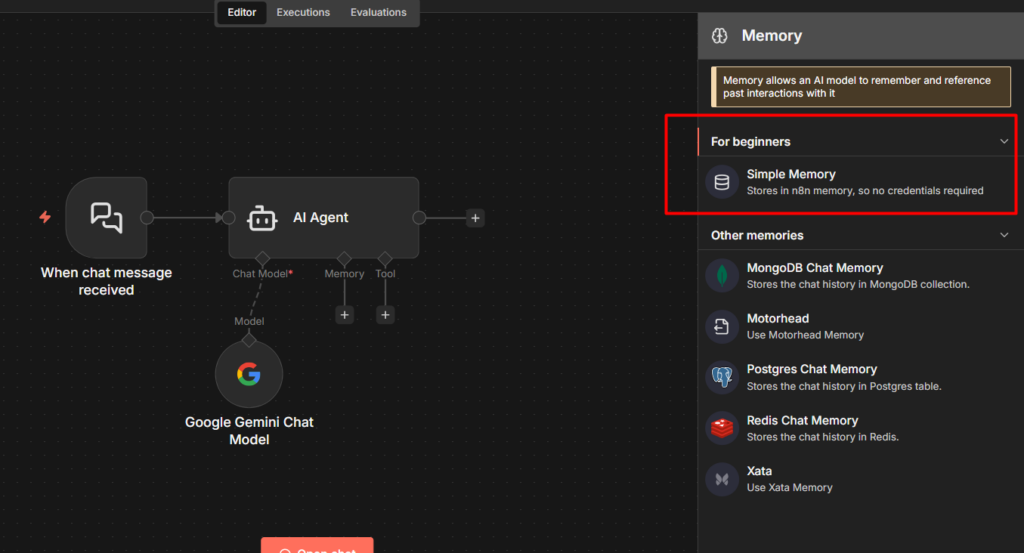
    Still on the sub-node area, connect a Simple Memory node to the Memory input.

    Adding simple memory to AI agent in n8n

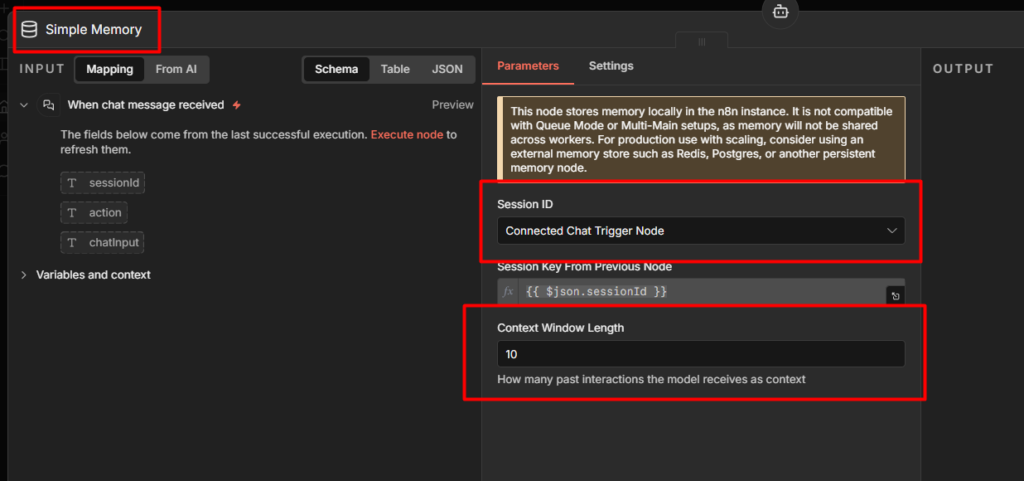
    Simple Memory keeps the conversation history in RAM during the current workflow session. This means your agent will remember what was said earlier in the same conversation – but only until the workflow restarts or the session ends.

    This is perfectly fine for testing, I’ll cover what to use in production in the next section, because this is exactly where most people get burned.

    Configuring the context window length in simple memory

    Leave the Context Window Length at 10 messages for now. That’s enough for most conversation without overloading the model’s context window.

    Check it out here to learn more about How to Use Simple Memory Node in n8n

    Added simple memory

    Step 5: Add a Tool

    Adding a tool to AI agent in n8n

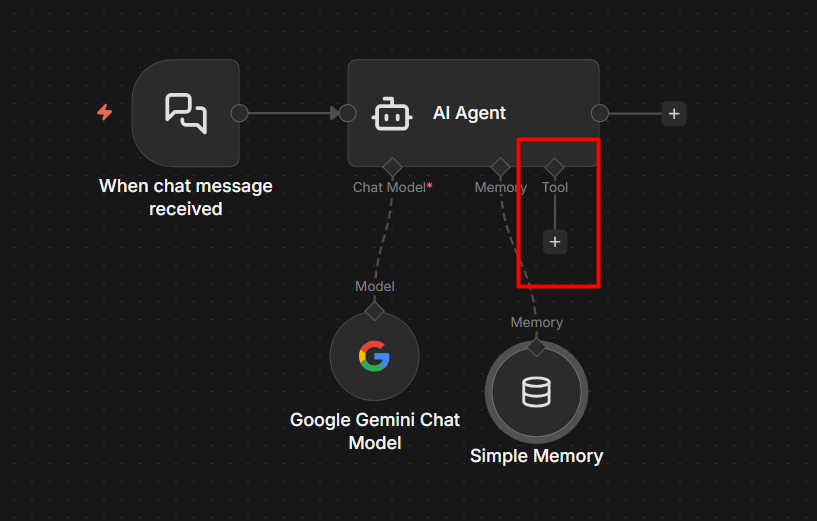
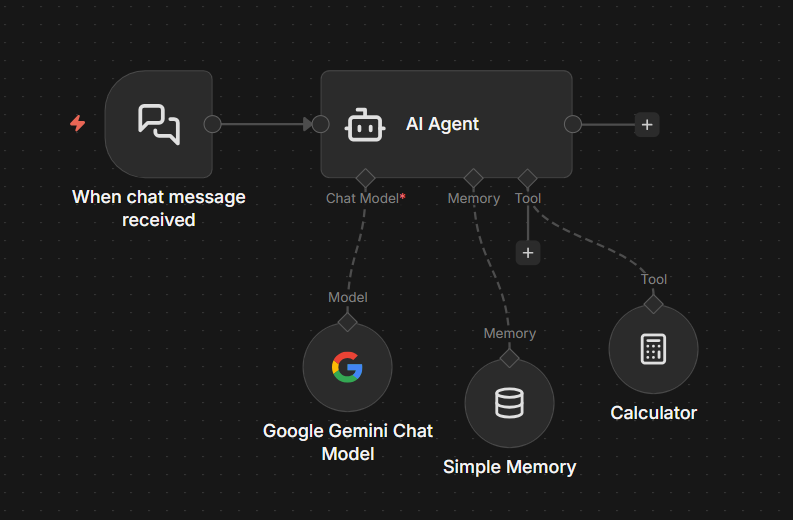
    Tools are how the agent takes actions beyond just generating text. For this example, add the built-in Calculator tool, It’s already in n8n, no setup required, and it lets you see the agent’s tool-calling behavior immediately.

    Connecting a calculator tool to AI Agent

    Connect it to the Tools input on the AI agent node.

    Here’s what actually happens when a user asks “What’s 15% of $340 for a tip?” – The agent recognizes it needs to calculate something, calls the calculator tool with 340 * 0.15, gets 51 and includes that in its response. You can watch this happen step by step in the execution logs.

    Step 6: Test It and Publish It

    Click the Chat button in the Chat Trigger node (or the Open Chat button that appears in the UI). A chat window opens

    Send a message: “Hey, I’m locked out of my account

    You should see the agent respond. But here’s the important part, click the execution that appeared in your workflow. Open it and look at the AI Agent node’s output. You’ll see the reasoning steps, What the model decided, which tool it chose (or didn’t), and why.

    This is the execution log view, and it’s one of n8n’s biggest strengths for working with agents. You can see exactly what the agent was thinking at each step. When something goes wrong, this is where you debug it.

    When you’re ready to use this in production, toggle the workflow to Publish in the top right corner.

    Choosing The Right Memory for Your Agent

    Simple Memory works perfectly in testing. The moment you deploy and restart your n8n instance, it forgets everything. Every conversation starts from scratch. Users have to re-explain their context every single time.
    Memory TypePersistsUse Case
    Simple Memory❌ NoTesting only, local development
    PostgreSQL memory✅ YesLong-term context, production chatbots
    Redis Memory✅ YesHigh-volume, fast session-based agents

    Motorhead Memory is deprecated as February 9, 2026. The Motorhead project is no longer maintained. n8n has hidden it from the nodes panel for new workflows.

    For production, use PostgreSQL Memory. It stores conversation history in a database table, survives restarts, and works with n8n’s native PostgreSQL integration. If you’re already self-hosting n8n with PostgreSQL as your n8n database, you can point the memory node at the same database.

    There are two things to get right with any persistent memory setup

    Session IDs must be unique per user. If you hardcode a session ID or leave it as a default, every user shares the same memory. Your agent will get confuse one user’s conversation history with another’s.

    Generate session IDs dynamically from a user identifier – their email, a user ID from your system, or a UUID.

    Set a reasonable context window. Storing 500 messages of history and sending all of it to the model on every request is expensive and often counterproductive. Most agents work well with the last 10-20 exchanges anything beyond that and you’re paying for tokens that don’t meaningfully improve responses though.

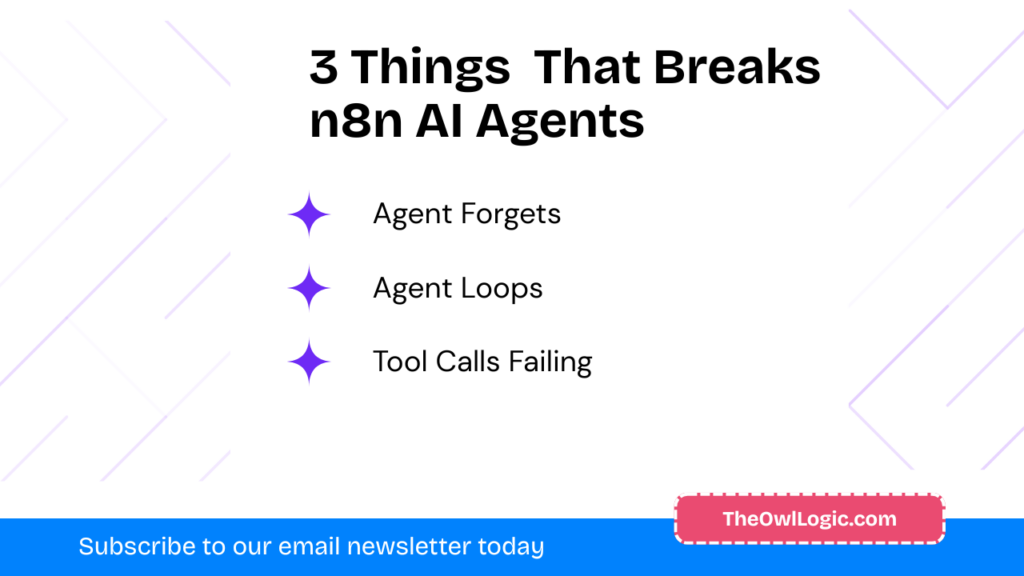
    3 Things That Break n8n AI Agents

    3 things that breaks n8n AI agents

    1. Agent “forgets” everything after deployment

    Conversations work perfectly in testing. In production, the agent has no memory of previous messages.

    You’re using Simple Memory and the workflow restarted (due to a deploy, update, or n8n instance restart).

    As a fix, Switch to PostgreSQL or Redis memory before going live. This is not optional for any agent that needs to maintain context across sessions.

    2. Agent loops or keeps asking clarifying questions

    The agent send multiple messages, asks the same question repeatedly, or never produces a final answer.

    Your system prompt is too vague. The agent can’t determine when it’s done, so it’s keeps going.

    Add explicit stopping conditions to your system prompt

    When you have enough information to answer, respond directly.
    Do not ask more than one clarifying question per response.
    If you cannot find the answer using available tools, say so clearly and stop.

    Also check your context window length. If it’s too long and the agent is reading 50+ messages of history, it sometimes gets confused about what was already resolved.

    3. Tool calls failing

    The agent responds as if it used a tool, but the action didn’t actually happen. No error shown to the user.

    The tool node is failing (expired credentials, API error, wrong field mapping) but the agent is continuing anyway and generating a plausible-sounding response without real data.

    As a fix, Open the execution and click into the specific tool node that fired. The error will be there.

    This is almost always a credential issues – check our error handling guide for how to setup error notifications so these don’t go unexpected.

    Also, be explicit in the system prompt that the agent should acknowledge when a tool fails rather than guessing.

    HITL Approvals + MCP Trigger

    Two features shipped in early 2026 that change how you build agents. Most content out there hasn’t covered them yet.

    Human-in-the-Loop (HITL) Tool Approval

    You can now mark specific tool as gated. The agent cannot execute them until a human explicitly approves the action.

    This is a big deal for high-stakes operations. Before this feature, if you built an agent that could send emails or delete records, you were trusting the agent’s judgement entirely, or using fragile prompt-based guardrails (“only do this if you’re sure”). Neither was reliable.

    Now you can set specific tools – “send email”, “delete record”, “post to production slack” to require approval.

    When the agent decides to call one of those tools, the workflow pauses.

    The approval request get routed to whoever needs to review it. They approve or reject. The agent continues or stops.

    Approvals are not limited to one interface either. You can route them through slack, email, a webhook.

    Any standard n8n node. So a high-priority approval can interrupt the right person on the right channel.

    MCP Server Trigger

    n8n now supports Model Context Protocol (MCP), which means external AI systems – other agent, claude, GPT – can call your n8n workflows as tools.

    You build a workflow, expose it via the MCP Server Trigger, and it becomes available as a callable tool in any MCP-Compatible AI system.

    This opens up multi-agent architectures where n8n handles the automation side while a more capable reasoning model handles complex decisions.

    Worth exploring once you’re comfortable with single-agent workflows.

    My Final Thoughts

    The support triage example in this post is deliberately simple. Once you have this working, add a real tool, a HTTP Request node that checks your knowledge base, or a Google Sheets lookup for customer data.

    That’s when agents start to feel genuinely useful.

    Built your first agent? Head back to the complete n8n beginner guide to see everything you’ve covered from day one.

    And don’t forget to subscribe to our weekly digest email newsletter. Good luck 🙂

  • How to Build a Follow-up Email Sequence in n8n (Workflow)

    How to Build a Follow-up Email Sequence in n8n (Workflow)

    This tutorial shows you how to build an automated 3-email follow-up sequence in n8n that handles all of that for you.

    The workflow checks your contacts list daily, sends the right email to each person based on timing, and stops automatically when someone replies. (Workflow included)

    Real use cases: People who downloads your ebook, new lead onboarding, anything where you need to stay in touch without manually tracking 50+ conversations.

    Why n8n instead of Mailchimp or Hubspot?

    FREE. Unlimited contacts. You own the data. No monthly fees that scale with your list size. You need a paid subscription in HubSpot to enable automated nurturing email sequences. n8n costs $0 if you self-host, or $20/month for unlimited everything on n8n cloud.

    But, still there are some downsides as well.

    What you need to follow this tutorial?

    I’ll show you how to build the simplest version first, a 3 email sequence that actually works. then I’ll explain how to add reply detection and scaling things up.

    The Email Sequence Strategy (Before You Build)

    Most people jump straight into building workflows and wonder why their sequence feels wrong. The timing is off, or they send too many emails, or not enough.

    You should need to decide first before you add your first node.

    How Many Emails Should You Send?

    Three emails is the sweet spot for most follow-up sequences based on my marketing experience.

    • Email #1: Initial contact or First feedback email(reminds them who you are, offer value)
    • Email #2: Follow-up (adds context, share resources or case study)
    • Email #3: Final check-in (gentle nudge, easy opt-out)

    Why nore more? Industry data shows 80% of responses come from the first three emails. Email 4 and 5 mostly annoy people who’ve already decided not to respond.

    Long-term nurturing sequences (educational content over weeks/months). But that’s a different workflow. For follow-ups after a meeting or demo, stick with three or anyways you can try out your own phase, maybe more than 3 could work for you too. Alright, let’s stick to the plan.

    The Workflow Structure (High Level Overview)

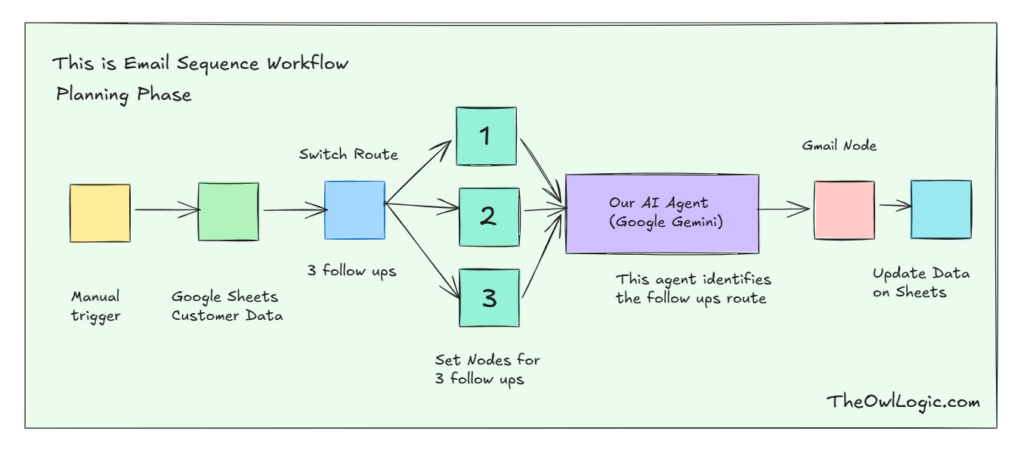
    Before configuring individual nodes, understand how the pieces going to connect. Let’s start the plan.

    Planning our Email sequence workflow in n8n

    The objective: I want to send emails for those who downloaded my marketing e-book

    Right now, I’ve their details such as email, full name.

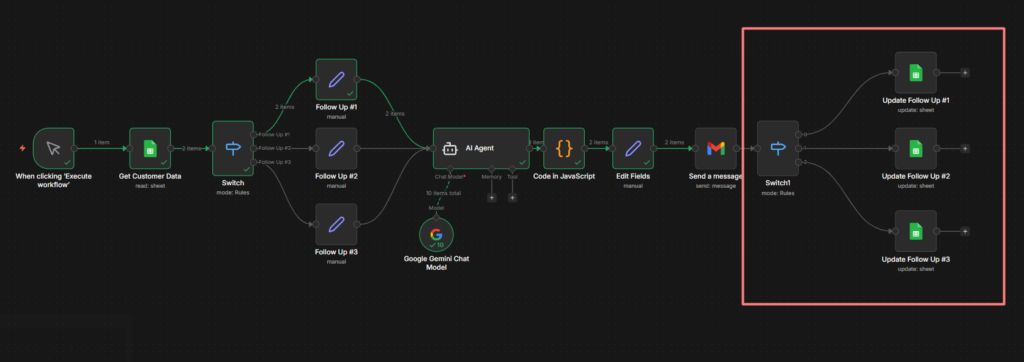
    Your email sequence workflows has 6 core nodes

    1. Manual trigger (for testing) / Schedule trigger
    2. Google Sheets (Read)
    3. Switch Node
    4. Set Node
    5. AI Agent (Gemini Chat Model)
    6. Code Node
    7. Set Node
    8. Gmail Node
    9. Switch Node
    10. Google Sheets (Update)

    Building the Workflow

    This is where everything comes together. By the end of this section you’ll have a working workflow that reads your contact list, decide which follow-up email to send, generates it with AI, send it via Gmail, and updates your sheet automatically.

    Let’s build it step by step.

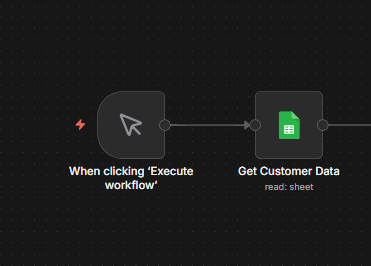
    Step 1: Add The Trigger

    For now, use a Manual Trigger while building and testing, We’ll switch this to a schedule trigger later when everything works perfectly.

    Step 2: Get User’s Data

    Connect Google Sheets to the trigger

    Add a Google Sheets node and connect it to the trigger.

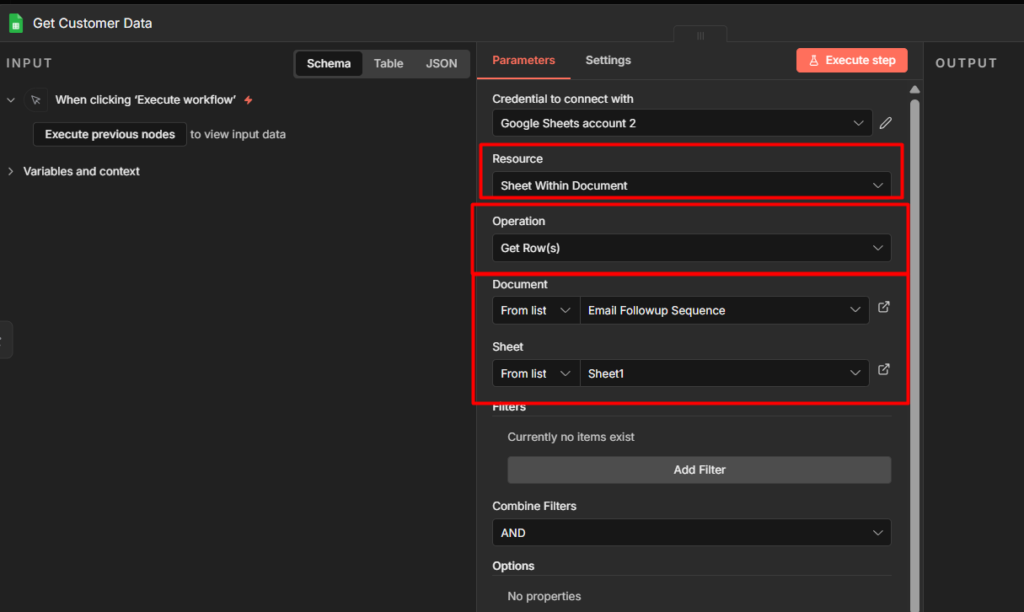
    Configurations

    Google sheets node configs
    • Resource: Sheet data
    • Operation: Read (Get Rows)
    • Document: Select your email Follow-up sequence sheet
    • Sheet: Sheet1 (for me)

    When you execute this node you should see all your user details flowing through separate items.

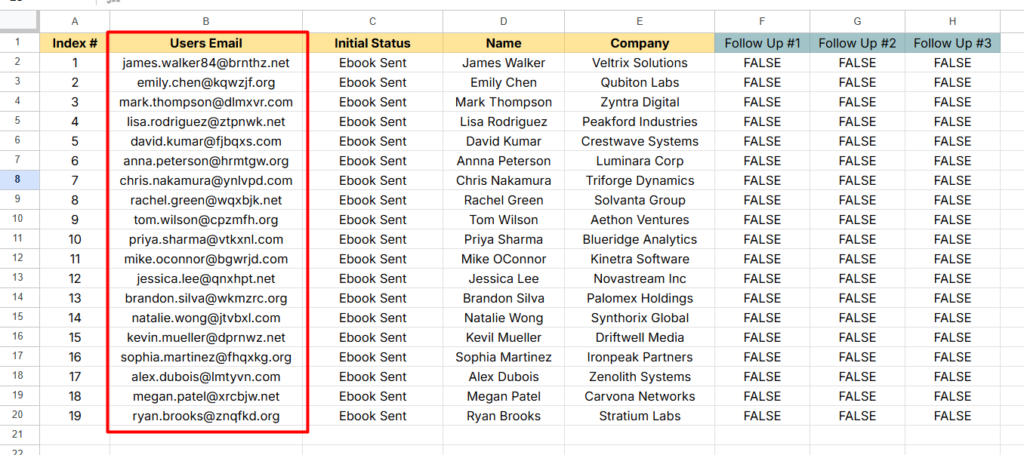
    Email lists in google spreadsheet

    One thing to check: Make sure every row in your sheet has a valid email address in the Users Email column. A single empty row will crash the Gmail node later. If you have blank rows, delete them now.

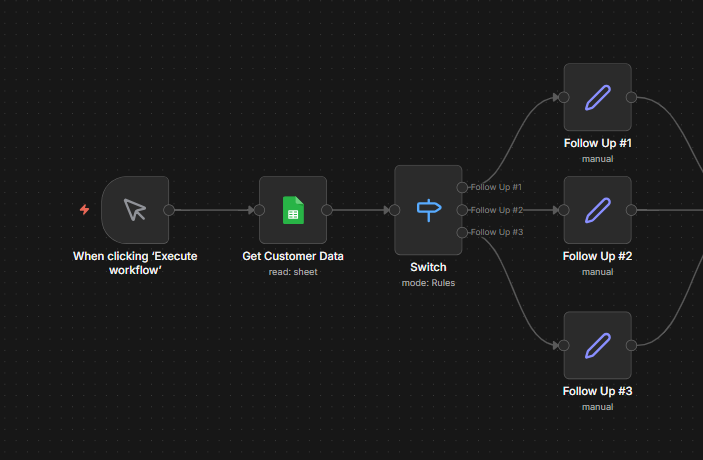
    Step 3: The Switch Node

    connecting switch node to the google sheets

    This is the brain of the workflow. The Switch node looks at each column and decides which email they need next.

    Read More: How to Build Conditional Logics in n8n (IF / Switch)

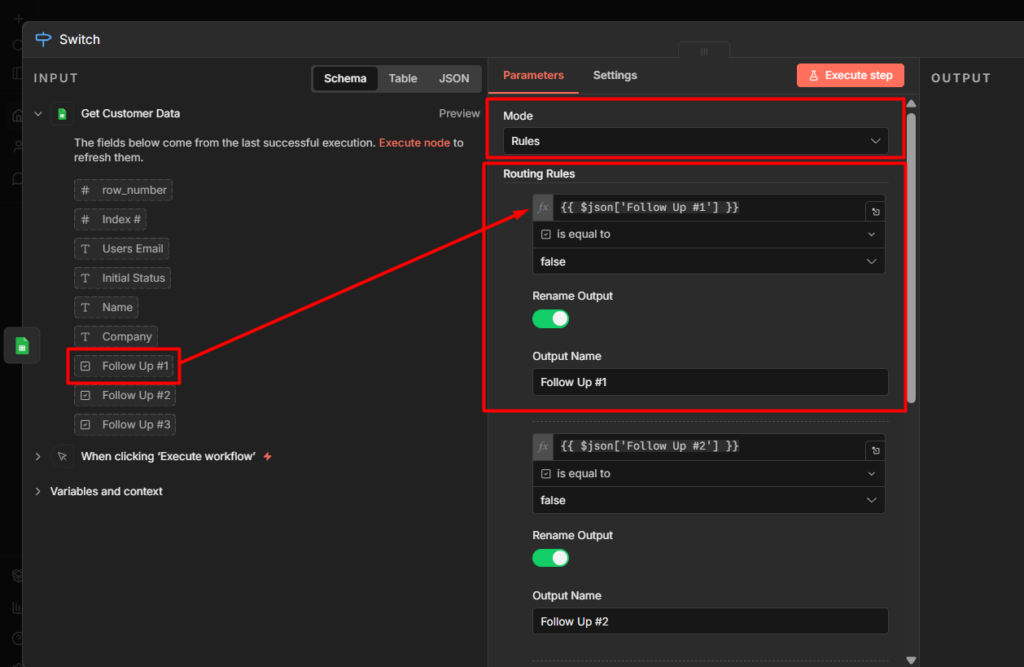
    Add a Switch node. set Mode to Rules.

    Add 3 Rules.

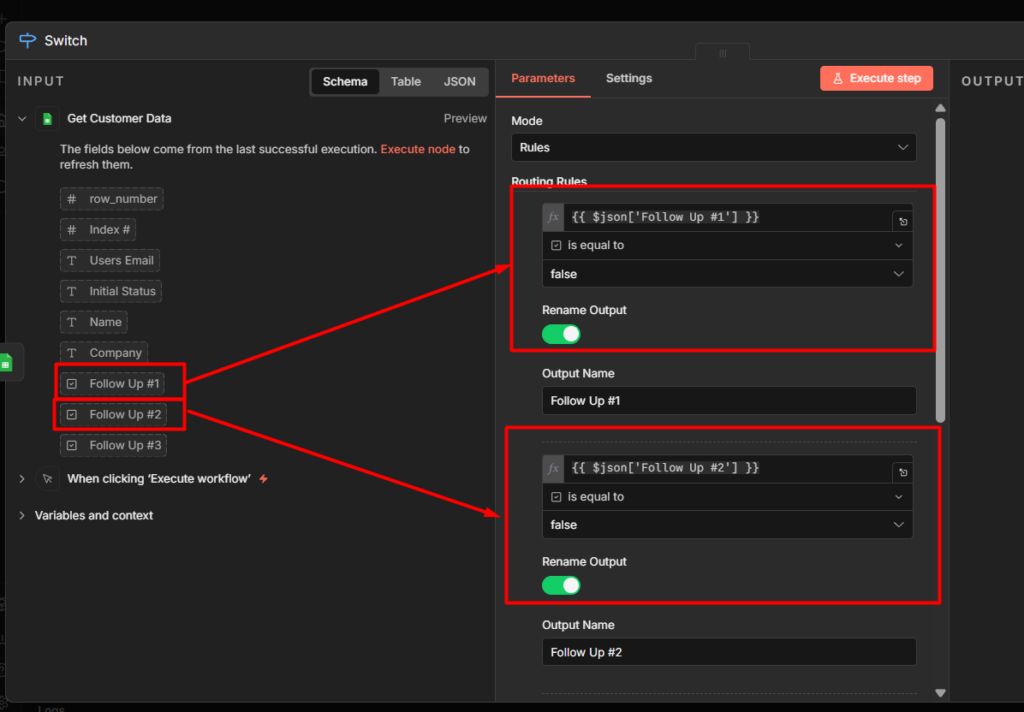
    Mapping from google sheets to switch

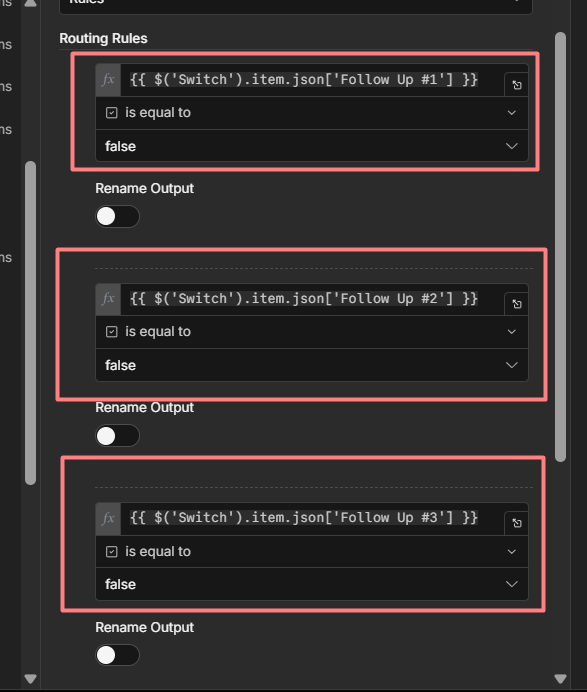
    Well, basically, you need to create 3 separate Routing Rules for separate follow ups.

    Logics

    • If Follow Up is false means we have to send them the follow-up email
    • If Follow Up is true means we have sent them the follow-up email
    Tagging the follow-ups column to n8n
    • What you’ve to do is, for 3 routes you have to assign those follow ups column appropriately.

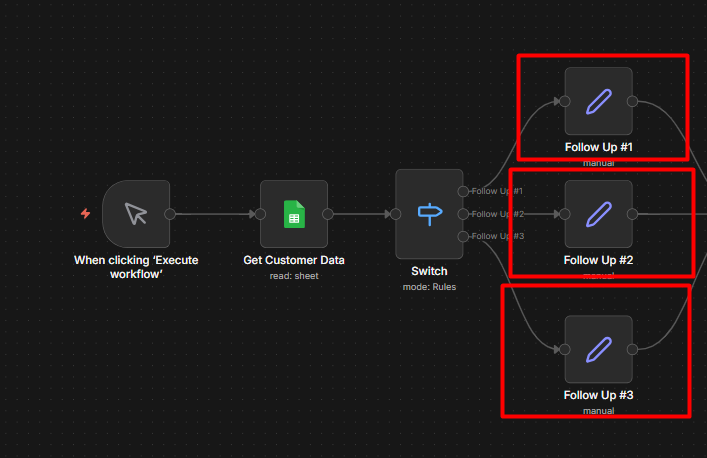
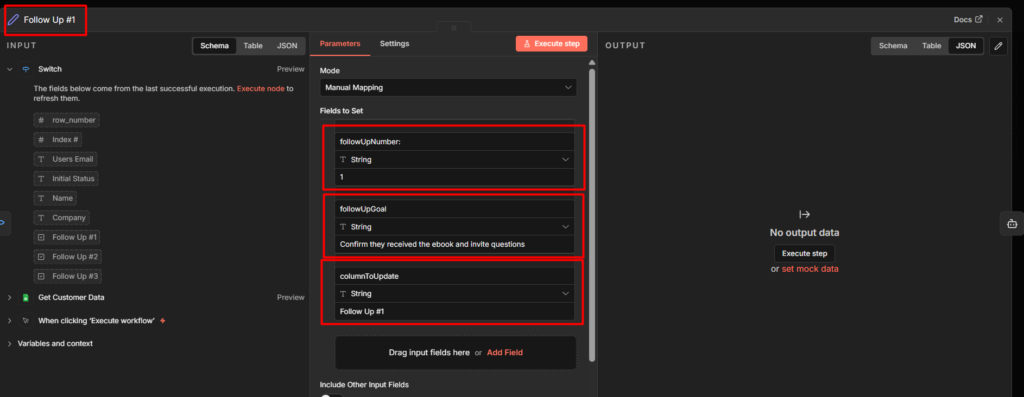
    Step 4: Set Node (One Per Route)

    Each Switch route needs to know which email it’s sending. Add a SET node on each of 3 routes.

    • Make sure add a SET node to it’s Switch follow-up route
    • Now add these configurations to SET nodes individually
    • This is for Follow Up #1
      • followUpNumber – 1
      • followUpGoal – Confirm they received the ebook and invite questions
      • columnsToUpdate – Follow Up #1
    • This is for Follow Up #2
      • followUpNumber – 2
      • followUpGoal – Check if they started reading, share one key insight
      • columnsToUpdate – Follow Up #2
    • This is for Follow Up #3
      • followUpNumber – 3
      • followUpGoal – Ask for one-line feedback on the ebook
      • columnsToUpdate – Follow Up #3

    Make sure to know this, you can add whatever here on the followUpGoal for all these 3 SET nodes. It’s all about giving an additional contexts. You maybe have a different goal, add that goal in one liner.

    Step 5: The AI Agent

    Add an AI Agent node. Connect Google Gemini Chat Model to it’s Chat Model input.

    Now add this system prompt to AI Agent node.

    You are an email writer for Shajid from The Owl Logic (theowllogic.com), 
    a blog focused on n8n automation and workflow development.
    
    Shajid recently launched an ebook about n8n automation. The recipient 
    downloaded this ebook and you are writing a follow-up email on his behalf.
    
    ## Recipient Details:
    - Name: {{ $('Get Customer Data').item.json.Name }}
    - Company: {{ $('Get Customer Data').item.json.Company }}
    
    ## Which Email to Write:
    - Follow Up Number: {{ $json['followUpNumber:'] }}
    - Goal: {{$json.followUpGoal}}
    - Column to Update: {{$json.columnToUpdate}}
    
    ## Email Instructions Based on Follow Up Number:
    
    If followUpNumber = 1:
    - Subject: "Your n8n Automation Ebook is Ready, {{ $('Get Customer Data').item.json.Name }}"
    - Goal: Confirm delivery, tell them what's inside, invite questions
    - Tone: Warm welcome, excited but not salesy
    
    If followUpNumber = 2:
    - Subject: "Did you get a chance to read it, {{ $('Get Customer Data').item.json.Name }}?"
    - Goal: Check if they started reading, share ONE specific insight 
      from the ebook to spark curiosity, re-share download link
    - Tone: Casual check-in, friendly nudge
    
    If followUpNumber = 3:
    - Subject: "Quick question about the ebook, {{ $('Get Customer Data').item.json.Name }}"
    - Goal: Ask for one-line feedback, mention you're building more 
      resources and their input shapes what gets built next
    - Tone: Direct, honest, respectful of their time
    
    ## Rules for ALL emails:
    - Max 150 words
    - Write in first person as Shajid
    - Conversational, not corporate
    - No emojis
    - No marketing language or hype words
    - No phrases like "I hope this email finds you well"
    - Sound like a real person writing to one person
    - End with: "- Shajid"
    
    ## Output Format:
    Return ONLY this JSON structure, nothing else:
    
    {
      "subject": "email subject here",
      "body": "email body here",
      "columnToUpdate": "{{$json.columnToUpdate}}"
    }

    You can simply have it in your own way though based on your requirement, for this tutorial, try to copy me until you succeed, after that you can be able to make your own follow-up sequence.

    For the prompt (user message)

    Write follow-up email {{ $json.columnToUpdate }} for:
    
    Name: {{ $('Get Customer Data').item.json.Name }}
    Company: {{ $('Get Customer Data').item.json.Company }}
    Goal: {{$json.followUpGoal}}
    Column to Update: {{$json.columnToUpdate}}
    
    Return the JSON output only.
    • We are asking Gemini to write follow-up email {{ $json.columnToUpdate }} for: which means we are passing down the follow up number whether 1,2,3 – so basically we

    Watch this video below for understanding them perfectly.

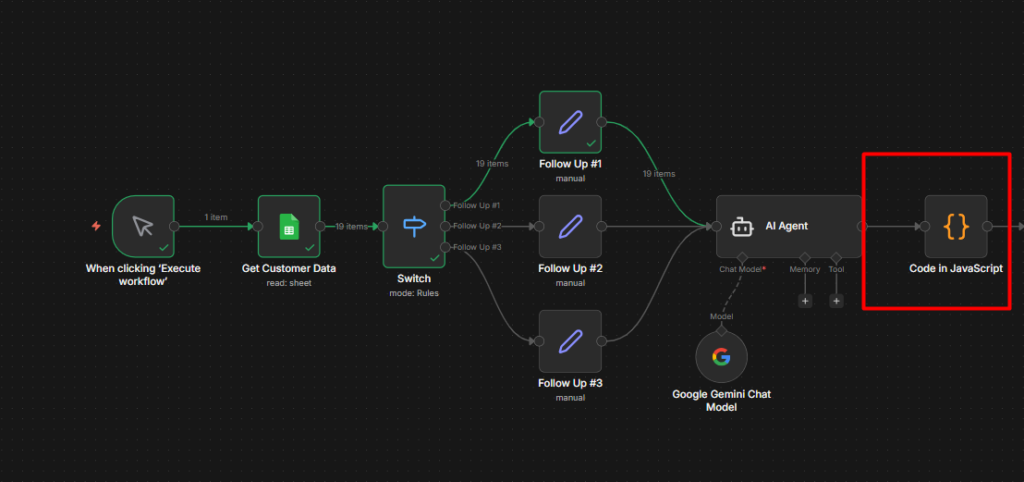
    Step 6: The Code Node to Parse JSON

    Adding code node after AI Agent to sanitize it's data structure

    AI Agent returns everything as one string. This Code node breaks it into a separate fields.

    const results = [];
    
    for (const item of $input.all()) {
      // Safety check - skip items without output
      if (!item.json.output) {
        results.push({ json: { ...item.json, error: 'No output from AI Agent' } });
        continue;
      }
    
      try {
        const raw = item.json.output;
        
        // Clean markdown code blocks if present
        const cleaned = raw
          .replace(/```json\n?/g, '')
          .replace(/```\n?/g, '')
          .trim();
    
        const parsed = JSON.parse(cleaned);
    
        results.push({
          json: {
            ...item.json,
            subject: parsed.subject || 'Follow up from Shajid',
            body: parsed.body || '',
            columnToUpdate: parsed.columnToUpdate || item.json.columnToUpdate
          }
        });
    
      } catch (e) {
        // If JSON parse fails, log which item failed and why
        results.push({
          json: {
            ...item.json,
            error: `Parse failed: ${e.message}`,
            rawOutput: item.json.output
          }
        });
      }
    }
    
    return results;

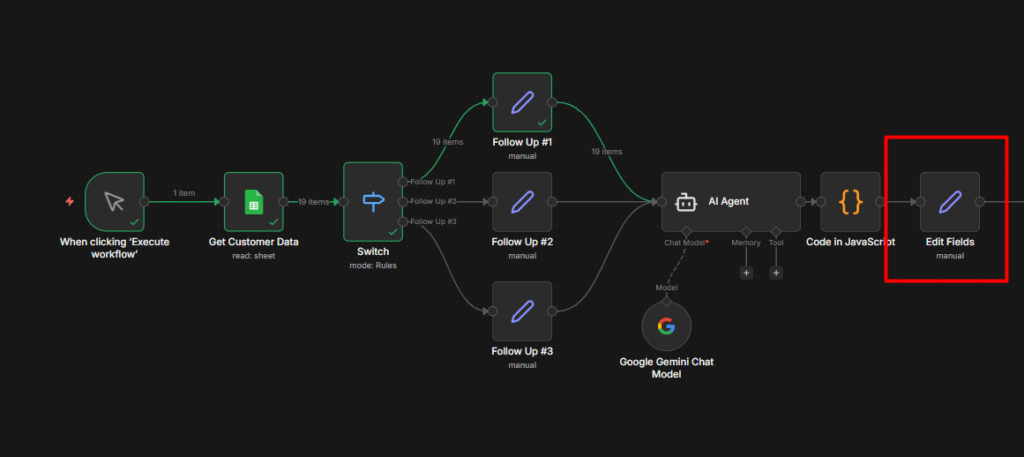
    Step 7: Adding a SET Node (Again)

    Setting a SET node after Code node in n8n

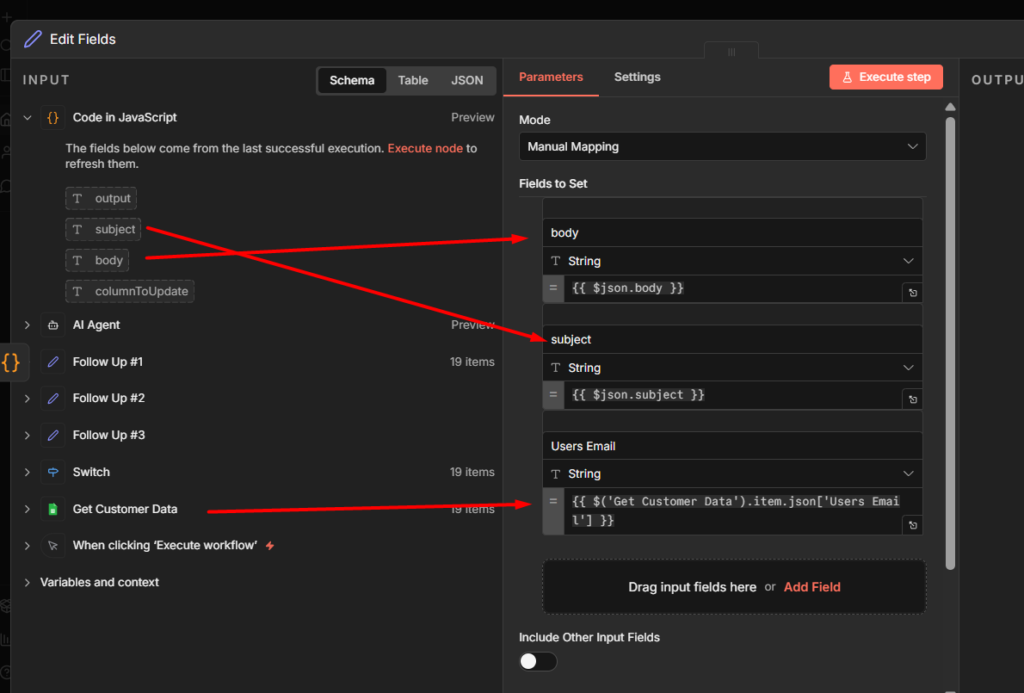
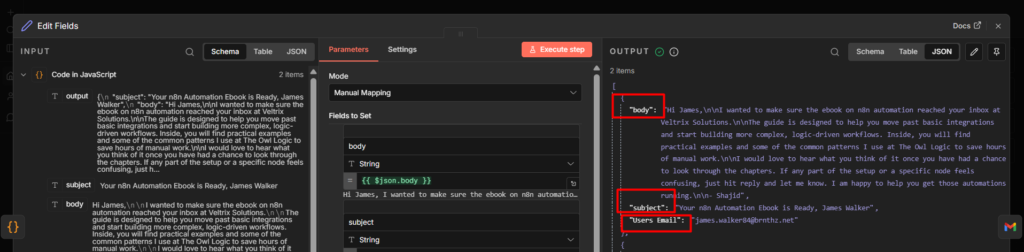
    Now we need to separate what code node gives us, perhaps you don’t need this node, but I added here for easy to access data. I don’t want run into any confusion later though.

    Mapping the code node's response to SET node

    Map the data to SET node from the Code node.

    • Add the body
    • Add the subject
    • Add the Users email from Sheet directly.
    Output from the code node to set node

    So it should come like this all the information.

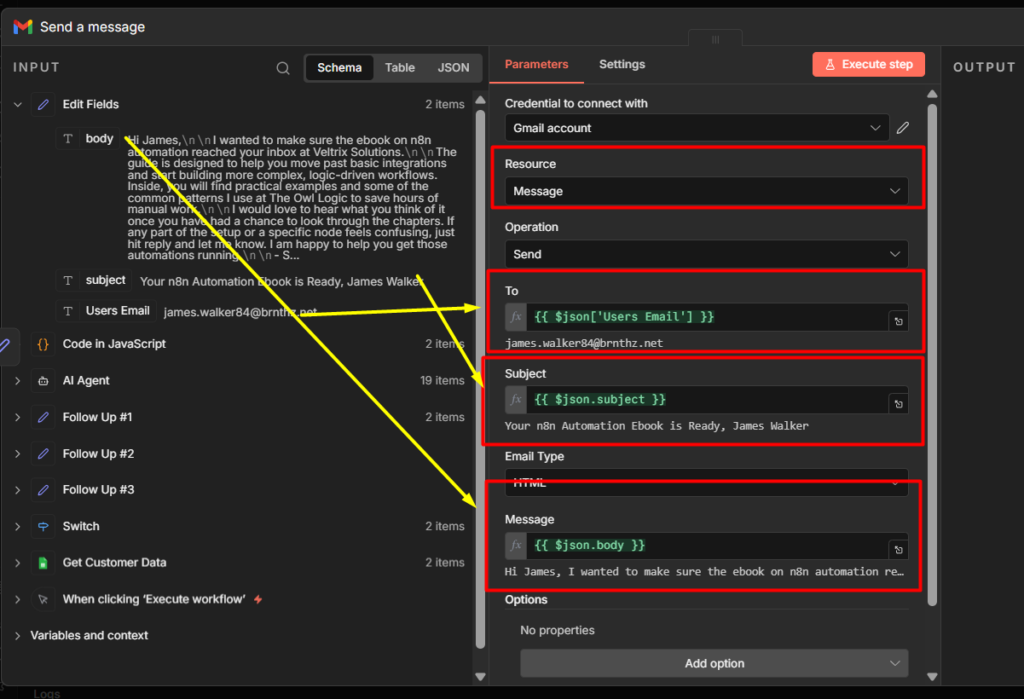
    Step 8: Gmail Node

    Add a Gmail Node (to send message)

    Configuration

    • To: {{ $json['Users Email'] }}
    • Subject: {{ $json.subject }}
    • Email Type: HTML
    • Message: {{ $json.body }}
    Mapping the SET nodes response to Gmail node

    Step 9: Switch Node to Update Google Sheet

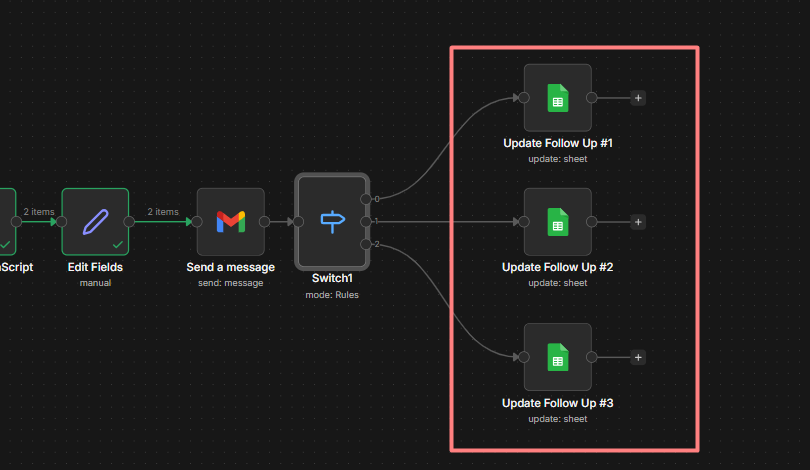
    Switch routes branching out 3 different follow ups

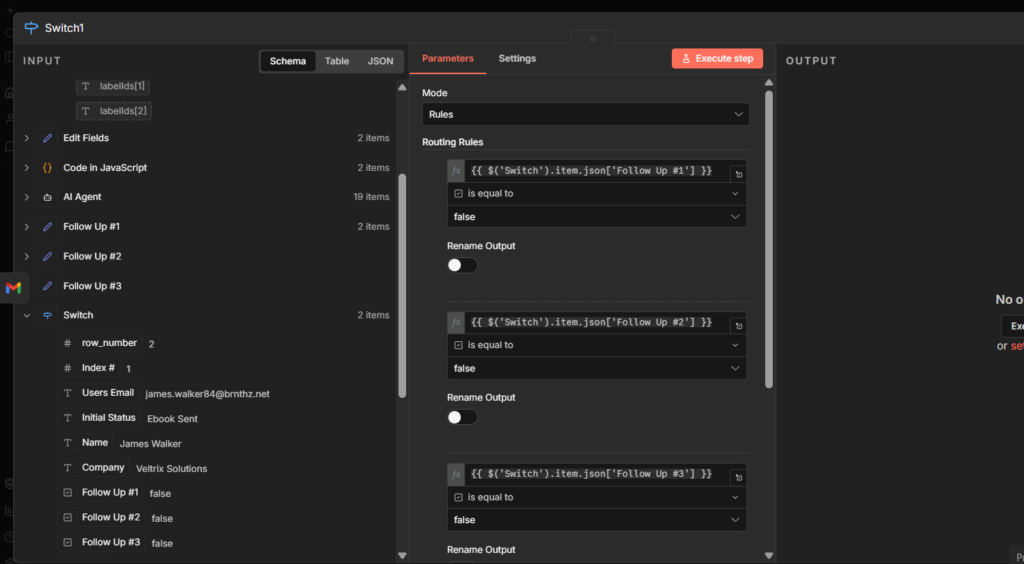
    Alright, now we have to connect another Switch Node.

    You have to connect the previous Switch nodes state to this new Switch node. Simply drag and drop the Follow Up #1 and create a Routing rule.

    Make sure to create 3 separate routing rules for Follow Ups, like how I did.

    Mapping the previous switch node data to this new switch node

    Step 10: Add Google Sheets to Per Route

    Updating google sheets as per switch route

    Now we have 3 different routes for follow-ups, and we need to attach 3 different Google Sheet (update) nodes to the each route.

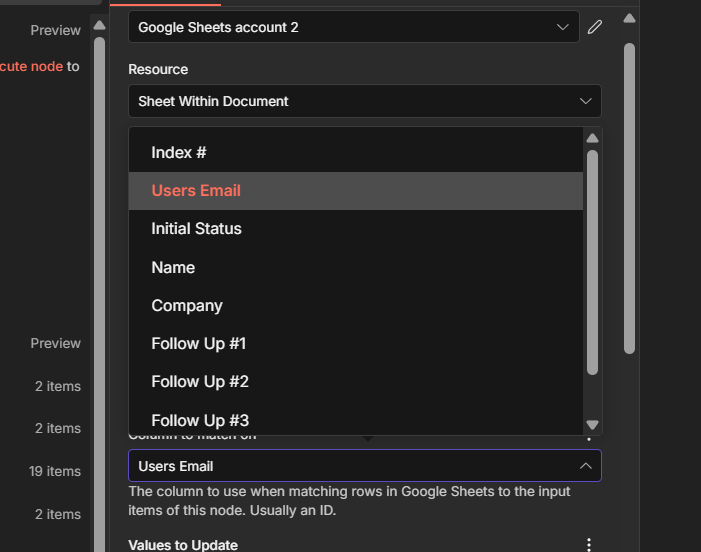
    Configuration

    • Operation: Update Row
    • From List: Your Document
    • Sheet: Sheet 1 (mine)
    • Mapping Column Mode: Map Each Column Manually
    • Columns to Match On: Users Email
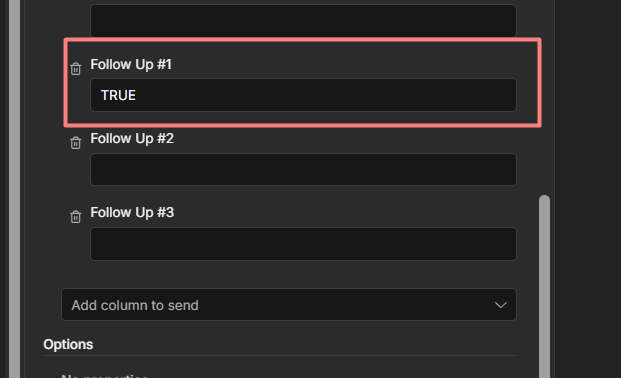
    Follow Up #1 to true
    Follow Up #2 to true on 2nd route switch node
    Follow Up 3 to true

    Make sure to understand this, for each route has follow up.

    • Route 1: Follow Up #1: You need to Update the Google Sheet Follow Up #1 Column to TRUE, and keep others empty
    • Route 2: Follow Up #2: You need to Update the Google Sheet Follow Up #2 Column to TRUE, and keep others empty
    • Route 3: Follow Up #3: You need to Update the Google Sheet Follow Up #3 Column to TRUE, and keep others empty

    Final Execution Email Follow-Up

    So literally before you add your contact lists, you work with one email for testing, whether everything works perfectly, including the formatting, After that gradually test with 5, 10, 20, 30 and once passed without any failure. You can move on with your lists.

    Frequently Asked Questions

    How do I add delays between follow-up emails?

    Don’t use Wait Nodes for multi-days delays. They block your entire workflow – if Contact 1 hits a 3-day wait, every other contact get stuck behind it.

    The correct approach: Scheduled trigger + date in your Switch conditions.

    Your workflow runs daily and asks “has enough time passed?” instead of sitting open for 3 days.

    Add a Last_Email_Date column to your sheet. Each Update node writes today’s date after sending. The Switch condition checks how many days have passed before sending the next email.

    Can I Use SMTP instead of Gmail?

    Yes. Replace the Gmail node with n8n’s Send Email node and plug your SMTP credentials.

    Good free options SendGrid (100/day), Brevo (300/day), Mailgun(1,000/day trial)

    Gmail works fine for testing and small lists. Switch to SMTP when you hit over 200+ contacts per day.

    Can I Connect MailChimp or ActiveCampaign?

    Yes. Instead of the Gmail node, use n8n’s Mailchimp or ActiveCampaign node to add contacts directly into their automations.

    That said, if you’re already building this in n8n, you don’t need them. n8n + Gmail handles everything for almost for free.

    How do I stop the sequence if someone replies?

    That requires a second workflow running alongside with this one, The second workflow.

    1. Monitor your Gmail inbox using an Email trigger (IMAP) node
    2. Check if the sender’s email matches anyone in your Google Sheet
    3. If Yes, update their statuses to mark sequence complete.

    Well, make sure to subscribe to our email newsletter for more information regarding this workflow. You can directly talk to me regarding any issue with this workflow or to make this workflow great.

    My Final Thoughts

    You just built an AI-powered follow-up email sequence from scratch in n8n.

    No mailchimp subscriptions. No hubspot invoices, Just n8n. Pure play.

    What’s next? If you want this running fully or autopilot without manual executing it, switch to a Schedule trigger, with data math as I mentioned above. Workflow handles timing on it’s own.

    Well, This is all up. You can grab the Workflow JSON here.

  • How to Plan a n8n Workflow (Beginner’s Guide)

    How to Plan a n8n Workflow (Beginner’s Guide)

    Why most beginners struggle with n8n (And, It’s not what you think).

    You’ve finished the First Hello World Workflow. You understand what an HTTP Request node does. You know how to connect nodes together. But when you open n8n to automate something real – like monitoring Reddit mentions of your product, you literally freeze.

    The canvas is blank. You know the tools exist, but you have no idea where to start.

    Technical knowledge isn’t your problem. Workflow decomposition is.

    Most n8n tutorials teach you what nodes do. They show you how to configure an HTTP Request or parse JSON. But they skip the most important skill – breaking down a problem into automation-friendly steps before you touch a single node.

    I learned this the hard way after watching dozens of beginners (myself included) build workflows that technically work but are impossible to maintain. They skip planning, jump straight to adding nodes, and end up with spaghetti logic that breaks the moment anything changes.

    This guide teaches you the thinking process that comes before the clicking. Once you understand how to decompose problems into workflow patterns, building in n8n becomes surprisingly straightforward.

    The Workflow Thinking Framework

    Before you add your first node, answer four questions. These questions force you to think like a workflow instead of like a human performing tasks manually.

    Question 1: What’s the Desired Outcome?

    Start with the end result, not the process to get there.

    Bad example: “I want to scrape Reddit.”
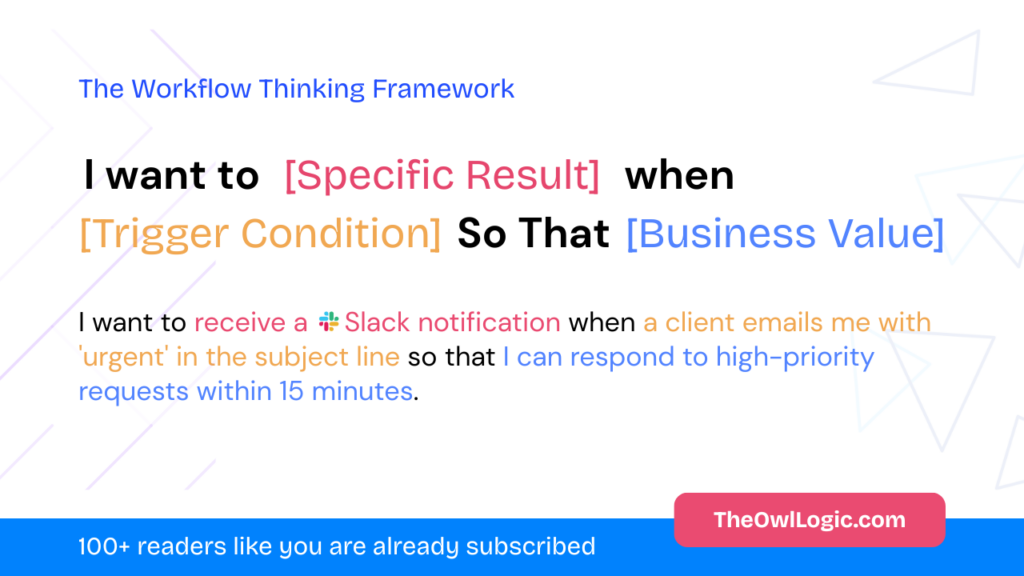
    Good example: “I want to receive a Slack notification when a new post in r/n8n mentions ‘workflow automation’ with 50+ upvotes.”

    Can you see the difference? The good example is specific, measurable, and describes the actual value you’re creating. The bad example describes a technical action without context.

    The Workflow thinking framework for beginner n8n builders

    Write your desired outcome as: “I want to [specific result] when [trigger condition] so that [business value].”

    This forces clarity. If you can’t fill in all three parts, your problem isn’t well-defined yet.

    Question 2: What Triggers the Workflow?

    Workflows need a starting point. In n8n, this is your trigger node, and choosing the wrong type creates problems later.

    Ask yourself: Does this workflow start based on time, an external event, or a manual action?

    Time-based triggers run on a schedule:

    • “Every Monday at 9am, generate a weekly report”
    • “Every 4 hours, check inventory levels”
    • Use the Schedule Trigger node

    Event-based triggers respond to something happening:

    • “When a new email arrives in support”
    • “When someone submits a form on your website”
    • “When a file is added to Google Drive”
    • Use service-specific trigger nodes or webhooks

    Manual triggers start when you click a button:

    • “I want to run this workflow on-demand”
    • “I’m testing and want to control execution”
    • Use the Manual Trigger node

    Most beginners default to Manual triggers because they’re testing. That’s fine for development, but switch to the real trigger type before deploying. A workflow that should respond to events won’t work if it requires manual clicks.

    Question 3: What Data Transformations Are Needed?

    Every workflow follows the same pattern: Input → Transform → Output.

    Input is the raw data from your trigger. It’s usually messy, contains extra fields you don’t need, and isn’t in the format the next step expects.

    Transform is where you clean, filter, format, and enrich that data.

    Output is what the next step (or final destination) needs.

    Let’s use a real example. You’re pulling posts from Reddit’s API:

    Input: 50 Reddit posts in JSON format, each with 20+ fields (author, created_utc, score, title, selftext, url, subreddit, etc.)

    Transform:

    • Filter to only posts with score > 100
    • Extract just title and url
    • Format as a readable message

    Output: A clean list of high-scoring posts ready for your Slack node

    This thinking process maps directly to n8n nodes. The transformation step might need multiple nodes, a Filter node to remove low-scoring posts, a Set node to extract specific fields, and a Code node if you need custom formatting.

    Understanding how data flows between nodes makes this transformation step much clearer.

    Question 4: What Could Go Wrong?

    Beginners skip this question. Then their workflow runs fine for a week and suddenly breaks.

    Think through failure modes before building:

    What if the external API is down?
    Your workflow should handle timeouts gracefully instead of failing silently. Maybe you send yourself an alert, or retry after 5 minutes.

    What if no data matches your filters?
    If you’re filtering Reddit posts for those with 100+ upvotes and none exist today, should your workflow fail? Or should it complete successfully with zero items?

    What if data format changes?
    APIs add new fields, remove old ones, or change data types. Your workflow should validate critical fields exist before using them.

    I’ve seen workflows break because someone assumed an API always returns an array. One day it returned null, and the workflow crashed trying to loop over nothing.

    Add error handling early. It’s easier than debugging production failures at 2am.

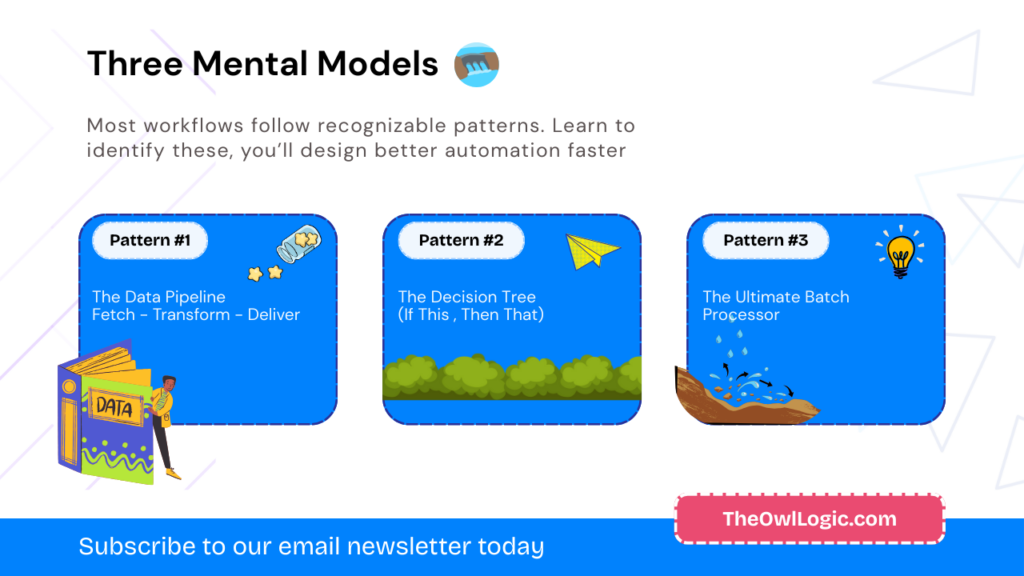
    Three Mental Models for Common Automation Patterns

    Three mental model patterns that should have in beginner n8n builders

    Most workflows follow recognizable patterns. Learn to identify these, and you’ll design better automations faster.

    Pattern 1: The Data Pipeline (Fetch → Transform → Deliver)

    When to use it: You’re moving data from one place to another with minimal logic in between.

    This is the simplest pattern. Data flows in one direction through a series of transformations, then lands somewhere useful.

    Example scenario: Send a daily weather report to Slack every morning at 8am.

    The workflow structure:

    1. Schedule Trigger – Runs at 8:00am daily
    2. HTTP Request – Fetch weather data from OpenWeather API
    3. Set node – Extract temperature and conditions from the JSON response
    4. Code node – Format a readable message like “Today in San Francisco: 72°F, partly cloudy”
    5. Slack node – Send the formatted message to #general

    No branching logic, no loops, no complex decision-making. Data enters at the top, gets transformed step by step, and exits at the bottom.

    This pattern works well because it’s linear and predictable. When something breaks, you know exactly where to look—the step that’s failing.

    Pattern 2: The Decision Tree (If This, Then That)

    When to use it: Different inputs require different actions.

    Real-world problems rarely have one-size-fits-all solutions. Support emails need different responses based on urgency. Sales leads need routing based on company size. File uploads need different processing based on file type.

    Example scenario: Triage support emails and route them based on urgency.

    The workflow structure:

    1. Email Trigger – New email arrives at support@yourcompany.com
    2. Code node – Analyze subject and body for keywords
    3. IF node – Branch into three paths:
      • Path A: Email contains “urgent” or “down” → High priority
      • Path B: Email contains “bug” or “error” → Medium priority
      • Path C: Everything else → Low priority
    4. Different actions per path:
      • High priority → Send Slack alert to on-call engineer
      • Medium priority → Create ticket in system with priority flag
      • Low priority → Send auto-reply, create normal ticket

    The IF node is your friend here. Each branch handles its specific case independently. This is much clearer than trying to build one giant node that handles all scenarios.

    Learn more about conditional logic in n8n to master this pattern.

    Pattern 3: The Batch Processor (Loop Over Items)

    When to use it: You need to perform the same action on multiple items, but each item needs individual processing.

    This is where beginners often get stuck. They think “I have 100 contacts, I need to send 100 emails” and try to build a workflow that handles all 100 at once. That’s not how n8n works.

    n8n processes items in batches automatically, but understanding how loops work prevents confusion.

    Example scenario: Send personalized follow-up emails to 100 conference attendees.

    The workflow structure:

    1. Schedule Trigger – Run once (manual or scheduled)
    2. Google Sheets node – Fetch all attendee data (name, email, company, session attended)
    3. Loop Over Items – n8n handles this automatically,
      • For each attendee, the workflow processes them individually
      • The Email node receives one attendee at a time
    4. Set node – Create personalized variables for each attendee
    5. Code node – Build custom email body: “Hi {{name}}, thanks for attending {{session}} at our conference…”
    6. Send Email node – Send to each attendee individually
    7. Wait node – Pause 2 seconds between emails to respect rate limits

    The critical insight: n8n automatically loops over items from previous nodes. You don’t need to write a for-loop yourself. Each node processes all items it receives, one at a time.
    But you do need to handle rate limits. If you’re sending 100 emails, most email services will throttle or block you if you send them all instantly. That’s where the Wait node saves you—or better yet, learn about handling API rate limits in n8n.

    Practical Exercise: Design Your First Workflow (Before Opening n8n)

    Here’s the mistake I see constantly: beginners open n8n, add a few nodes, realize they don’t know what comes next, and start over. Then they do it again. And again.

    Stop doing that. Plan on paper first.

    Use this pre-workflow checklist before touching your mouse:

    1. Write the Problem in One Sentence

    Use this template: “I want to [outcome] when [trigger] so that [benefit].”

    Don’t cheat and make it vague. Be painfully specific.

    Example:
    I want to save new videos from the Fireship YouTube channel to my Notion workspace when they’re published so that I have a curated learning library.

    2. Map the Data Flow

    Answer three questions:

    What data comes in?

    • RSS feed from YouTube containing video title, URL, publish date, description

    What transformations happen?

    • Filter out YouTube Shorts (keep only videos longer than 60 seconds)
    • Extract just the title, URL, and publish date
    • Format publish date from ISO 8601 to readable format

    What data goes out?

    • Clean database entry in Notion with Title, URL, Date Added fields

    This step forces you to think about data types and formats. An RSS feed gives you different data than a direct API call. Notion expects data in a specific format. Understanding this before building saves hours of debugging.

    3. Identify Your Pattern

    Which pattern does this match?

    • Data Pipeline – Fetch → Transform → Deliver (linear flow, no complex logic)
    • Decision Tree – Different actions based on conditions
    • Batch Processor – Same action on multiple items

    Our YouTube-to-Notion example is a Data Pipeline with filtering.

    4. List Required Nodes (But Don’t Open n8n Yet!)

    Based on your pattern and data flow, write down which nodes you’ll need:

    1. RSS Feed Trigger (fetch YouTube feed)
    2. Filter node (remove Shorts)
    3. Set node (extract specific fields)
    4. Code node (format date – optional, could use expressions)
    5. Notion node (create database entry)

    Notice I wrote “optional” for the Code node. This is thinking through alternatives. n8n expressions might handle date formatting without custom code.

    5. Anticipate One Failure Point

    What’s the most likely thing to break?

    In our example: YouTube’s RSS feed could be down, return empty results, or change their data structure.

    How would we handle it?
    Add an IF node after the RSS Trigger. If the feed returns zero items or errors, send yourself a Slack notification instead of trying to create empty Notion entries.

    Now Open n8n and Build It

    Here’s what will happen: You’ll build the workflow in 10 minutes instead of an hour because you’ve already solved the hard problems. You’re translating a plan into nodes, not designing while building.

    When you get stuck, you’ll know exactly where the problem is. Your plan said “filter out Shorts,” so if that’s not working, you know the Filter node configuration is wrong—not your entire approach.

    Common Thinking Traps (And How to Avoid Them)

    Common thinking traps while you thinking for a workflow

    Trap 1: “I’ll Figure It Out As I Go”

    This leads to workflow spaghetti. You add nodes reactively, realize you need something earlier, insert nodes in the middle, and end up with a tangled mess.

    Solution: Spend 5 minutes planning before adding your first node. Use the pre-workflow checklist above. I promise you’ll save 30 minutes of confused clicking.

    Trap 2: “This Needs to Be Perfect”

    Analysis paralysis kills momentum. You research every possible approach, read documentation for hours, and never build anything.

    Solution: Build the MVP workflow first. Get it working with the simplest possible approach, even if it’s not elegant. You can always optimize later. A working workflow that’s ugly is infinitely more valuable than a perfect workflow that doesn’t exist.

    Trap 3: “I Need a Node for Everything”

    n8n has hundreds of nodes, but you don’t need to master them all. Sometimes a Code node with 5 lines of JavaScript is simpler than finding the perfect specialized node.

    Solution: Use Code nodes for simple transformations. String manipulation, date formatting, basic math—these are often clearer as explicit code than as complex expressions or chains of Set nodes.

    Trap 4: “It Works, Ship It!”

    Your workflow runs successfully once, so you deploy it to production. Then it breaks in the first week because you didn’t handle errors.

    Solution: Add error handling before deploying. Test failure scenarios intentionally:

    • What if the API returns an error?
    • What if you get zero results?
    • What if the data format is unexpected?

    Workflows that handle errors gracefully are the difference between a helpful automation and a maintenance nightmare.

    Next Steps: Apply This to Real Automation

    You now have a mental framework for designing workflows. Don’t just read this and move on and apply it.

    Your assignment:

    Pick one boring task you do manually every day or week. It doesn’t need to be complex. In fact, start simple.

    Examples:

    • Save attachments from specific emails to a folder
    • Post your new blog articles to Twitter automatically
    • Track product mentions on Reddit
    • Generate a weekly summary of Slack messages

    Apply the 4-Question Framework:

    1. What’s the desired outcome? (Be specific)
    2. What triggers the workflow? (Time, event, or manual)
    3. What transformations are needed? (Input → Transform → Output)
    4. What could go wrong? (Anticipate one failure)

    Choose your pattern (Pipeline, Decision Tree, or Batch Processor).

    Then build it.

    Start with automating boring tasks in n8n if you need practical examples, or browse the full n8n tutorial series for specific node guidance.

    The difference between beginners who struggle and those who succeed isn’t technical skill. It’s this: successful automation builders think through the workflow before they build the workflow.

    You just learned how to think like a workflow. Now go automate something.

  • 50 Boring Tasks You Can Automate with n8n in 2026 (No Coding)

    50 Boring Tasks You Can Automate with n8n in 2026 (No Coding)

    Every article I publish goes through the same tedious steps – generate an outline, run grammar checks, format for WordPress CMS, create social posts (for repurposing).

    I used to do each step manually, switching between tabs (Now split in chrome tabs), copying and pasting, checking boxes off a list. Guess how many hours it would take?

    For me, It takes about 14 hours repetitive tasks, then I switched my specific skills and tasks to no-code automation platform (n8n). Get started with n8n.

    Now it handles the entire pipeline. I focus on writing. The boring stuff happens automatically while keeping me as a human-in-loop.

    What’s human in loop? The automation runs, but I review the output before it takes final action – or I check the results afterward to catch anything off. Either way, I stay in control without doing the repetitive work myself.

    What “Boring Stuffs” Can You Actually Automate?

    Before we get into “how”, here’s what n8n can take off your plate.

    • Data entry and spreadsheet syncing – If you receive any new form submission or order, you can easily add it to Google sheets or to your database. Customer data changes in CRM? sync it everywhere instantly.
    • Email management – Auto reply to common questions, sort incoming emails by sender or keyword, forward specific messages to team members, from email to slack or maybe WhatsApp.
    • File organization – Rename file based on patterns, move upload to dated folders, back up important documents to cloud storage like Google drive or dropbox.
    • Notification and reminders – Get Slack alerts when something important happens, notify team about your deadlines.
    • Social media posting – Schedule posts across platforms, auto-share new blog content, post updates when product launch.
    • Report generation – Pull data from multiple sources (e.g. database, sheets), format it, send it to stakeholders on a schedule
    • Lead and CRM updates – Capture leads from forms, or emails, enrich the contact data, update deal stages or buckets automatically.

    If you find yourself doing the same task more than twice a week, It’s probably a sign that you need to automate.

    Why n8n Instead of Python or Zapier?

    Automate the Boring Stuff with Python” is an excellent book. But it assumes you want to learn programming. If you just want to stop wasting time on repetitive tasks, writing, and maintaining Python scripts might be overkill.

    The Python Approach: Write code, debug it, schedule it with cron, maintain it when APIs change, fix it when something breaks. I agree It’s powerful, but requires ongoing technical investment.

    The Zapier/Make Approach: Easy drag-and-drop setup, works great for simple tasks, but cost scale quickly – $20 / $50 (monthly) for serious usage – and you’re limited to what they’ve pre-built. (and, yet, they have most of the integrations unless you need a custom one for your business needs)

    The n8n Approach: Visual workflow builder like Zapier and Make, but you can self-host the instance locally for free. Write custom nodes when you can’t do something with the visual tools.

    50 “Boring Tasks” You Can Automate Today

    boring ideas to automate

    These are real automations – some I use daily, other I’ve built for my friends or seen in the automation community.

    Content & Publishing

    • Generate article outlines from a list of keywords
    • Run grammar and spell checks on drafts automatically
    • Format and publish WordPress posts from Google Docs
    • Create social media posts when a new blog post goes live
    • Scrape communities for content ideas and dump them into a spreadsheet (Educational only)
    • Pull YouTube video transcripts and save to Google Docs
    • Auto-create featured images using templated designs
    • Track content performance weekly and compile into a report
    • Send draft review reminders to editors after 48 hours
    • Auto-translate posts for multilingual sites
    • Update internal links across old posts when new content publishes

    Email & Communication

    • Sort incoming emails into folders by sender or keyword
    • Auto-reply to common questions with templated response
    • Send follow-up emails 3 days after no-response
    • Forward invoices to your accountant automatically
    • Unsubscribe reminders – flag newsletters you never open

    Data & Spreadsheets

    • Sync form submissions to Google Sheets in real-time
    • Update your CRM when a spreadsheet row changes
    • Merge data from multiple sheets into one master sheet
    • Clean up duplicate entries automatically
    • Pull analytics into a weekly report spreadsheet
    • Convert CSV uploads to formatted Google Sheets automatically
    • Validate data entries and flag rows with missing fields
    • Sync Stripe payments to a revenue track spreadsheet
    • Auto-calculate monthly totals and append to summary sheet
    • Pull exchange rates daily and update pricing sheets
    • Cross-reference two sheets and highlight mismatches
    • Export database tables to spreadsheet on a schedule
    • Track affiliate commission from multiple platform in one sheet

    Files & Backups

    • Back up important folders to Google Drive every night
    • Rename and organize downloaded files by date
    • Convert uploaded images to webp format automatically
    • Archive old files to cold storage after 90 days

    Notifications and Reminders

    • Get Slack alerts when a client pays an invoice
    • Birthday and contract renewal reminders
    • Notify your team when inventory drops below a threshold
    • Alert you when a competitor publishes a new content

    Client & Project Management

    • Create Trello/Asana tasks from form submission
    • Send onboarding emails when a new client signs up
    • Update project status across multiple tools simultaneously
    • Generate and send invoices on schedule
    • Track billable hours from Toggl/Clockify to spreadsheet automatically
    • Notify clients automatically when their deliverable is ready
    • Archive completed projects to cold storage after 30 days
    • Creating meeting notes template in Notion when calendar event starts
    • Alert you when a client hasn’t responded in 7+ days
    • Send project kickoff checklist to team when contract is signed

    WordPress Specific

    • Monitor uptime and get alerts when your site goes down
    • Auto-post new WooCommerce products to social media
    • Sync WooCommerce orders to Google Sheets or Airtable

    Your First Automation Takes 5 Minutes

    I won’t walk through a full tutorial here – that’s what the Hello World Workflow Guide is for. But understanding the pattern helps you see how simple this actually is.

    Every n8n automation follows the same structure

    Trigger > Action > (Optional: More Actions)

    The trigger decides when your workflow runs. New email arrives. Form gets submitted. Webhook receives data. You pick the event that should kick things off.

    The action decides what happens when triggered. Add a row to Google Sheets. Send a Slack message. Update your CRM.

    Between trigger and action, you map the data. “Take the sender’s email from Gmail and put it in Column A”. n8n shows you the actual data structure when you click on any node’s output – you can drag and drop fields instead of writing expressions manually.

    That’s the entire mental model. The complexity comes from chaining more nodes together or adding conditional logic, not from the core concept itself.

    If you’ve never touched n8n, you can start with hello world workflow. You’ll have something running in under 10 minutes.

    Start With One

    Don’t try to automate everything at once. Pick the one task from this list that annoys you most. Build that workflow. Watch it run for a week. or maybe, you have a custom workflow in mind, just try to connect the dots and watch it run for a week.

    Once you see n8n handling something you used to do manually, you’ll spot the next opportunity yourself.

  • 5 Best n8n Alternatives in 2026 (After 50+ Workflows Built)

    5 Best n8n Alternatives in 2026 (After 50+ Workflows Built)

    I’ve been using n8n for over a year now. Built 50+ workflows. Taught it to business owners. Even wrote dozens of contents about n8n here it se as well on The Owl Logic.

    But here’s what I tell people who ask if they should use n8n, “Maybe not”

    n8n is undeniably powerful. But it’s not for everyone. Some teams need simpler tools. Others need different pricing models. some want easier onboarding for non-technical staffs like marketers, business managers.

    This guide helps you figure out if n8n alternatives make more sense for your situation. i’m not here to bash n8n (you can see from my other articles I genuinely like it). I’m here to give you an honest comparison so you pick the right tool.

    Why Teams Looks for n8n Alternatives (Based on Surveys)

    Let’s have a small talk about why people actually switch away from n8n.

    Steep Learning Curve for Non-Technical Teams

    n8n assumes you understand JSON, API requests, and data structures. The code node expects JavaScript or Python. Expressions use syntax that feels alien if you’ve never programmed before.

    I saw a post marketing manager spent ~40 minutes trying to format a data. Not because she is slow, n8n just doesn’t hand-hold you through these things.

    Limited Pre-Build Integrations

    n8n has 400-1200 nodes. Zapier has 8000+, Make has 3000+

    The HTTP request node lets you connect to any API, but that required reading documentation, understanding authentication, and debugging requests. Perfectly fine for developers.

    Self Hosting Complexity

    Self hosting n8n means managing docker containers, database backups, SSL certificates, and infrastructure scaling.

    I’ve seen teams abandon self-hosting after three months because managing it consumed more time than the workflows saved. The cloud version removes this complexity but costs significantly more.

    Pricing Models Doesn’t Fit for All Use Cases

    n8n charges per workflow execution. Make charges per operations (each node action)

    I’ve seen $20/month n8n bill balloon to $500 because a workflow with 15 nodes ran every 5 minutes. That same automation would cost $89/moth on Make’s operation pricing.

    How to Choose the Right n8n Alternative

    Don’t just pick the most popular tool sake of my friend referred me this, Make sure to match the platform to your actual needs.

    Your SituationLook ForSkip Tools That
    Non-technical team building automationVisual no-code builder, 2000+ pre-build nodes, minima setupRequire coding knowledge, self-hosting or API configuration
    High-volume workflows (100k+ executions/month)Execution-based pricing, generous free tiersCharge per operations, have strict usage limits
    AI-first workflows (content generation agents)Native LLM nodes, vector database support, agent buildersRequire custom HTTP requests for every AI call
    Need full control and data sovereigntyOpen-source, self-hostable, on-premise deploymentCloud only SaaS platforms
    Budget conscious startup testing automationFree tiers with real functionality, transparent pricingEnterprise-only features, pay-to start models

    Use this table to eliminate options that won’t work. Then dive into specific alternatives below.

    Best n8n Alternatives by Use Case

    Here are the fiver alternatives that actually matters for different scenarios.

    1. Make (formerly Integromat) – Best for visual complexity without code
    2. Zapier – Best for speed and breadth of integration
    3. Activepieces – Best for open-source AI-native automation
    4. Gumloop – Best for AI-powered workflows for non-developers
    5. Pipedream – Best for developer-first serverless workflows

    Make (formerly Integromat): Best for Visual Complexity Without Code

    Make is n8n’s closest competitor. Visual workflow builder, powerful data manipulation, serious depth. But easier for non-developers

    Best for

    • Marketing teams building multi-step campaigns or Ad campaigns.
    • Operation teams connecting SaaS tools without coding
    • Automations with complex branching logic

    Notable Strengths

    • 3,000+ integrations covering mainstream and niche apps
    • Visual builder shows entire workflow at once
    • Built-in function for data transformation without writing code
    • Better onboarding for beginners

    Limitations

    • Operation-based pricing gets expensive for workflows with many steps
    • No Self-hosting option (cloud only)
    • Custom JavaScript code requires Enterprise plan

    Pricing: Free plan with 1,000 operations/month. Paid plans start at $9/month.

    vs n8n: More integrations and easier for non-technical users, but less control and significantly more expensive at scale. (I mean massive scale like 100k operation)

    Zapier: Best for Speed and Breadth of integrations

    zapier page

    Zapier invented the automation category. still the easiest to use. Still the most expensive at scale

    Best for

    • Teams that need to automate fast without learning curve
    • Connecting mainstream business apps (everything integrated with zapier)
    • Simple to medium complexity workflows

    Notable Strengths

    • 8,000+ integrations – If an app exists, Zapier probably connects to it
    • Simplest interface in the marketing (linear trigger > action > action)
    • AI features for building workflows from descriptions
    • Extensive template library for common use cases
    • Best documentation and support

    Limitations

    • Most expensive option by far (a workflow costing $20/month on n8n might cost $200/month on zapier)
    • Limited customization compared to n8n or make
    • Code steps exist but are restrictive (timeouts, limited libraries)
    • Multi-step conditional logic feels clunky

    Pricing: Free plan with 100 tasks/month. Paid plans start at $20/month but scale quickly with usage.

    vs n8n: Easiest to use with most integrations, but 5-10x more expensive at scale and limited customization. Use Zapier when speed matters more than the cost and you need something working today. Use n8n when you have a developer resources and want control.

    Activepieces: Best for Opensource AI-Native Automation

    Activepieces page

    Activepieces is what n8n could have been. True open-source license (not n8n’s Sustainable Use License). Built for AI from the ground up.

    Best for

    • Teams building AI agents and LLM workflows
    • Developers who want truly open-source (not fair-code)
    • Organizations needing Model Context Protocol (MCP) support

    Notable Strengths

    • 594+ pieces (nodes) with deep AI integration
    • Supports MCP – 400+ MCP servers for AI agents
    • True Apache 2.0 license (fork it, embed it, do whatever you want)
    • AI pieces are automatically available as tools for LLMs
    • Free self-hosted version with no execution limits
    • Generous cloud free tier

    Limitations

    • Smaller community than n8n (fewer tutorials, less help)
    • Integration library smaller than Make or Zapier
    • Less mature – newer platform means occasional rough edges
    • Documentation not as comprehensive as established tools

    Pricing: Free self-hosted. Cloud free tier with 1,000 tasks/month. Pro plan $100/month.

    vs n8n: Similar flexibility and self-hosting, stronger AI focus, truly open-source license. Choose Activepieces if you’re building AI-first workflows or need a genuinely open license. Choose n8n for more integrations and a larger community.

    Gumloop: Best for AI-Powered Workflows for Non-Developers

    gumloop page

    Gumloop built automation for the AI era. Natural language workflow creation, built-in LLM access, AI debugging assistant.

    Best for

    • Non-developers building AI workflows
    • Content generation and enrichment pipelines
    • Teams that want AI capabilities without API complexity

    Key Strengths

    • Describe workflows in plain English – Gumloop builds them
    • Built-in premium LLM access (Claude, GPT-4, etc.)
    • Gummie assistant debugs workflows and suggests fixes
    • Visual canvas similar to n8n but optimized for AI operations
    • Fastest time-to-value for AI-powered automation

    Limitations

    • Less suitable for traditional automation (database ops, email sending)
    • Smaller integration library for non-AI tasks
    • Newer platform with evolving feature set
    • More expensive than self-hosted n8n for high volume

    Pricing: Free plan available. Paid plans start around $50/month.

    vs n8n: Much easier AI integration without coding, but less general-purpose. Use Gumloop if your primary need is AI workflows (content, enrichment, agents). Use n8n if you need flexibility across AI and traditional automation.

    Pipedream: Best for Developer-First Serverless Workflows

    pipedream page

    Pipedream is for developers who think visually but code when they need to. Event-driven, serverless, multiple languages.

    Best for

    • Developers building webhook-based integrations
    • Teams comfortable with Node.js, Python, Go
    • Serverless architecture fans

    Notable Strengths

    • Code-first approach with visual workflow builder
    • Event-driven architecture (perfect for real-time triggers)
    • Write code in Node.js, Python, Go, or Bash
    • Generous free tier (10,000 invocations/month)
    • Native support for npm packages and pip libraries
    • Excellent VS Code integration

    Limitations

    • Requires coding knowledge (not suitable for non-developers)
    • Less visual than n8n or Make
    • Smaller integration library than visual-first tools
    • Learning curve if you’re used to pure no-code

    Pricing: Free plan with 10,000 invocations/month. Paid plans start at $29/month.

    vs n8n: More developer-friendly with better code environment and serverless architecture. Choose Pipedream if your team codes daily and wants serverless. Choose n8n if you want balance between visual building and code customization with self-hosting control.

    Quick Comparison Table

    ToolBest ForIntegrationsSelf-HostingPricing ModelLearning CurveAI Capabilities
    n8nTechnical teams, high-volume workflows400-1,200YesExecution-basedSteepStrong (LangChain, agents, MCP Supported)
    MakeNon-technical teams, visual complexity3,000+NoOperation-basedModerateLimited
    ZapierSpeed, mainstream apps8,000+NoTask-basedEasyModerate
    ActivepiecesAI-first, truly open-source594+YesExecution-basedModerateExcellent (MCP support)
    GumloopAI workflows for non-devsModerateNoVariesEasyExcellent
    PipedreamDeveloper workflows1,000+NoInvocation-basedSteepGood

    When n8n is Still Right Choice?

    Not every search for alternatives should end in switching. n8n still win in specific scenarios.

    You have developer resources. If your team includes developers or technical operations staff, n8n’s flexibility pays off. The learning curve becomes irrelevant when someone can write JavaScript in the Code node or read API documentation for HTTP requests.

    You need full data control. Healthcare, finance, government, or any regulated industry with data sovereignty requirements. Self-hosting n8n on your infrastructure means data never leaves your control. That’s impossible with cloud-only platforms like Zapier or Make.

    You’re running high-volume workflows. A workflow that executes 100,000 times per month costs $50-100 on n8n Cloud. That same workflow might cost $500+ on Zapier or Make. For volume, n8n’s execution-based pricing is unbeatable.

    You want to contribute or fork the codebase. Even though n8n uses a Sustainable Use License (not pure open-source), you can fork it, modify it, and contribute back. That’s more flexibility than any closed-source alternative.

    You’re building complex, unique workflows. When your automation needs don’t fit templates or pre-built integrations, n8n’s Code node and HTTP Request node let you build anything. I’ve built custom error handling, rate limiting, and data transformation logic that would be impossible in Zapier’s linear model.

    Frequently Asked Questions

    Is there a completely free n8n alternative?

    Activepieces and Pipedream both offer generous free tiers. Activepieces is truly open-source (Apache 2.0) and can be self-hosted with no limits. Pipedream’s free tier includes 10,000 invocations per month. Zapier and Make have free plans but with tight restrictions (100-1,000 tasks/month).

    Which n8n alternative is easiest for non-technical users?

    Zapier wins for pure simplicity. Linear workflows, massive integration library, extensive templates. Make is second – more powerful than Zapier but still visual and approachable. Gumloop is easiest specifically for AI workflows.

    Can I migrate my n8n workflows to another platform?

    Not directly. No tool offers import from n8n’s workflow JSON. You’ll need to rebuild workflows manually. The concepts translate (triggers, actions, data flow), but the implementation differs in each platform. Budget 2-4 hours per workflow for rebuilding and testing.

    Which alternative has the most integrations?

    Zapier with 8,000+, followed by Make with 3,000+. But count isn’t everything. Check if your specific apps are supported and how deeply integrated they are. A platform with 1,000 integrations but deep support for your tools beats one with 5,000 shallow integrations.

    What’s the cheapest n8n alternative for high-volume workflows?

    Depends on workflow structure. For complex workflows (10+ nodes per execution), n8n’s execution-based pricing is usually cheapest. For simple workflows (2-3 steps) running frequently, Make’s operation pricing might cost less. Self-hosted Activepieces is free but requires infrastructure management. Run your numbers with each platform’s pricing calculator.

    Is Make better than n8n?

    “Better” depends on your team’s skills and needs. Make is better for non-technical teams building visual automations quickly. n8n is better for technical teams needing customization, high-volume workflows, or self-hosting. Make has more integrations; n8n has more control. Choose based on your situation, not popularity.

    Your Next Move

    There’s no single “best” automation platform. The right choice depends on your team’s technical skills, workflow complexity, volume, and budget.

    If you’re still using n8n and it’s working, don’t switch just because alternatives exist. But if you’re fighting the learning curve, overpaying for executions, or need better non-technical user support, one of these alternatives probably fits better.

    Start with free tiers. Build the same test workflow in 2-3 platforms. See which one feels right for your team. The right tool is the one your team will actually use.

    And if you decide n8n is still your platform? The complete n8n beginner guide is the best place to get more out of it.

  • How to Integrate Google Sheets to n8n (Updated 2026)

    How to Integrate Google Sheets to n8n (Updated 2026)

    I was literally spending 5-8 hours every week manually transferring the data – traffic metrics, source channels, sales figures and more.

    Everything was manual, day-to-day grunt work.

    As a business owner, when work piles up (and it always does), I’d skip the data processing entirely.

    Those tasks would just pile up into my backlog, creating even more stress down the line.

    Then I thought: enough, Let’s automate with n8n.

    I integrated Google Sheets with n8n, and now everything runs on autopilot. EVERYTHING.

    In this post, I’m going to show you exactly how to integrate Google Sheets to n8n. Step by step. This is a beginner friendly guide that assumes zero prior automation experience.

    Prerequisites

    Before we integrating Google Sheets with n8n, make sure following ready.

    1. An n8n account or Self-hosted instance.

    You’ll need access to n8n to build your workflow. You’ve got two options

    • n8n cloud (Recommended for beginners): Sign up for free account at n8n.cloud. No installation required, and you start building workflows immediately.
    • Self-hosted n8n instance: If you prefer running n8n on your server or locally, follow this guide How to install n8n locally (Window + Mac)

    For this tutorial I’m using a local instance.

    2. A Google Account

    You need a Google account to access Google Sheets and Google Cloud Console. If you don’t have one, create a free account.

    3. Google Cloud OAuth Credentials (Already Setup)

    To connect Google Sheets with n8n, you’ll need OAuth credentials from Google Cloud Console.

    If you haven’t setup this yet, follow our comprehensive guide here: Complete n8n credentials and services guide

    This guide covers

    • Creating a Google Cloud Project
    • Enabling Google Sheets API
    • Setting OAuth 2.0 credentials
    • Connecting credentials to n8n

    Already have credentials but they keep expiring? Check out our troubleshooting guide here How to Fix n8n credentials Expiring Issues

    Once your Google OAuth credentials are connected to n8n, come back here continue with the integration workflow.

    4. A Google Sheet to Work With

    Create a simple Google Sheet to to test the integration. You can use existing spreadsheet or create a new one with simple data.

    5. Basic Understanding of Spreadsheets

    You don’t need a coding experience here. If you know how to use Google Spreadsheet (rows, columns, basic data entry), you’re ready to go.

    Step 1: Setting Up Your First Google Sheet Workflow

    Create a New Workflow

    • Log in to your n8n account
    • Click on “New Workflows” in the left sidebar
    • You’ll see a blank canvas – this is where your automation playground

    Add a Manual Trigger

    Every n8n workflow needs a trigger to start it. For testing purposes, We’ll use a manual trigger, which lets you run the workflow whenever you click the execute button.

    Why manual trigger? We want to test everything manually before setting up automated triggers like, schedules, or webhooks. This gives full control during the learning phase.

    Rename Your Workflow

    Rename the workflow to something useful, Always use clear, descriptive names. When you’re managing 10+ workflows, you’ll thank yourself for this habit.

    Step 2: Connect Your Google Sheets Node

    Configuring Google Sheets Node

    1. Click on the “+” icon next to your manual trigger.
    2. In the search bar, “Google Sheets”
    3. Click on the “Google Sheets” to add it to your editor.

    You’ll see the node configuration panel open on the right side.

    There are many operations for sheets, Append, Update, Delete, Create, Get and etc.

    For this tutorial, we are going to use GET operation Get row(s) to read what is inside on the Google Sheets.

    Credentials to Connect With

    Click on the “Credentials to connect with” dropdown and select your Google OAuth credentials that you’d already setup.

    Don’t see your credentials here? Go back to our n8n credentials and services to set it up.

    Document: Select Your Google Sheet

    You have three ways to select your spreadsheet

    • From List: Choose from your recent Google Sheets (easiest)
    • By URL: Paste the full Google Sheets URL
    • By ID: Use the spreadsheet ID from the URL

    For beginners, select “From List” and choose your test spreadsheet from the dropdown.

    Sheet: Select Your Sheet Tab

    If your spreadsheet has multiple tabs (Sheet 1, Sheet 2, etc). Select which one you want to read from.

    In my case, I’m using Sheet 1.(the default tab name)

    Step 3: Execute The Workflow

    Time to see the magic happen! let’s run this workflow and fetch Google Sheets data.

    Run Your First Test

    1. Make sure both nodes are connected (you should see a line in between them)
    2. Click “Execute Workflow”

    What happens next?

    n8n will connect your Google Sheet, fetch all the rows, and display the data in the output panel below the Google Sheets node.

    Congratulations You’ve just fetched (read) data from Google Sheets to n8n.

    What you can do from here?

    Now that you have sheet data flowing into n8n, the automation possibilities are endless.

    • Filter and process the data using n8n’s built-in nodes
    • Send data to other apps like Gmail, Discord, Slack, etc
    • Transform the data with code, AI or data manipulation nodes
    • Trigger action based on specific values in your sheet
    • Append new data back to same or different sheet

    Common Google Sheets Operations Explained

    Now that you’ve successfully read data from Google Sheets, let’s explore the other essential operations you’ll use most frequently. Understand these will give you the foundation to build any Google Sheets automation with n8n.

    Append Row – Adding New Data

    When you want to add new entries to the bottom of your spreadsheet (like logging form submission, new leads or daily reports).

    How it works?

    • Add a Google Sheets node to your workflow
    • Select “Append Row” from operations dropdown
    • Choose your spreadsheet (document) and sheet
    • Map the data you want to add to each column

    Update Row – Modifying Existing Data

    When you need to change information in specific rows (like updating order status, making tasks complete, or changing contact details).

    How it works

    • Add a Google Sheet node
    • Select “Update Row” from Operations
    • Choose your spreadsheet (document) and sheet.
    • Specific which row to update (or use column matching to find the right row)
    • Map the new values for each column

    Important: You need a way to identify which row to update. You can either use

    • The row number (if you know it)
    • Match by unique column value (like email or order ID)

    Append or Update Row – Smart Data Handling

    When you’re not sure if a record already exists. This operation check first, then either updates the existing row or creates a new one.

    How it works

    • Same structure as choosing sheet nodes.
    • Choose your spreadsheet (document) and sheet
    • Define the column to check for existing records (like email or ID)
    • Map your data

    Why this is so powerful? This prevents duplicate entries while keeping your data up-to date automatically.

    What You’ve Learned

    Let’s recap what you’ve learnt in this tutorial

    • Set up Google Sheets integration with n8n – You connected your Google account and configured OAuth credentials to enable secure communication between n8n and Google Sheets.

    • Created your first automation workflow – You build a working n8n workflow from scratch, understanding how nodes connect and execute

    • Successfully fetched data from Google Sheets – You use the “Get Row(s)” operation to pull spreadsheet data into n8n, which is the foundation for any Google Sheets automation

    • Understood the essential operations – You now know the difference between, Append, Update and Append & Update. When to use each one.

    Your Turn & Share Your Progress

    The best way to solidify what you’ve learned is to build something yourself.

    Got your workflow working? Awesome, here’s what you have to do next?

    • Experiment freely – try combining different operations, break things, and rebuilt them.
    • Start small, then scale – don’t jump straight into complex 20-node workflows. Master simple 2 – 4 node flows first.
    • Document your workflows – Use n8n’s notes feature to add comments explaining what each node does.
    • Build something real – The best practice project is one that solves an actual problem you have. What manual tasks could you automate today?
  • How to Use Sub-Workflows in n8n (When to Use & Examples)

    How to Use Sub-Workflows in n8n (When to Use & Examples)

    Sub-workflows let you call one workflow from another workflow. Instead of rebuilding same automation in multiple places, you build it once and reuse it like a component.

    Why it really matters?

    Let’s say you’re validating customer addresses (for an example). You check if the street address exists, verify the postal code format, and make sure the city matches the state.

    That’s maybe 6-8 nodes doing the validation.

    Now you need the same validation in three different workflows – one for new orders, one for customer profile updates, and one for shipping.

    Without sub-workflows, you copy those 6-7 nodes into all three workflows.

    • Order workflow: has address validation nodes
    • Profile workflow: has the same address validation nodes (copied)
    • Shipping workflow: has the same address validation nodes (copied)

    When the postal service changes their validation rules, you have to update all three workflows.

    With sub-workflows, you build one address validation workflow. Then your other three main workflows just call it. Update the validation once, and all three workflows automatically use the new rules.

    But sub-workflows aren’t always the answer. Sometimes they add complexity you don’t even require. perhaps a simple IF node or loop does the job better.

    This guide shows you when sub-workflows actually help.

    This is an advanced topic in n8n – If you’re a beginner, better to read our Complete Beginner’s n8n Guide first to understand this topic.

    When to Use Sub-Workflows in n8n

    Use sub-workflows when you’re dealing with one of these situations

    Reusable logic across workflows – When you’re copying the same node group into multiple workflows. Data validations, API calls with specific error handling, report generation, anything you do more than once is a candidate.

    Memory issues in a massive workflows – Workflows with 50+ nodes can hit memory limits. Breaking them into smaller sub-workflows gives each piece it’s own execution context

    Modular testing – Testing a 50-node workflow means running all 50 nodes. Testing a 10-node sub-workflow in isolation is faster and catches issues earlier.

    Human-in-loop – Need approval, sub-workflows handle these cleanly and return the approval result to the parent.

    Don’t use sub-workflows when

    • Simple branching is enough – An IF node handles “do X if true, Y false” that’s totally fine. Don’t build a sub-workflow for a 3-node branch
    • When you’re doing batch processing – Loop over items processes arrays within a single workflow.
    • If you’re never going to reuse it, and then don’t use it.

    How Sub-Workflows Work

    A sub-workflow is just a regular n8n workflow that another workflow calls.

    The parent workflow sends data to the child workflow. The child does it work. The it sends results back to the parent.

    Here’s what happens

    • Parent workflow hits a Execute Sub-workflow node
    • Data get passed to the child workflow
    • Child workflow runs from start to finish
    • Final output returns to the parent
    • Parent continues with the returned data

    By default, the parent wait for the child workflow to complete. The workflow execution pauses at Execute Sub-workflow node until the child finishes.

    I checked that Sub-workflow executions don’t count toward your monthly execution quota if you were in n8n cloud. n8n only counts the parent workflow execution. This means you can call sub-workflows as much as you want without burning through your plan limits.

    Enough theory, Let’s see it in action.

    Let’s Build It: The Address Verification System

    Let’s build a scenario here.

    Copy the spreadsheet content if you’d like to create your own

    customer data sheet for n8n tutorial

    We’ve lists of customer data, We need to verify their address and update the Verification Status as Order Approved

    Let’s create the workflow

    • Add a Manual trigger
    • Read the sheet – Spreadsheet with customer detail
    • Execute the sub-workflow – We validate the address in a different workflow
    • Update the Verification Status as Order Approved (This is the final output)

    1. Add a Manual Trigger + Google Sheet (Read)

    connecting google sheet node in n8n

    2. Add Execute Workflow Node

    connection execute workflow node in n8n
    configuring execute workflow node in n8n

    Go to Execute Workflow node, and select the Workflow, either Create a new Sub-Workflow or use the existing one. I create a new.

    Once you selected the created a new, then n8n will opening up a new tab with that workflow.

    When executed by another workflow node settings in n8n

    In the new created sub-workflow, you have to add the Input data mode, for this tutorial, I go with Accept all data which means fetch all incoming data from the parent workflow.

    Sub-workflow interface in n8n

    Now you’ll see like this in your sub-workflow. and make sure to Save and Publish your sub-workflow otherwise it will throw errors.

    3. Adding the Core Logic

    We need to validate only for new customers,

    • in our customer sheet, there is a column called “Return Customer”
    • which means we can validate it with. If return customer is “Yes” then we don’t need to validate his/her address.
    • If it’s “no” then we need to just validate it.
    explaining how sub-workflow works

    4. Connecting Final Sheet Update Node

    Now, we are going to connect the final the sheet node to update the verification status to Order Approved

    explaining how parent and child works in n8n
    google sheet node configuring

    Go to Update row in a sheet – make sure to match the columns, and change the verification status to Order Approved.

    5. Execute the Parent Workflow

    indicating that child (sub-workflow) is working on the parent workflow
    the final sub-workflow tutorial output - theowllogic

    Well, the sub-workflow is executing on its own and the parent workflow on-halt because child-workflow must pass down the data to the parent.

    What happened in the sub-workflow? aye, let’s see it.

    executions data lists on sub-workflow

    Go to your sub-workflow, and executions to see all the data output.

    final output of customer sheet (tutorial)

    this is the final output, and yeah, This is not a big tutorial workflow, yet this gives you a glimpse on when to use sub-workflow.

    Passing Data Between Workflows

    The trickiest part of sub-workflows is getting data in and out correctly.

    Sending Data to the Sub-Workflow

    When the parent workflow calls a sub-workflow, it passes data through the execute Sub-workflow node.

    In our tutorial example, the parent workflow reads 17 customer records from Google Sheets. When it hits the Execute Sub-Workflow node, those 17 records get sent to the child workflow.

    The child workflow receives this data in it’s trigger node – the Execute Sub-workflow Trigger (also called as “When Executed by Another Workflow)

    // Parent sends these 17 customer records:
    [
      {
        "Customer Name": "Christopher Lee",
        "Product": "Graphics Tablet",
        "Return Customer": "No",
        "Address": "8421 Pine Road"
      },
      {
        "Customer Name": "David Wilson", 
        "Product": "Laptop Pro 15",
        "Return Customer": "Yes",
        "Address": "3156 Sunset Lane"
      }
      // ... 15 more records
    ]
    
    // Child workflow receives all 17 records in the trigger node

    If you set the Execute sub-workflow mode to “Run once with all items“, the sub-workflow gets all 17 records in one executions.

    If you set it to “Run once for each item“, the sub-workflow runs 17 times – once per customer record.

    Receiving Data From The Sub-Workflow

    Here’s where people get confused, (yes, I did too, so please you don’t)

    The Sub-Workflow’s last node output becomes the parent workflow’s Execute Sub-Workflow node output.

    Not the input. Not some middle node. The final node.

    In our tutorial, the sub-workflow ends with two Google Sheet updates nodes (one for return customers, one for new customers). The combined output from both update operations return to the parent workflow.

    Let’s say the sub-workflow processed 17 customers

    • 5 return customers went through the TRUE path
    • 12 new customers went through the FALSE path
    • Both paths updated their respective sheet columns

    Parent workflow receives all 17 updated records

    // Sub-workflow returns this to parent:
    [
      {
        "Customer Name": "Christopher Lee",
        "DB Verification": "DONE",
        "Verification Status": "Order Approved"
      },
      {
        "Customer Name": "David Wilson",
        "DB Verification": "RETURN CUSTOMER", 
        "Verification Status": "Order Approved"
      }
      // ... 15 more updated records
    ]

    In the parent workflow’s next node (the final Update row in sheet), you access this data usig

    {{ $json["Customer Name"] }}
    {{ $json["DB Verification"] }}
    {{ $json["Verification Status"] }}

    Common mistakes: people try {{ $json.output.field}} or goes through nesting, It’s just {{ $json.field }}. The sub-workflow output is the JSON object.

    What Happened In Our Tutorial? (Complete Flow)

    1. Parent workflow reads 17 customers records from Google Sheets
    2. Parent workflow sends all 17 records to sub-workflow
    3. Sub-workflow receives 17 records in its trigger
    4. Sub-workflow checks “Return Customer” column using IF node.
    5. Sub-workflow splits data: 5 return customers (TRUE), 12 new customers (FALSE)
    6. Sub-workflow updates appropriate columns for each group
    7. Sub-workflow returns all 17 updated records to parent
    8. Parent workflow receives 17 records with updated verification data
    9. Parent workflow updates final “Verification status” column to “Order Approved”

    Frequently Asked Questions (Real)

    I’ve an existing nodes in placed primary workflow? How do I copy instantly?

    Yes, you can do this, make sure to highlight the nodes you want, and right click, select the option as create sub-workflow. This way faster than manual setup when refactoring existing workflows.

    can copy and convert nodes to sub-workflow

    Or press alt + x

    What You Just Learned

    Sub-workflows solving specific-problems, reusing logics, breaking up massive workflows or isolating testable components

    They’re not always the answer. Sometimes an IF node does the job better. Sometimes keeping everything in one workflow is simpler.

    But when you find yourself copying node groups between workflows, or when your workflow canvas looks like a tangled mess, that’s when sub-workflows shine.

    Start with something simple. Extract your most-copied logic into a sub-workflow. See how it feels. The expand it from there.

  • How to Use n8n Loop Over Items (When You Actually Need It)

    How to Use n8n Loop Over Items (When You Actually Need It)

    Here’s something no one tells you when you’re learning n8n. 80% of the time, you don’t need Loop Over Items (split it batches) node.

    I started my n8n workflow by building it connecting dots, so I added this node (loop over items) to the editor, and I was passing data from point A to B to C iteratively, and sending one by one without getting interrupted, then I removed the “Loop over items”, surprisingly it worked but faster.

    n8n already processes multiple items automatically.

    The Loop over items node is the exception, not the rule.

    But, I’d say that you still need it. It is when,

    • API rate limits will breaking your workflow
    • When pagination fails
    • Certain nodes will only process the first item and ignore the rest.

    This guide will show you exactly when Loop over items is necessary with real use case scenarios, when it is completely unnecessary to add, and how to avoid the mistakes that broke my workflows when I was learning.

    my first web scraping n8n workfow

    This is first time I ever posted a workflow on reddit, and I received 162k views and 400+ upvotes. I think this is 10 months ago, and I used first time ever Loop over items.

    How n8n Actually Processes Multiple Items?

    Most n8n nodes process ALL items automatically. That’s built into how n8n works.

    Say you pull 100 rows from Google Sheets. Each row becomes an “item” in n8n. When that data hits your next node, maybe a slack node that post messages. n8n automatically runs that Slack node 100 times. One message per item.

    You don’t build a loop. You don’t configure anything special. It just happens.

    This is different from Make.com(formerly Integromat). In Make, use an iterator to process items one by one through entire workflow.

    In n8n, each node processes all items, then passes results to next node.

    Most beginners (past me) assume they need Loop over items because that’s how worked in Make. They actually don’t. n8n already handles it.

    You can see this for yourself.

    1. Manual trigger
    2. Code node that create 5 test items
    3. Another code node that add fields to each item

    Run it, look at the output. You’ll see 5 items, all processed, no loop needed.

    The 3 Scenarios Where You Need Loop

    Scenario #1: Rate Limiting & API Throttling

    APIs limit how many requests you can make per minute. Gmail allows 100 emails per minute. Most APIs cap at 60-120 requests per minutes. Some are trickier.

    If you’ve 500 items and n8n’s default behavior processes them all at once, you’ll hit that limit. Your workflow fails. The APIs returns error, sometimes it process, other’s don’t.

    Solution

    • Option 1: You need to add wait (1 minute) to the end of node.
    • Option 2: Batch your items 1 or 10. (totally depends on your requirement)

    If you’re calling external APIs for many items, you probably need this. Everything else in n8n handles multiple items automatically, but external APIs don’t care about n8n architecture – They’ll block you for too many requests.

    For more advanced rate limiting patterns: How to handle API Rate limits in n8n

    Scenario #2: Node Exceptions (Nodes that Don’t Auto Loop)

    Some nodes only process the first item by default design. It’s not a bug, and it’s how those specific nodes work.

    The most common example: RSS Feed Read Node

    You give it an array of 5 RSS URLs. Most nodes would fetch all 5 feeds. RSS feed read node? Only fetches the first one and ignore the rest.

    Why? The RSS Feed read node expects a single URL, fetches the feed, and returns multiple items (contents). It’s designed for “One feed in, many contents out” – not “many feeds in”

    If you need to read multiple RSS feeds, then you need to connect with Loop over items.

    n8n’s official doc maintains a list of node exceptions. Before assuming thing up, check if you node is on that list.

    Other nodes that might need loops

    • Certain webhooks nodes that expects a single request
    • Some database nodes with specific query patterns
    • Custom nodes that process items differently

    Scenario #3: Pagination with Unknown Page Counts

    APIs that return paginated data sometimes don’t tell how many pages are exist.

    They just say here “page 1”, “page 2” without revealing total pages.

    well, let’s move on with a workflow here. This is going to be a little bit advanced workflow, and though you would need to understand these before you move to this workflow, otherwise you can still try it out with me and see whether you understood or else check it out the references here.

    Create a workflow, and add a manual trigger. In the manual trigger, ping this object code.

    [
      {
        "subreddit": "n8n",
        "after": null,
        "allPosts": []
      }
    ]
    manual trigger pinned option in n8n

    Once you pinned the object, then connect Loop Over Items node,

    In the Loop node,

    • Add the batch size into 1.
    • Click on the option, and toggle to enable “Reset”

    What is Reset option? This option controls whether the loop can restart with ew data or just run once with the original data.

    batching size on loop over items in n8n

    Now, you connect the loop output path to HTTP Request

    loop over items in n8n

    Within the HTTP Request,

    • Toggle to enable “query parameters”
    • In query parameters
      • Name: limit
      • Value: 25

    So what we are doing here is, we are going to send a request to n8n subreddit to fetch posts, and we are limiting to 25 posts, that’s why we are creating a limit = 25

    http request node in n8n

    This is how it should look like. Please be make sure to compare your workflow with the image.

    After that we are going to add a code node.

    const posts = $input.first().json.data.children;
    const nextPageToken = $input.first().json.data.after;
    const loopData = $('Loop Over Items').first().json;
    
    const previousPosts = loopData.allPosts || [];
    const allPosts = [...previousPosts, ...posts]
    
    return {
      allPosts: allPosts,
      after: nextPageToken,
      subreddit: loopData.subreddit,
      hasMorePages: nextPageToken !== null,
      totalPosts: allPosts.length,
      currentPage: (loopData.currentPage || 0) + 1
    }
    code node in n8n

    Code review: When the workflow starts, you begin with an empty bag (allPosts: []). you also have instructions on which sub-reddit to visit (subreddit: "n8n") and a note that says “start from the beginning” (after: null)

    HTTP request node goes to reddit, and says “give me 25 posts from r/n8n starting from the beginning “.

    Reddit responds with 25 posts AND a special ticket that says “if you want more posts, come back with this ticket: t3_abc123”

    Now your Code node runs. It looks at three things.

    • First: It grabs those 25 new posts.
    • Second: It grabs that special ticket for getting more posts later
    • Third: it checks your shopping bag to see what you already collected from previous trips. on the first tip, array is empty, on the second trip, your array has 25 posts, on the third trip, it has 50 posts.

    Now we can fetch posts from reddit based on pagination by limiting.

    Quick Troubleshooting

    Loop processes the same item every time?

    You’re using .first() inside the loop. This literally means “always grab the first item” – not the current one.

    // ❌ Wrong - always returns first item
    {{ $('Google Sheets').first().json.email }}
    
    // ✅ Right - returns current item
    {{ $json.email }}

    Loop never stops?

    You’re missing an exit condition. Every loop needs a way out. Like, we need to safety limit the fetches data. Make sure to test with small datasets first.

    Quick Decision Flowchart

    quick decision flowchart whether you need loop over items or not.

    Use this every time you think you need Loop Over items

    Start – Do you have multiple items to process?

    • No – You don’t need any loop
    • Yes – Next,

    Does the next node automatically process all items?

    • Yes – No Loop Over Items needed
    • No – Next,

    Check these 3 reasos

    • Need rate limiting – Loop Over items with batch size + Wait node
    • Node exception (RSS, etc) – Loop Over items with batch size 1
    • Pagination scenario – Loop Over Items with reset option on.
    • None of the above – reconsider workflow

    Still not sure, Test without Loop over items first. If items 2-100 aren’t processing, then add it.

    When to Skip Loop Over Items Entirely

    You do NOT need Loop over items for,

    • Standard data processing: Google Sheets, databases, Airtable – they all return multiple items. n8n processes them automatically.
    • AI/LLM operations: OpenAI node, Claude node – they handle batching internally.
    • Most HTTP requests: Unless the API specifically has rate limits you’re hitting, n8n will make all requests.
    • Basic transformations: Code nodes, Set nodes, Filter nodes – all process multiple items by default.
    • Email to small groups: Sending 50 emails? n8n handles it. Sending 500? Now you might need rate limiting.
    • The rule: If you can’t explain in one sentence WHY you need Loop Over Items (using one of the three scenarios), you don’t need it.

    Final Thoughts

    Loop Over Items is powerful when you need it. But I’ve reviewed dozens of community workflows, and 80% of them have unnecessary Loop Over Items nodes, and some add another loop inside the main loop. I’ve zero idea, what they are trying to accomplish.

    The pattern I follow is build without it first. Only add when I hit one of three situations – rate limit, node exceptions, or pagination

    You workflow will be simpler. It will run faster. And when you DO need Loop over items, you’ll know exactly why.

  • How to Build Conditional Logic in n8n (IF, Switch + Examples)

    How to Build Conditional Logic in n8n (IF, Switch + Examples)

    Workflows becomes useful when they make decisions.

    You need to route customer emails differently based on domain, process high-value orders separately, or send urgent tickets to different teams.

    That’s conditional logic – having your workflow ask questions and take different action based on the answers.

    I’ll show you how to build decision-making into your n8n workflows using IF nodes, switch nodes and conditional expressions. more importantly, I’ll show you how to troubleshoot when things don’t work as expected, because that’s where most people get stuck.

    If you’re new to n8n, I recommend starting with building your first workflow to understand the basics. This guide assumes you know how to add nodes and execute workflows.

    The IF Node: Primary Decision Making Node

    n8n IF Node introduction

    The IF node looks at your data and splits it into two paths: true and false. Data that matches your condition goes down the true path. Everything else goes down the false path.

    Here’s what make this powerful: both branches can have completely different workflows attached. Your true branch might send a Slack message while your false branch updates a database. The IF node routes each piece of dat to where it needs to go.

    The data itself doesn’t change when it flows through an IF node. If you send in a customer record, that exact same customer record comes out, just on either true or false output.

    IF node inspects the data and makes a routing decision, but the data stays intact.

    Understanding how data flows through conditional nodes is critical. I cover the fundamentals in my guide on how n8n workflow nodes handle data, but here’s the quick version, when an IF node receives multiple items, it evaluates each one individually. Some items might go true, others false. Both outputs can have data at the same time.
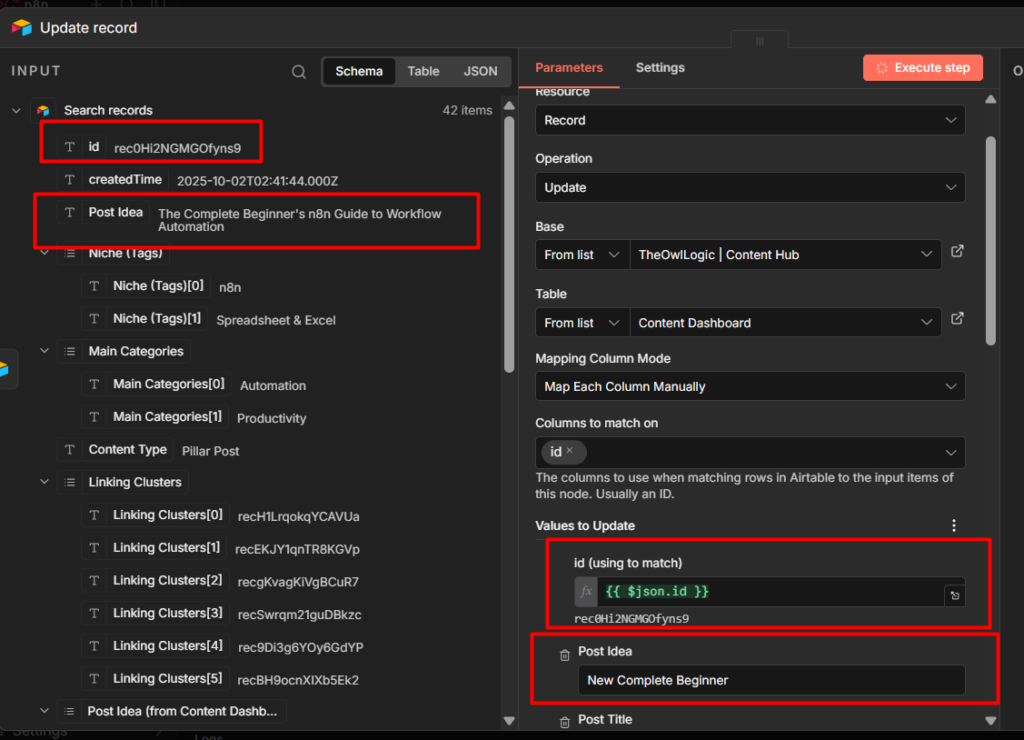
    Key Takeaways

    • Learn how to filter and route data using IF and Switch nodes with real customer scenario (Example of real use case provided)
    • Find out why your condition fails (data type, mismatches, case sensitivity) and how to fix them
    • mixed AND/OR logic using expressions when the UI dropdown isn’t enough
    • Download the workflow JSON below to import and test it in your n8n instance, or follow the step by step guide

    How to Setup Your First IF Node

    Let me walk through a practical example, filtering customer orders, Let’s assume, we are going to give a discount for those who have purchased above $1000 for upcoming holiday season, and we are going to send them emails. Well, we have a lists of customer db with purchasing value. Let’s break down the core objectives.
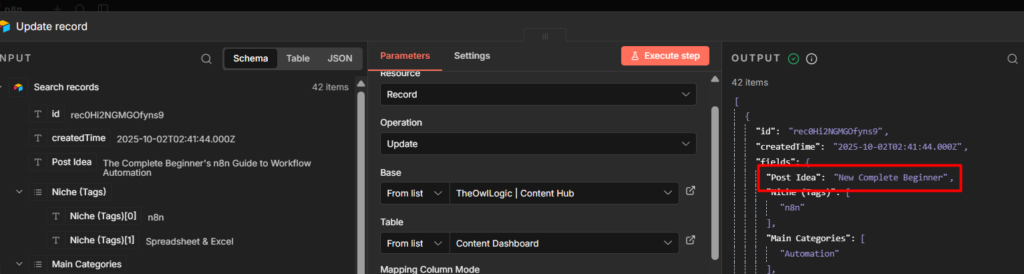
    customer db in spreadsheet for n8n (examples)

    Our goal is,

    • Find customers who had purchased over $1000
    • Get their email address.
    • Start email sequence for Holiday season reminder with VIP 20% Offer above $1200 purchases.
    • Don’t do anything to those who purchased below $1000
    n8n IF node data flow sketch diagram
    IF node adding conditional status

    What do you think it will happen now? you got any guesses here.
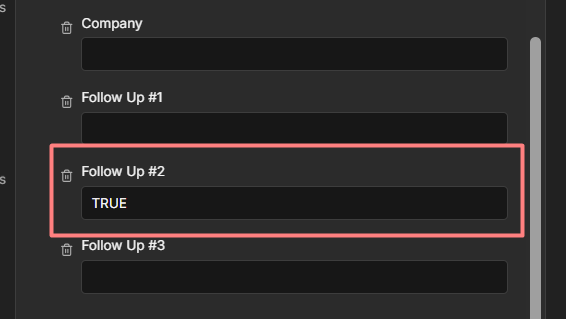
    IF node outputs TRUE FALSE items

    Yes, you get 9 customers who had purchased over $1000, and then you can add any node, like gmail, to send them a message with coupon code, or whatsoever.
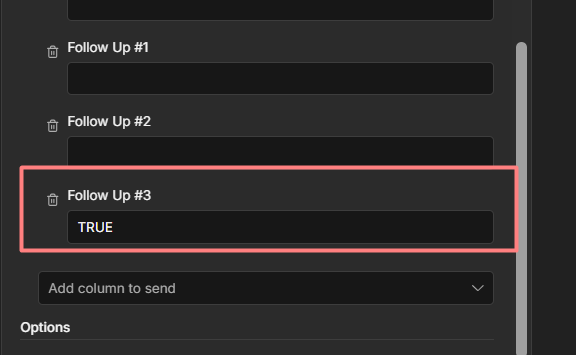
    Same for false branch too, either you can send to sheets or whatsoever, that’s totally up to you how you want to manipulate the data you have.

    Understanding Data Types and Comparison Operators

    Every comparison in an IF node requires you to select a data type. This tells n8n how to interpret the values.

    Comparing “1000” as a string different from comparing 1000 as a number.

    Let’s expand our customer workflow (what we did earlier with IF) We filtered by purchase amount, but what if we only target US customers? or customers who haven’t received the emails recently?

    Each of these checks different data-type.

    Choosing the Right Data Type

    • String: Text data like names, emails, or country codes. Use this when comparing text, even if the text contain numbers (like phone number or zip codes)
    • Number: Numeric values for mathematical comparisons. Purchase amounts, quantity, age, or any value you need to compare them mathematically.
    • Boolean: True or False values. Use this when checking if something else enabled, or active. for an example: John doe is a US customer, so in the sheet there is a column header with US country, true.
    • Date & Time: Timestamps and dates. Use this when comparing if something happened before or after specific times.
    // Number - what we already did
    {{ $json.purchaseAmount }} larger than 1000
    
    // String - check if customer is in US
    {{ $json.country }} equals "US"
    
    // String - check email domain
    {{ $json.email }} contains "@gmail.com"
    
    // Boolean - check VIP status
    {{ $json.isVIPMember }} equals true
    
    // Date & Time - check recent activity
    {{ $json.lastPurchaseDate }} after "2026-01-23"

    Common Operators Mistakes (And How to Avoid Them?)

    Using “equals” when you need “contains” – You want to check if customer uses Gmail.

    Don’t check if email equals “gmail.com”. The full gmail is “customerx@gmail.com”, which doesn’t equal “gmail.com”. Use contains instead.

    // Wrong
    {{ $json.email }} equals "gmail.com"  // Never matches
    
    // Right
    {{ $json.email }} contains "@gmail.com"  // Matches customer@gmail.com

    Comparing numbers stored as strings: your database might return purchase amount as strings, If your data "1000" (with quotes), that’s a string.

    Comparing it as a number might not work because n8n tries to convert, but it is unpredictable.

    Check your actual data type in the expression editor. If you see quotes around the number, convert it first.

    {{ Number($json.purchaseAmount) }} larger than 1000

    or just use string comparison if that makes more sense for your data.

    {{ $json.purchaseAmount }} equals "1000"

    Date format mismatches – Dates come in many formats. n8n expects ISO 8601 Format (2026-01-15T10:30:00Z) for reliable comparisons. If your dates look like “01/15/2026” or “January 15, 2026”, you’ll need to convert them first.

    Case sensitivity: String comparisons are case-sensitive by default. “US” doesn’t equal “us”. If you need case-insensitive matching, convert both values to lowercase first:

    {{ $json.country.toLowerCase() }} equals "us"

    Building Workflow #2 With New Data

    I hope, I didn’t bore you guys, you need to learn and understand this to keep your head clean when you manipulating or mapping data. let’s go.

    Updated the customer db in n8n for sample spreadsheet

    Now our sheet has US Country on F Column , and I added boolean value TRUE / FALSE.

    Our objective is to send emails to those who purchased over $1000 US customers.

    Mapping the values in IF Node

    Now we need to map the US country to value.

    Adding it to true boolean value in IF Node

    Here’s the steps you need to take.

    • Drag the US country parameters, directly to the value, then n8n automatically detects it’s data type.
    • After that you need to select whether it is true or false.
    • I select “TRUE” because that’s my core objective.
    • You can execute the workflow now.
    diagram that shows and filtered out the customers based on the business rules

    Yay, we got it. but n8n do all the heavy lifting for your when you drag and drop the parameters, still, you need to understand what is happening behind the scenes.

    Data Type Reference

    Data TypeCommon OperatorsWhen to Use
    Stringequals, contains, starts with, ends withEmail domains, country codes, status values
    Numberlarger, smaller, equals, betweenPurchase amounts, ages, quantities
    Booleanequals (true/false)Active status, feature flags, yes/no fields
    Date & Timeafter, before, betweenLast purchase date, signup date, deadlines

    Building Multiple Conditions (AND/OR Logic)

    In the previous section, we added a second condition to our IF node using the AND operator. Wait, where did I add that?

    using conditional operator AND OR logic.

    Yes, It is basically chaining if the conditions are equals then it will provide us filtered data. so we checking greater than or equals to 1000, and customer need to be in United states, if both conditions are satisfies, then n8n passed the appropriate data to next node.

    What AND Logic Does?

    • Customer A: $1200 purchases, US customer – Both true – Goes to true output
    • Customer B: $1200 purchase, UK customer – One false- goes to false output
    • Customer C: $800 purchase, US customer – One false – goes to false output
    • Customer D: $800 purchase, UK customer – Both false – goes to false output

    Only Customer A gets the email, AND logic is strict, everything should match.

    Understanding OR Logic

    Now let’s change the business rule. Marketing team wants include VIP members even if they are spent less than $1000.

    Let’s practically work on this in a workflow I guess, that would seems easier to understand.

    Workflow #3 AND OR Logic Combined

    so as we said, we need to add a new rule here. We are going to add a new column as VIP.

    workflow added new column for customer db in n8n spreadsheet (Sample)

    Here’s where the IF Node UI gets tricky. You can’t mix AND or OR operators in the dropdown. When you change the dropdown, n8n changes ALL the operators.

    If you have three conditions connected by AND and change one dropdown to OR, all three becomes OR.

    conditional chaining on IF node

    Alright, so how do we gonna solve this?

    We use expressions. Instead of multiple conditions with dropdown, we write the entire logic as a single expression

    Our new business rule is: Send email if customer has (amount >=1000 AND is a US customer) OR VIP customer.

    This is the expression

    {{ ($json['Total amount'] >= 1000 && $json['US Country'] === true) || $json.VIP === true }}
    explaining how n8n expressions works
    IF node condition with expression

    so we are adding an expression stating in the codeblock, and we are expecting a boolean value, which means it should true or false, In our case we need to our values to be true. so we are setting up the values which is boolean is true.

    let’s execute and see.

    Final output of expression in n8n

    We get 11 customers who match our logic, some because they are high-value US customers, some because they’re VIP customers, and some because they meet both criteria.

    Switch Node: Route Data to Multiple Paths

    Switch node introduction in n8n

    IF node splits your workflow to two directions.

    Switch splits into as many direction as you need.

    When to use Switch nodes?

    So, basically I wanted to give you with the examples of the current workflow, that we are sending customers emails who purchases over $1000 and US based.

    • Sort customers by spending tiers (Gold, Bronze, Silver)
    • Route support tickets by priority (Low, Medium, High, Urgent)
    • Send different emails based on locations (US, UK, Asia, EU)
    • Handle different product categories with unique logic.

    alright, now you maybe asking, “yeah, we can use it with IF Nodes right?”

    Yes, but you should know that when to use IF Nodes?

    • Simple yes/no answers.
    • Just two paths needed
    • Binary choices (approved, rejected, or active/inactive)

    Switch has two modes,

    • Rules mode: Visual condition (what we’ll use)
    • Expression mode: Write code to calculate output number

    We’ll use visual mode since it’s more practical for our users.

    Workflow #4 Routing by Customer Tier

    Let’s route our customers to different email campaigns based on spending levels, In marketing, we should not always treat always who spend higher, even though who spend lower. Engagement is the key.

    We have three customer tiers

    • Bronze: $0 – $500
    • Silver: $501 – $1000
    • Gold: $1001+
    introduction to switch node in n8n

    Connect the switch node to the sheets.

    n8n switch node rules

    You’ll get this interface, sometimes you won’t see the parameters on the left side node, which means you have to execute them individually to to see the output data of the previous node. Check the reference image below for your understanding

    executing the single node to get the output of previous node's data

    Click on that “Play” icon to execute that node, but not the workflow. Got it. let’s move to the next phase.

    Explaining the UI of switch node and it's output

    You have to configure this as it is for your criteria or business needs, for now I wanted to create the bronze tier, and it’s done.

    Let’s create other tiers as well – click on the Add routing rule to create another route for “Silver tier”

    but silver tier is tricky, I’ll let you to solve it, if you couldn’t find the answer then scroll down.

    data value mapping on switch nodes in n8n

    In this scenario, we have to check two comparisons for silver tier

    • It should greater than 500
    • and less than 1000

    But, you cannot write two comparisons in a single field, that’s where we have to use expressions here.

    so the logic is simple.

    {{ $json['Total amount'] > 500 && $json['Total amount'] <=1000 }}

    It should be greater than 500 and less than 1000.

    and, go for the Gold tier as well.

    switch node in n8n executed all the filtered customers.

    Finally I was able to get the customers list based on tier types, this is how you have to use Switch nodes appropriately. By blending expressions and with help of UI as well like dragging and mapping.

    I hope you understood this module clearly, but I prefer to read multiple times, and try with different scenario. This way you can build a great things in the future easily.

    I do believe in one thing certainly that mastering basics can do anything.

    Get here the Workflow JSON here

    Frequently Asked Questions

    Q. Why isn’t my IF node working even though my condition looks correct?

    The most common issue is a data type mismatch. If you’re value stored as as text “1000” but you comparing it as numbers, the condition will fail. Check your data type in the IF node dropdown, or toggle on the convert types where required option

    Q. Can I use OR logic IF Node dropdown?

    Yes, if it’s for a single comparison, but you cannot mix with OR + AND operators, to do this multiple comparisons, then you have to use chain comparisons with expressions. e.g `|| &&”

    Q. My Switch node is sending customers to the wrong output

    Switch sends data to the FIRST matching rule by default. If you have any overlapping conditions (like checking silver tier before the gold tier), customers might match the wrong rule first. Always order your switch rules to specific to least specific for best case scenario.

    Final thoughts

    You’ve already learned how conditional logic works in n8n. Now it’s time to build your own workflows. Start simple, and correlate with your ideas. Send us your Switch related workflows to us to review.

    Send it to: hello@theowllogic.com

    Now go build something useful, for additional references, you can check below the resources.