Connecting n8n to Supabase is straightforward once you know which connection method to use. There are three options, and picking the wrong one is the most common reason people end up
reading troubleshooting docs instead of building workflows.
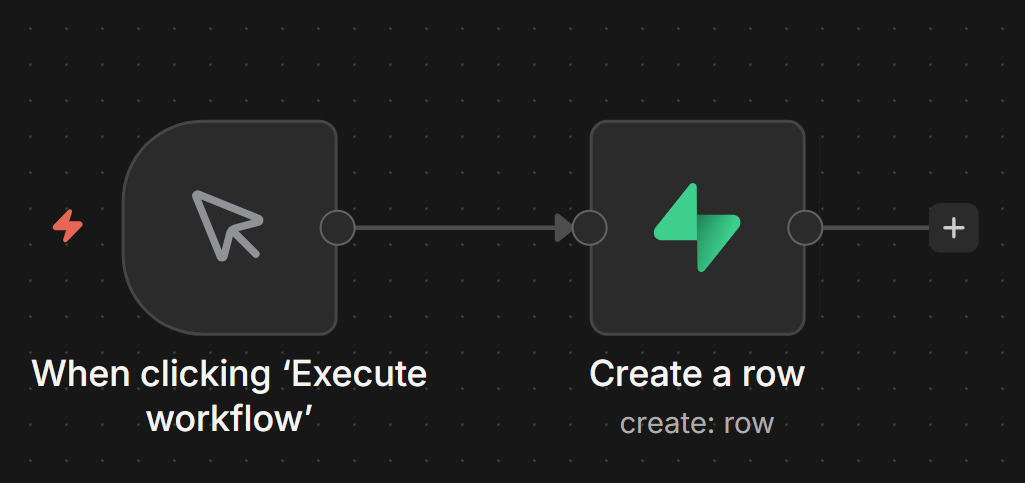
Three Ways to Connect n8n to Supabase
Before touching credentials, decide which connection method fits for your workflow or usecase.
| Method | When to use it |
| Native Supabase node | CRUD on public schema tables simplest setup, no SQL required |
| Postgres node | Complex queries, JOINs, stored procedures, or direct database access with custom schemas |
| HTTP Request node | Supabase Edge Functions, Auth API, Storage API, or Realtime REST endpoints the native node doesn’t cover |
Most workflows use the native Supabase node. It handles the common operations create, read, update, delete rows through a visual interface without writing SQL.
The Postgres node gives you more power but requires a direct database connection string instead ofAPI key auth.
The HTTP Request node is for anything outside the database itself.
The rest of this guide focuses on the native Supabase node and Vector Store node, with a section at the end on when to reach for Postgres instead.
Credentials Setup Supabase Node
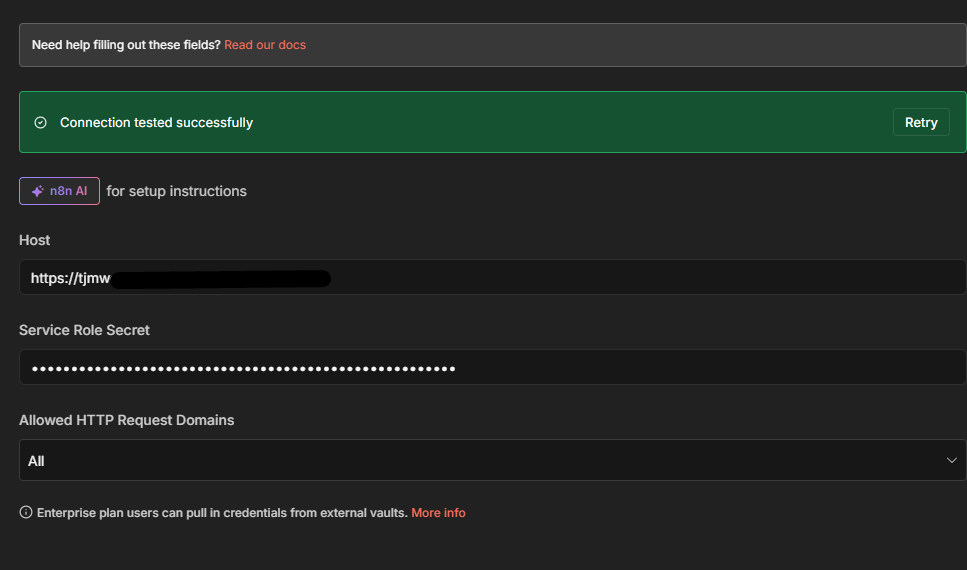
The Supabase node authenticates with two pieces of information: your project URL and your service role secret key. These come from two different places in Supabase.
Host (Project URL): On your project’s main dashboard, the URL appears directly below the project name — something like https://asfddssdexz.supabase.co. Hit Copy to grab it.
Service Role Secret: Go to Project Settings → API. Scroll to the API Keys section, click Reveal next to the service_role key, and copy it.
In n8n: open Credentials → New → search for Supabase → paste both values → Save.
One thing to understand before saving: the service_role key bypasses all Row Level Security (RLS) policies. That means your n8n workflows have unrestricted read and write access to every
table in the database. For internal automation syncing data, processing records, building pipelines this is usually fine. If you’re building workflows that act on behalf of specific users or
handle multi-tenant data, review whether service_role is appropriate before using it in production.
For help with n8n credential management more broadly, the n8n credentials and service guide covers the patterns in detail.
CRUD Operations What the Supabase Node Actually Does
The Supabase node supports five operations: Get Row, Get All Rows, Create Row, Update Row, and Delete Row. Here’s what each does in practice.
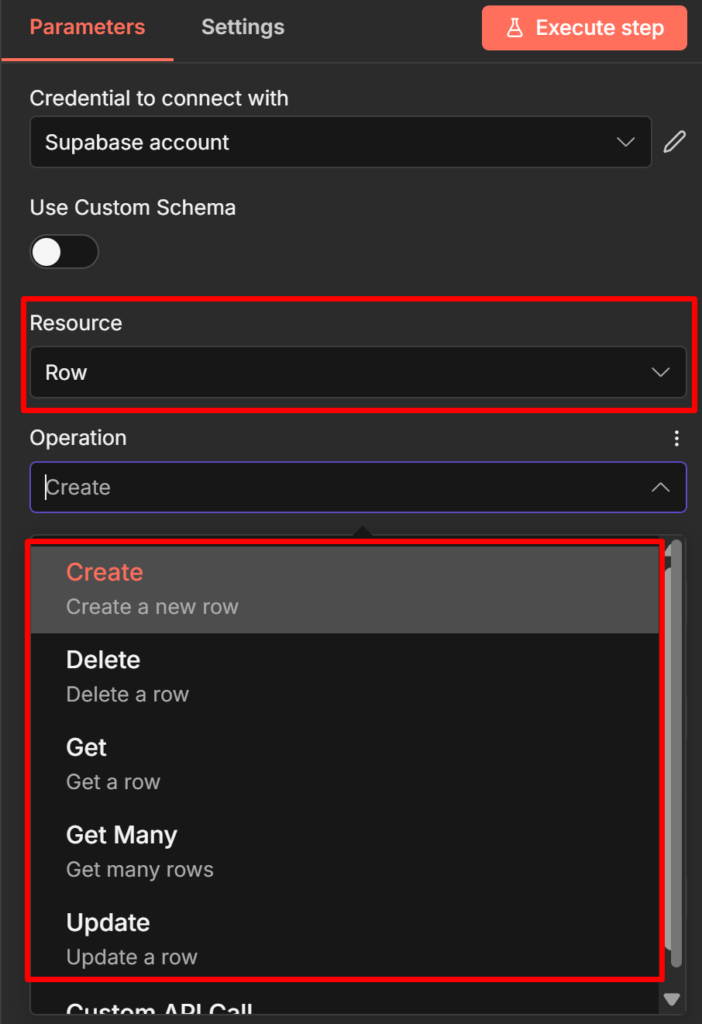
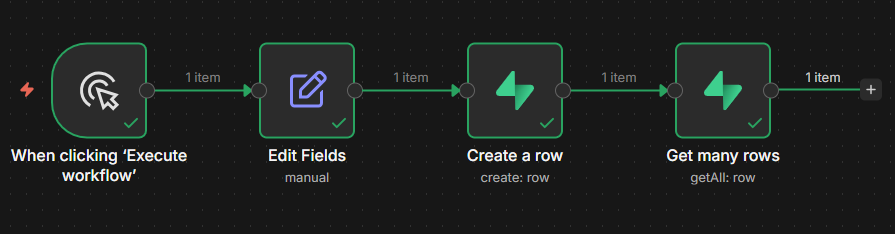
Create Row
Use this to insert a new record into a table. Set Table to your table name, then map the fields you want to write.
A typical use case: a form submission webhook triggers an n8n workflow, and you write the submission data to a leads table.
// What the node writes to Supabase

{
"name": "Alice Chen",
"email": "alice@example.com",
"source": "contact_form",
"created_at": "2026-04-23T09:15:00Z"
}
Map each field in the node’s Fields to Send section using expressions like {{ $json.name }} to pull values from the previous node.
Get All Rows (with filters)
This is the most-used read operation. It retrieves multiple records and supports filtering, AND/OR logic, and a limit on return count.
Example: a scheduled workflow that runs every hour and fetches all leads where status is pending :
- Table:
leads - Return All: off (leave the default limit unless you need all records)
- Filter:
statusequalspending
For large tables, keep Return All off and set a reasonable Limit. Returning 10,000 rows into a workflow that processes each one will slow execution and may hit memory limits.
Custom schema support: By default, the Supabase node only reads from the public schema. If your tables live in a custom schema, enable Use Custom Schema in the node settings and enter your schema name. This option is easy to miss and causes silent failures if you forget it.
Why Your Supabase Node Returns No Data (The RLS Problem)
This is the most common failure pattern when connecting n8n to Supabase for the first time. The node runs without error, the execution shows green, but the output is empty.
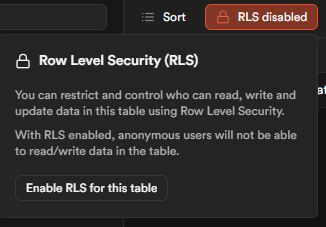
The cause is Row Level Security.
Here’s the mechanism: When you create a table using the Supabase Table Editor (the UI), Supabase enables RLS on that table automatically. With RLS active and no policies defined, theanon (public) key returns zero rows not an error message, just nothing. The service_role key bypasses RLS entirely, which is why switching to service_role in your credentials immediately fixes the empty output.
The confusing part is that there’s no error to tell you what’s happening. Your query ran, it just returned no data because RLS blocked it.
Two valid fixes:
Fix 1 Use the service_role key (recommended for internal automations). This is what the credentials setup section above configures. If your n8n workflows are internal, not acting on
behalf of end users, service_role is the right choice.
Fix 2 Create an RLS policy. If you need the anon key for a specific reason, go to Authentication → Policies in your Supabase dashboard, select your table, and create a policy that grants the access pattern you need. For example, to allow all reads:
CREATE POLICY "Allow public read access"
ON leads
FOR SELECT
USING (true);
A third failure mode applies only to self-hosted setups: if both n8n and Supabase run in separate Docker containers, don’t use localhost as the host. Use supabase-kong (the Supabase API
gateway container name) instead.
Check it out How to Install n8n locally (Docker + NPM Method)
For setting up error alerts so silent failures like this get caught automatically, the error handling guide covers the error trigger workflow pattern.
Triggering n8n Workflows From Supabase Events
The connection works in both directions. Supabase can push events to n8n when database records change. There are two methods.
Database Webhooks (simpler)
Supabase Database Webhooks send an HTTP POST request to a URL whenever a row is inserted, updated, or deleted. In n8n, a Webhook node receives this POST and triggers your workflow.
Setup in Supabase: Database → Webhooks → Create a new hook. Select your table, choose the events (INSERT, UPDATE, DELETE), and paste your n8n Webhook node URL as the endpoint.
The payload n8n receives looks like this:
{
"type": "INSERT",
"table": "leads",
"schema": "public",
"record": {
"id": 42,
"name": "Bob Okafor",
"email": "bob@example.com",
"status": "pending",
"created_at": "2026-04-23T10:30:00Z"
},
"old_record": null
}
For UPDATE events, old_record contains the row’s state before the change. This lets you compare before and after without an extra database query useful for detecting which specific
fields changed.
The webhook guide covers how to configure the n8n Webhook node.
Supabase Realtime (more complex)
Supabase Realtime broadcasts database changes over WebSocket connections. n8n doesn’t have a native Realtime listener node, so you can’t subscribe to Realtime directly from a workflow canvas.
The practical pattern is to bridge Realtime using a Supabase Edge Function: the Edge Function subscribes to Realtime events and POSTs to an n8n Webhook node when events arrive. This adds
a layer of infrastructure, so most teams stick with Database Webhooks unless they need the lower latency Realtime provides.
Using Supabase as a Vector Store for AI Workflows
If you’re building AI workflows, RAG systems, document Q&A, and AI agents that search a knowledge base, the Supabase Vector Store node is a completely separate node from the CRUD Supabase node. It’s found in the AI section of the node panel, not the regular integrations section.
It requires two things in Supabase that the CRUD node doesn’t need – the pgvector extension enabled, and a documents table structured for vector storage. The n8n docs include a SQL script
in the Vector Store node’s quickstart section run it in Supabase’s SQL editor to create the right table structure.
-- Run this in Supabase SQL editor to create the vector store table
-- (use the exact script from n8n's Supabase Vector Store node docs,
-- as the schema may vary with pgvector version)
create extension if not exists vector;

create table documents (
id bigserial primary key,
content text,
metadata jsonb,
embedding vector(1536) -- adjust dimension to match your embedding model
);
The dimension (1536 above) must match your embedding model’s output. OpenAI’s text embedding-3-small uses 1536. If you use a different model, update this value or you’ll get a dimension mismatch error on insert.
Two main workflow patterns:
Insert Documents (ingestion pipeline): Document Loader → Text Splitter → Embeddings model → Supabase Vector Store (Insert Documents mode)
Use this to load PDFs, web pages, or text files into your vector store. Each chunk of text gets embedded and stored with its vector representation.
Retrieve Documents (RAG chain or AI agent tool): Connect the Supabase Vector Store in Retrieve Documents (As Tool for AI Agent) mode directly to your AI Agent node’s tools connector. The agent calls it when it needs to search your knowledge base.
When to Use the Postgres Node Instead
The native Supabase node covers most CRUD use cases, but two scenarios push you toward the Postgres node.
Complex queries. The Supabase node’s filter UI handles simple conditions well equality, greater than, less than. If you need JOINs across tables, aggregate functions, subqueries, or anything that requires writing actual SQL, use the Postgres node. It accepts raw SQL queries and returns results the same way any other n8n node does.
Custom schemas and stored procedures. While the Supabase node supports custom schemas via the Use Custom Schema toggle, the Postgres node gives you direct database access without going through Supabase’s API layer. For stored procedures or database functions that aren’t exposed through the RESTAPI, the Postgres node is your only option.
The trade-off: the Postgres node requires a direct database connection string (host, port, database name, username, password) rather than API key auth. Supabase provides these under Project Settings → Database → Connection string. Credential rotation is slightly more involved than rotating an API key.
For teams running both n8n and Supabase self-hosted, the n8n self-hosted setup guide covers the infrastructure considerations for connecting services in the same environment.