Tag: AI Agents

  • How to Use the Simple Memory Node in n8n (Beginner’s Guide)

    How to Use the Simple Memory Node in n8n (Beginner’s Guide)

    You built your first AI Agent in n8n. It responded well, sounds smart, and handles questions exactly how you configured it.

    Then you type “What did I just tell you?

    And it says “I don’t have information about that

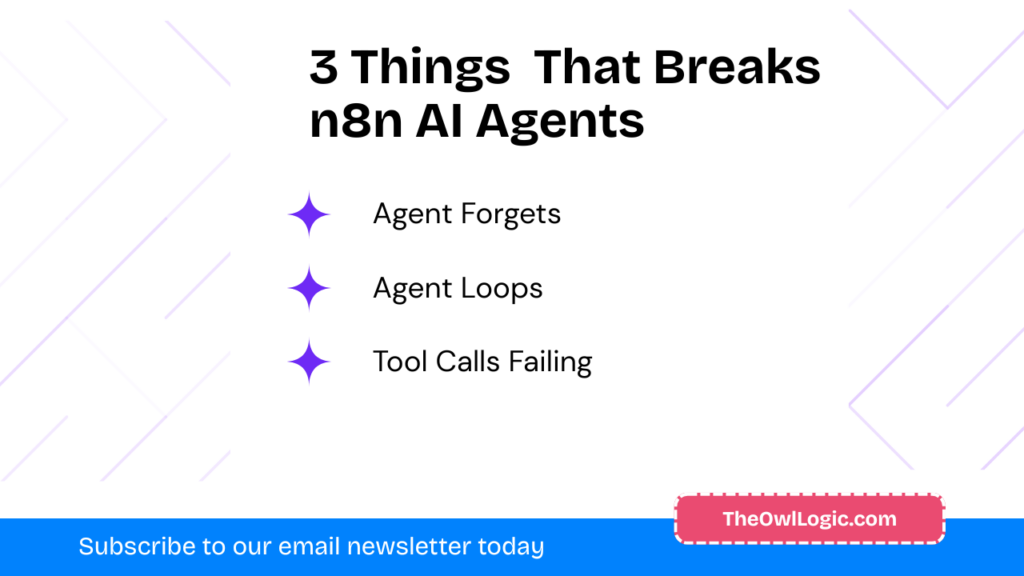
    That’s not a prompt problem. Your agent has no memory of it. Every single message it receives feels like the first one, a completely fresh conversation with no context of what came before.

    The Simple Memory fixes this. Here’s how to set it up correctly, what the settings actually mean, and the two mistakes that will silently break your workflow if you skip this post.

    What the Simple Memory Actually Does?

    When you send a message to an AI Agent in n8n, the request goes to an LLM like Claude or Gemini. The LLM processes that one message and sends back a response. That’s it. No memory of previous turns each API call is completely independent by design.

    The Simple Memory sites between your chat trigger and your AI Agent and solves this by keeping a rolling of log of recent conversation exchanges.

    Before each new message goes to the LLM, n8n injects the recent chat history into the request automatically. The LLM now has context.

    One important thing to understand upfront is, This memory lives inside your n8n instance’s process. It’s not saved to a database. If your n8n instance restarts, all conversation history clears. For prototyping and internal tools, that’s usually fine. For production chatbots with real uses, I’ll cover that at the end.

    How to Add Simple Memory to an AI Agent

    If you already have a workflow with an AI Agent node set up, adding memory takes less than 5 seconds.

    Step 1

    connecting AI Agent to n8n

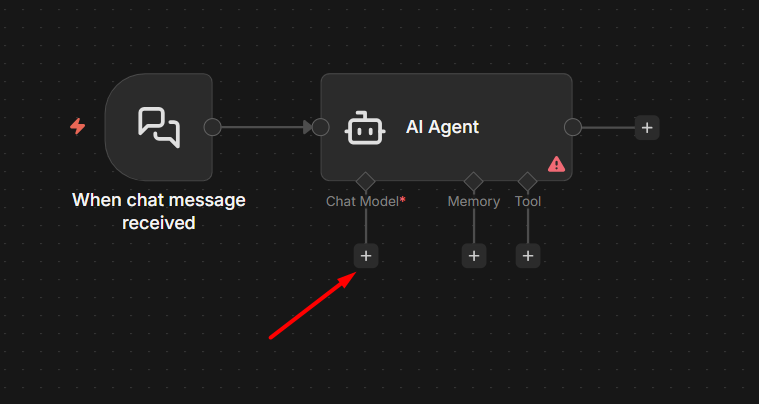
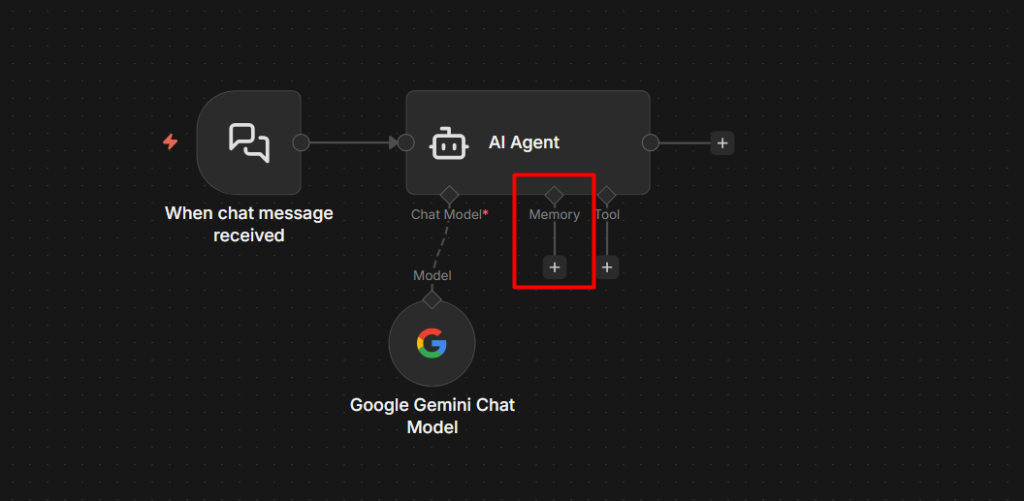
    Open your workflow on the canvas. Find your AI Agent node.

    Step 2

    Connecting simple memory node to n8n workflow

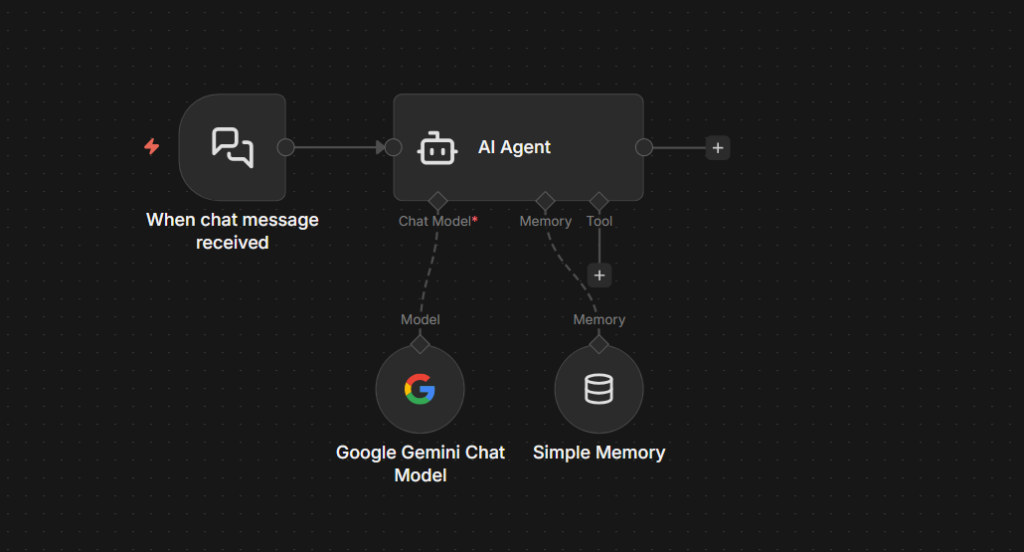
    At the bottom of the AI Agent node, you’ll see a connector labeled Memory. Click it.

    Step 3

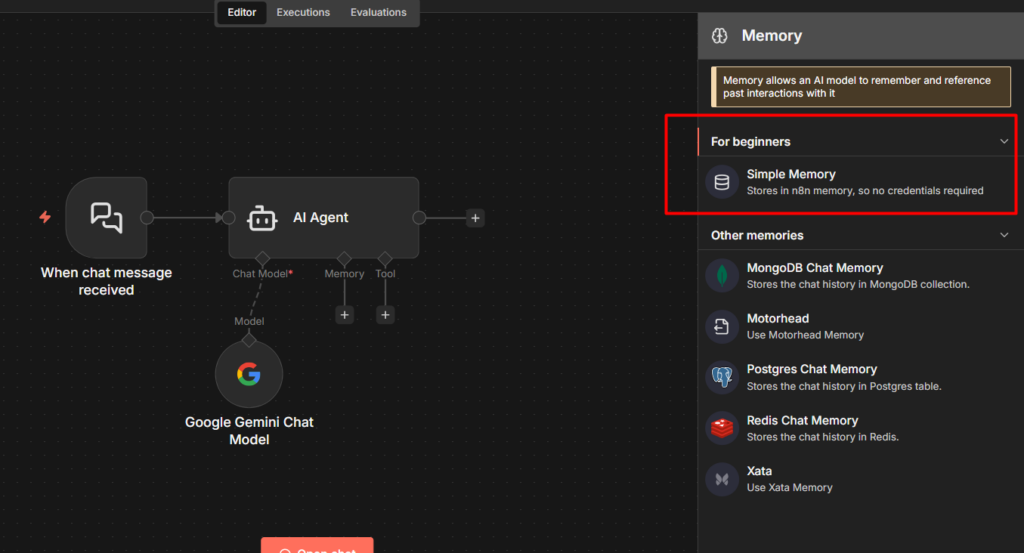
    A panel opens with available memory nodes. Select Simple Memory

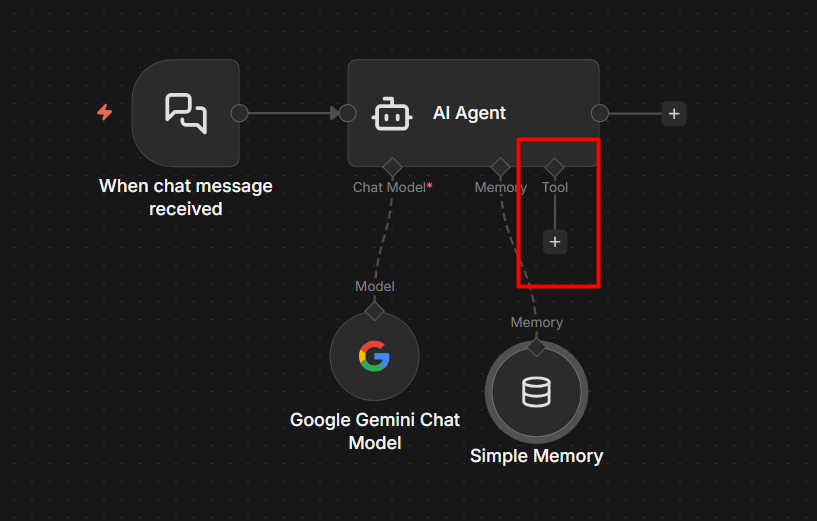
    A new node appears connected to your AI Agent via the memory connector.

    Step 4

    Configuring simple node in n8n

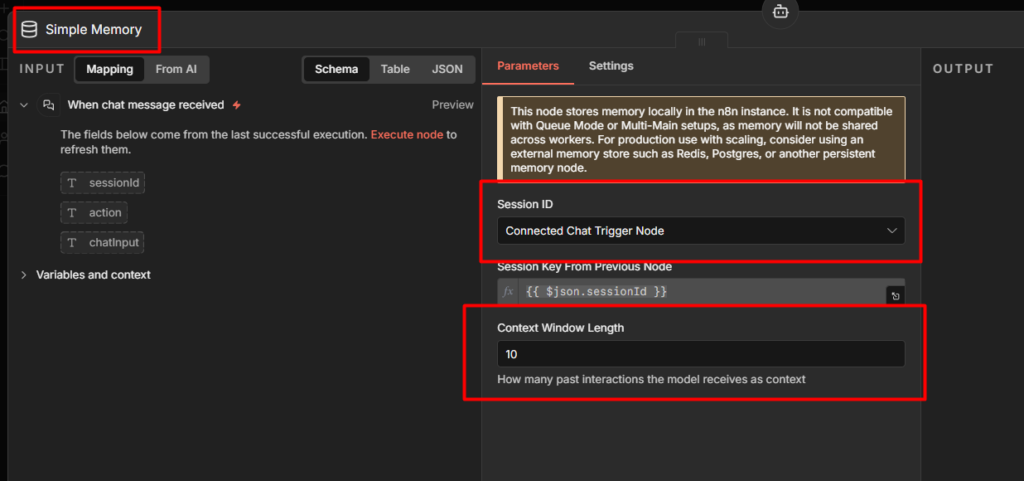
    Click into the Simple Memory node to configure it. You’ll see two things

    • Session Key: The identifier that groups messages into a conversation. When you’re using the On Chat Message trigger, n8n fills this automatically from the sessionId passed in the request. You don’t need to touch it.
    • Context Window Length: How many recent exchanges to keep in memory. The default is 5.

    Step 5

    Save your workflow and test it. Open the chat, tell the agent your name, send a few more messages, then ask it to recall something you said earlier.

    It will remember.

    If you don’t have an AI Agent workflow yet. Start here: How to Build an AI Agent in n8n

    What “Context Window Length” Actually Means?

    This setting trips up almost everyone at the first time.

    Context Window Length counts exchanges, not individual messages. One exchange = one message from you + one reply from the AI. That’s two messages stored.

    If you set it to 5, the agent keeps the last 5 exchanges – 10 messages total in the memory.

    Context Window LengthExchanges RememberedMessages in Context
    112 (1 user + 1 AI)
    5 (default)510
    101020

    Why does this matter? Because every message in the context window gets sent to the LLM on each new request. A window of 10 means 20 messages worth of tokens on every call. At scale, that adds up fast in both cost and response latency.

    For most use cases, the default of 5 works well. If your conversations are short and task-focused (book an appointment, answer a product related questions), you can drop it to 3. If you’re building something more conversational where users reference things from much earlier, bump it up to 8 or 10 – just know you’re trading off token cost for context depth.

    2 Common Errors and How to Fix Them

    “No sessionId” error

    This one shows up when you’re triggering your AI Agent from something other than On Chat Message trigger, a Webhook, a Scheduled trigger, or a manual test run.

    This Simple Memory node expects a session identifier to know which conversation it’s working with. The On Chat Message trigger provides this automatically. Everything else doesn’t.

    How to fix it for testing? Open the Simple Memory node and manually type a static value into the Session Key field – something like my_test_session. This tells the node to treat all requests as part of one conversation. It works fine for building and debugging.

    How to fix it for production? If you’re triggering your agent from a webhook, you need to pass session identifier in the request and map it to the Session Key field. For a customer support bot, that might be the user’s email address or account ID. For a telegram bot, It’s the chat ID. Whatever uniquely identifies a conversation for your use case.

    {{ $('Webhook').item.json.body.userId }}

    Map that expression to the Session Key field and every user gets their own isolated memory. See how to handle errors in n8n if you want to add proper error handling around sessions that fail to resolve.

    Two memory nodes reading from the same session

    If you add more than one Simple Memory node to the same workflow without changing their Session Keys, they both read from and write to the exact same memory. This causes weird behavior, one part of your workflow may overwrite context that another part needs.

    The fix is simple, give each Simple Memory node its own unique Session Key. Something like workflow_a_session and workflow_b_session keeps them separate.

    One Limitation You Must Know Before Going Live

    Simple Memory does not work if your n8n instance runs in queue mode.

    Queue mode is a self-hosted setup where multiple worker processes share the load. When a workflow executes, n8n routes it to whichever worker is free. The Simple Memory node stores data inside the worker’s process memory, not in a shared database. If two consecutive messages from the same user land on different workers, the second worker has no idea what the first one stored.

    The result isn’t an error. The agent just loses memory mid-conversation, silently with no warning.

    Who this affects: If you’re running self-hosted n8n with Redis and multiple workers enabled, this is your setup. If you’re on n8n Cloud or a Single-instance self-hosted setup, you’re fine.

    What to do instead: Switch to the Postgres Chat Memory node. It stores conversation history in a database that every worker can access.

    When to Replace The Simple Memory

    Simple Memory is the right starting point. Zero configs, nothing to provision, works immediately.

    But there are two situations where you’ll need to replace it.

    You’re going to production with real users. Simple Memory clears on restart. If your n8n instance ever updates, redeploys, or crashes, every active conversation loses it’s history. Users will notice. For anything facing real users, migrate to the Postgres Chat Memory node before you launch.

    You’re running in queue mode. As covered above, Simple Memory and queue mode don’t work together. Postgres is the standard replacement here too (or Redis Chat Memory).

    The migration is straightforward. Set up a Postgres database, add your credentials to n8n, and swap the Simple Memory node for the Postgres Chat Memory node. n8n creates the required table structure automatically on first run.

    Redis Chat Memory is also an option if you need very fast read/write performance for high-traffic real-time applications. For most teams, Postgres is the simpler and durable choice though.

    Once you have memory working correctly, the next thing worth exploring is what happens when you need the agent to manage that memory – Injecting system context, clearing history on demand, or inspecting what’s currently stored. That’s what the Chat Memory Manager node is for, and it connects to whichever memory node you’re already using.

    Check it out here: Building a Rate Limiter in n8n with Upstash Redis

    Final Thoughts

    None of this requires being an expert. It requires being willing to build something, break it, understand why, and built it better.

    The developers who create genuinely useful AI agents aren’t the ones who read the most about AI. They’re the one who ship something working, notice where it falls short, and keep iterating.

    You now know how memory works in n8n. You know the tradeoffs, the failure modes, and when to upgrade. That puts you ahead of most people who just drop a node and assume it works.

    Go build something worth remembering

  • How to Build an n8n AI Agent Workflow (Step-by-Step – 2026)

    How to Build an n8n AI Agent Workflow (Step-by-Step – 2026)

    An AI agent in n8n is a workflow that can think through a task, decide what to do, and act without defining every steps in advance.

    A normal n8n workflow follows a fixed path. If X happens, do Y. If Z happens, do W. Every branch has to be anticipated and built by you. That works well for structured, predictable tasks, syncing rows from a spreadsheet, sending a confirmational email, posting a Slack message.

    But a lot of real work isn’t structured. Incoming support messages don’t fit neat categories. Research tasks depend on what you find along the way. Lead qualification depends on context that’s different for every prospect.

    AI agents handle that kind of work. You give the agent a goal and a set of tools, and it figures out the steps. It reads the input, decides which tool to use, uses it, reads the result, and keep going until it has a complete answer.

    Concretely, an n8n AI agent can,

    • Answer questions by searching a knowledge base before responding
    • Triage incoming messages and decide whether to reply, escalate or log them
    • Research a topic by querying APIs and summarizing the findings
    • Enrich CRM records by pulling data from external services and writing it back
    • Draft content, check it against rules you define, and revise until it passes

    This post walks you through building your first one from scratch. By the end you’ll have a working agent, understand how memory actually works (and why Simple Memory burn you in production), and know about two features from early 2026 that most tutorials haven’t caught up to yet.

    Before You Start

    This tutorial assumes you have n8n running and atleast one AI API credentials ready. If you’re not setup yet, here’s what to sort first.

    An n8n instance. You have two options

    A language model API key. This tutorial uses Gemini (free tier available via Google AI Studio). You can also use Anthropic Claude or ChatGPT. Well, all work the same way. (However, we have listed the steps below that you could take to obtain an API key)

    Basic n8n familiarity. You should know what a node is and how to connect them. If you haven’t built anything in n8n yet, start with Your First Workflow in n8n – It takes about just 10 minutes or less.

    Let’s discuss a little bit about what is AI agent, and what makes AI agent feels more powerful than just a n8n workflow.

    What Makes an AI Agent Different From a Regular n8n Workflow

    A normal n8n workflow is like a recipe. Every step is predefined. If email contains “refund” > send template A. If it contains “Invoice” > send template B. The moment something lands outside those rules, the workflow either fails or does the wrong thing.

    An AI agent understand a goal and figures out the step itself.

    The same support inbox handled by an agent looks like this.

    • Read the message
    • Understand the actual issue
    • Check the customer’s history
    • Decide whether to respond directly, look something up or escalate

    The agent adapts. You don’t have to anticipate every edge case in advance.

    The tradeoff is real though, agents are less predictable than fixed workflows. For anything that needs deterministic, auditable results every time, like payroll processing ,database writes – a standard workflow is still the right tool. Agents shine when the input is unstructured and the right action depends on context.

    The 4 Components Every n8n AI Agent Needs

    Every AI agent in n8n built from the same four-part structure, regardless of what the agent actually does.

    1. Trigger – What starts the agent. This could be a Chat Trigger (for conversational agents), a Webhook (for integrating with external systems), a Scheduled Trigger, or even a form submission. The trigger passes the initial input to the agent
    2. AI Agent node – The orchestration layer. This node receives the input, sends it to your chosen language model, reads the model’s response, decides which tool to call (if any), calls it, checks the results, and loops until it has a complete answer. It’s the brain.
    3. Sub-nodes – The three types that connect directly to the AI Agent node.
      • Chat Model – The actual LLM (OpenAI GPT, Anthropic Claude, Google Gemini, Kimi K2.5, etc)
      • Memory – How the agent retains context across messages
      • Tools – What the agent can do (Call an API, search the web, run a calculation, query a database)
    4. Output – Where the results goes. This could be a reply in the chat interface, a Slack message, a row appended to Google Sheets, or anything else n8n’s integration library.

    This structure doesn’t change. Whether you’re building a simple Q&A bot or multi-step research agent, these four part are always there.

    Building Your First AI Agent (A Support Triage Bot)

    I’ll use a support triage agent as the example

    • It reads incoming messages.
    • Decides whether to answer directly or escalate, and responds.

    It’s practical, easy to understand, and shows exactly how the agent make decisions.

    Step 1: Add a Chat Trigger

    Adding a chat trigger in n8n

    Create a new workflow and add a Chat trigger node. This is the easiest way to start with agents because it gives you built-in chat interface to test with. No external services or webhooks needed while you’re learning the setup.

    Chat trigger creates a Chat URL

    The Chat Trigger creates a simple URL where you can open a chat window and send a test messages directly to your agent.

    Step 2: Add the AI Agent Node

    Add the AI Agent node to the Chat trigger

    Click the + button after the Chat trigger and search for AI Agent. Add it to the canvas and connect it to your trigger.

    Adding system message to n8n AI agent

    Open the AI Agent node. The most important field here is the System Message. This is where you define who the agent is and what it’s supposed to do.

    Here’s a real example for the support triage agent

    You are a support agent for a SaaS product. Your job is to:
    
    1. Answer common questions directly if you can (password resets, billing basics, plan information)
    2. If the issue requires account-specific information you don't have, let the user know you're escalating to the team
    3. Always be concise. Don't pad responses with unnecessary filler.
    4. If the user seems frustrated, acknowledge it briefly before answering.
    
    You do NOT have access to account data unless a tool provides it. Don't make up information.

    The last line matters. Without explicit instructions about what the agent doesn’t know, it will sometimes hallucinate account details. Tell it what it can and can’t do.

    Step 3: Connect a Chat Model

    Connect the Chat Model to AI Agent in n8n

    The AI Agent node won’t do anything without a language model. Hover over the bottom of the AI agent node – you’ll see sub-node connector. Click the Chat Model connector and add a model node.

    Connect Google Gemini Chat Model

    For most use cases, I use Gemini, and for starting point Gemini, and Anthropic Claude are good.

    How to obtain Gemini API Key

    You don’t need to manually create a Google Cloud Console project to get a Gemini API key, one will be created automatically when you generate the key.

    If you don’t have the credentials setup yet, the credentials setup guide walks through exactly how to add them (For Google Cloud Console)

    Place your API Key here

    Paste the Google Gemini API key here to complete the credentials. That’s it and then you will be needed a model though, for this tutorial I go with models/gemini-3-flash-preview

    adding google gemini model to the AI agent

    Connect your chosen model to the AI Agent node’s chat model input.

    Finally connected a chat model to an AI agent in n8n

    Step 4: Add a Simple Memory (for Testing)

    Adding a memory to AI agent in n8n

    Still on the sub-node area, connect a Simple Memory node to the Memory input.

    Adding simple memory to AI agent in n8n

    Simple Memory keeps the conversation history in RAM during the current workflow session. This means your agent will remember what was said earlier in the same conversation – but only until the workflow restarts or the session ends.

    This is perfectly fine for testing, I’ll cover what to use in production in the next section, because this is exactly where most people get burned.

    Configuring the context window length in simple memory

    Leave the Context Window Length at 10 messages for now. That’s enough for most conversation without overloading the model’s context window.

    Check it out here to learn more about How to Use Simple Memory Node in n8n

    Added simple memory

    Step 5: Add a Tool

    Adding a tool to AI agent in n8n

    Tools are how the agent takes actions beyond just generating text. For this example, add the built-in Calculator tool, It’s already in n8n, no setup required, and it lets you see the agent’s tool-calling behavior immediately.

    Connecting a calculator tool to AI Agent

    Connect it to the Tools input on the AI agent node.

    Here’s what actually happens when a user asks “What’s 15% of $340 for a tip?” – The agent recognizes it needs to calculate something, calls the calculator tool with 340 * 0.15, gets 51 and includes that in its response. You can watch this happen step by step in the execution logs.

    Step 6: Test It and Publish It

    Click the Chat button in the Chat Trigger node (or the Open Chat button that appears in the UI). A chat window opens

    Send a message: “Hey, I’m locked out of my account

    You should see the agent respond. But here’s the important part, click the execution that appeared in your workflow. Open it and look at the AI Agent node’s output. You’ll see the reasoning steps, What the model decided, which tool it chose (or didn’t), and why.

    This is the execution log view, and it’s one of n8n’s biggest strengths for working with agents. You can see exactly what the agent was thinking at each step. When something goes wrong, this is where you debug it.

    When you’re ready to use this in production, toggle the workflow to Publish in the top right corner.

    Choosing The Right Memory for Your Agent

    Simple Memory works perfectly in testing. The moment you deploy and restart your n8n instance, it forgets everything. Every conversation starts from scratch. Users have to re-explain their context every single time.

    Memory TypePersistsUse Case
    Simple Memory❌ NoTesting only, local development
    PostgreSQL memory✅ YesLong-term context, production chatbots
    Redis Memory✅ YesHigh-volume, fast session-based agents

    Motorhead Memory is deprecated as February 9, 2026. The Motorhead project is no longer maintained. n8n has hidden it from the nodes panel for new workflows.

    For production, use PostgreSQL Memory. It stores conversation history in a database table, survives restarts, and works with n8n’s native PostgreSQL integration. If you’re already self-hosting n8n with PostgreSQL as your n8n database, you can point the memory node at the same database.

    There are two things to get right with any persistent memory setup

    Session IDs must be unique per user. If you hardcode a session ID or leave it as a default, every user shares the same memory. Your agent will get confuse one user’s conversation history with another’s.

    Generate session IDs dynamically from a user identifier – their email, a user ID from your system, or a UUID.

    Set a reasonable context window. Storing 500 messages of history and sending all of it to the model on every request is expensive and often counterproductive. Most agents work well with the last 10-20 exchanges anything beyond that and you’re paying for tokens that don’t meaningfully improve responses though.

    3 Things That Break n8n AI Agents

    3 things that breaks n8n AI agents

    1. Agent “forgets” everything after deployment

    Conversations work perfectly in testing. In production, the agent has no memory of previous messages.

    You’re using Simple Memory and the workflow restarted (due to a deploy, update, or n8n instance restart).

    As a fix, Switch to PostgreSQL or Redis memory before going live. This is not optional for any agent that needs to maintain context across sessions.

    2. Agent loops or keeps asking clarifying questions

    The agent send multiple messages, asks the same question repeatedly, or never produces a final answer.

    Your system prompt is too vague. The agent can’t determine when it’s done, so it’s keeps going.

    Add explicit stopping conditions to your system prompt

    When you have enough information to answer, respond directly.
    Do not ask more than one clarifying question per response.
    If you cannot find the answer using available tools, say so clearly and stop.

    Also check your context window length. If it’s too long and the agent is reading 50+ messages of history, it sometimes gets confused about what was already resolved.

    3. Tool calls failing

    The agent responds as if it used a tool, but the action didn’t actually happen. No error shown to the user.

    The tool node is failing (expired credentials, API error, wrong field mapping) but the agent is continuing anyway and generating a plausible-sounding response without real data.

    As a fix, Open the execution and click into the specific tool node that fired. The error will be there. This is almost always a credential issues – check our error handling guide for how to setup error notifications so these don’t go unexpected. Also, be explicit in the system prompt that the agent should acknowledge when a tool fails rather than guessing.

    HITL Approvals + MCP Trigger

    Two features shipped in early 2026 that change how you build agents. Most content out there hasn’t covered them yet.

    Human-in-the-Loop (HITL) Tool Approval

    You can now mark specific tool as gated. The agent cannot execute them until a human explicitly approves the action.

    This is a big deal for high-stakes operations. Before this feature, if you built an agent that could send emails or delete records, you were trusting the agent’s judgement entirely, or using fragil prompt-based guardrails (“only do this if you’re sure”). Neither was reliable.

    Now you can set specific tools – “send email”, “delete record”, “post to production slack” to require approval. When the agent decides to call one of those tools, the workflow pauses. The approval request get routed to whoever needs to review it. They approve or reject. The agent continues or stops.

    Approvals are not limited to one interface either. You can route them through slack, email, a webhook. Any standard n8n node. So a high-priority approval can interrupt the right person on the right channel.

    MCP Server Trigger

    n8n now supports Model Context Protocol (MCP), which means external AI systems – other agent, claude, GPT – can call your n8n workflows as tools. You build a workflow, expose it via the MCP Server Trigger, and it becomes available as a callable tool in any MCP-Compatible AI system.

    This opens up multi-agent architectures where n8n handles the automation side while a more capable reasoning model handles complex decisions. Worth exploring once you’re comfortable with single-agent workflows.

    My Final Thoughts

    The support triage example in this post is deliberately simple. Once you have this working, add a real tool, a HTTP Request node that checks your knowledge base, or a Google Sheets lookup for customer data. That’s when agents start to feel genuinely useful.

    I hope you made your first AI Agent, and don’t forget to subscribe to our weekly digest email newsletter. Good luck 🙂