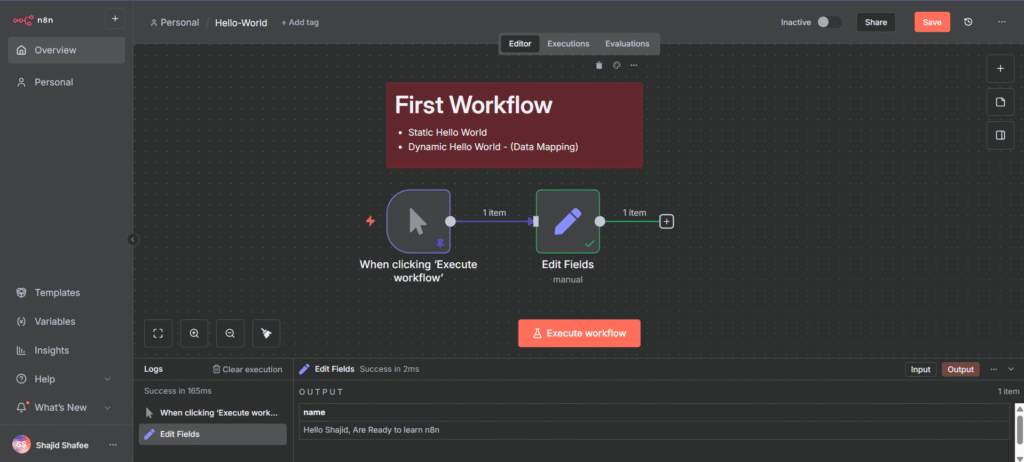
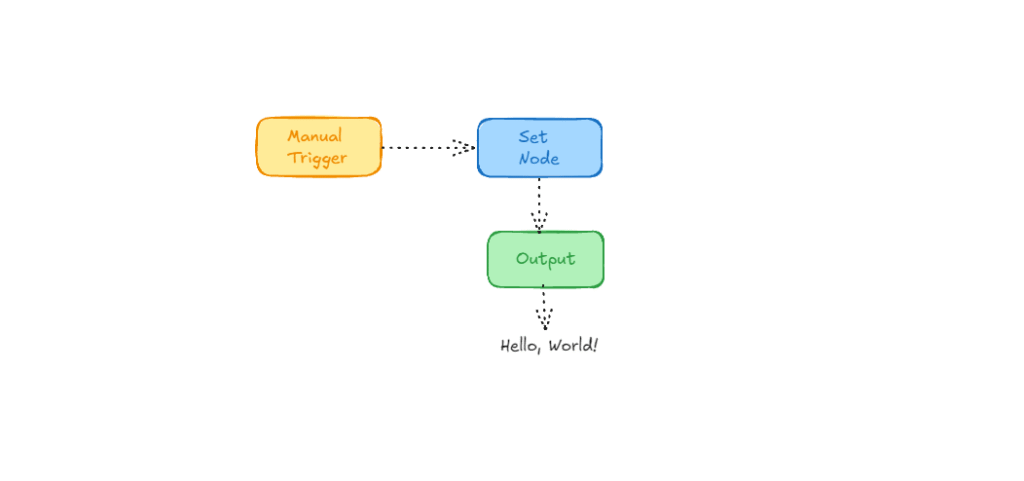
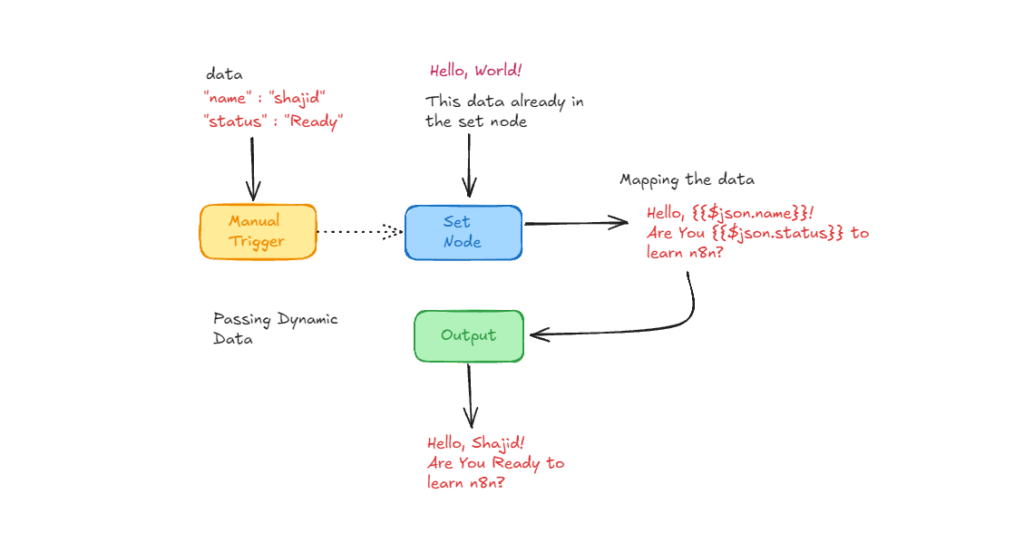
This workflow demonstrates the two core concepts of n8n: Triggers (what’s start the process also known as “Entry point”) and Data Flow (how information moves between nodes).
What you’ll get?
This workflow will teach you on surface level of how we pass the data from A to B. later on, we create more workflows like a real pro. Trust me. Once you complete this workflow, you will get to know many things.
Static Hello World Workflow
This is the easiest workflow in this post, and follow the instructions properly to evade unusual errors.
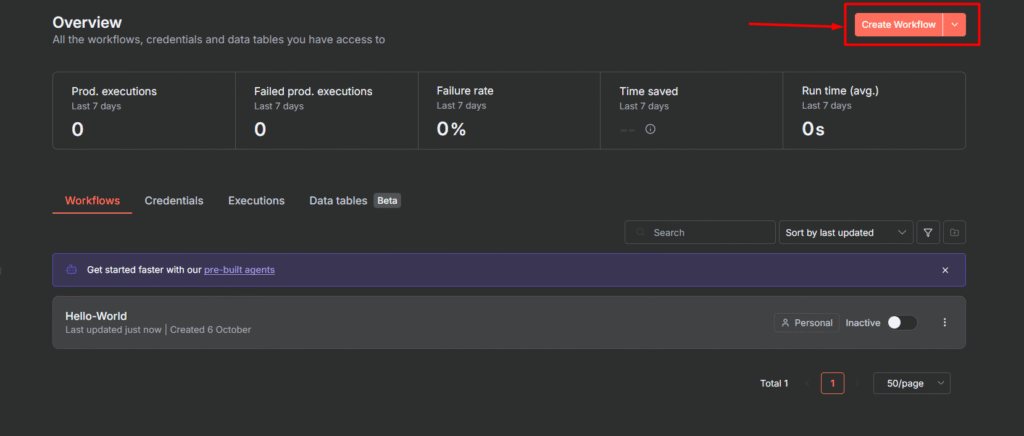
Step 1: New Workflow
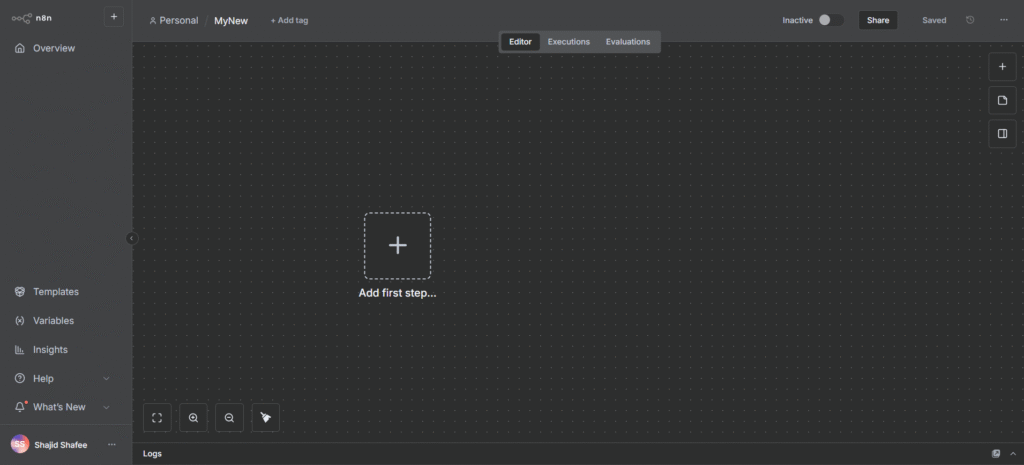
Open your n8n instance whether it is self-hosted or cloud, click New in the top navigations or on your dashboard to start a blank canvas.
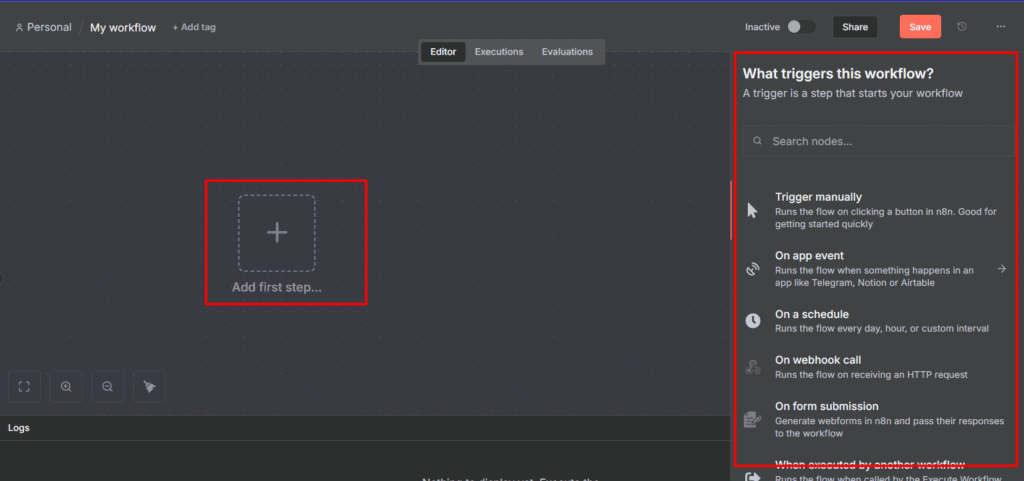
Step 2: Setup the Trigger Node
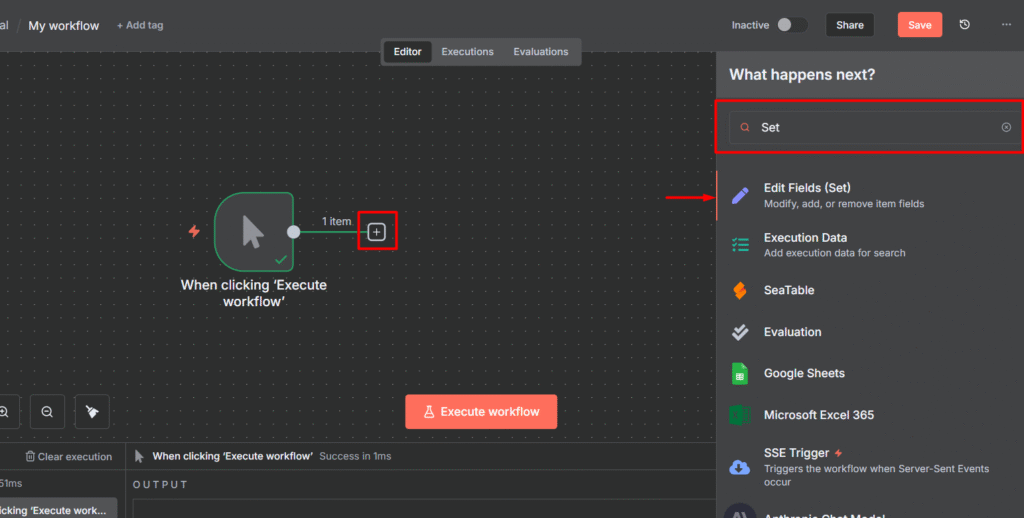
When you click on the “+” icon then sidebar will open up and asks what triggers this workflow? We’ve already talked a lot about triggers, you can check the reference links below once you complete this workflow.
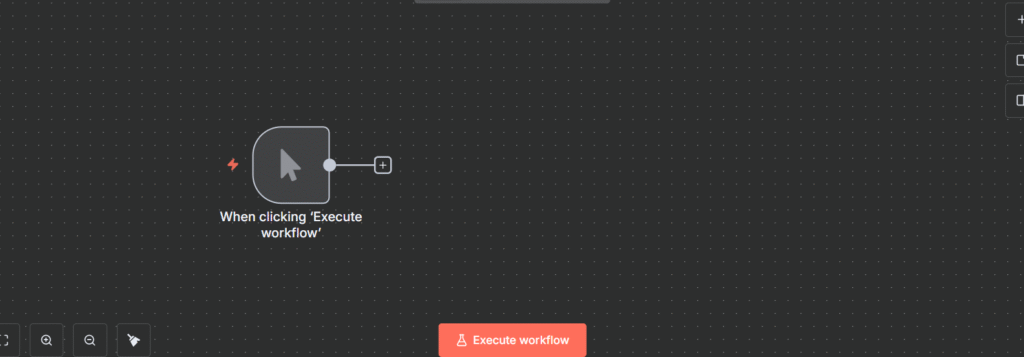
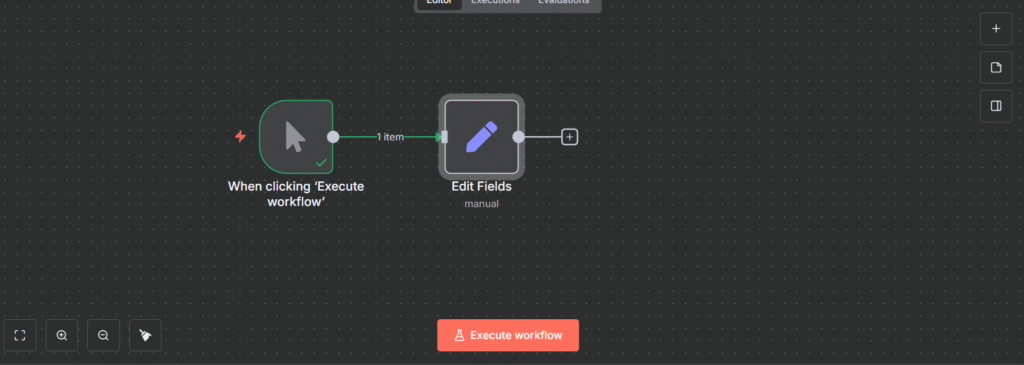
Once you select the manual trigger, it will appear on the visual editor.
Do nothing else on this node. It’s configured by default to run when you manually click on the execute workflow.
Step 3: Setup Action Node (The “Set” Node)
The Set node is one of the most important nodes, it allows you to create, modify, or remove data fields. This is just perfect node for “Hello World”
Click the + button next to the Manual trigger node.
Search for Set and select the node.
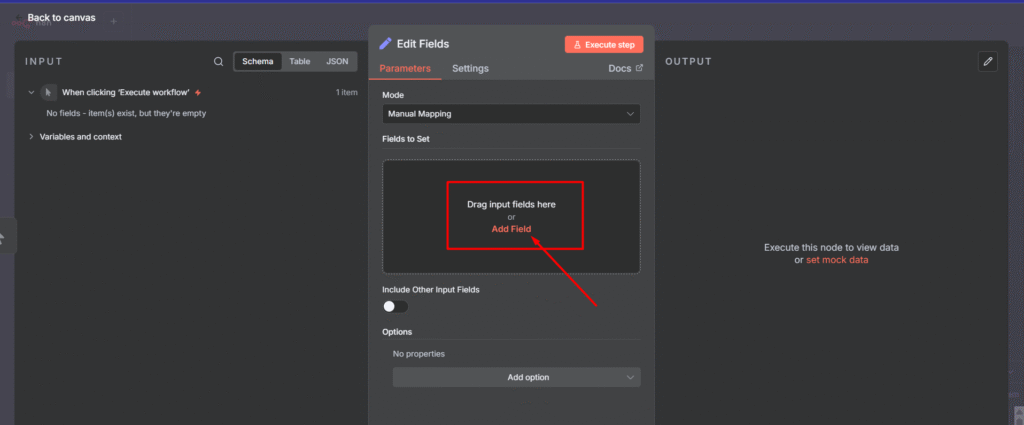
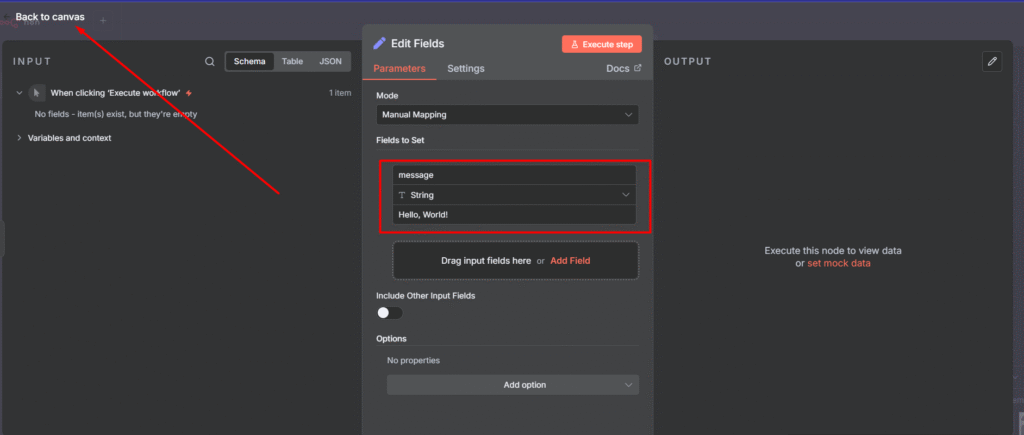
In the Set Node configuration panel
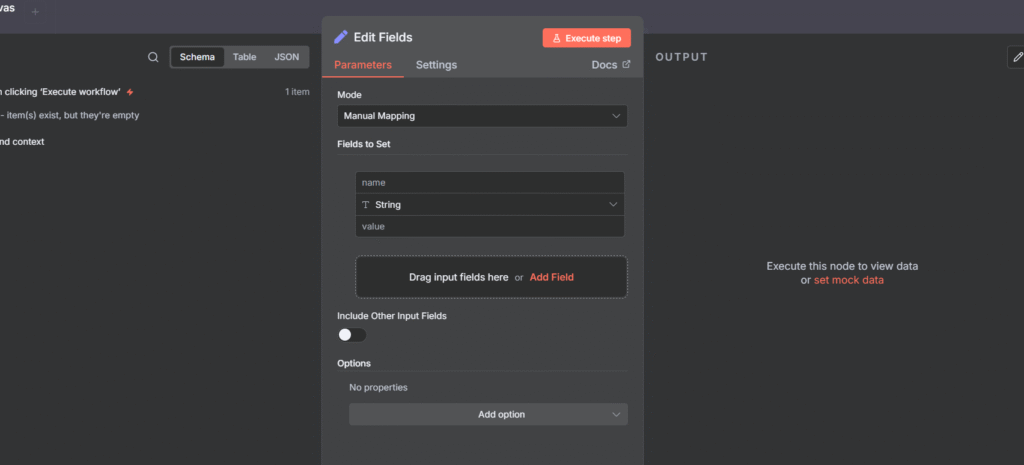
Click Add field
In the new row, for the Value Name (Key), type message
For the value (Value), type Hello, World!
Click on the Back to Canvas or press esc
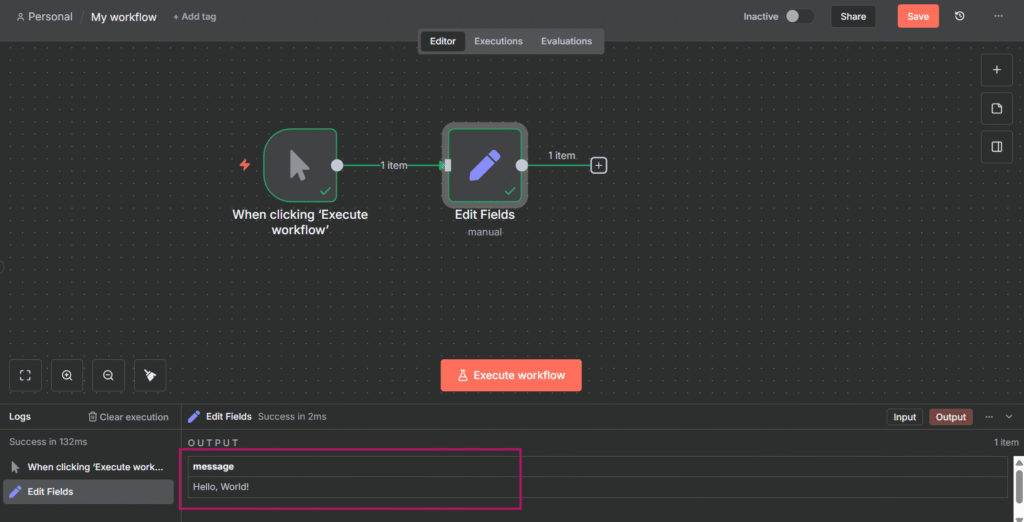
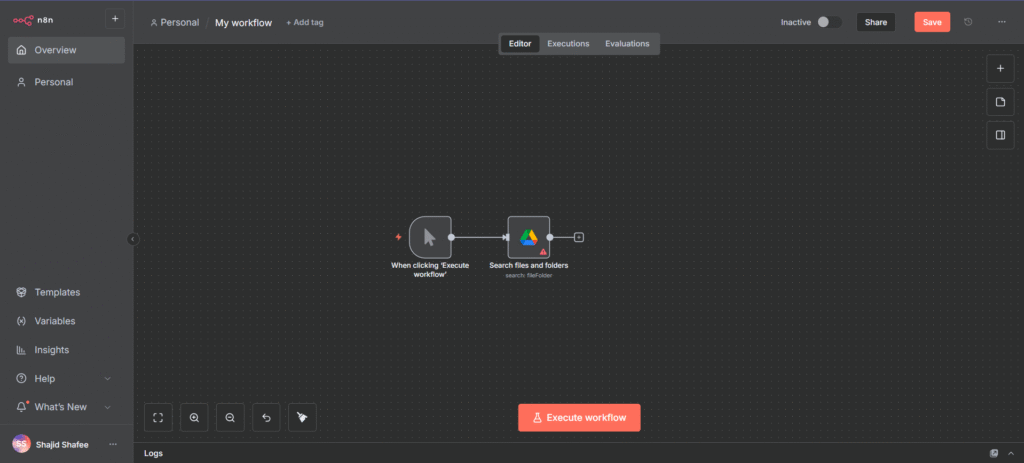
Now your entire canvas shows with two nodes such as manual trigger, and set node. Now hit on Execute Workflow.
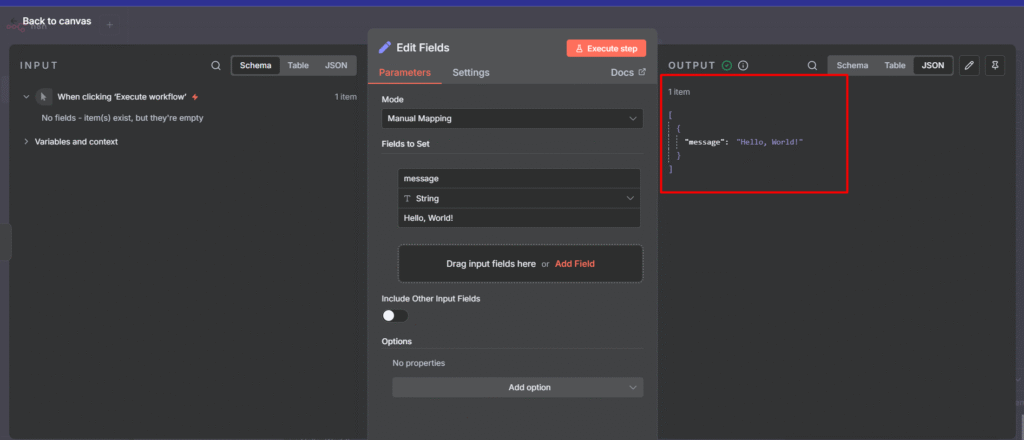
However, you can double click on Set node to see the output. Which message says Hello, World! that’s great isn’t it?
Now let’s dynamically pass down the data
Passing Dynamic Data (Mapping) to Your Workflow
What we are going to do here is we are going to map data directly to Set node.
Step 1 : Configure Manual Trigger Node’s Output
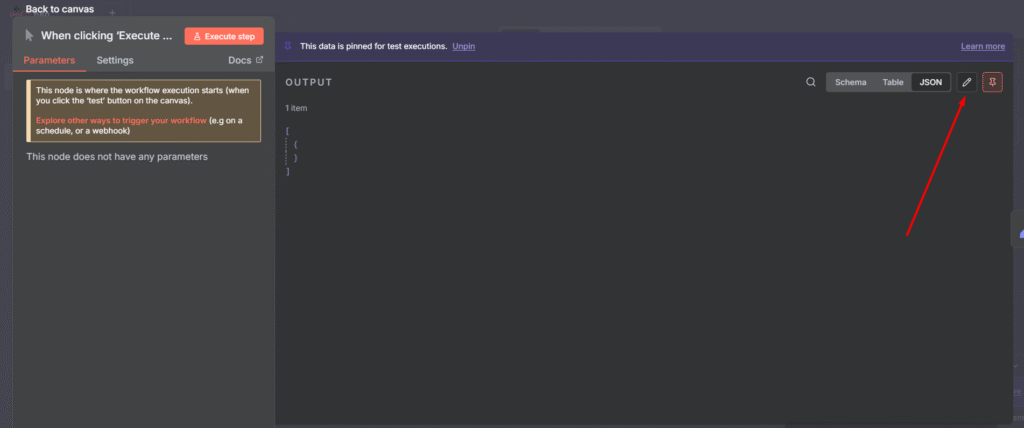
Double click on the Manual trigger node, then go to click on the pencil icon.
You’ll see a code block space.
{
  "name": "Add Your Name Here",
  "status": "Ready"
}
Understanding the JSON structure (Optional)
The above JSON (JavaScript Object Notation) is the language of data in n8n. Every piece of data flowing through your workflow will look like this. The manual trigger node here is simulating the data you would receive from a real source. such as contact form submission or a database query.
Step 2: Code Block and Set Node
Each key (name and status) acts as a variable that we can access later using the dollar-sign expression ($).
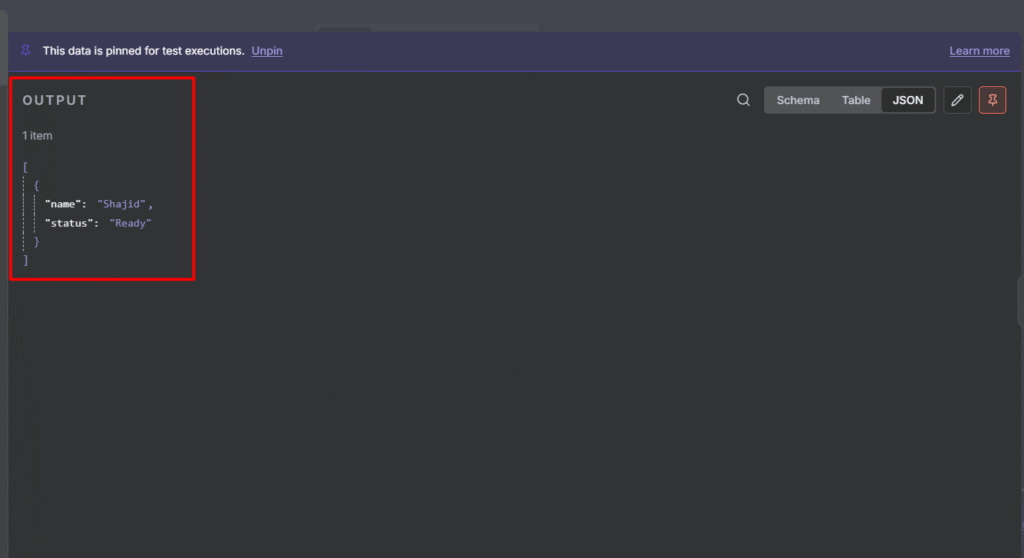
Copy the above code block and paste it on the Manual trigger node’s output.
Save the code block.
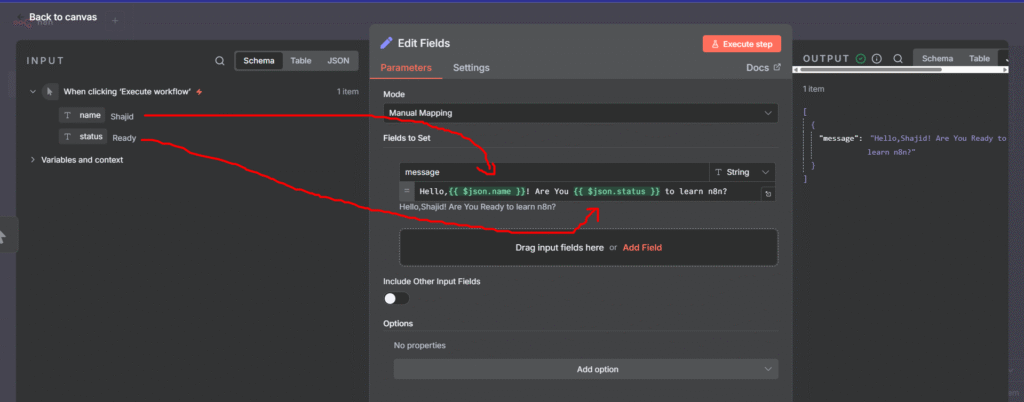
Go back to your canvas > Go to Set Node.
On the left hand-side, You will see the name, and status value pairs.
Now it’s time to map the values that are in the manual trigger.
Go to your message field, Remove the previous text which Hello, World!
Replace with Hello, {{ $json.name }}! Are You {{ $json.status }} to learn n8n?
once you execute the workflow or that specific step, then you can see the output on right hand side.
Now message contains, Hello, Shajid! Are You Ready to learn n8n?
Congratulations 🫸🏻, You have created your first n8n workflow successfully. Please share your workflow with us in our reddit community.
Once you’re comfortable with this workflow, head back to the complete n8n beginner guide to tackle the next step
If you’d any issue with the content, let me know directly via an email, hello@theowllogic.com
Installing n8n locally is one of the best decisions you can make for workflow automation.
Why? Because unlike cloud platforms that charge $20-50/month and limit your workflows, running n8n on your computer is completely free.
No restrictions on workflows, no execution limits, and your data never leaves your machine.
But here’s what nobody tells you: the installation process can be confusing.
Should you use npm, or docker? What happens when you close the terminal? Where are your workflows even saved?
I hope this helps you out.
NPM
Quickest setup, users already familiar with Node.js.
Prerequisites – Node.js and npm installed.
Data persistence – Easy, data is saved locally by default.
Recommended Ram – Minimum 4GB+
Docker
More robust, production-like setup, better isolation.
Docker Desktop installed.
Requires setting up a persistent volume (covered below).
8GB+ (Docker takes resources)
I’ve been there. I spent hours figuring this out so you don’t have to.
This guide covers everything you need to install n8n locally – whether you’re on Windows, Mac, or Linux.
I’ve included screenshots for every step, troubleshooting for common errors, and honest advice about which installation method actually makes sense for you.
What you’ll get:
Two installation methods explained (npm, Docker)
Complete step-by-step instructions with screenshots
Troubleshooting for the errors you’ll actually encounter
Tips for keeping your installation secure and backed up
No technical jargon. No skipped steps. Just a straightforward guide to getting n8n running on your computer. Thank me later.
For those who know what NPM is? that’s great. but for those who don’t know? NPM stands for Node Package Manager which is opensource package manager for Node.js
Step 0: Installing Warp Terminal (Optional)
This is an optional method, and this is how I actually work though, Install warp (It’s free), and use warp as your terminal.
The reason I say install warp is perhaps windows users would have hard time terminal issues, sometimes leading PowerShell security issues. The above step is totally optional though.
Step 1: Verify Node Installation
Open up your terminal or use warp, and type node -v and npm -v you can check it out the below gif.
Most probably you won’t have installed the node.js. Let’s go with the step 2
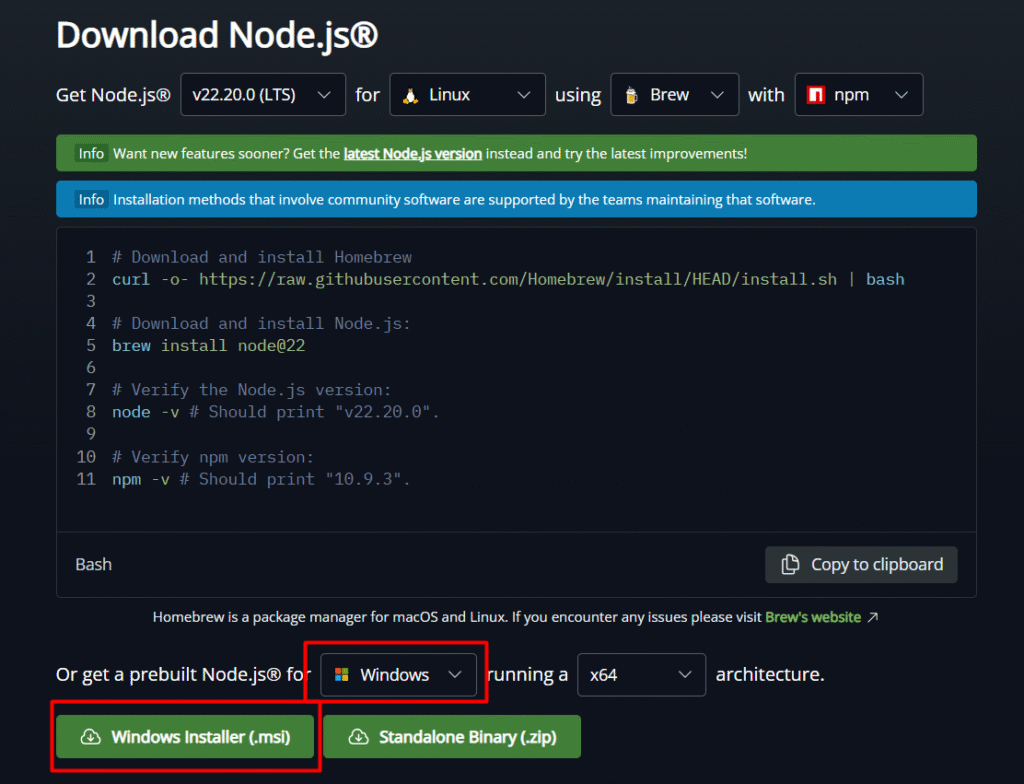
Based on the Operating system preference download the installer whether you got Linux or MacOS.
Install Node.js
Step 3: Re-verify Node.js installation
make sure to run this command on your terminal node -v then you will see your Node.js version.
Step 4: Installing n8n
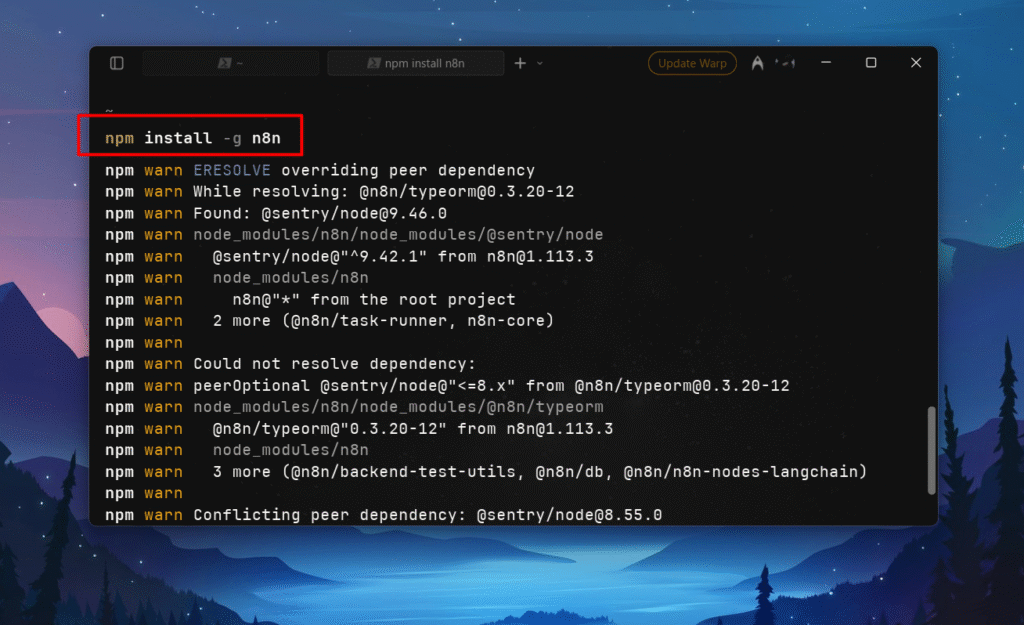
go to warp or terminal, type npm install -g n8n.
Installation takes 3 – 5 mins approximately.
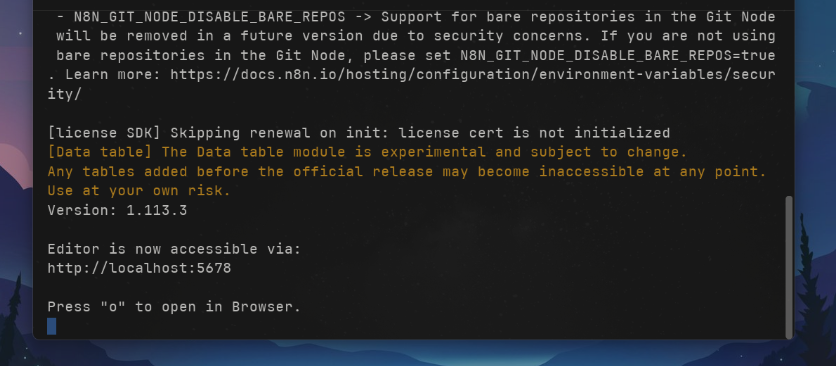
After installation, Go to your terminal and type n8n to open.
Now n8n is accessible via http://localhost:5678 or you can press “o” to open in your browser.
After that make sure register an account, and verify it with your email-address.
then you’re done.
Alright here’s the tips,
To terminate the n8n from running, then you press ctrl + c on the terminal or warp, this will terminates and closes n8n for you.
If you want to run n8n again, then go to terminal > type n8n.
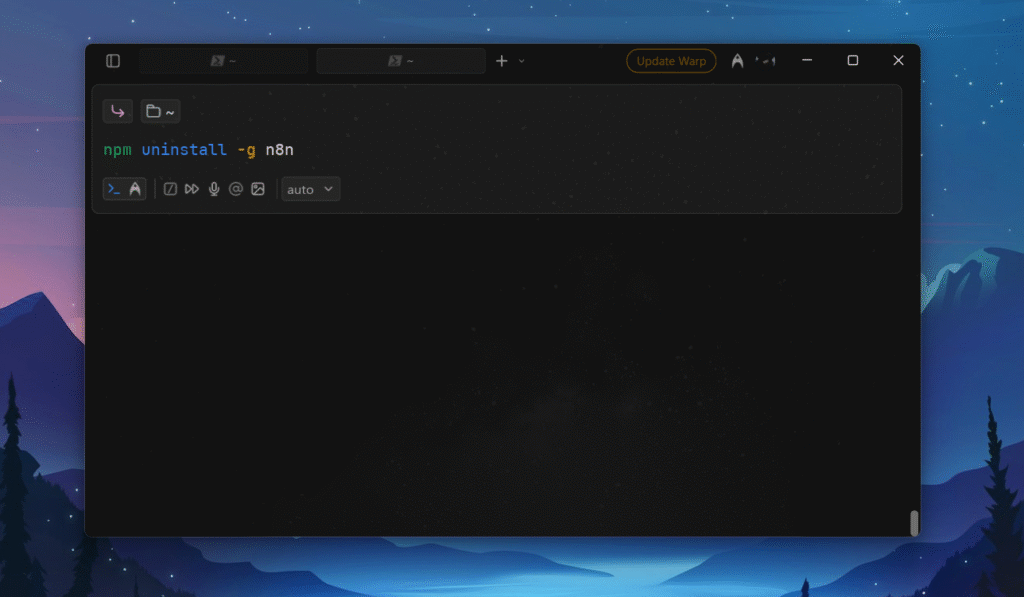
Maybe, you wanted to uninstall the n8n? write this command in your terminal / warp npm uninstall -g n8n
Installing n8n Locally With Docker
Docker is like a virtual container that packages an app and everything it needs to run into one neat box, so it works the same way on any computer. basically packaging the whole n8n into one container (Think it as a box), then you can use it on your computer. that is what it is.
For Docker, At least you need 4 GB of RAM (but, 8GB is recommended) I do have 20GB of RAM, and yet 3 GB taken for container. Most of the time it container stables around 1.7 – 2.0 GB of RAM.
Step 1: Install Docker
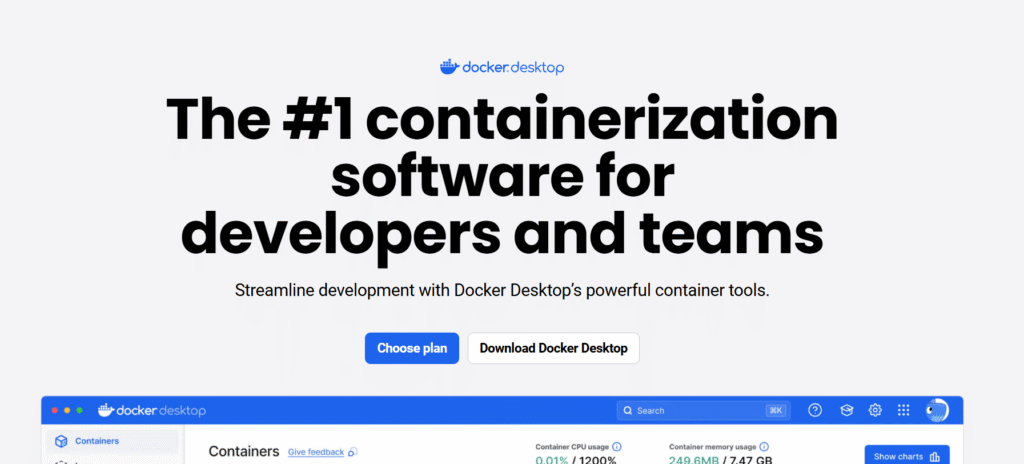
Go to docker desktop link here, and click on Download Docker Desktop.
Choose your operating system – Windows, Mac, Linux.
You will get around approximately ~517 MB to download.
Once download is completed, then install it on your directory.
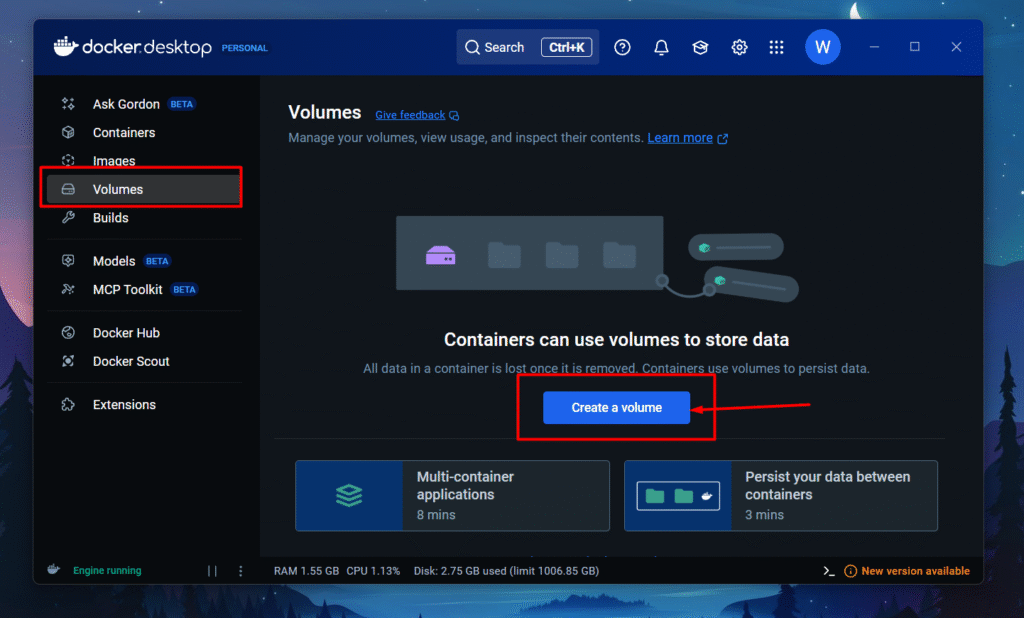
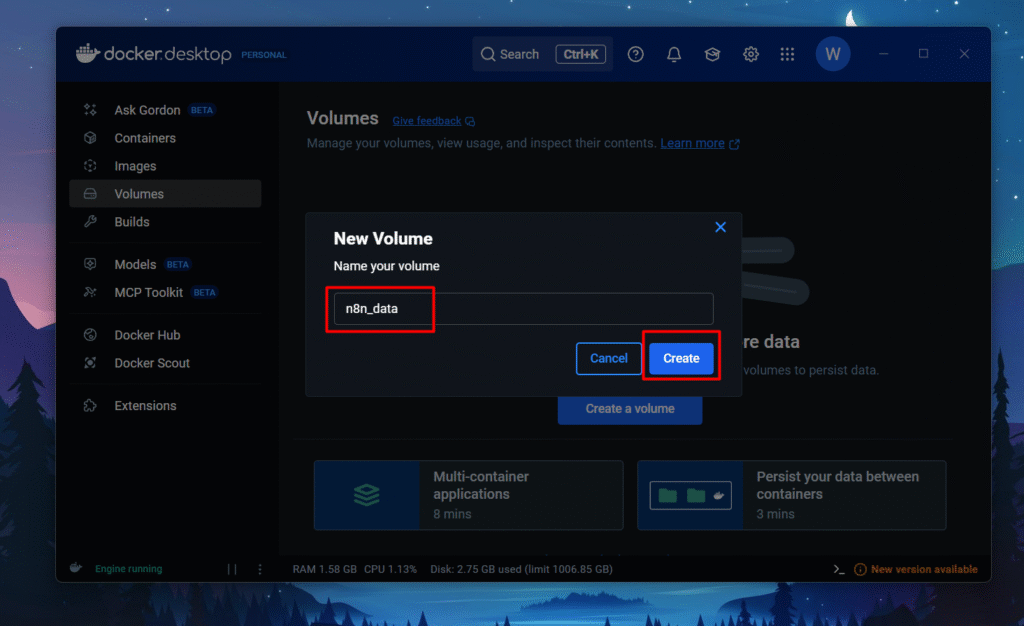
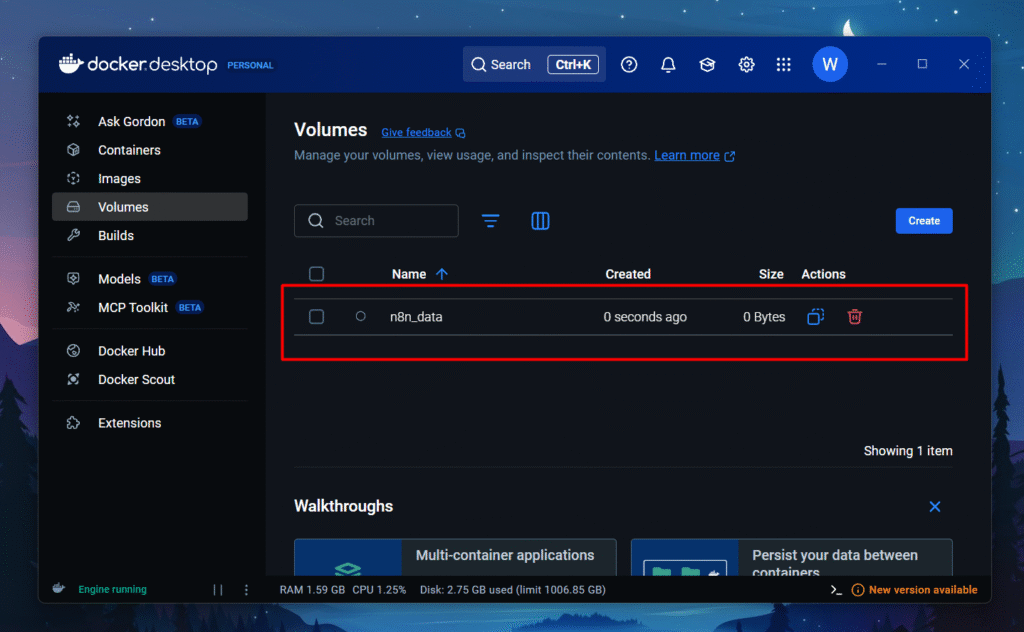
Step 2: Creating Volumes on Docker Desktop
This is an essential step in install n8n, you can still directly install without volume on docker but data won’t persist. Think it like as a folder that stores all your credentials/workflows.
Go to Volumes > Create a volume
Name your volume as n8n-data and hit create
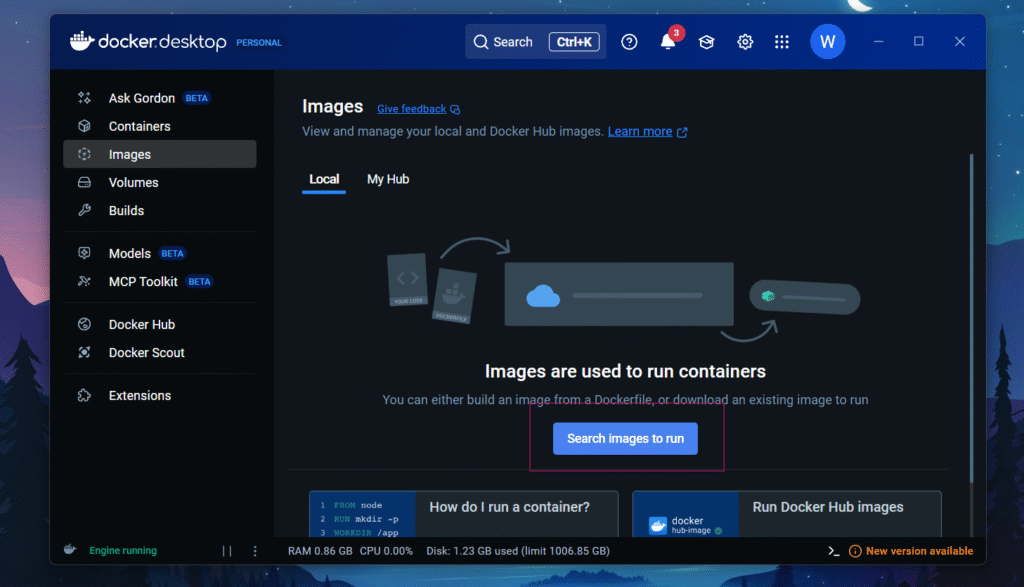
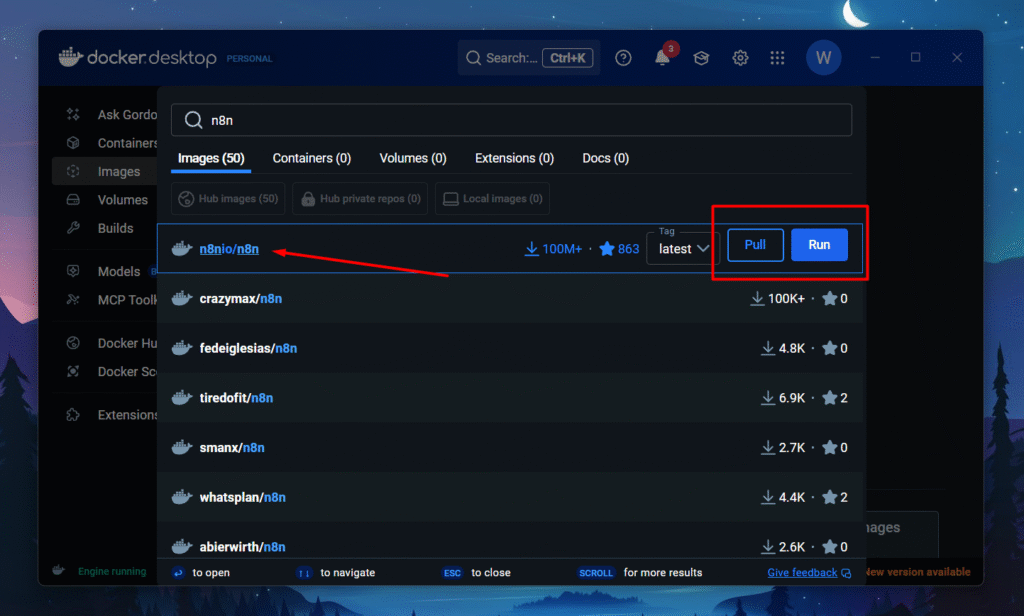
Step 3: Installing n8n Image on Docker Desktop
Go to Images > Search images to run
Search for n8nio/n8n (which comes under n8n’s domain and also has 100M+ downloads)
Click on Pull
Step 4: Configuring n8n Image & Settings on Docker
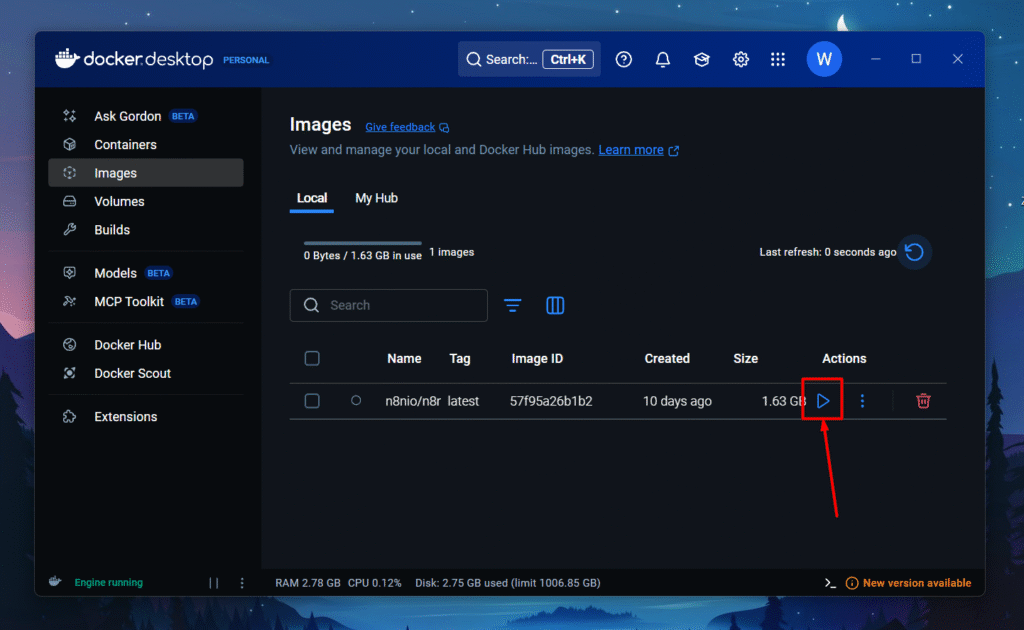
Click on the Play button
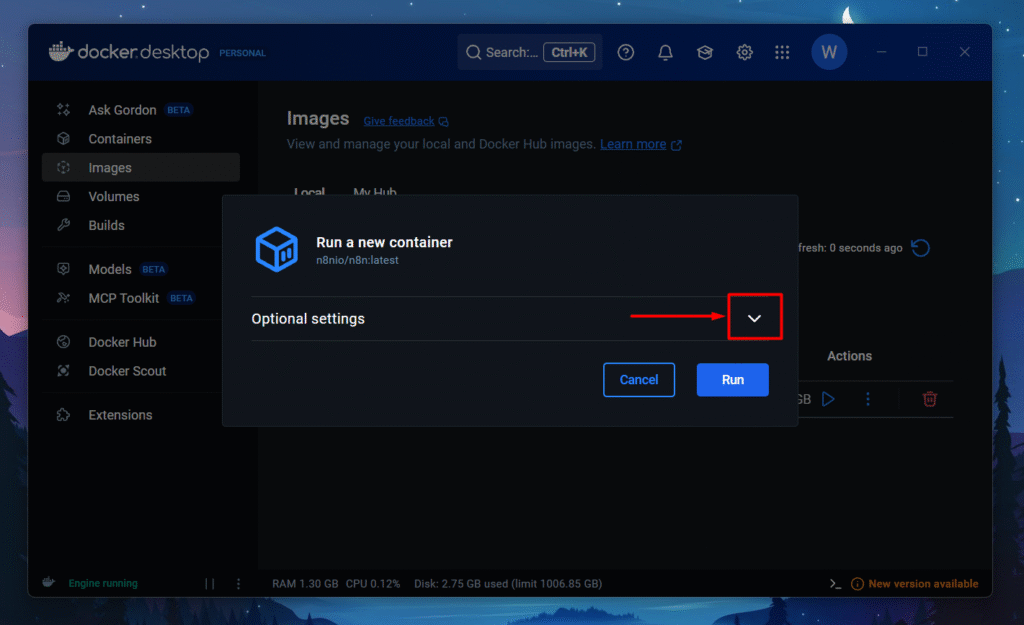
Drop down optional settings
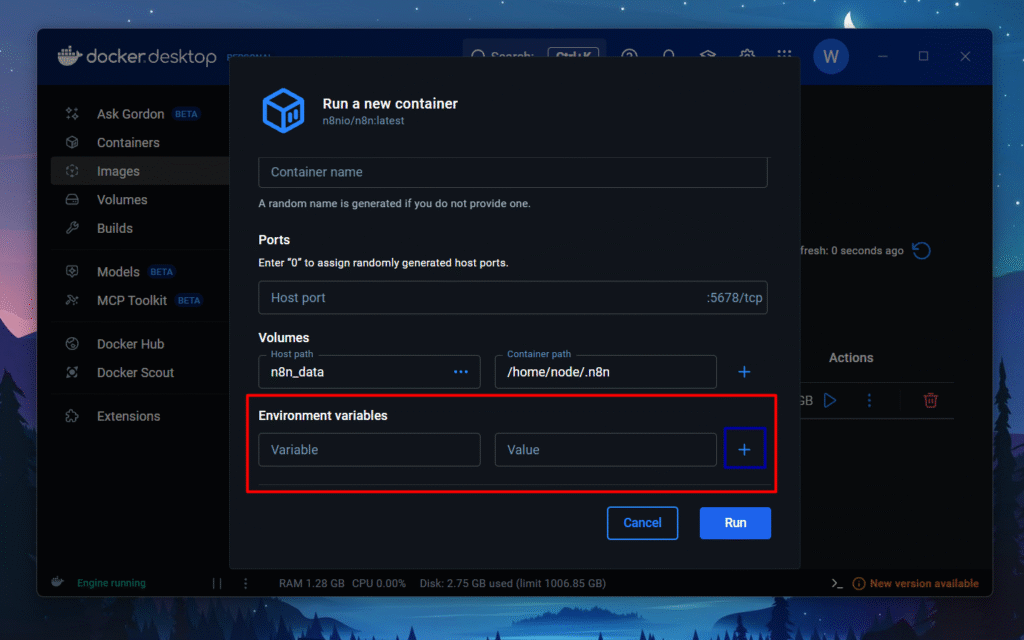
Container Name, you can give any name you like this hello_docker or a random name will be generated.
Ports – Enter Host Port -> 5678
Volumes
Host path : n8n_data
Container path : /home/node/.n8n
Now drop down to Environment variables.
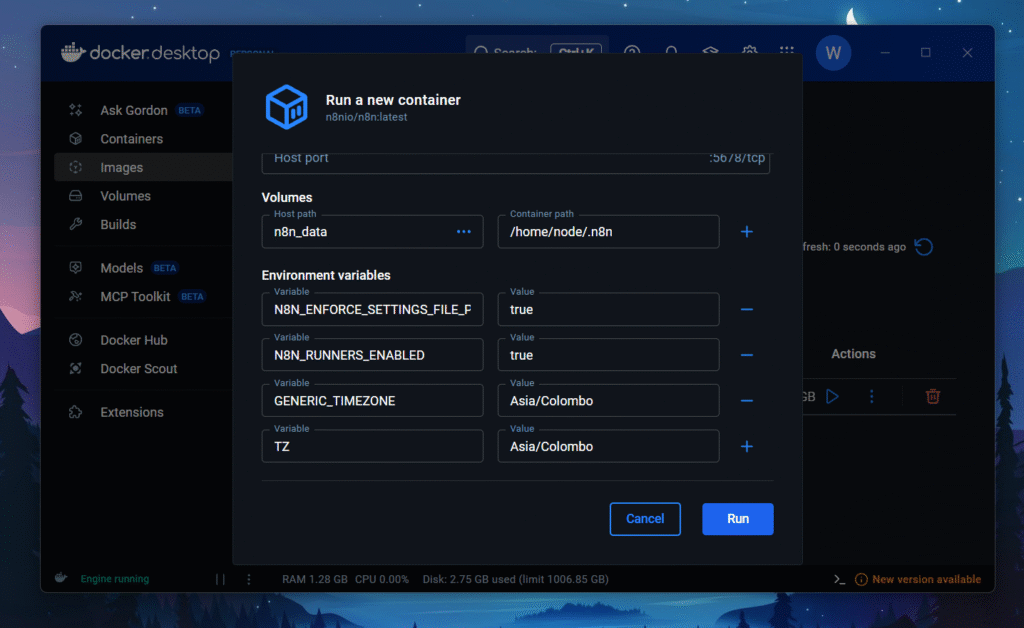
In Environment variables, you need to add 4 variables, so press + icon to create 3 more Environment variables.
N8N_ENFORCE_SETTINGS_FILE_PERMISSIONS = true
N8N_RUNNERS_ENABLED = true
GENERIC_TIMEZONE = Asia/Colombo
TZ = Asia/Colombo
Make sure to recheck everything is correct.
Click on Run
Listen to this carefully, The generic time-zone, and TZ actual my timezone, You’ve to replace that value with your timezone. You can find your local timezone here.
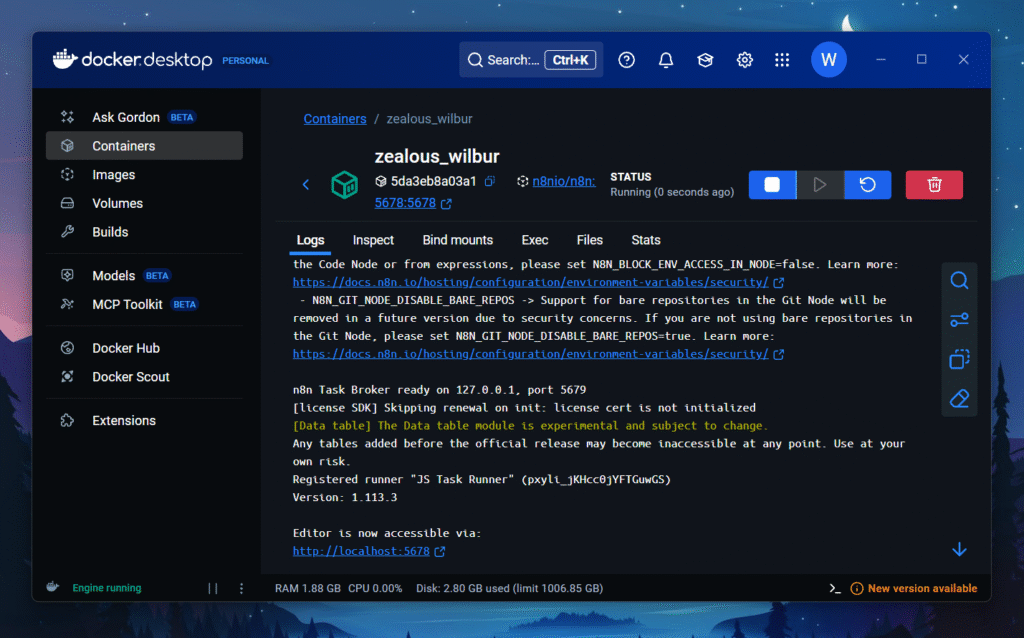
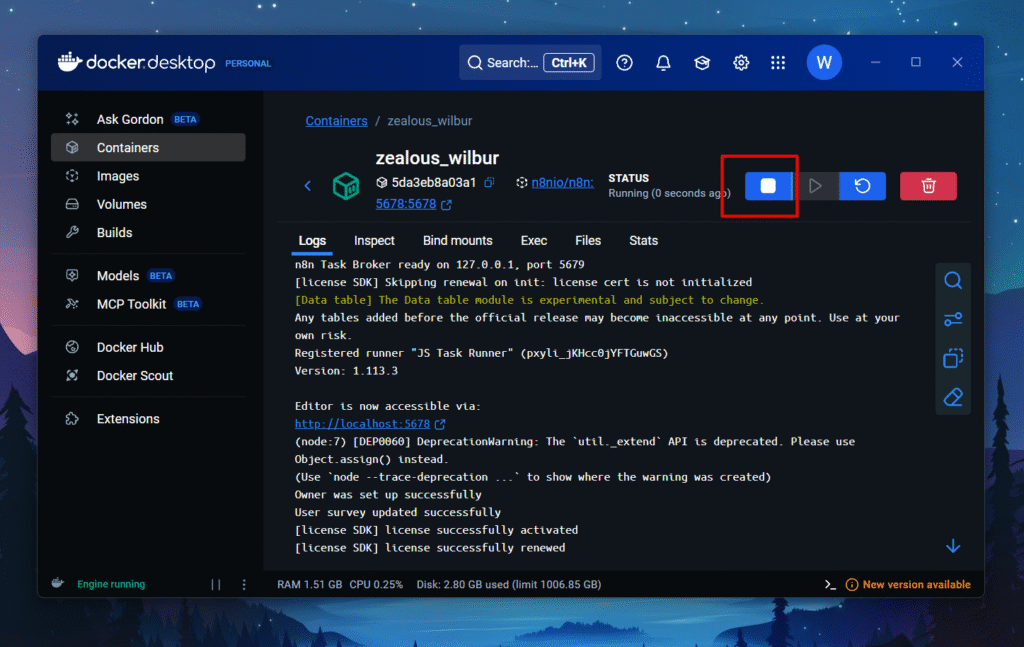
This is the interface you will get once the container starts to run.
Editor now accessible via http://localhost:5678
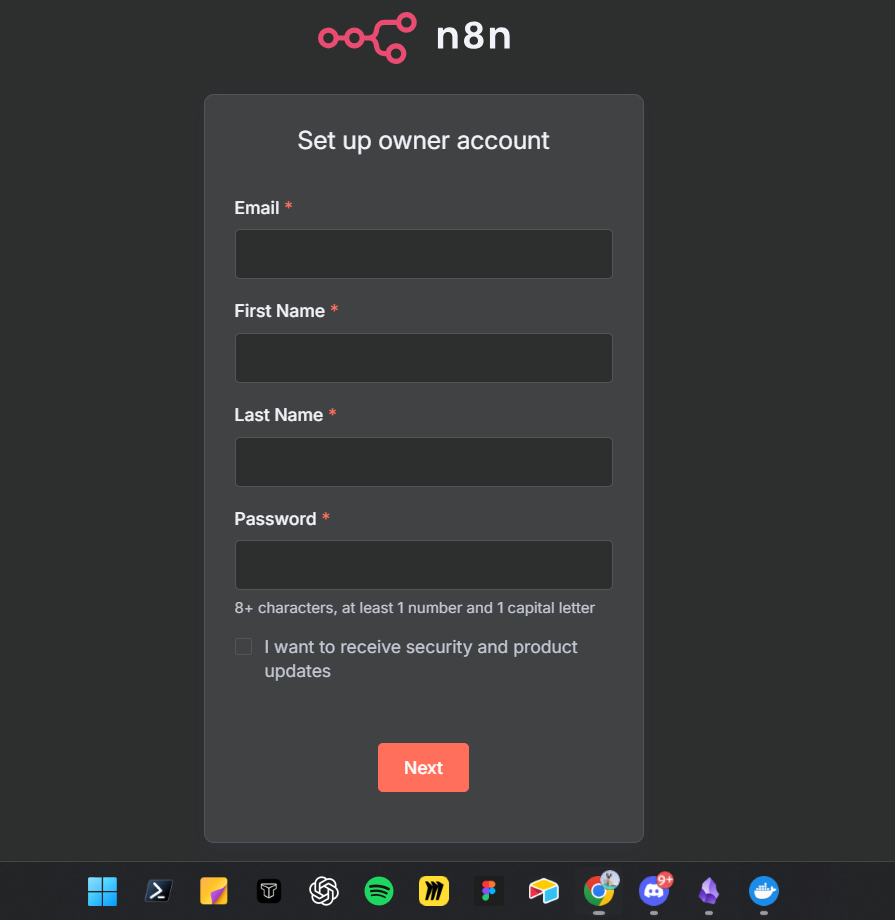
Step 5: Configuring Your n8n Account
Enter your information such as email, password, first name and all.
Once you registering, then n8n will start sending a n8n license key to unlock selected paid features.
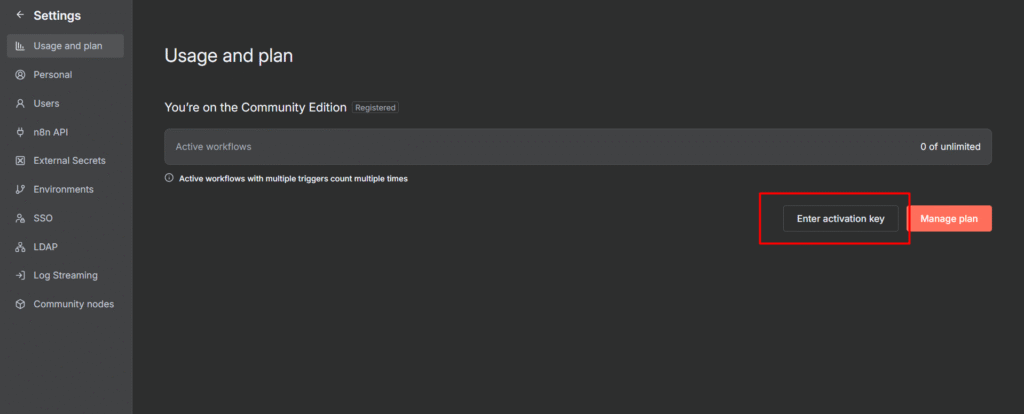
Once you retrieved the license key, go to Settings > Usage and Plan > Enter Activation Key > Paste the activation key.
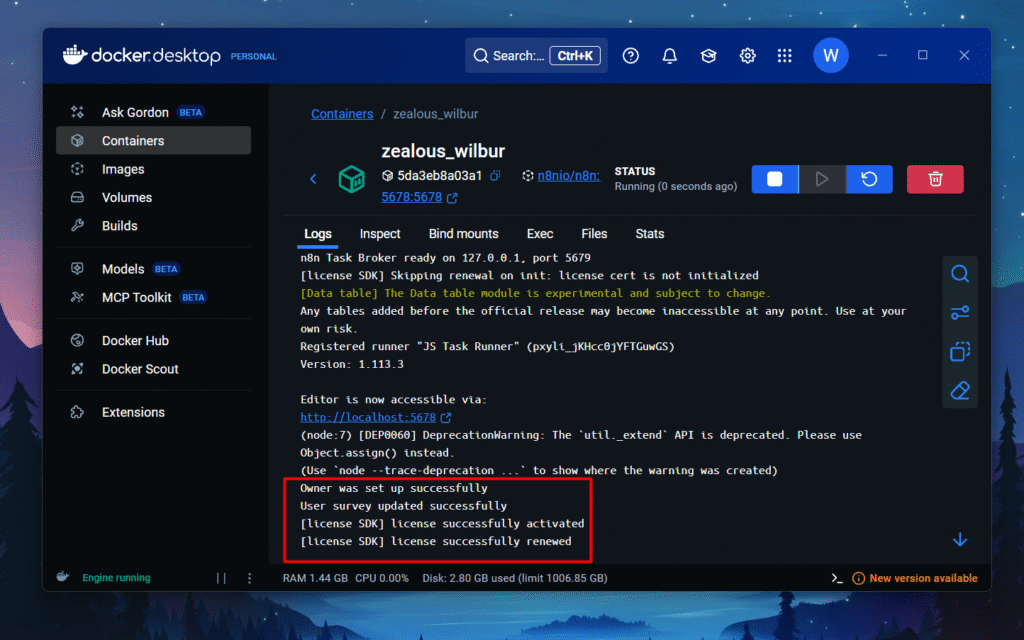
you can see in docker container, mine is zealous_wilbur wherein license successfully activated in logs.
Yaay! finally installed on docker. Congratulations, that’s a solid wild ride. Now you know, how to access your n8n locally. Yes, I sense some questions coming out from your mind. I totally get it. I try to answer them below as a references for you, or else click here to post the question on our reddit-community.
Step 6: How to Stop n8n Container
that’s pretty straightforward click on the Stop Icon in the container, and before stopping, make sure save your workflows.
The best practice: Save your workflow often, even when you made a small changes.
Essential Docker Commands for n8n
This is pretty much fun using docker with your terminal / warp because that gives you different vibe, and yeah in background a tech wiz soundtrack. that’s make you one.
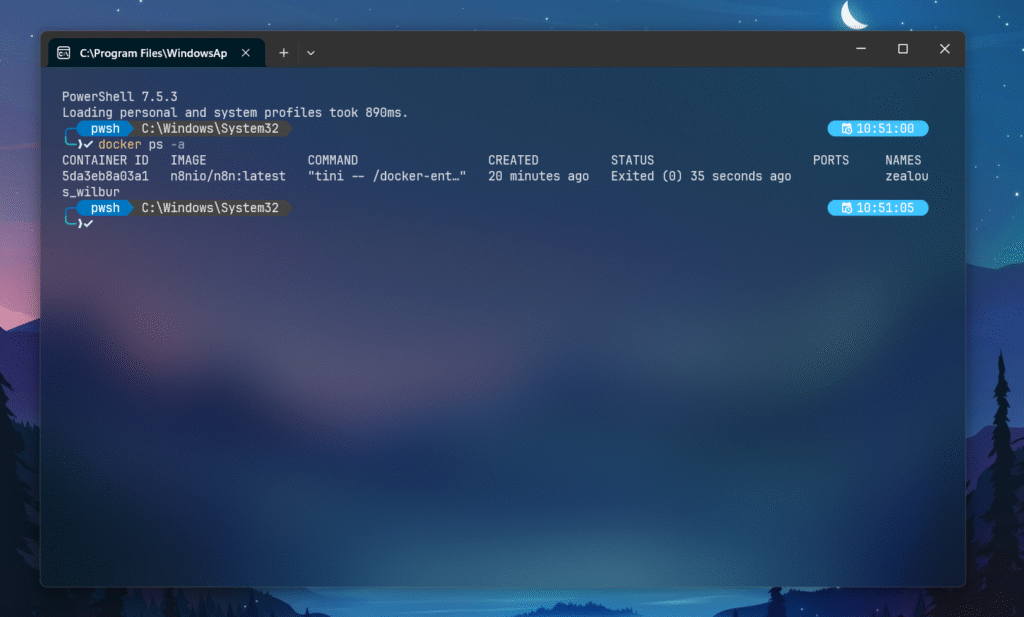
docker ps -a
docker ps only shows the running containers, and -a option include all the containers that exited, stopped or paused. that’s why you can see the zealous_wilbur has been exited 35 seconds ago.
docker stop <container id> – This will stop the specific container that matches the ID.
docker rm <container id> – this command will remove the container
My Thoughts
Take a moment appreciate yourself, you’ve came this far, You’re now running n8n locally. This means you have got no execution limits, and full control over your data, The hardest part is over, Now is the time to head back to http://localhost:5678 and start building automations.
If you’d any issue with the content, click here to comment on our reddit-post. This will help me to understand the issue and tackle by myself.
Credentials are similar to permission slips that let n8n access your accounts, and without any provided credentials, nodes can’t actually do anything with external services.
Google Cloud Console Setup (One Time + OAuth Consent Screen)
This is a very crucial step, you’ll only need to do this once for all google services (Gmail, sheets, maps, and etc)
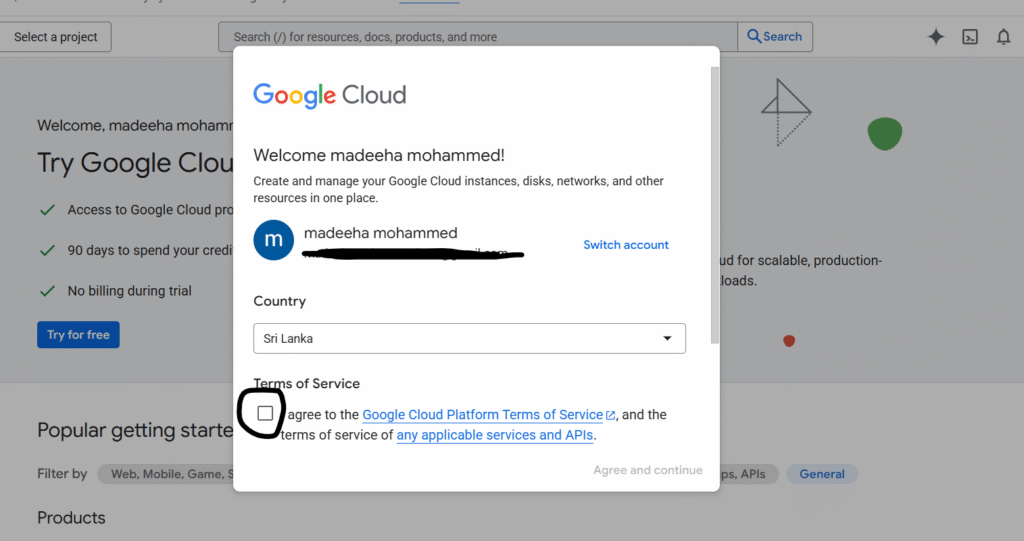
Step 1 – Access Google Cloud Console
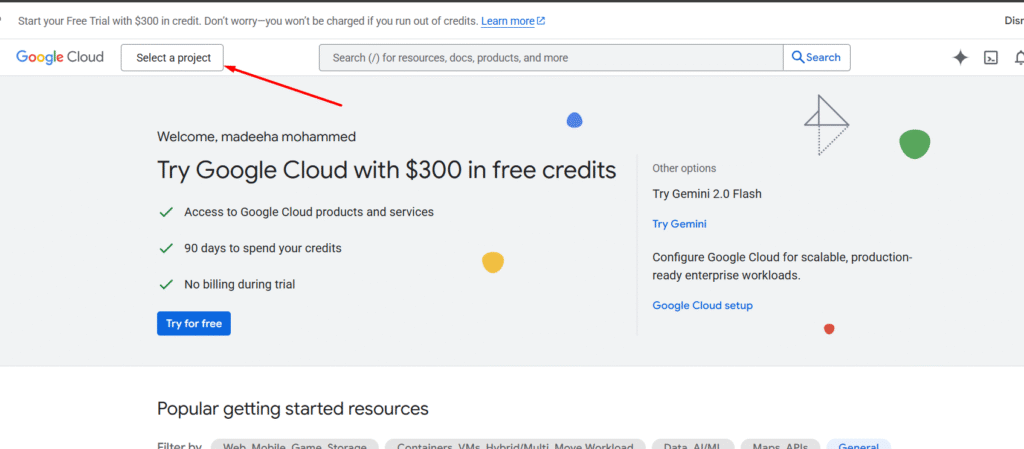
Go to https://console.cloud.google.com/
Sign in with your Google account
Accept the Terms of Service and continue
Step 2: Create a New Project
Click on the “Select a Project” button next to “Google Cloud”
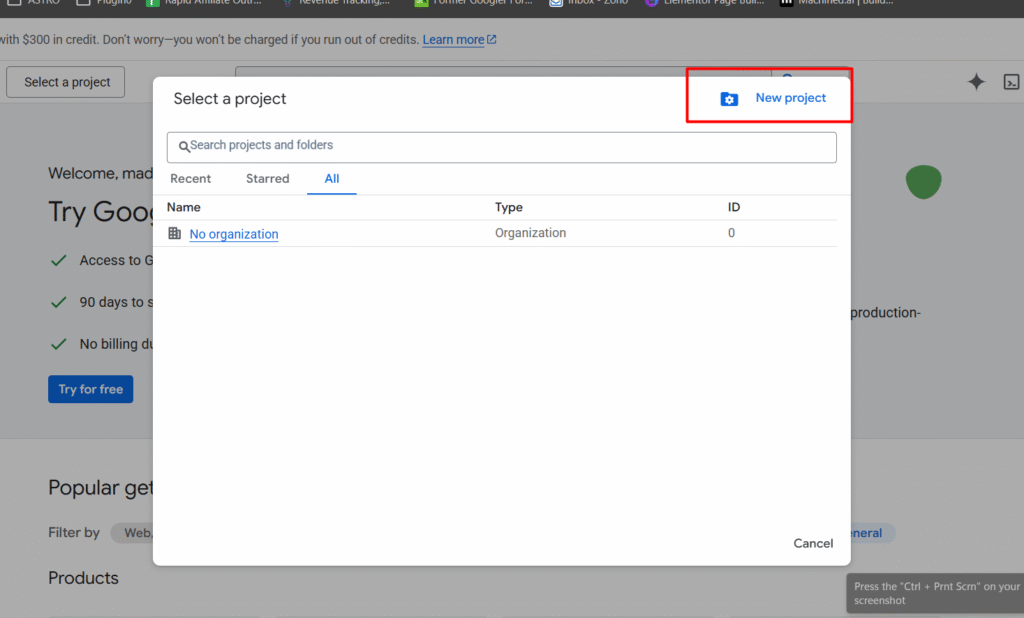
Click on New project
Enter a project name, and click on create.
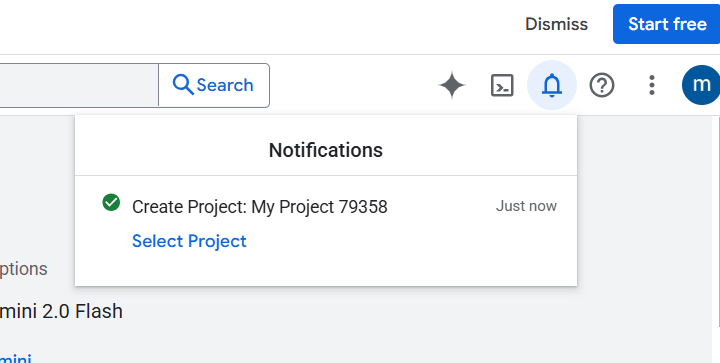
You’ll receive a notification that project has been created
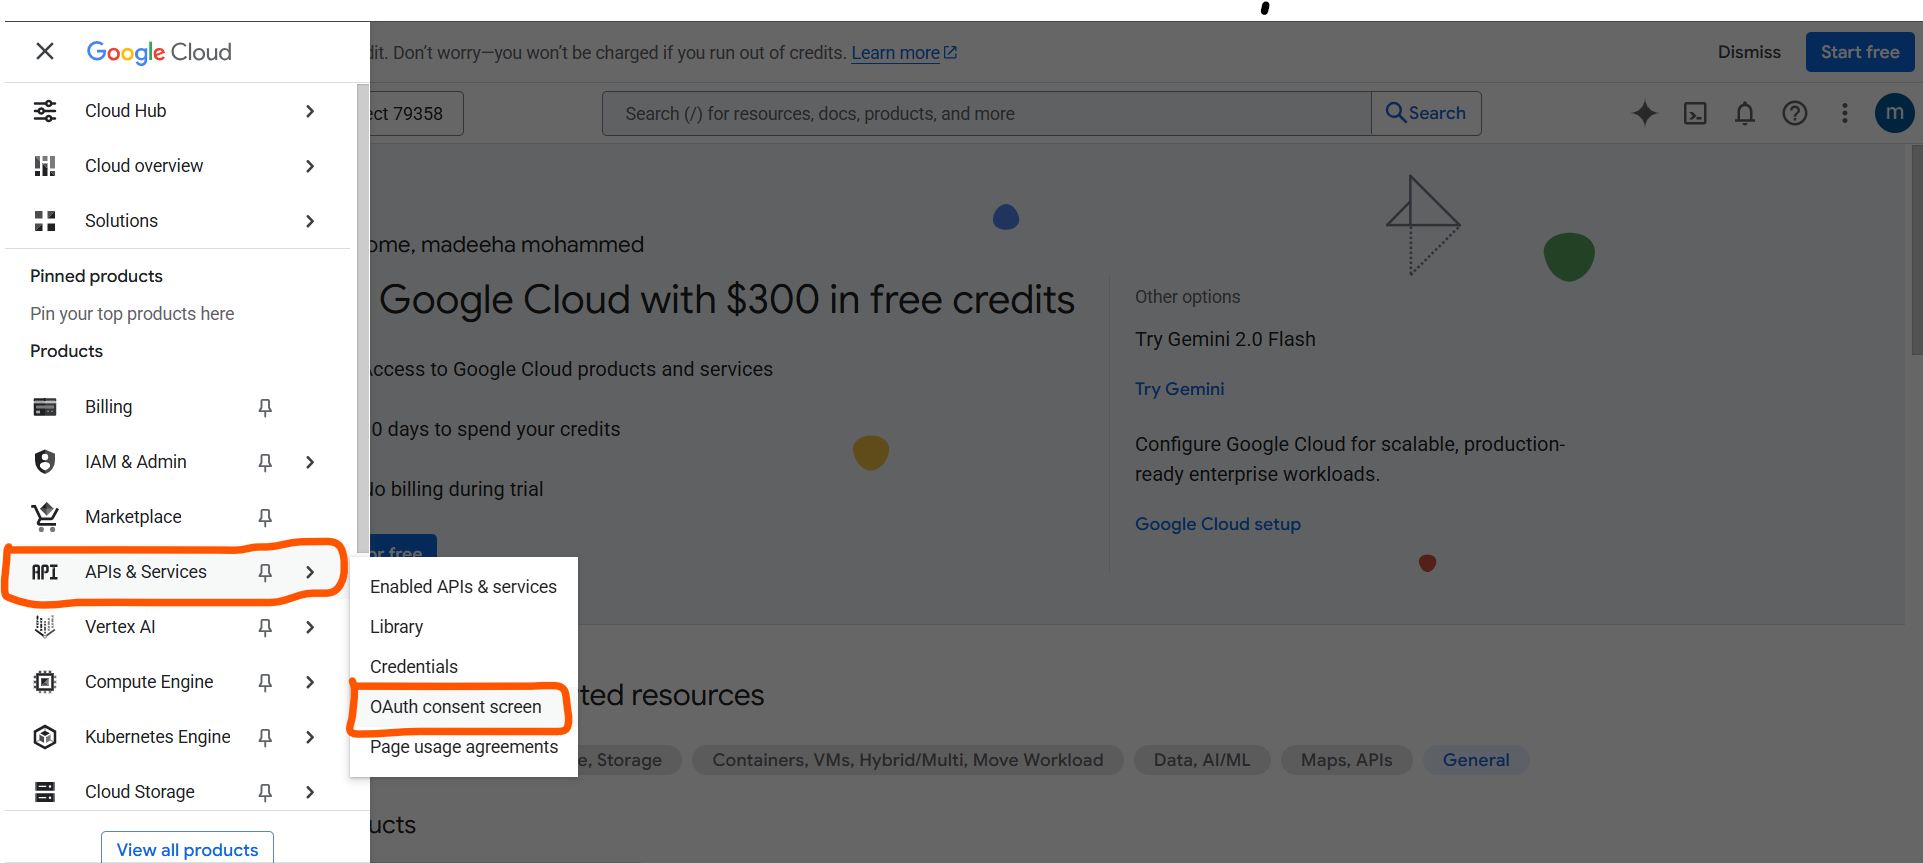
Go to APIs & Services > OAuth consent screen
Click on Get Started
Provide any app name you prefer.
User support email: click on the drop down and select your gmail address
Click on next
Audience: Select external. If you have a workspace account then you can select on internal
Contact Information: Add your email address.
Finish the setup by agreeing to the user data policy.
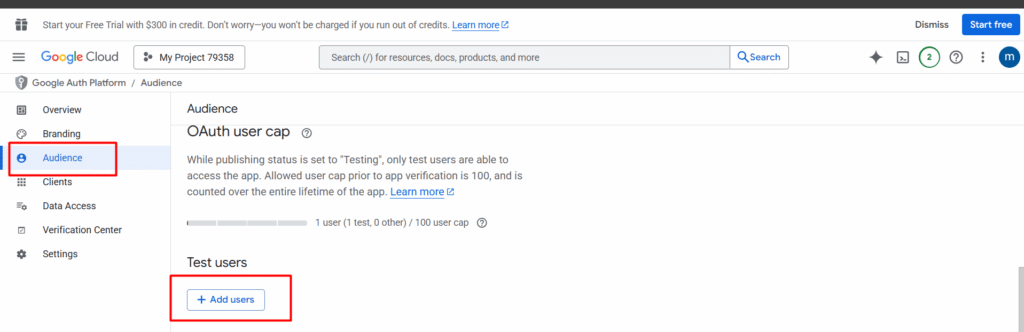
Step 3: Add Test Users
Click Add users, and add your email address right there.
Step 4: Let’s Create an OAuth Client
Go to Clients > Create a Client
Select Application Type as Web Application
Name your web client, Like “n8n client”
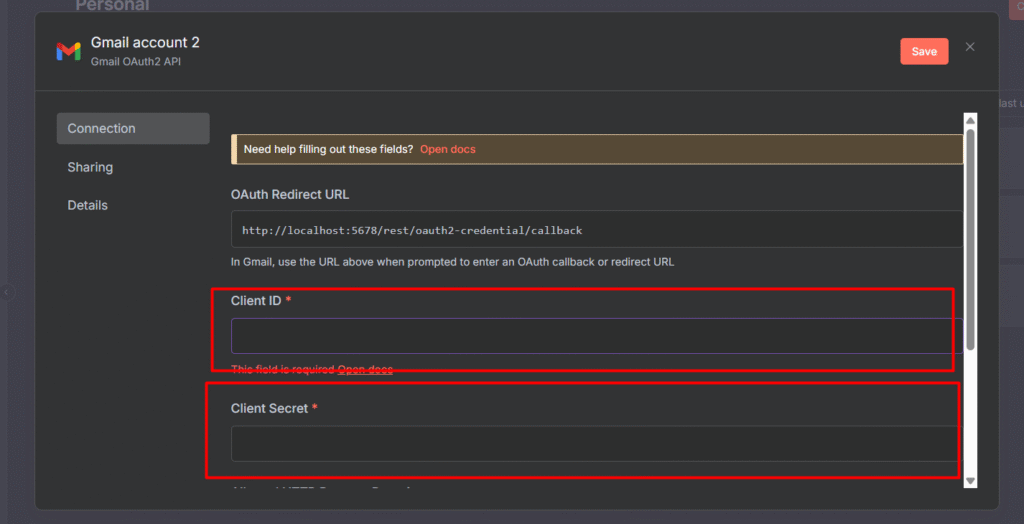
For Authorized Redirect URIs: http://localhost:5678/rest/oauth2-credential/callback – Add this URL
Click Create.
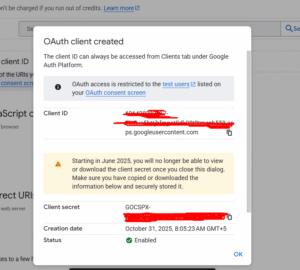
A modal appears with Client ID and Client Secret, make sure to copy those values and save it on your desktop.
Alright, it’s time to add these credentials to n8n.
Gmail Credential Setup
Step 1: Enabling the Gmail API
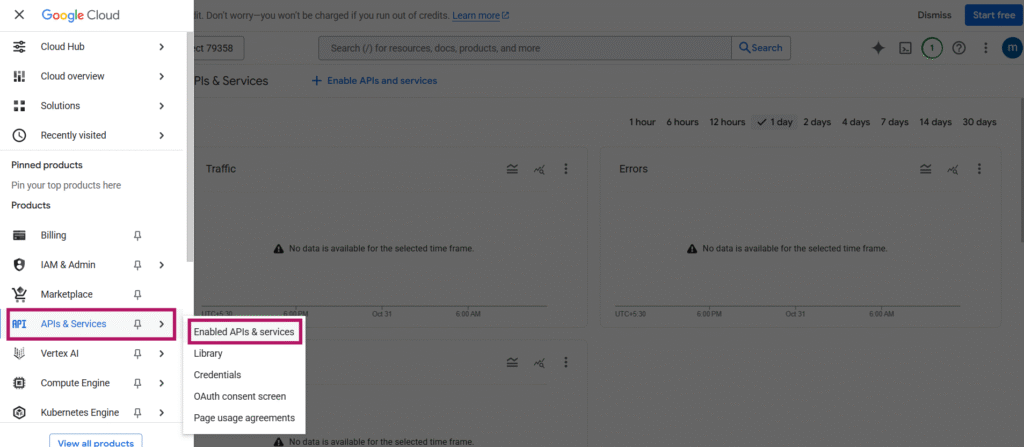
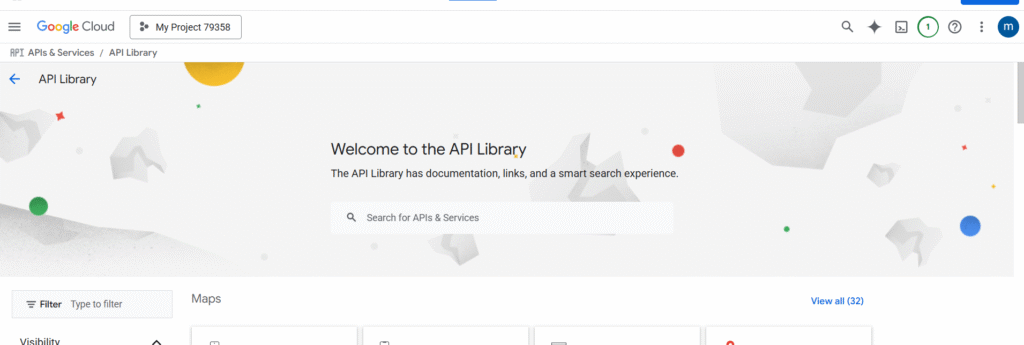
Go to Google Cloud Console > APIs & Services > Enabled APIs & Services
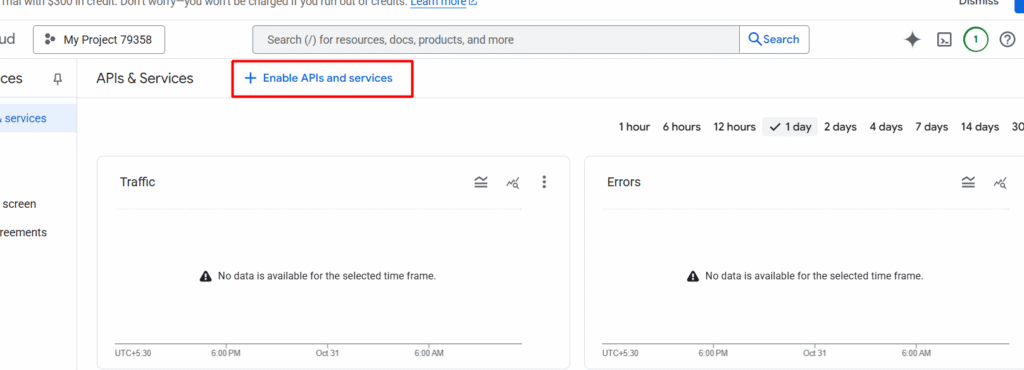
Make sure to click on the Enable APIs and services
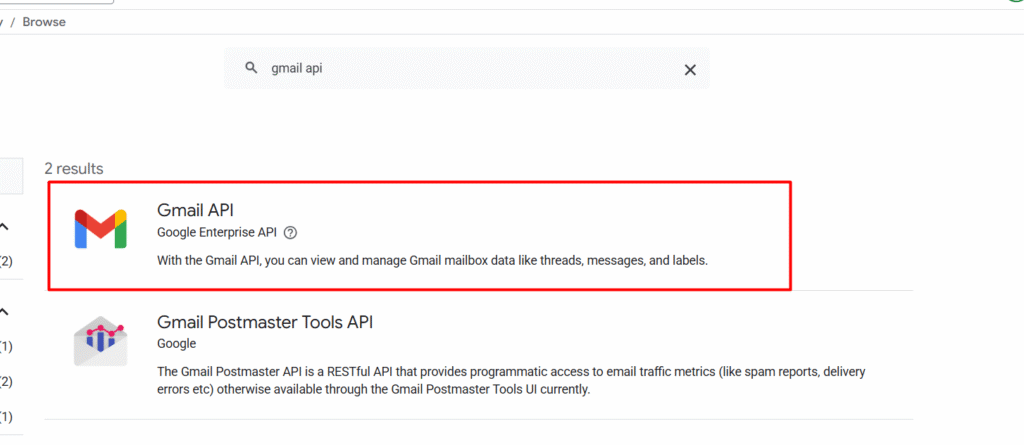
Search for Gmail API
Select the first result which is Gmail API by Google Enterprise API.
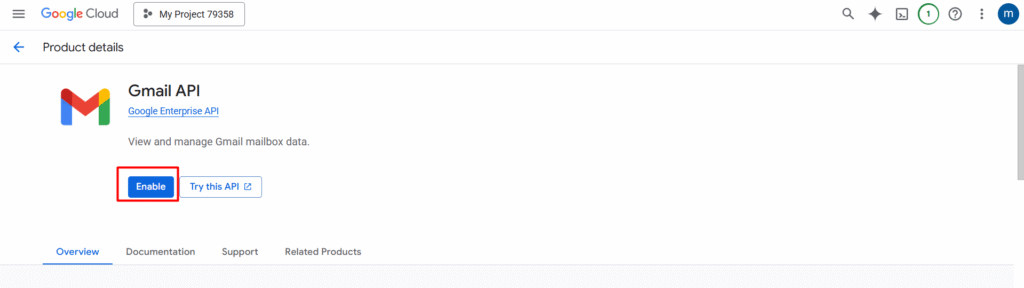
Click on Enable the API.
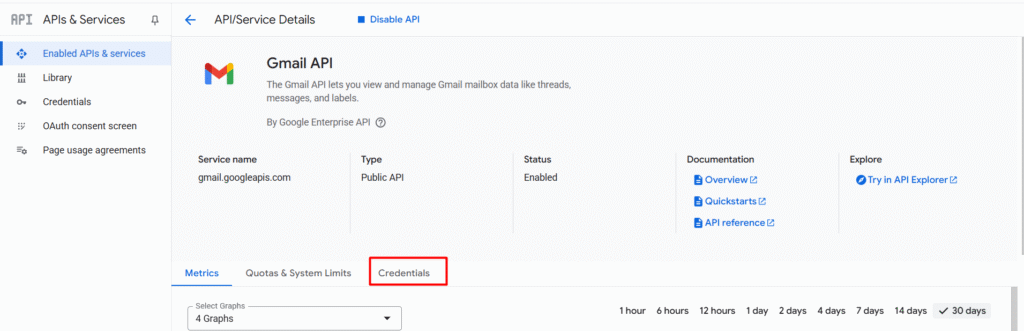
Go to Credentials section on the navigation
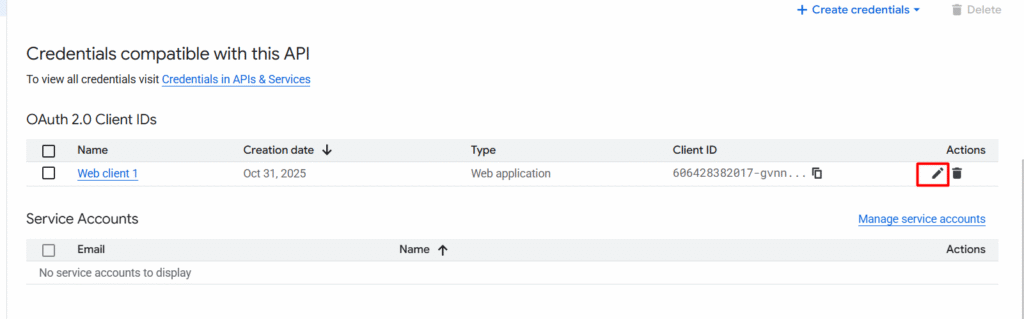
In the credentials section, you can see that previously created OAuth 2.0 client ID while we creating the OAuth consent. Now click on the pencil icon to edit, then you will see the Client ID and the secret.
Make sure to copy the both ID and secret.
Step 2: Adding the Credentials on n8n
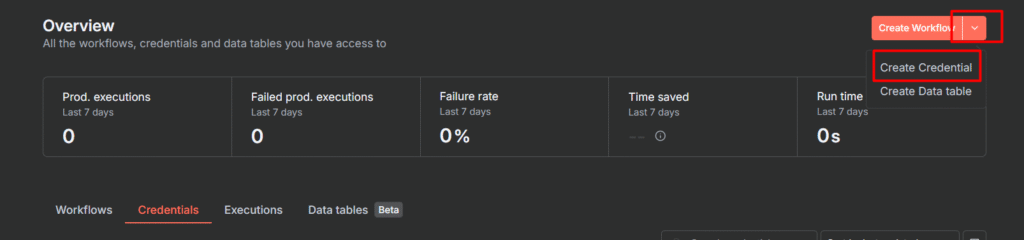
Go to your n8n dashboard > credentials section or Click on the dropdown and select Create credential
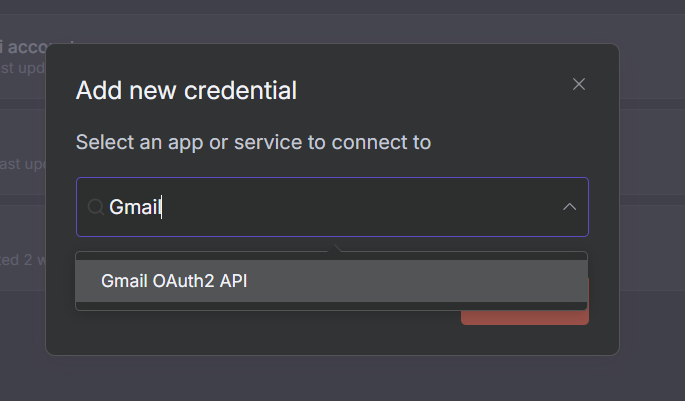
Search for Gmail, and select Gmail OAuth2 API.
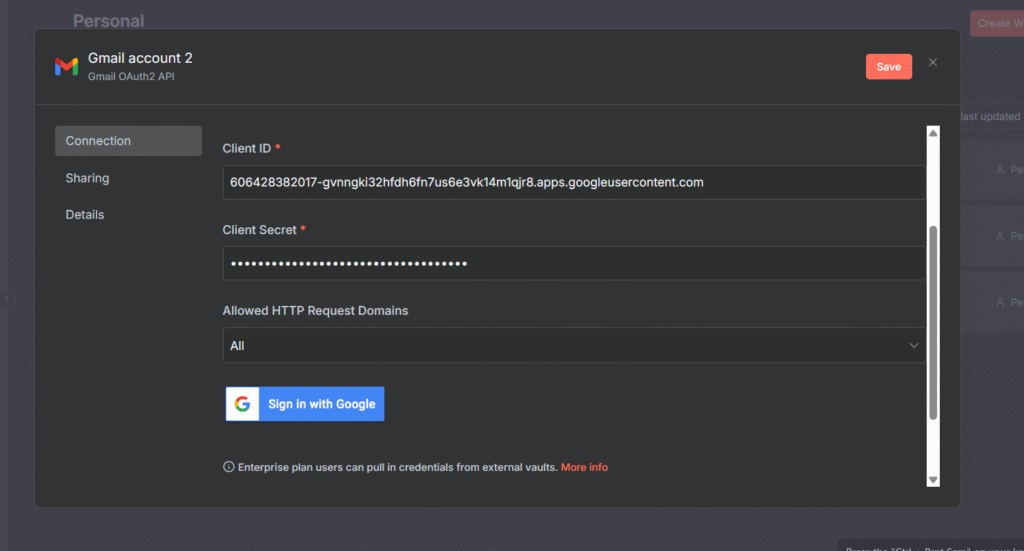
Paste the Client ID and Client Secret
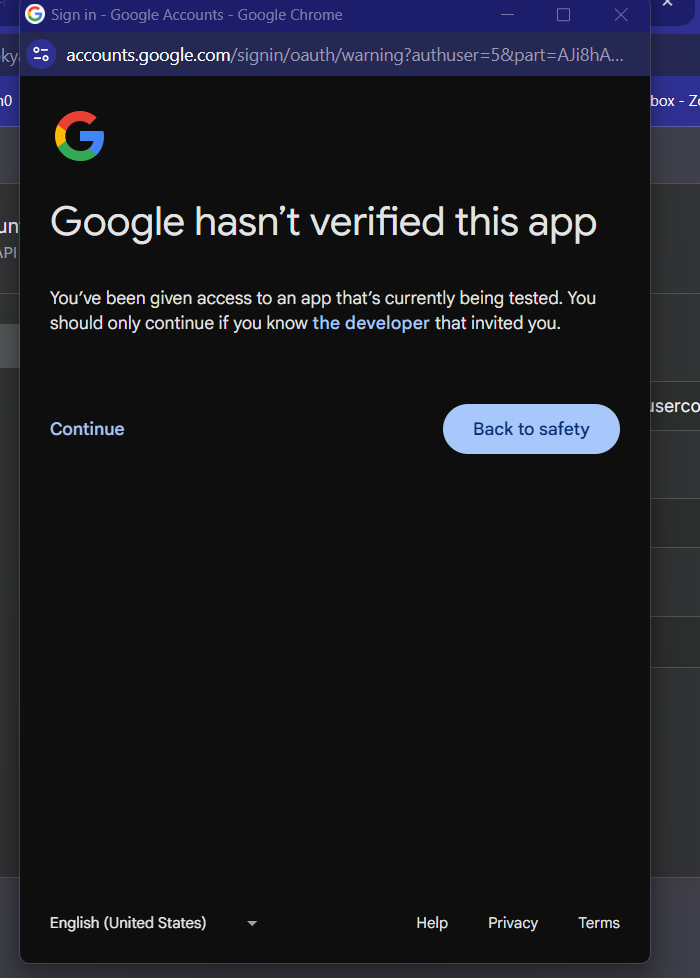
Once you paste the ID and secret, then make sure to Sign in with Google. (sign-in with your gmail account that you have assigned as a test-user)
Click on continue
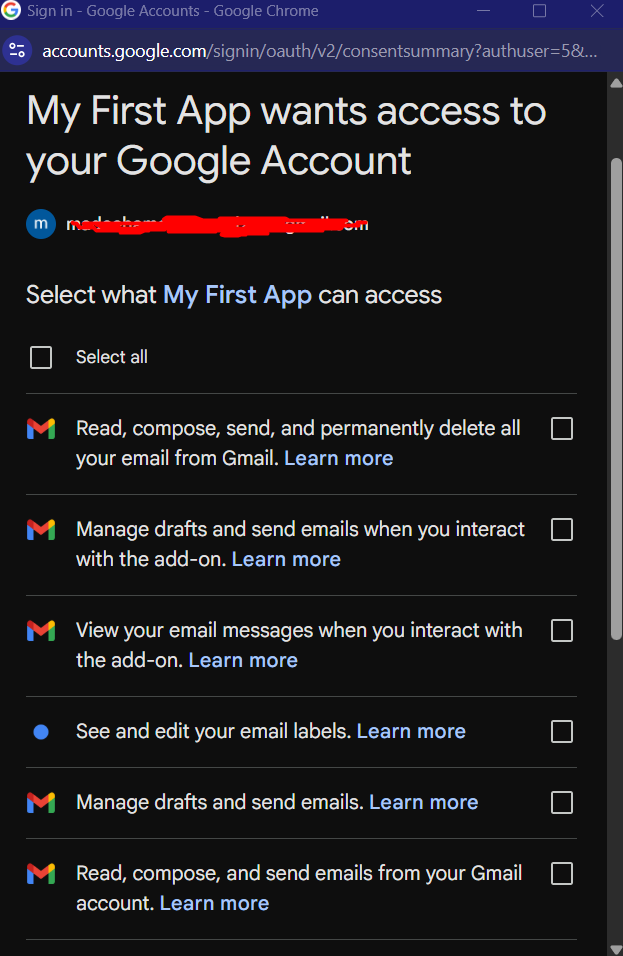
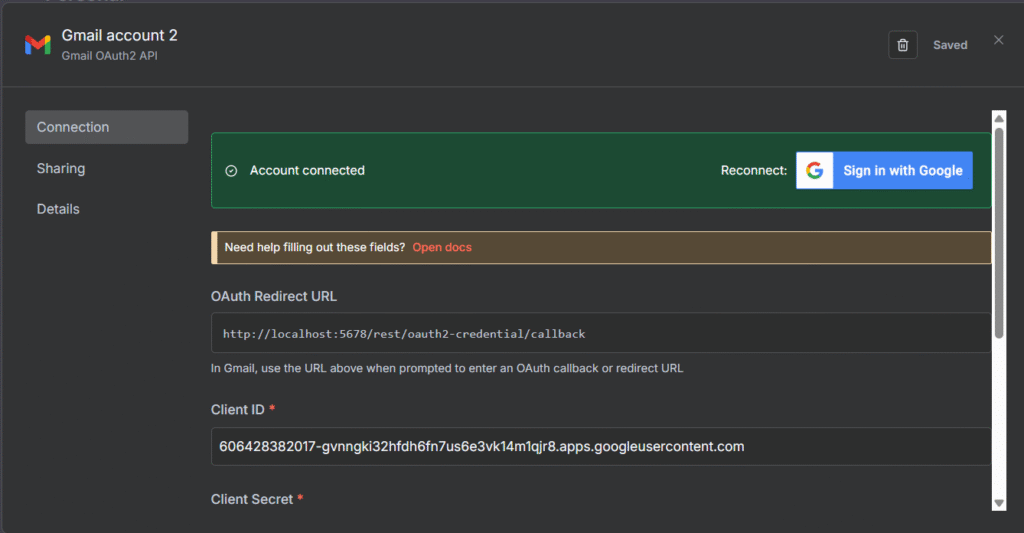
Now select all the access and continue, and you will receive a pop-up window says credentials successful.
Even in your credentials are connected. so we can test it out whether everything is working fine.
Testing Gmail Connection
Let’s verify everything works by sending a test email.
Create a Test Workflow
In your n8n dashboard, click Create workflow
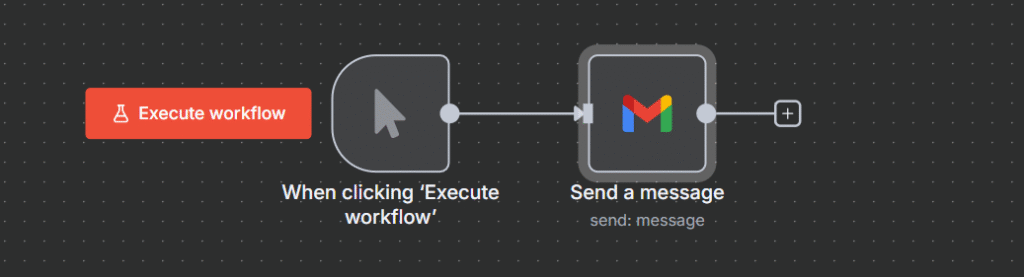
Add a manual trigger node (this lets you start the workflow manually)
Add a Gmail node.
Connect the Manual trigger to Gmail node
Configure Gmail Node
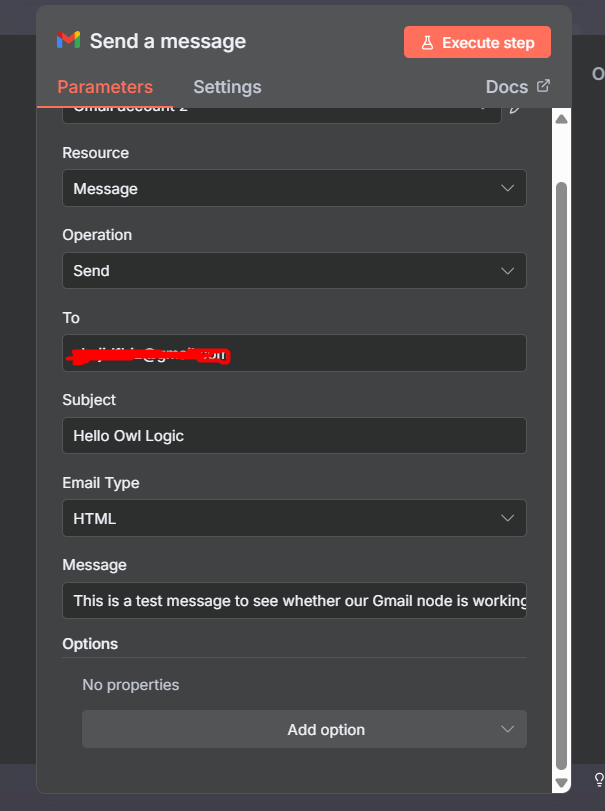
In the Gmail node, select “Send a message” action.
Fill in the fields
To: your own email address or any other email address owned by you for testing.
Subject: “Test from n8n”
Message: This is a test email from my n8n workflow!
Execute & Verify
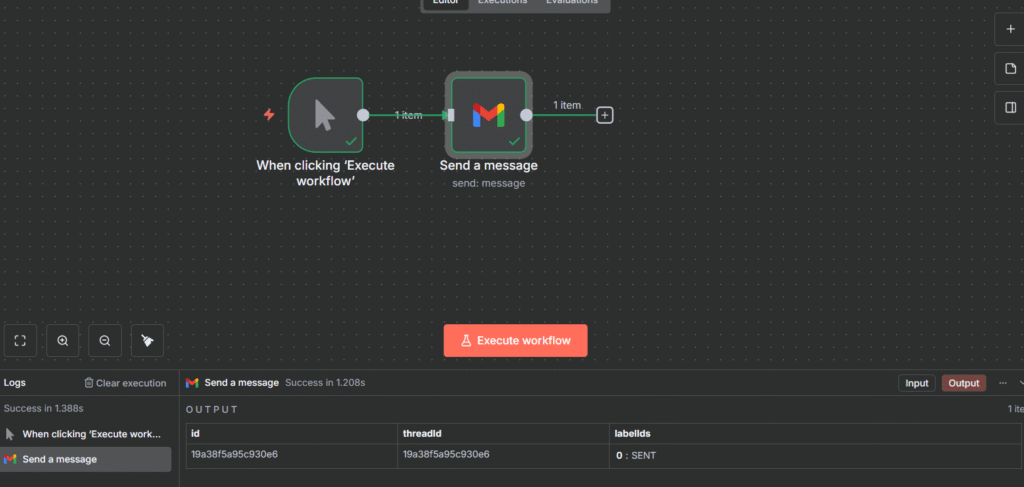
Click the Execute workflow
Check the output – you should see labelIds:["sent"]
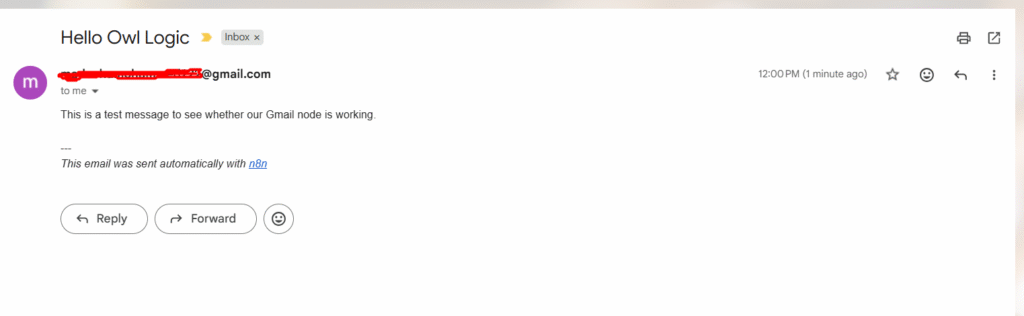
Open your Gmail inbox.
Look for the test email
Final Thoughts
Congratulations! You’ve successfully set up Gmail credentials in n8n, and sent your first automated email. Here’s what you accomplished.
Configured Google Cloud Console – Created a project and set up OAuth consent screen (one-time setup for all Google services)
Generated OAuth Credentials – Created Client ID and Client Secret for secure authentication
Enabled Gmail API – Activated the Gmail API in Google Cloud Console
Connected n8n to Gmail – Added credentials and authorized n8n to access your Gmail account
Tested the Connection – Created and executed a workflow that sent a test email
You’ve cleared the biggest hurdle in n8n automation. From here, the possibilities are endless.
n8n is a powerful workflow automation tool that lets you connect different apps and services without writing complex code, and it’s simply a no-code platform. Think of it like a bridge between your favorite tools like slack, google sheet and etc.
When something happens in in one app, n8n can automatically trigger action in another.
Alright, What makes n8n unique? I say it’s flexibility, you can either use their cloud service or host it yourself (self-hosted) on your own server or local server.
Cloud n8n is the easiest way to get started. Simply create an account at n8n, and you’re ready to build automations within minutes. n8n handles all the technical stuffs and heavy liftings such as server maintenance, security updates, backups and scaling. You just need to focus on creating a workflow. that’s literally great isn’t it?
Self-hosted n8n means you download the opensource software and run it on your own server. This could be AWS, Hostinger, Digital Ocean or even your local computer. You’re in complete control over your data, customization and scaling – but you’re responsible for keeping everything running smoothly, that’s all on you.
Alright, that’s great, now you know that what is what? and I hope you understood the difference between self-hosted and n8n cloud. Let’s see the comparisons, This is where we actually testing out the water in terms of everything.
Detailed Comparison Between Self Hosted & Cloud
Aspects
😶🌫️ Cloud
🖥️ Self-hosted
Cost
Subscription-based, starts free then scales with usage
Free software, but you pay for server hosting + maintenance time
Setup & Ease use
2 minutes to start, zero technical knowledge needed
Requires server setup, Docker knowledge helpful, 30-60 minute initial setup
Maintenance
Handled by n8n team
You handle updates, backups, security patches
Data Privacy & Security
Data stored on n8n’s servers
Complete data ownership, runs behind your firewall
Customization
Standard features only
Full access to customize, add custom nodes
Scalability
Automatic scaling handled by n8n
You manage server resources and scaling
Support
Email support, community
Community-only (free), or enterprise support (paid)
When to Choose n8n Cloud?
Cloud n8n is maybe perfect choice for many users and organizations. I also starts with a n8n cloud and obtained the first 14 days free trial. Well, here are the key scenarios where the cloud may come in handy for you. Just try to put yourself in these below buckets?
1. You’re New to Automation and Wants to Start Quickly
If you’re just beginning your automation journey, cloud n8n removes all the technical barriers. There is no need to understand servers, hosting and deployment process. Simply visit this n8n, as I stated above, register it and then start your workflow simple as that.
The cloud platform also provides a gentler learning curve because you only need to think about creating an automation.
2. You Have a Small Team Without IT Resources
Not every business has a dedicated IT department or tech wiz. If you’re team consists primarily of marketers, growth specialists, sales people, customer support agent, or other non-technical roles, ahem. then Cloud is the best bet for you.
3. You Want a Predictable Monthly Costs
Cloud n8n operates a transparent execution-based pricing model, making it easy for you to forecast a predictable monthly automation cost. Unlike other automation sites that charge per tasks or operations.
n8n charges based on the complete workflow execution which means one workflow run counts as execution regardless of how many step it contains (or nodes).
Aye, now I hope you could easily put yourself in these above buckets, and let’s head to the n8n cloud pricing model.
Perfect for individual and small teams getting started
Email support included.
Pro Plan: Starting at $50/month
10,000 workflow executions per month (scales up to 50,000 executions for $120/month)
Everything in Starter Plan.
Best for growing teams with moderate automation needs
Enterprise Plan: Custom Pricing
Unlimited exeuction.
365 days of insights.
Dedicated support with SLAs
Custom integrations
Advanced Security Features
For large organizations with mission critical workflows.
I should appreciate n8n because of their transparency and no hidden costs, Your monthly bill is actually straightforward, no surprise charges for infrastructure, maintenance, security patches, or SSL certificates. Everything is included in the subscription.
Let’s say you’re a small marketing agency running
3 workflows that sync leads from your website to CRM (Triggered ~50 times/day) = 1500 executions/month.
2 daily scheduled workflows for social media reports = 60 executions/month
1 workflow that processes customer feedback form (~15 per day) = 450 executions/month
Total: ~2010 executions/month = This fits comfortably within the starter plan at $20/month. You know your exact cost, and as your agency grows, you can easily track when it’s time to Upgrade to PRO.
When to Choose Self-hosted?
Self-hosted n8n gives you complete ownership and control over your automation infrastructure. While it requires technical knowledge to configure it. Here’s when self-hosted makes most sense.
1. You Need Complete Data Control and Privacy
in Self-hosted, your data never leaves your infrastructure whether it in a dedicated server or your local computer. so basically, Every workflow executions, every piece of customer information stays with you and your infrastructure.
2. You’re In a Regulated Industry
Regulated industries like Healthcare, finance and government sectors often have strict compliance requirements that makes self-hosting not just a preferrable option but mandatory.
3. You Have a Technical Experts In-House
Ideally, you have someone on your team who comfortable with DevOps such as maintaining the server, monitoring, docker containerization, troubleshooting technical issues.
For companies building technical teams, self-host n8n can also serve a valuable learning experience. Your team gets hand-on experience with modern automation platform, and infrastructure management – Skills that benefits your organization beyond.
4. Community Support
While you won’t have a dedicated professional support on the free community, n8n has an active community forum with over 45k members, ready to help you troubleshoot issues and share solutions. If you need a guaranteed support, the self-hosted Business and Enterprise plan offers SLAs and direct access to n8n’s team.
5. You’re Running High-Volume of Workflows (Cost-effective at Scale)
Here’s where the economy of self-hosted shines, At low volumes, cloud n8n is often cheaper – but as your automation scales, self-hosting becomes significantly more cost-effective.
Let’s compare them with actual VPS from Hostinger
Starter Plan: 2,500 executions/month = $20/month
Cloud Pro Plan: 10,000 executions/month = $50/month
Cloud Pro Plan: 50,000 executions/month = $120/month
Self hosted on Hostinger VPS – Hostinger offers VPS hosting specifically optimized for n8n starting at $4.99/month that makes easy n8n installation with pre-configured Ubuntu template and docker setup that just takes you few clicks.
KVM 1 – $4.99/month (1 vCPU, 4GB RAM, 50GB NVMe) – Good for light workflows
KVM 2 – $6.99/month (2 vCPU, 8GB RAM, 100GB NVMe) – Recommend starting point for all users
Alright let’s look at the practical examples, because I always wanted to give you some extra clarification. Let’s split up to 3 scenarios
10k executions/mo
50k executions/mo
200k executions/mo
Cloud Plan
Cloud Pro Plan
Cloud Pro Plan
Enterprise Plan
Cloud Cost
$50/mo
$120/mo
$500+/mo
Self-host Plan
Hostinger KVM 2
Hostinger KVM 2
Hostinger KVM 2
Self-host cost
$6.99/mo
$6.99/mo
$9.99/mo
Monthly Savings
$43/mo
$113/mo
$490/mo
Yearly Savings
$516/year
$1356/year
$5880+/year
Maybe you would think like this? Can I use n8n + Hostinger directly without going to n8n cloud. YES! you can do this as well. For an instance, assume that you have already a KVM1 server.
Choose n8n Cloud if you want zero setup, have limited technical skills, or run under 10,000 executions monthly—pay $20-50/month for complete peace of mind. Choose self-hosted (Hostinger) if you’re comfortable with basic tech and want unlimited executions for under $10/month, especially beyond 10,000 runs where savings multiply. Not sure? Start with cloud’s free trial to learn n8n, then migrate to self-hosted once comfortable. Either way, you’re getting one of the most cost-effective automation platforms available.